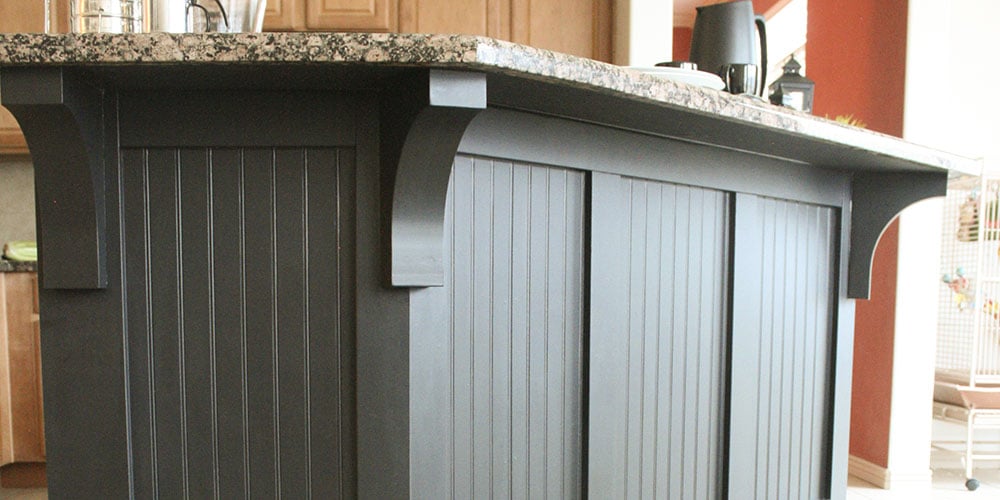
A kitchen island can be perfectly functional and still look as though it arrived with the house wearing its factory-issued beige sweater. In Part One of this makeover, the plain cabinet base received decorative panels, trim, and a stronger architectural outline. Now comes the detail that gives the whole project its personality: corbels.
Adding corbels beneath a countertop overhang can make an ordinary island look like a custom furniture piece. Depending on the countertop, cabinet construction, and installation method, corbels may also provide structural support. That distinction matters. A decorative block of wood should never be promoted to “load-bearing hero” simply because it looks confident.
This second phase covers how to choose appropriately sized corbels, plan their placement, secure them to a solid structure, conceal the fasteners, repair small gaps, and finish the island with durable paint. The result should look intentional rather than attached during a burst of enthusiasm at 11:47 p.m.
Why Corbels Make Such a Big Difference
Corbels are brackets that project from a vertical surface and supportor appear to supporta horizontal element above them. Traditionally, they were used beneath shelves, rooflines, mantels, and stone projections. In kitchens, they are commonly installed under countertop overhangs or at the ends of an island.
Their visual effect is larger than their physical footprint. Corbels create shadow lines, frame seating areas, soften boxy corners, and connect an island’s countertop with the cabinetry below. When paired with beadboard, board-and-batten trim, raised panels, or decorative molding, they help transform a standard cabinet base into something resembling a freestanding table or old-fashioned workbench.
Corbels can suit more than farmhouse kitchens. A simple triangular profile works well in contemporary rooms. A gently curved bracket complements transitional cabinetry. Heavily carved acanthus or scroll designs lean traditional. Chunky square corbels can give a Craftsman-inspired kitchen a grounded, substantial appearance.
Structural Corbels Versus Decorative Corbels
Before shopping, decide whether the corbels will be decorative, structural, or part of a support system that also includes concealed steel brackets. This is the most important decision in the project.
Decorative corbels
Decorative corbels add dimension but are not expected to carry the countertop’s load. They may be suitable when the overhang is already supported by hidden brackets, posts, a framed knee wall, or a manufacturer-approved substrate. Lightweight polyurethane corbels are often used for this purpose because they are easy to paint, although they should not be treated as structural wood supports unless specifically rated for that job.
Structural corbels
Structural corbels must be made from suitable material, sized for the overhang, and anchored to framing or another load-bearing part of the island. Attaching one only to thin paneling, beadboard, or a cabinet skin is not enough. The corbel may stay attached to the panel while the panel pulls away from the cabinetwhich is technically teamwork, but not the kind anyone wants.
Countertop manufacturers publish different support rules. Some engineered-stone guidance, for example, calls for extra support once an overhang passes a specified depth and limits spacing between supports. Thickness, seams, cutouts, substrate construction, and the amount of countertop resting on the cabinets can all change the requirement.
Ask the countertop fabricator or manufacturer to confirm:
- How much unsupported overhang is permitted
- Whether wood corbels are acceptable for the material
- How far each corbel or bracket must extend beneath the overhang
- The maximum allowed distance between supports
- Whether seams or appliance cutouts need additional reinforcement
Do not drill, screw, or nail directly into stone or engineered quartz unless the manufacturer explicitly approves that method. Mechanical fasteners normally secure the support to the cabinet structure, not through the countertop.
Planning Corbel Size and Placement
A corbel should look proportional to both the island and the countertop. A tiny bracket beneath a deep stone overhang can look nervous. An enormous carved corbel under a narrow ledge can make the island appear to have grown wooden elbows.
As a visual starting point, choose a corbel that extends across much of the overhang without interfering with knees or stools. Some countertop specifications require structural supports to reach a substantial portion of the overhang, so manufacturer instructions should take priority over appearance.
For a typical 36-inch-high island with seating, allow approximately 24 inches of width for each diner and plan adequate knee depth. Also study the walking space behind the stools. Common kitchen-planning recommendations call for at least a 36-inch walkway, while more room may be needed when people regularly pass behind seated diners.
Placement usually looks best when corbels align with vertical trim, panel stiles, cabinet divisions, or the ends of the seating area. Equal spacing creates rhythm, but symmetry should not override structural needs. A countertop seam, curved overhang, or angled cabinet corner may require a different layout.
Make a full-size template
Before ordering expensive woodwork, cut a cardboard template matching the proposed corbel. Tape it beneath the island and place the stools in position. Sit down, cross your legs, stand up, and walk around the island. This glamorous procedure is called ergonomic testing.
The template helps answer several practical questions:
- Will the corbel crowd a seated person’s knees?
- Does it align with the island trim?
- Is the profile too ornate for the room?
- Will an angled corner require a modified back edge?
- Can the corbel be securely attached to solid framing?
Choosing the Right Material and Style
Paint-grade corbels are commonly made from poplar, maple, cedar, or another stable wood species. Poplar is smooth and relatively easy to paint. Maple offers a harder surface but may take more effort to sand. Cedar is lightweight and workable, although its knots, grain, or natural oils may require careful priming when a flawless painted finish is desired.
For a stained island, match the corbel species as closely as possible to the surrounding cabinetry. Different woods absorb stain differently, and two boards labeled “brown” can become distant relatives once stain is applied. Test the complete finishing system on scrap material or an inconspicuous area before committing.
The corbel design should repeat something already present in the kitchen. A simple curve might echo an arched cabinet door. A square profile can relate to Shaker panels. A carved traditional design can coordinate with crown molding or furniture feet. Repetition makes the detail look planned rather than adopted from a clearance bin.
Tools and Materials for the Makeover
The exact supplies depend on the island, but a typical painted installation may require:
- Wood or manufacturer-approved structural corbels
- Cardboard or foam board for templates
- Tape measure, level, pencil, and square
- Appropriate structural screws
- Drill bits and a counterbore or countersink bit
- Matching wood plugs
- Wood glue or another approved adhesive
- Wood filler and paintable caulk
- Sandpaper in medium, fine, and very fine grits
- Bonding or stain-blocking primer when needed
- Durable cabinet, trim, or furniture paint
- Brushes, a small roller, drop cloths, and painter’s tape
Angled islands may require custom cuts on the back of a corbel. Because powered saws can cause serious injury, complicated cuts should be completed by an experienced adult, cabinet shop, carpenter, or the corbel supplier. A clean professional cut costs less than replacing a damaged corbeland is considerably easier than replacing a finger.
Preparing the Corbels
Inspect and dry-fit every piece
Wood products can contain minor twists, dents, rough edges, or dimensional variations. Inspect each corbel before applying glue or paint. Hold every piece against its intended location and check for rocking, gaps, or interference with trim.
Number the corbels and mark their positions discreetly. This is especially useful when an island has angled ends because two supports that appear identical from across the room may fit very differently once installed.
Sand before installation
It is easier to smooth curves, inside corners, and carved details while the corbel can still be rotated on a work surface. Sand only enough to remove milling marks and rough fibers. Over-sanding sharp edges can soften the profile and make matching pieces look inconsistent.
Vacuum the dust and wipe the surface with a clean, lint-free cloth. Dust left in carved details has a remarkable ability to reappear in wet paint like it has been waiting for its big debut.
Plan concealed fasteners
One clean method is to create recessed screw holes, drive the screws below the surface, and cover them with matching wood plugs. A counterbore forms a flat-bottomed recess that can accept a plug. After the glue dries, the plug is trimmed and sanded flush.
Fastener size, length, location, and quantity depend on the corbel and the structure behind it. Screws must reach solid framing without damaging utilities or components inside the cabinet. When the support is genuinely structural, have the attachment plan reviewed by the countertop fabricator or a qualified professional.
Installing the Corbels
- Mark the centerlines. Transfer the planned locations to the island and verify that the marks align with framing or reinforcement.
- Test the complete layout. Temporarily hold all corbels in position. Check spacing, level, stool clearance, and alignment with the trim.
- Protect nearby surfaces. Cover flooring and mask finished cabinetry where adhesive or filler could cause damage.
- Apply adhesive sparingly. When adhesive is part of the approved installation, use a controlled amount. Excess glue creates drips that are easier to prevent than to remove.
- Secure the corbel. Hold it firmly in position while the approved fasteners are installed into solid structure.
- Recheck alignment. Confirm that the corbel has not shifted before the adhesive begins to set.
- Clean squeeze-out immediately. Remove excess according to the adhesive manufacturer’s directions without smearing it across unfinished wood.
After installation, avoid loading the overhang until adhesives and finishes have cured for the recommended period. “Dry to the touch” is not the same as ready for a child to climb onto the counter in pursuit of cookies.
Hiding Screws With Wood Plugs
Wood plugs provide a more finished appearance than exposed screw heads. Apply a small amount of glue inside each counterbore, insert the plug, and align its grain with the surrounding wood when possible. Leave the plug slightly proud of the surface until the glue dries.
The excess can then be carefully trimmed flush by an experienced person using an appropriate hand tool or controlled cutting method. Sand the area gradually rather than attacking it with heavy pressure. Aggressive sanding can create a shallow dip around the plug that becomes obvious under glossy paint.
For a painted island, apply a thin layer of wood filler over tiny remaining imperfections. Let it dry fully, sand it smooth, and inspect the surface under light from the side. Low-angle light reveals ridges, pinholes, and scratches that overhead lighting politely ignores.
Caulking the Gaps for a Built-In Look
Caulk is the quiet finishing step that helps separate professional-looking trim work from a collection of closely related boards. Use paintable caulk where corbels meet painted cabinetry or where decorative panels meet molding. Do not use ordinary painter’s caulk as a substitute for structural fastening.
Apply a narrow bead, smooth it neatly, and remove excess before it skins over. Large gaps may indicate poor fit or movement and should be corrected rather than filled with a heroic mountain of caulk.
Movement joints between cabinetry and stone may require a flexible sealant recommended by the countertop manufacturer. Confirm product compatibility before applying anything to natural stone or engineered surfaces.
Priming and Painting the Island
A dark painted island can create a strong focal point, especially when perimeter cabinets are white or light neutral. Black, charcoal, navy, forest green, and deep brown are popular choices because they emphasize molding and corbel shadows. Lighter colors can also work beautifully, particularly in coastal, cottage, or compact kitchens.
Preparation determines whether the finish looks like cabinetry or a rushed craft project. Clean grease and residue from every surface. Scuff glossy finishes with fine sandpaper, repair damage, remove dust, and apply a primer suited to the existing finish and wood species.
After the primer dries, sand lightly with very fine sandpaper to remove raised fibers and small imperfections. Wipe away all debris before painting. Apply multiple thin coats rather than one thick coat. Thin applications level more evenly, preserve carved details, and are less likely to sag along the sides of the corbels.
Use a high-quality brush for inside curves and a small smooth-finish roller for broad panels. Maintain a wet edge, inspect for drips, and allow the full recommended drying time between coats. Paint may feel dry quickly while remaining vulnerable to dents and scratches for days, so treat the island gently during its curing period.
The Final Reveal
Once the corbels, plugs, filler, caulk, primer, and paint come together, the island should read as one unified design. The supports visually connect the countertop to the paneled base, while the darker recesses around the corbels give the island depth.
The most successful makeover does not make visitors say, “Those are new corbels.” It makes them ask whether the island was custom-built. That is the magic of well-proportioned architectural detail: people notice the improvement without immediately identifying the trick.
Before calling the project complete, inspect the island from every angle. Check the view from the adjoining room, the seating side, and the kitchen entrance. Touch up thin areas, remove painter’s tape carefully, and confirm that stools move without striking the new supports.
Experience Notes: What the Corbel Stage Is Really Like
The following project diary is a composite based on common DIY situations rather than a claim of personal hands-on experience.
The corbel stage often begins with excessive confidence. The panels are finished, the molding is attached, and the island already looks dramatically better. Installing a few brackets appears to be the easy victory lap. Then the first corbel is held in place and reveals that the floor is slightly uneven, the cabinet corner is not perfectly square, and the countertop overhang changes depth near the angled end.
The first useful lesson is to stop and make templates. Cardboard may not be exciting, but it is much cheaper to trim than hardwood. A full-size pattern quickly shows whether the chosen profile will crowd a stool or collide with the decorative rail. In many projects, moving a corbel only an inch or two creates better alignment and noticeably more knee room.
The second lesson is that matching pieces may need individual fitting. An angled island can have corners that look identical until measured carefully. Labeling each support prevents the frustrating experience of perfecting one fit and then accidentally installing that corbel on the opposite side.
Dry-fitting also exposes visual problems that measurements miss. A mathematically centered corbel may look off-center when nearby cabinet doors, panels, or countertop curves enter the picture. The best location often balances structural requirements with the lines people actually see.
Adhesive control becomes another memorable lesson. A generous amount feels reassuring until it begins sliding down a freshly prepared panel. Using only the approved quantity and keeping clean cloths nearby avoids a frantic race against drying glue. The goal is a secure joint, not an archaeological layer of adhesive for future homeowners to discover.
Concealing the screws usually takes longer than expected. Plugs need time to dry before they are trimmed, filler needs time before sanding, and primer may reveal tiny defects that were invisible in bare wood. This is where patience produces the custom result. Rushing straight to paint tends to preserve every ridge and pinhole in high definition.
Dark paint is especially honest. It makes the island look substantial and sophisticated, but reflected light can expose sanding scratches, caulk ridges, and brush marks. Viewing the surface from the side between coats helps catch these problems early. A light sanding and one additional thin coat usually improve the finish more than attempting to correct wet paint repeatedly.
The final lesson is that curing time matters. Families naturally want to use the island immediately, slide stools back into place, and begin setting grocery bags against the new finish. Waiting according to the coating manufacturer’s directions reduces chips and pressure marks. Temporary inconvenience is preferable to discovering a perfect stool-shaped dent the following morning.
Once everything is cured, the transformation can feel surprisingly complete. The countertop no longer appears to float awkwardly above a plain cabinet box. The new corbels give the overhang a visual reason to exist, while the paneling and molding make the base feel deeper and more architectural. The makeover succeeds not because any one detail is extravagant, but because every piece supports the same design story.
Conclusion
A kitchen island makeover with corbels is a relatively focused project with the power to change the character of an entire room. The most important steps happen before installation: confirming countertop requirements, identifying solid attachment points, testing the size with templates, and planning comfortable seating clearances.
Once the supports are securely installed, concealed fasteners, careful filling, neat caulk lines, proper primer, and thin coats of durable paint create the polished finish. Corbels may be the feature everyone notices, but accurate preparation is what makes them look as though they have always belonged there.
Note: Countertop support requirements vary significantly. Before altering an island or relying on decorative corbels for support, follow the countertop manufacturer’s current specifications and consult a qualified fabricator, cabinet professional, or contractor when necessary.