Note: In modern networking, engineers usually talk in CIDR notation instead of old-school address classes. Still, “Class C network” remains a useful learning phrase for a /24 IPv4 block such as 192.168.1.0/24, which gives you 256 total addresses before subnetting. Think of this guide as subnetting training wheelswith real-world brakes.
Introduction: Subnetting Without the Headache
Subnetting a Class C network sounds like something a router whispers to scare interns. In reality, it is just a clean way to divide one IPv4 network into smaller, more organized networks. Instead of letting every printer, laptop, camera, server, and mystery device named “DESKTOP-7GHTYQ” hang out in one big digital room, subnetting gives each group its own space.
A traditional Class C network uses the default subnet mask 255.255.255.0, also written as /24 in CIDR notation. That means the first 24 bits identify the network, and the last 8 bits are available for host addresses. A /24 network contains 256 total IP addresses, but only 254 are normally usable by devices because the first address identifies the network and the last address is reserved for broadcast.
For example, 192.168.1.0/24 includes addresses from 192.168.1.0 through 192.168.1.255. The usable host range is usually 192.168.1.1 through 192.168.1.254. Nice and simpleuntil your office grows, your security needs improve, or your boss asks why the guest Wi-Fi can see the accounting printer. That is when subnetting becomes your friend.
This guide explains how to subnet a Class C network in seven practical steps. You will learn how to choose a subnet mask, calculate subnet ranges, identify usable hosts, avoid common mistakes, and apply the method to a real example. No magic. No panic. Just binary behaving itself for once.
What Is a Class C Network?
In the older classful IPv4 system, Class C addresses were designed for smaller networks. A Class C network traditionally used a default mask of 255.255.255.0, or /24. Although the internet moved to classless addressing long ago, the phrase “Class C” is still commonly used in tutorials, certification study, home labs, and small-business networking.
A typical private Class C-style network looks like this:
The 192.168.0.0/16 range is reserved for private networks, which is why you often see home routers using addresses like 192.168.0.1 or 192.168.1.1. These addresses are not directly routed on the public internet, making them perfect for internal LANs, labs, offices, classrooms, and test environments.
Why Subnet a Class C Network?
Subnetting is useful because it improves organization, performance, security, and address management. A flat network may work fine when you have ten devices. But when you add departments, VLANs, wireless networks, IP cameras, VoIP phones, servers, or cloud-connected equipment, a single large broadcast domain can become messy.
Subnetting helps you separate traffic. For example, you might place office computers in one subnet, guest Wi-Fi in another, servers in a third, and security cameras in a fourth. This makes firewall rules easier to write, troubleshooting easier to perform, and network growth easier to plan. It also keeps the guest network from casually wandering into places it does not belonglike a raccoon in a data center.
How to Subnet a Class C Network: 7 Steps
Step 1: Start With Your Original Network
Begin by identifying the network you want to divide. For this tutorial, we will use:
This gives us one Class C-style network with 256 total addresses. The first address, 192.168.10.0, is the network address. The last address, 192.168.10.255, is the broadcast address. The usable host range is 192.168.10.1 to 192.168.10.254.
Before you subnet anything, write down the current network, mask, first usable address, last usable address, and broadcast address. This simple habit prevents many late-night troubleshooting sessions fueled by stale coffee and regret.
Step 2: Decide How Many Subnets You Need
Next, decide how many smaller networks you need. This is the most important planning step. Do not choose a subnet mask just because it looks fancy. Choose it because it matches your design.
Suppose a small company wants separate subnets for:
- Administration
- Sales
- Engineering
- Guest Wi-Fi
- Servers
- Security cameras
- VoIP phones
- Network management
That is eight subnets. To create eight subnets from a /24 network, you need to borrow 3 bits from the host portion because 2 to the power of 3 equals 8.
The original /24 mask becomes /27 because you add the 3 borrowed bits to the original 24 network bits.
That means each subnet will use the mask 255.255.255.224.
Step 3: Calculate How Many Hosts Each Subnet Supports
After borrowing 3 bits from the last octet, you have 5 host bits left. The host formula is:
For a /27 subnet:
Each /27 subnet gives you 30 usable host addresses. That is enough for a small department, a server group, a small wireless segment, or a lab network. It is not enough for a giant office floor with 200 devices, unless you enjoy IP address conflicts as a hobby.
This is where subnetting becomes a balancing act. More subnets mean fewer hosts per subnet. Fewer subnets mean more hosts per subnet. You are slicing pizza. More slices are useful, but each slice gets smaller. Networking: now with carbs.
Step 4: Find the Magic Number
The “magic number” is the subnet block size. It tells you where each subnet starts. For a Class C network, you usually calculate it from the last octet of the subnet mask.
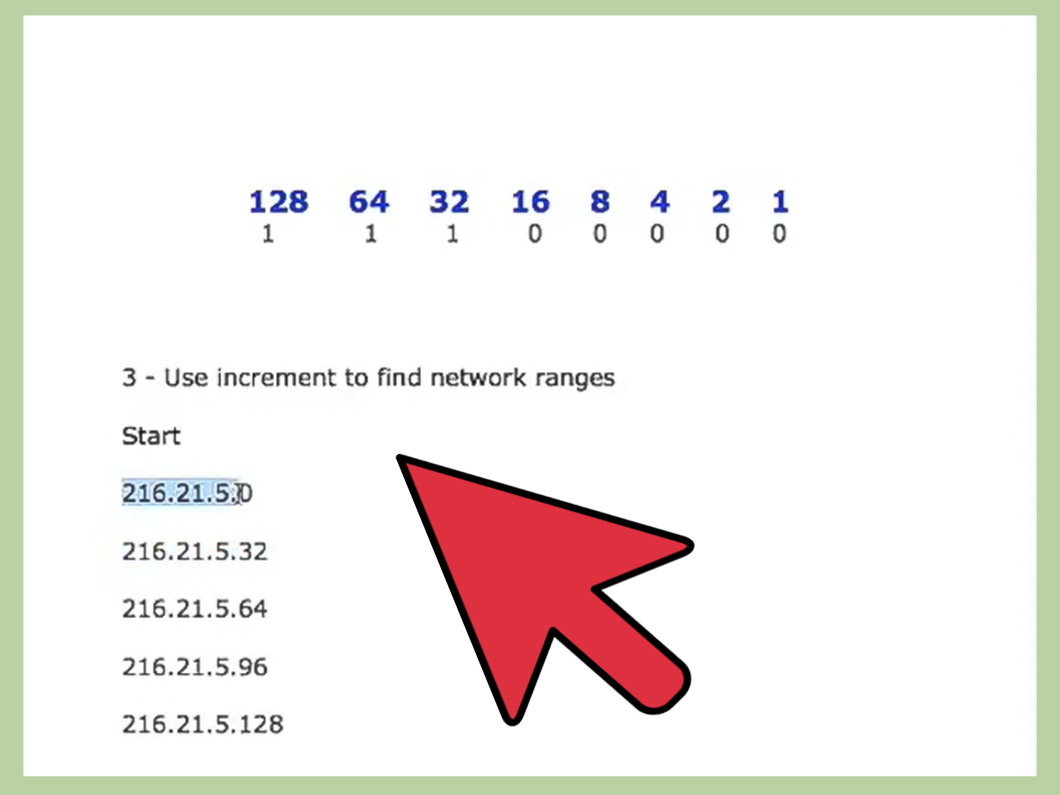
For a /27 mask, the subnet mask is 255.255.255.224. The interesting octet is 224.
So each subnet increases by 32 in the last octet. Your subnet ranges will start at 0, 32, 64, 96, 128, 160, 192, and 224.
This is one of the fastest subnetting shortcuts. Once you know the block size, you can build the subnet table quickly without converting every number to binary.
Step 5: List the Subnet Ranges
Now list each subnet using the block size of 32. For 192.168.10.0/24 divided into /27 subnets, the ranges look like this:
| Subnet | Network Address | Usable Host Range | Broadcast Address |
|---|---|---|---|
| 1 | 192.168.10.0/27 | 192.168.10.1 – 192.168.10.30 | 192.168.10.31 |
| 2 | 192.168.10.32/27 | 192.168.10.33 – 192.168.10.62 | 192.168.10.63 |
| 3 | 192.168.10.64/27 | 192.168.10.65 – 192.168.10.94 | 192.168.10.95 |
| 4 | 192.168.10.96/27 | 192.168.10.97 – 192.168.10.126 | 192.168.10.127 |
| 5 | 192.168.10.128/27 | 192.168.10.129 – 192.168.10.158 | 192.168.10.159 |
| 6 | 192.168.10.160/27 | 192.168.10.161 – 192.168.10.190 | 192.168.10.191 |
| 7 | 192.168.10.192/27 | 192.168.10.193 – 192.168.10.222 | 192.168.10.223 |
| 8 | 192.168.10.224/27 | 192.168.10.225 – 192.168.10.254 | 192.168.10.255 |
Notice the pattern. Each network address begins 32 addresses after the previous one. Each broadcast address is one less than the next network address. Each usable range starts one address after the network address and ends one address before the broadcast address.
Step 6: Assign Subnets to Real Network Segments
Once the math is complete, assign the subnets to real purposes. A clean address plan might look like this:
| Department or Purpose | Subnet | Gateway Example |
|---|---|---|
| Administration | 192.168.10.0/27 | 192.168.10.1 |
| Sales | 192.168.10.32/27 | 192.168.10.33 |
| Engineering | 192.168.10.64/27 | 192.168.10.65 |
| Guest Wi-Fi | 192.168.10.96/27 | 192.168.10.97 |
| Servers | 192.168.10.128/27 | 192.168.10.129 |
| Cameras | 192.168.10.160/27 | 192.168.10.161 |
| VoIP Phones | 192.168.10.192/27 | 192.168.10.193 |
| Network Management | 192.168.10.224/27 | 192.168.10.225 |
The gateway is usually the router or Layer 3 switch interface for that subnet. Many administrators use the first usable address as the gateway, but that is a convention, not a law carved into a router-shaped stone tablet. Some teams use the last usable address instead. The key is consistency and documentation.
Step 7: Document, Test, and Troubleshoot
Subnetting is not finished when the math works on paper. You still need to document the plan, configure devices, test connectivity, and verify that routing and firewall rules behave correctly.
At minimum, your documentation should include:
- Network address and CIDR prefix
- Subnet mask
- Gateway address
- Usable host range
- Broadcast address
- VLAN ID, if used
- DHCP scope
- Reserved static addresses
- Purpose of the subnet
After configuration, test from a host inside each subnet. Confirm that the device gets the correct IP address, subnet mask, gateway, and DNS settings. Then test local communication, inter-subnet routing, internet access, and any firewall restrictions. If Guest Wi-Fi can reach your server subnet, something is wrong. If the printer can route to a cloud backup network but your laptop cannot reach the default gateway, also wrongthough impressively creative.
Common Class C Subnet Masks
Here is a quick reference table for subnetting a /24 Class C-style network:
| CIDR | Subnet Mask | Number of Subnets from /24 | Addresses per Subnet | Usable Hosts per Subnet | Block Size |
|---|---|---|---|---|---|
| /25 | 255.255.255.128 | 2 | 128 | 126 | 128 |
| /26 | 255.255.255.192 | 4 | 64 | 62 | 64 |
| /27 | 255.255.255.224 | 8 | 32 | 30 | 32 |
| /28 | 255.255.255.240 | 16 | 16 | 14 | 16 |
| /29 | 255.255.255.248 | 32 | 8 | 6 | 8 |
| /30 | 255.255.255.252 | 64 | 4 | 2 | 4 |
A /25 is useful when you need two large subnets. A /26 gives four medium subnets. A /27 gives eight smaller subnets. A /28 is popular for small groups of servers, appliances, or lab segments. A /30 has traditionally been used for point-to-point links because it gives exactly two usable addresses, though many modern networks may use /31 for certain point-to-point designs when supported.
Subnetting Example: Divide 192.168.5.0/24 Into Four Subnets
Let’s work through another example. Suppose you need four subnets from 192.168.5.0/24.
Four subnets require 2 borrowed bits:
Add those 2 bits to the original /24 prefix:
A /26 subnet mask is 255.255.255.192. The block size is:
So the subnets begin at 0, 64, 128, and 192:
| Subnet | Network Address | Usable Host Range | Broadcast Address |
|---|---|---|---|
| 1 | 192.168.5.0/26 | 192.168.5.1 – 192.168.5.62 | 192.168.5.63 |
| 2 | 192.168.5.64/26 | 192.168.5.65 – 192.168.5.126 | 192.168.5.127 |
| 3 | 192.168.5.128/26 | 192.168.5.129 – 192.168.5.190 | 192.168.5.191 |
| 4 | 192.168.5.192/26 | 192.168.5.193 – 192.168.5.254 | 192.168.5.255 |
Each subnet supports 62 usable hosts. This design could fit four departments, four VLANs, four floors, or four lab groups. It is also easier to manage than a crowded /24 where every device lives together like roommates who keep stealing each other’s bandwidth.
How to Check Your Work
To verify subnetting, use three questions:
- Does the network address land exactly on the block size?
- Is the broadcast address one less than the next subnet?
- Are the usable hosts between the network and broadcast addresses?
For example, in 192.168.5.64/26, the block size is 64. The network address is 192.168.5.64. The next subnet starts at 192.168.5.128, so the broadcast address is 192.168.5.127. Usable hosts are 192.168.5.65 through 192.168.5.126. If your host address is 192.168.5.127, do not assign it to a laptop. That is the broadcast address, and the laptop will not appreciate being promoted to a network-wide megaphone.
Common Subnetting Mistakes
Using the Network Address as a Host Address
The first address in a subnet identifies the subnet itself. In 192.168.10.32/27, the address 192.168.10.32 is the network address. Do not assign it to a PC, printer, phone, or server.
Using the Broadcast Address as a Host Address
The last address in a subnet is reserved for broadcast. In 192.168.10.32/27, the broadcast address is 192.168.10.63. Assigning it to a device can cause connectivity problems.
Choosing a Subnet That Is Too Small
A /29 may look tidy, but it only gives 6 usable host addresses. That might work for a tiny management segment, but it is a bad fit for an office full of laptops, phones, and tablets. Always leave room for growth.
Forgetting DHCP Scope Boundaries
If you configure DHCP with the wrong start or end address, clients may receive addresses outside the subnet or collide with reserved static devices. Keep DHCP pools inside the usable host range and exclude addresses used by routers, switches, servers, printers, and access points.
Ignoring Routing and Firewall Rules
Creating subnets separates networks logically, but devices in different subnets need routing to communicate. If you want to restrict communication, you need firewall rules or access control lists. Subnetting creates the rooms; routing and security policies decide who gets the keys.
Class C Subnetting and CIDR: What Changed?
Old classful networking divided IPv4 addresses into fixed classes. Class A, Class B, and Class C networks had default masks. That worked in the early days, but it wasted addresses and lacked flexibility. CIDR, or Classless Inter-Domain Routing, replaced the old model by allowing networks to be described with flexible prefix lengths such as /21, /24, /27, or /30.
So why do people still say “Class C”? Because it is convenient. In most beginner subnetting lessons, “Class C” means “a /24 network where subnetting happens in the fourth octet.” That makes it easier to learn the pattern before moving into larger or more complex address plans.
Practical Experience: What Subnetting Teaches You in the Real World
The first time you subnet a Class C network, the math may feel like a puzzle designed by a calculator with trust issues. But after you do it a few times, subnetting becomes less about memorizing numbers and more about thinking clearly. The best network administrators do not just ask, “Can I divide this /24?” They ask, “What problem am I solving?”
In real environments, subnetting often starts with a messy network. Maybe every device sits in 192.168.1.0/24. The office computers, guest Wi-Fi, IP cameras, smart TVs, printers, and servers all share the same broadcast domain. Everything technically works, so nobody complainsuntil something breaks. Then troubleshooting becomes a scavenger hunt. Is the issue DHCP? A duplicate IP? A chatty camera? A guest device scanning the network? A printer that believes it is the main character?
One practical lesson is to subnet before the network becomes painful. A small company may not need a huge enterprise design, but it can still benefit from simple segmentation. Put guests in their own subnet. Put servers in their own subnet. Keep network equipment in a management subnet. Separate cameras and IoT devices if possible. These choices make the network easier to secure and easier to understand.
Another experience-based tip: document everything immediately. Do not rely on memory. Memory is where subnet plans go to wear disguises. A simple spreadsheet with subnet name, CIDR block, gateway, VLAN ID, DHCP range, and notes can save hours later. Label switch ports. Record firewall rules. Keep static IP reservations organized. When someone asks, “What is 192.168.10.161?” you should not need to perform archaeology.
It is also smart to leave unused space. Beginners often pack subnets too tightly because the math allows it. For example, if a department has 28 devices, a /27 with 30 usable hosts technically fits. But what happens when the department adds five people, two printers, and a conference-room display? Suddenly, the perfect subnet becomes a tiny digital elevator. A slightly larger subnet may look wasteful today but prevent redesign tomorrow.
Testing is where theory meets reality. After creating a subnet, test a device with DHCP, then test a static address. Ping the gateway. Confirm DNS. Try reaching permitted resources. Verify blocked traffic is actually blocked. If Guest Wi-Fi can reach the server VLAN, do not celebrate connectivity. Fix the firewall rule. Good subnetting is not just about making devices talk; it is also about making sure some devices politely do not talk.
Finally, subnetting builds confidence. Once you can look at 192.168.20.96/27 and know the range is 192.168.20.97 to 192.168.20.126 with broadcast 192.168.20.127, you stop fearing IP plans. You start seeing patterns. You understand why masks matter, why gateways must match subnets, and why one wrong address can ruin a quiet afternoon. Subnetting is not glamorous, but it is foundational. It is the difference between “the network is down” and “VLAN 30 has a gateway mismatch.” One is chaos. The other is a fixable Tuesday.
Conclusion
Subnetting a Class C network is a practical skill that helps you divide a /24 IPv4 network into smaller, cleaner, safer, and easier-to-manage pieces. The process is straightforward: start with your original network, decide how many subnets you need, borrow host bits, calculate the new mask, find the block size, list the ranges, and assign each subnet to a real purpose.
The most important idea is balance. A subnet that is too large may waste addresses and mix unrelated devices. A subnet that is too small may run out of room quickly. Good subnetting considers both current needs and future growth. Whether you are studying for a networking exam, building a home lab, organizing a small office, or preparing for more advanced routing and VLAN design, mastering Class C subnetting gives you a strong foundation.
And remember: the network address is not a host, the broadcast address is not a host, and documentation is not optional unless you enjoy solving your own mysteries six months later.