Setting up an OpenGL project in Visual Studio should be a simple prelude to graphics programming. Instead, it often feels like a boss battle involving missing DLLs, mysterious linker errors, and one library that was accidentally downloaded for the wrong processor architecture.
The good news is that you only need to solve this puzzle once. By creating a reusable OpenGL FreeGLUT GLEW template project, you can start future graphics experiments without repeating the same configuration ritual. This guide explains what each library does, shows two reliable installation methods, provides a working starter program, and covers the errors that commonly make new OpenGL developers question their career choices.
What OpenGL, FreeGLUT, and GLEW Actually Do
Before configuring Visual Studio, it helps to understand why three different components are involved.
OpenGL Handles the Graphics
OpenGL is a cross-platform graphics API used to communicate with graphics hardware. It provides functions for rendering points, triangles, textures, lighting, shaders, and complete 2D or 3D scenes.
OpenGL deliberately does not define how an operating system should create a desktop window, receive keyboard input, or construct a rendering context. That separation makes OpenGL portable, but it also means an OpenGL program needs help before it can draw its first gloriously empty screen.
FreeGLUT Creates the Window and OpenGL Context
FreeGLUT is an open-source replacement for the original GLUT library. It can create a window, establish an OpenGL context, process mouse and keyboard input, and manage the application event loop.
In this template, FreeGLUT is responsible for opening the application window and giving OpenGL a place to render. It also lets the program request a particular OpenGL version and profile.
GLEW Loads Modern OpenGL Functions
Windows includes the basic OpenGL system library, but its traditional headers expose only older core functionality directly. Modern functions such as shader creation, buffer objects, and vertex array objects must be loaded through function pointers supplied by the graphics driver.
GLEW, short for OpenGL Extension Wrangler Library, performs that loading process. Once an OpenGL context exists, calling glewInit() makes supported core and extension functions available to the program.
The initialization order is therefore important:
- Initialize FreeGLUT.
- Create a window and OpenGL context.
- Initialize GLEW.
- Start calling modern OpenGL functions.
Calling GLEW before a valid context exists is like asking for directions before the road has been built.
Prerequisites for the Visual Studio OpenGL Project
Install a current desktop version of Visual Studio and select the Desktop development with C++ workload in the Visual Studio Installer. This workload supplies the MSVC compiler, Windows SDK, linker, debugger, and standard C++ libraries required by the project.
You will also need:
- A graphics driver that supports the requested OpenGL version
- FreeGLUT headers, libraries, and runtime files
- GLEW headers, libraries, and runtime files
- A consistent target architecture, preferably x64
OpenGL itself does not normally need to be downloaded separately on Windows. The operating system provides opengl32.lib for linking and opengl32.dll at runtime. FreeGLUT and GLEW provide the additional window-management and function-loading layers.
Method 1: Install FreeGLUT and GLEW with vcpkg
Using vcpkg is the easiest option for most developers. It reduces manual path configuration, keeps library architectures consistent, and makes dependency installation repeatable.
Step 1: Install vcpkg
Open Developer PowerShell or a regular PowerShell window and run:
The bootstrap script creates the vcpkg executable. The exact installation directory is your choice, but a short path without spaces makes command-line work less dramatic.
Step 2: Install the x64 Libraries
The x64-windows triplet tells vcpkg to build dynamic 64-bit Windows libraries. For a 32-bit project, use x86-windows, although x64 is the more practical default for new desktop projects.
Step 3: Integrate vcpkg with Visual Studio
User-wide MSBuild integration allows regular Visual Studio C++ projects to find supported vcpkg headers and libraries automatically. You normally run this integration command only once for that vcpkg installation.
Step 4: Create the Visual Studio Project
- Open Visual Studio.
- Select Create a new project.
- Choose Empty Project for C++.
- Name it
OpenGLTemplate. - Open Build > Configuration Manager.
- Set the active solution platform to x64.
- Add a new C++ file named
main.cpp.
If vcpkg integration is active and the project architecture matches the installed triplet, Visual Studio should locate the FreeGLUT and GLEW files without additional include or library paths.
Method 2: Configure the Libraries Manually
Manual configuration takes longer, but it teaches you exactly how compilation, linking, and runtime loading fit together. It is also useful when you want a self-contained project directory that can be archived or moved without relying on a machine-wide package installation.
Create a Portable Folder Structure
Organize the project like this:
Do not mix 32-bit and 64-bit files. A 64-bit project cannot link against a 32-bit library simply because both files look polite in File Explorer.
Add the Header Directory
- Right-click the project and select Properties.
- Set Configuration to All Configurations.
- Set Platform to x64.
- Open C/C++ > General.
- Add this value to Additional Include Directories:
Add the Library Directory
Open Linker > General and add the following value to Additional Library Directories:
Add the Required Linker Dependencies
Open Linker > Input and add these entries to Additional Dependencies:
The inherited %(AdditionalDependencies) value should remain in place so that Visual Studio does not discard dependencies supplied by other project settings.
Copy the Runtime DLLs Automatically
The linker uses .lib files while building, but Windows needs the matching .dll files when the application runs. Add this command under Build Events > Post-Build Event > Command Line:
This copies the DLLs beside the compiled executable after each build. It is cleaner than placing third-party DLLs in Windows system folders, where forgotten files may linger like digital attic furniture.
Create a Working OpenGL FreeGLUT GLEW Starter Program
Place the following code in main.cpp:
Why the Include Order Matters
glew.h should appear before freeglut.h or other OpenGL headers. GLEW defines and manages OpenGL function declarations, so including a traditional OpenGL header first can produce conflicts or warnings.
Why GLEW Is Initialized After Window Creation
GLEW queries function pointers from the active graphics context. Before glutCreateWindow() succeeds, no current OpenGL context exists. Initializing GLEW earlier can therefore fail or leave modern functions unavailable.
Why the Template Requests OpenGL 3.3 Core
OpenGL 3.3 is a practical learning target because it supports modern shaders, vertex buffer objects, and vertex array objects while remaining widely available on desktop hardware. A core-profile context also discourages reliance on deprecated immediate-mode functions such as glBegin() and glEnd().
Build and Test the Project
Choose Build > Build Solution, or press Ctrl+Shift+B. Run the program with Ctrl+F5.
A successful test should produce:
- A window with a dark blue background
- The graphics renderer name in the console
- The detected OpenGL version in the console
- A clean exit when you press Escape or close the window
Printing the renderer and version is more than decorative debugging. It confirms which graphics driver created the context and whether the requested OpenGL capability is actually available.
Common Visual Studio OpenGL Errors
Cannot Open Include File: GL/glew.h
The compiler cannot find the header directory. Confirm that Additional Include Directories points to the directory containing the GL folder, not directly to the folder containing glew.h.
Correct:
Usually incorrect:
LNK1104: Cannot Open File glew32.lib
The linker cannot locate the library file. Verify the library directory, file name, configuration, and active platform. Also confirm that the path was added under Linker > General, not accidentally placed in an unrelated property field with a suspiciously similar name.
LNK2019 or Unresolved External Symbol
This generally means the header was found but the required library was not linked. Check that glew32.lib, freeglut.lib, and opengl32.lib appear in Additional Dependencies.
An architecture mismatch may produce similar linker errors. Inspect the active Visual Studio platform and use matching x64 or x86 libraries.
freeglut.dll or glew32.dll Was Not Found
The project compiled, but Windows could not locate a runtime dependency. Copy the correct DLLs to the same output directory as the executable or use the post-build command shown earlier.
The Window Opens and Immediately Closes
Run without debugging using Ctrl+F5 so the console remains visible, or start the program from a terminal. Read the error output before the window disappears into the digital afterlife.
OpenGL 3.3 Context Creation Fails
Update the graphics driver from the GPU or computer manufacturer. If the hardware is older, temporarily request OpenGL 3.0 or omit the explicit version request to test whether FreeGLUT can create any context.
Do not assume the version of Windows determines OpenGL support. The installed graphics driver and hardware capability are the decisive factors.
GLEW Reports an Error in a Core Profile
Make sure glewExperimental = GL_TRUE; is set before glewInit(). This instructs GLEW to expose functions that have valid entry points even when extension reporting differs in a modern core context.
Turn the Working Project into a Reusable Template
Once the program builds correctly in both Debug and Release configurations, clean the project before exporting it.
- Remove experimental source files and temporary assets.
- Keep only the starter code and dependency configuration.
- Select Build > Clean Solution.
- Confirm that both Debug x64 and Release x64 rebuild successfully.
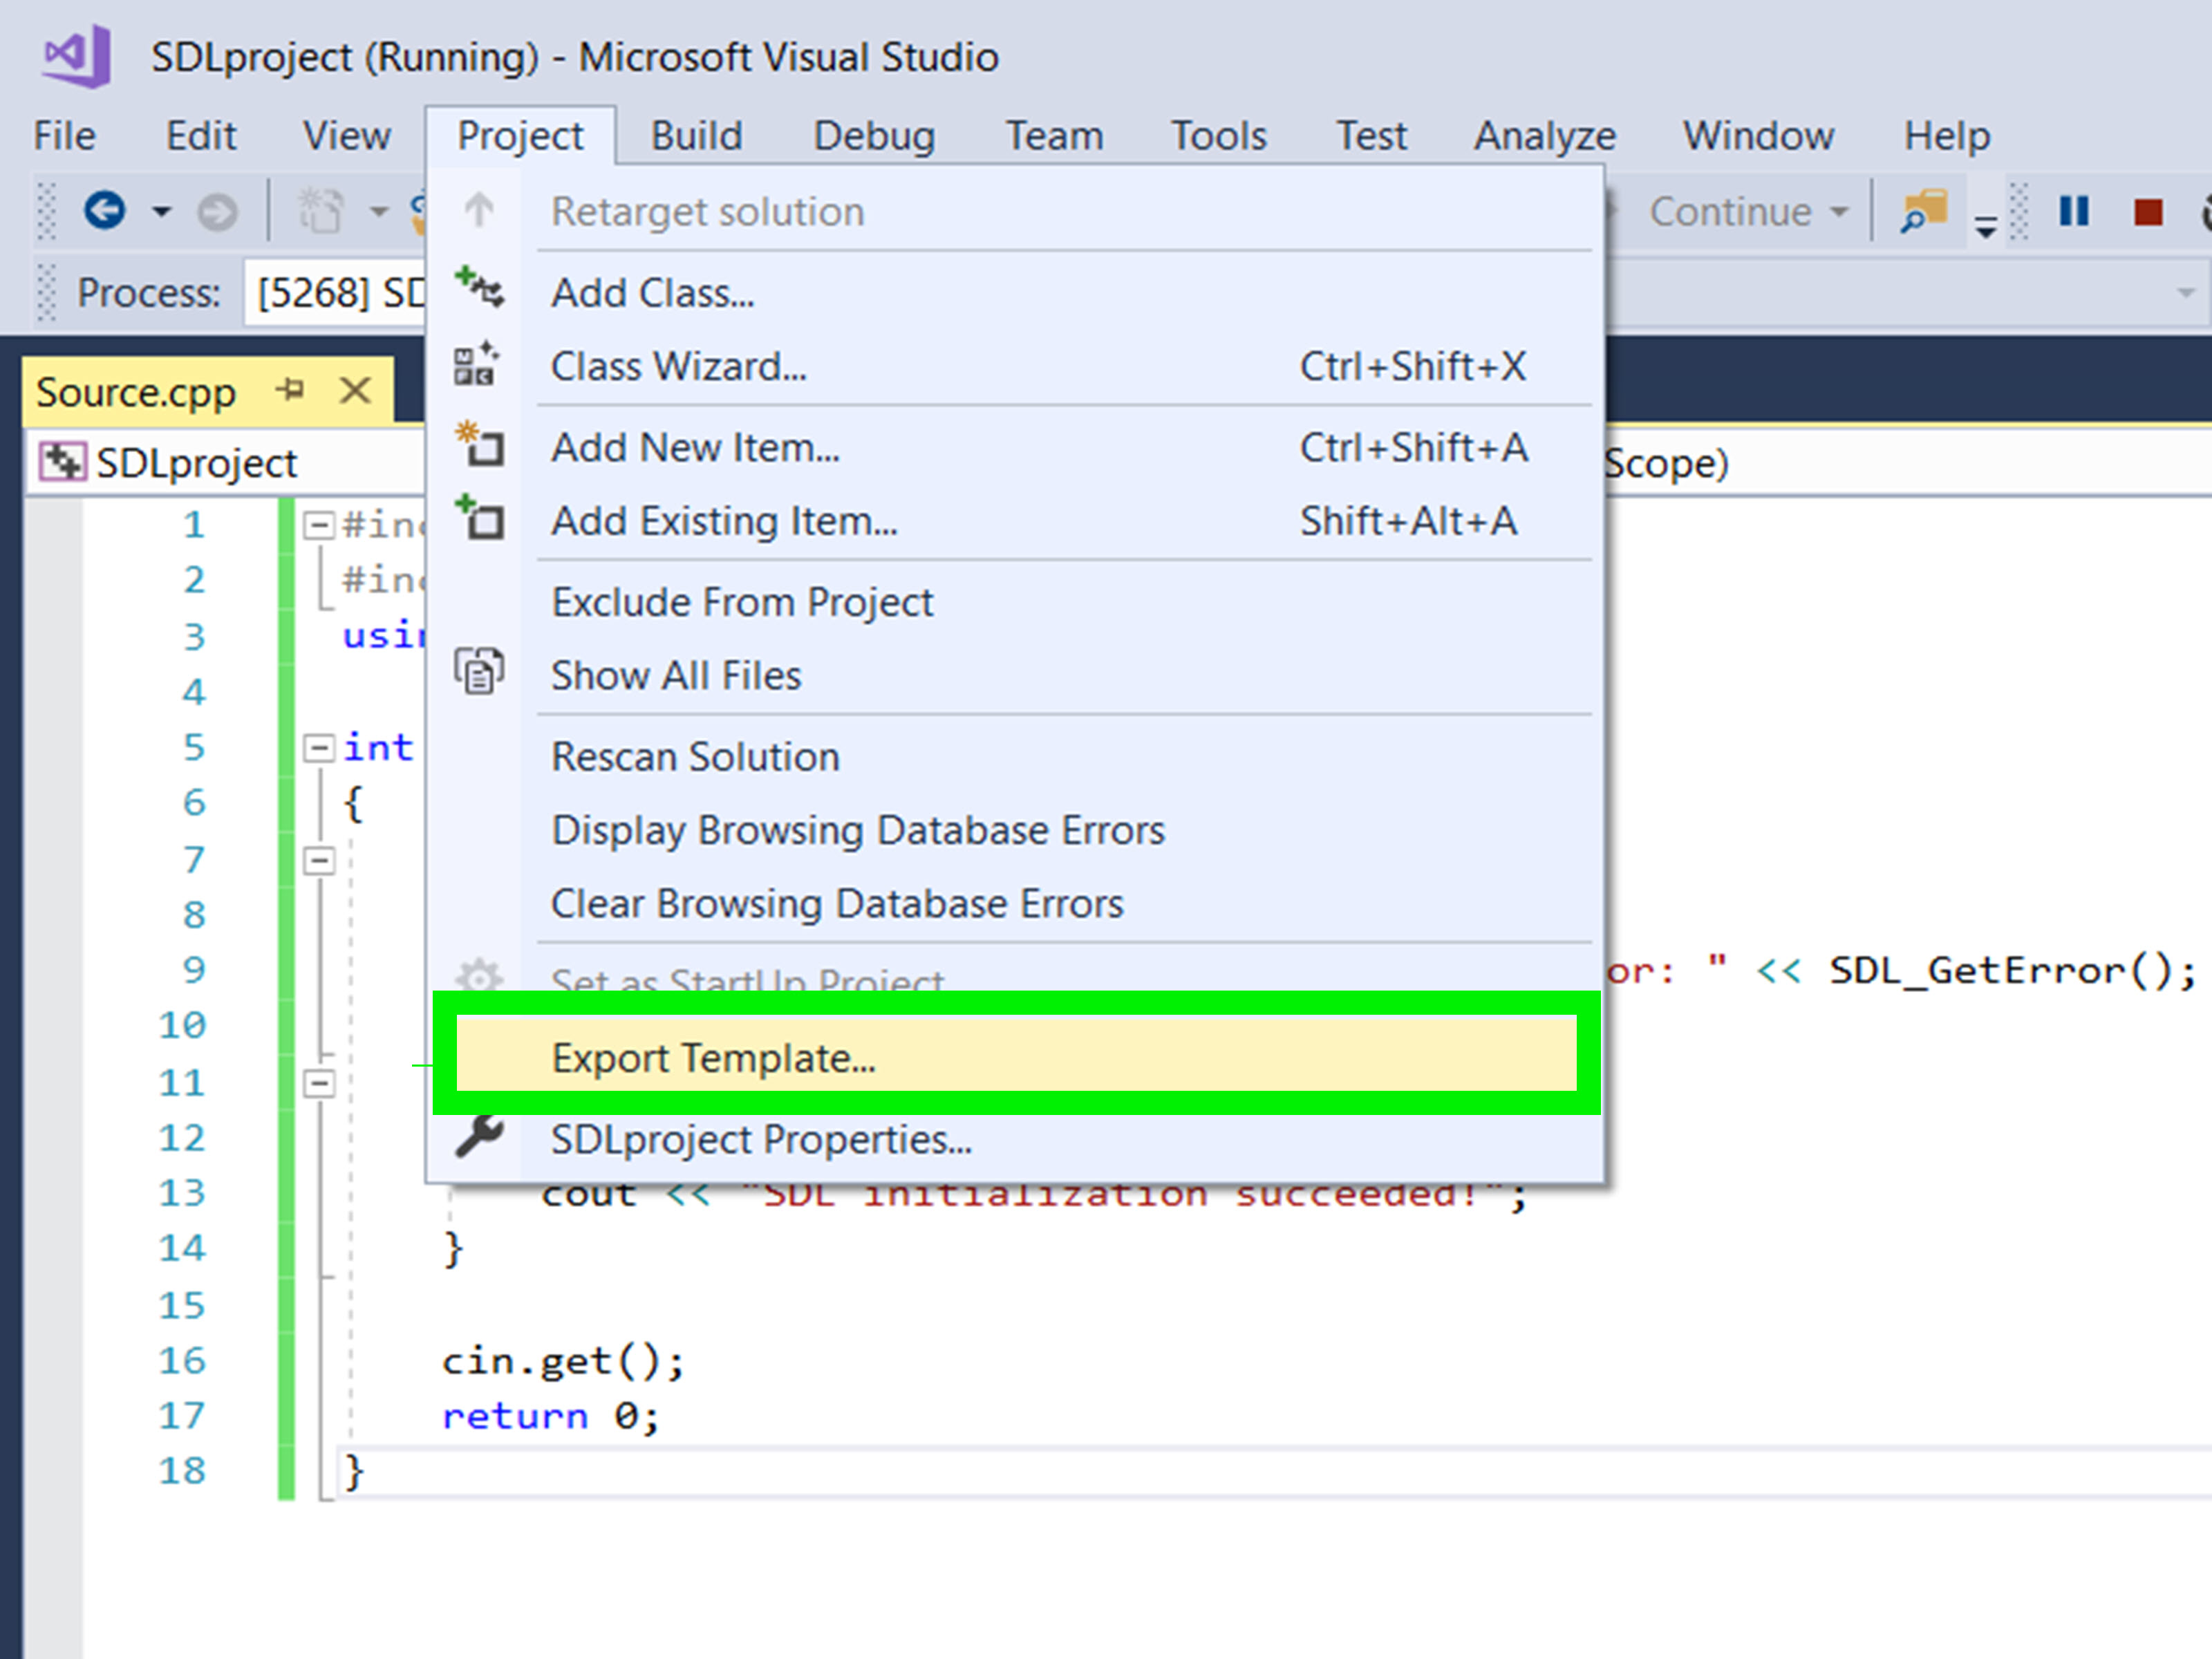
- Open the Project menu and choose Export Template.
- Select Project Template.
- Name it something searchable, such as
OpenGL FreeGLUT GLEW x64. - Complete the wizard and allow Visual Studio to import the template.
If the Export Template command is not visible, it can be added through Tools > Customize > Commands. Another dependable approach is to store the clean starter project in Git and create new projects by copying or cloning the repository.
For a team project, a repository is often more maintainable than a personal Visual Studio template because dependency instructions, source code, and configuration changes can be versioned together.
Experiences from Building OpenGL Template Projects
The First Build Should Do Almost Nothing
A common mistake is combining environment setup with the first shader, triangle, camera system, texture loader, and perhaps an ambitious plan to recreate an entire game engine before lunch.
A better first milestone is intentionally boring: open a window, clear it with a recognizable color, print the renderer, and close cleanly. That tiny test separates dependency problems from rendering problems. If a later triangle fails to appear, you already know that FreeGLUT, GLEW, the driver, and the basic event loop are working.
Changing the background to an unusual color also helps. A black window can be confused with a failed render, while a dark blue or bright purple window clearly proves that glClearColor() executed.
Architecture Consistency Prevents Most Setup Pain
The most frustrating errors are often not caused by C++ code at all. They come from mixing an x64 executable with an x86 library, pairing a Debug library with an incompatible runtime, or copying a DLL from a different package version.
Choose x64 at the beginning and label every dependency directory clearly. Avoid generic folders named only lib and bin when several architectures are involved. Names such as lib/x64 and bin/x64 prevent mistakes months later, when nobody remembers why one mysterious library file worked.
Project-Relative Paths Travel Better
Absolute paths such as C:\Users\Someone\Downloads\OpenGLStuff\include may work perfectly on one computer and fail instantly everywhere else. They also break when the folder is renamed, the repository is moved, or another developer opens the solution.
Using macros such as $(ProjectDir), $(SolutionDir), and $(OutDir) makes a manual OpenGL Visual Studio setup portable. This small habit turns a personal experiment into a reusable template rather than a project held together by one computer’s directory history.
Automating DLL Copies Is Worth the Minute It Takes
Manually copying DLLs feels harmless during the first build. By the tenth rebuild, it becomes a source of stale files and confusing runtime behavior. A post-build command ensures that the executable always receives the runtime files associated with the currently configured dependencies.
Package managers may perform app-local deployment automatically, but a manual vendor layout still benefits from an explicit copy step. The goal is to make a successful build lead directly to a successful run, without a scavenger hunt through download folders.
A Good Template Includes Diagnostics
Developers sometimes remove renderer and version output because it looks temporary. In practice, those two lines remain valuable throughout a project’s life. They can reveal that Windows switched to an integrated GPU, a remote desktop session exposed a limited renderer, or another machine created an older context than expected.
A mature template may later add OpenGL debug output, shader compilation logs, framebuffer-size reporting, and a central error-checking utility. However, initialization diagnostics should stay lightweight. A template is a launchpad, not a warehouse containing every helper class ever imagined.
Save a Known-Good Copy Before Experimenting
Once the clean template works, commit it to source control or archive it before adding shaders and rendering systems. Graphics experiments often involve changing context flags, dependency builds, compiler options, and source organization. Keeping a known-good baseline makes it easy to determine whether a failure came from the environment or the latest code change.
This practice also makes learning faster. Instead of rebuilding the toolchain for each tutorial, you can create a fresh project from the template and focus immediately on buffers, transformations, textures, lighting, or whichever rabbit hole has captured your attention that day.
Conclusion
A reusable OpenGL FreeGLUT GLEW template project removes the least entertaining part of graphics programming from future work. FreeGLUT creates the window and context, GLEW loads modern OpenGL functions, and Visual Studio compiles and links the application.
For the easiest setup, install FreeGLUT and GLEW through vcpkg and use its Visual Studio integration. For a portable, educational setup, keep headers, libraries, and DLLs inside a clearly organized project directory and configure the paths with Visual Studio macros.
Whichever method you choose, remember the three rules that prevent most failures: create the OpenGL context before initializing GLEW, match every library to the project architecture, and keep runtime DLLs beside the executable. Once the starter window appears, the configuration dragon has been defeated and you can move on to the much friendlier challenge of debugging shaders.
Note: Menu names may vary slightly between Visual Studio editions, but the compiler, linker, architecture, and runtime dependency principles remain the same.
Research basis:
Technical references: