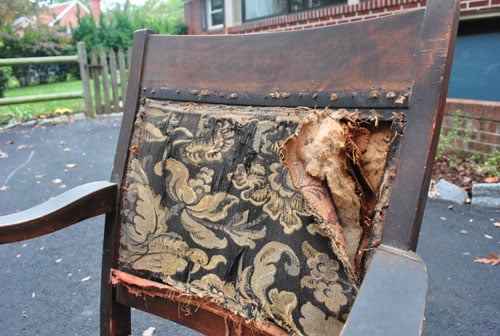
Every old rocking chair has a little drama in it. Maybe it came from a thrift store with a suspicious floral cushion. Maybe it lived on a porch for years and now looks like it has seen things. Maybe it belonged to your grandma and deserves better than becoming the household “clothes mountain.” The good news is that redoing a rocking chair with spray paint and fabric is one of those deeply satisfying DIY projects that looks fancy, feels practical, and does not require a master’s degree in furniture restoration.
If you want a fresh, modern rocking chair makeover without stripping every inch by hand or learning advanced upholstery techniques, this approach hits the sweet spot. Spray paint makes it easier to get into curves, spindles, and hard-to-reach nooks. New fabric instantly changes the personality of the chair, whether you want cozy cottage charm, crisp modern contrast, or a look that whispers, “Yes, I do drink coffee on purpose out of stoneware mugs.”
In this guide, you’ll learn how to redo a rocking chair with spray paint and fabric step by step, what tools you actually need, how to avoid the most common mistakes, and how to get a durable finish that does not chip the second someone sits down with a blanket and a dramatic novel. Let’s rescue that rocker.
Why This Rocking Chair Makeover Works So Well
A rocking chair is a perfect candidate for a furniture refresh because it usually has a solid frame and a relatively small upholstered area. That means you can make a huge visual impact without buying yards and yards of fabric or spending an entire month covered in sanding dust. It is also easier to personalize than a big sofa or sectional. Change the color, swap the fabric, and suddenly the chair goes from “attic extra” to “favorite seat in the house.”
This method is especially smart for wooden rocking chairs with removable seat pads, simple back cushions, or small upholstered inserts. It can also work for metal rocking chairs if you prep the surface properly and use the right primer and spray paint. The key is not speed alone. The key is smart prep. In furniture projects, prep is the difference between “beautiful makeover” and “Why is the paint peeling off like sunburn?”
What You’ll Need
- Rocking chair
- Drop cloth or cardboard
- Screwdriver or drill
- Mild cleaner or degreaser
- Microfiber cloths or tack cloth
- Sandpaper in medium and fine grits
- Wood filler if needed
- Spray primer suitable for wood or metal
- Spray paint for furniture
- Optional clear sealer
- Upholstery fabric
- Staple remover or needle-nose pliers
- Staple gun and staples
- Foam or batting if the cushion needs help
- Scissors or rotary cutter
- Dust mask or respirator, safety goggles, and gloves
That may look like a long list, but most of it is basic DIY gear. If your chair seat is simple, this can absolutely be a weekend project.
Step 1: Decide Whether the Chair Is a Makeover or a Full Rescue Mission
Before you start spraying like an excited art student, inspect the chair closely. Wiggle the arms, check the rockers, tighten loose screws, and look for cracked joints. If the chair rocks unevenly, has broken supports, or feels unstable, fix the structure first. Paint and pretty fabric do not count as repair. They are more like great lighting: helpful, flattering, and totally incapable of solving a deep structural issue.
If the piece is a rare antique or has significant value, pause before painting. Some chairs are better refinished than painted. But if the chair is worn, ordinary, or already altered, a spray paint and fabric makeover can be the perfect second life.
Step 2: Take It Apart and Label What Comes Off
Remove the seat cushion, back pad, or any upholstered panel if possible. Take photos before you disassemble anything. Then take more photos. Future you will be thrilled when “Where did this screw come from?” becomes a solvable mystery instead of a personal crisis.
If the old fabric is attached to a seat board, carefully remove the staples. Save the old fabric pieces, even if they are ugly enough to start an argument. They make excellent templates for cutting the new fabric. If the foam is still supportive, you may be able to reuse it. If it crumbles, smells odd, or has the structural integrity of cake, replace it.
Step 3: Clean, Repair, and Sand the Frame
Spray paint loves a clean, dull, dry surface. It does not love grease, wax, dust, or mystery furniture polish from 2009. Clean the chair thoroughly using a mild detergent or degreaser. Let it dry fully.
For Wooden Rocking Chairs
Fill dents, nicks, or small cracks with wood filler and let it cure. Sand the repaired spots smooth, then lightly sand the entire chair to scuff the old finish and help the primer grip. You do not need to sand it down to bare wood unless the finish is flaking badly. The goal is adhesion, not arm-day punishment.
For Metal Rocking Chairs
Remove loose rust and flaking paint with sandpaper or a wire brush. Wipe away dust and use a primer formulated for metal. This matters. Metal is not interested in your optimism if you skip the right prep.
After sanding, wipe the chair with a tack cloth or a clean, lint-free rag. Leftover dust is the enemy of a smooth finish.
Step 4: Prime First, Celebrate Later
Primer is not the boring extra. Primer is the reason your paint job looks even, holds better, and does not stain, bleed, or peel. Choose a spray primer made for the surface of your chair. A bonding or multi-surface primer works for many wood projects. Rust-inhibiting primer is best for metal.
Spray in a well-ventilated area and protect the floor and nearby surfaces. Hold the can at the recommended distance listed on the label and use smooth, steady passes. Several light coats are better than one heavy coat. Heavy coats cause drips, and drips are the DIY version of a public text mistake: hard to ignore and annoying to explain.
Let the primer dry according to the can instructions before moving on.
Step 5: Spray Paint the Rocking Chair the Right Way
Now for the fun part. Choose a spray paint designed for furniture or multi-surface use. Satin and matte finishes are popular for rocking chair makeovers because they hide minor imperfections better than high gloss, but gloss can look fantastic if the chair is in great shape and you want a crisp, polished finish.
Best Spray Paint Technique
- Start with the underside and harder-to-see areas first.
- Keep the can moving before, during, and after each pass.
- Use long, light, overlapping strokes.
- Rotate the chair as needed to reach spindles and curved parts.
- Apply multiple thin coats instead of one thick coat.
Do not rush recoat times. Do not decide one wet coat is “more efficient.” That road leads to runs, tacky spots, and deep regret. If the chair has lots of turned details or narrow slats, spray paint is especially helpful because it gives more even coverage than a brush in those tight areas.
Popular color ideas for a rocking chair makeover include classic black, creamy white, sage green, navy, charcoal, warm mushroom, and soft terracotta. If you want the chair to feel modern, pair a darker frame with lighter fabric. If you want a cottage or vintage feel, softer paint colors and patterned fabric work beautifully.
Step 6: Let the Paint Cure Before Reassembly
Dry and cured are not the same thing. A chair may feel dry to the touch but still be vulnerable to scratches, pressure marks, and fingerprints. Let the paint cure according to the manufacturer’s directions before heavy use or reassembly. That waiting period can feel rude, but it is worth it.
If you want added protection, apply a compatible clear sealer after the color coat has dried as directed. This can be especially helpful for high-use chairs in living rooms, nurseries, or covered porches.
Step 7: Reupholster the Seat or Cushion With New Fabric
This is where the chair gets its personality back. Choose upholstery fabric rather than lightweight quilting cotton or fashion fabric. Upholstery fabric is made to handle friction, weight, and regular use. If the rocking chair will live in a sunny room or on a porch, consider performance or outdoor fabric for better durability and fade resistance.
How to Cut the Fabric
Lay the old fabric flat and use it as a pattern. If the old fabric is too stretched or mangled, place the seat board on the new fabric and cut around it, leaving enough extra material to wrap around the edges and staple securely underneath. A few extra inches of margin is your friend.
What to Do With the Foam and Batting
If the original foam still feels supportive, you can reuse it. Add a fresh layer of batting if the cushion looks flat or lumpy. Batting softens the shape, smooths edges, and gives the finished seat a fuller look. If the foam is worn out, replace it with upholstery foam cut to size.
How to Staple the Fabric Neatly
Center the fabric over the cushion and seat board. Pull one side snug and staple the middle. Move to the opposite side, pull firmly, and staple the middle there. Repeat on the remaining two sides. Then work outward from the center, alternating sides as you staple. This keeps the fabric tension even and helps avoid wrinkles.
At the corners, fold neatly like you are wrapping a very stubborn present. Trim bulk if needed, but do not cut too much too soon. The seat underside does not need to be glamorous, but it should be secure and smooth enough that the cushion sits flat when reattached.
Step 8: Reassemble the Chair and Style It
Once the paint has cured and the fabric is stapled cleanly, reattach the seat and any other upholstered parts. Tighten hardware, test the rocking motion, and place the chair where it can shine. Add a lumbar pillow, a knit throw, or a small side table if you want the full magazine-spread effect.
A freshly redone rocking chair works in a nursery, reading corner, bedroom, porch, living room, or entry nook. In other words, this one project can earn its keep almost anywhere.
Common Mistakes to Avoid
- Skipping cleaning: Paint over grime is a breakup waiting to happen.
- Using heavy coats: Thick spray paint causes drips and uneven texture.
- Ignoring cure time: A rushed reassembly can ruin an otherwise great finish.
- Choosing flimsy fabric: Pretty is nice, durable is better.
- Not testing color and sheen: Spray a sample board first if you are unsure.
- Forgetting comfort: A chair can be gorgeous and still feel like sitting on regret if the cushion is shot.
Indoor vs. Outdoor Rocking Chair Makeover
If your rocking chair will live indoors, you have more freedom with paint finish and fabric type. For outdoor or porch use, choose materials that can handle moisture, temperature swings, and sunlight. Use exterior-rated spray paint and durable outdoor fabric. Even then, a covered space will help your work last longer.
For nursery or family-room use, consider stain-resistant or performance fabric. That way, the chair is prepared for juice spills, snack crumbs, pet hair, and other tiny household plot twists.
How Much Does It Cost to Redo a Rocking Chair?
The total cost depends on what you already own, but many rocking chair makeover projects are affordable. A few cans of primer and spray paint, a small amount of fabric, staples, and optional foam can often cost far less than buying a brand-new accent rocker. If you thrifted the chair or inherited it for free, the value gets even better.
That is part of the charm here. You are not just saving money. You are getting a more custom result than many store-bought chairs offer, and you get the strangely satisfying bragging rights of saying, “Oh, that? I redid it myself.”
Real Experiences and Lessons From Redoing a Rocking Chair
One of the most relatable experiences with a rocking chair makeover is discovering that the project is never quite as dramatic as you feared and never quite as neat as you imagined. The chair usually starts out looking innocent enough, but the moment you flip it over and remove the first staple, you realize furniture can hold an astonishing amount of dust, lint, and unexplained crumbs. That part is humbling. It is also weirdly motivating. Once the old fabric is off, the chair suddenly stops looking tired and starts looking fixable.
Another common experience is the emotional roller coaster of spray paint. The first coat almost always looks underwhelming. It can appear patchy, thin, or slightly tragic. Many first-time DIYers panic at this stage and try to fix everything with one thick coat. That is usually the exact wrong move. In real life, the best results come from trusting the process: light coat, wait, second coat, wait, third coat if needed. Somewhere around coat two or three, the chair starts to transform in a very satisfying way. It goes from “garage object” to “actual furniture” right in front of you.
Fabric brings its own adventure. People often assume the hardest part will be cutting the fabric, but it is usually the stapling and corner-folding that tests patience. Corners love to act dramatic. You pull one side smooth, and suddenly the opposite side wrinkles like it is protesting the entire project. The helpful lesson here is to staple in stages, not all at once. Tack the center points first, keep the tension even, and adjust before committing to a hundred staples. That small change makes the whole seat look more professional.
There is also the comfort factor that surprises people. A chair can look amazing after fresh paint, but if the cushion is flat, the makeover still feels unfinished. Many DIYers find that replacing old foam or adding a layer of batting gives the chair that “finished on purpose” look. The seat appears fuller, the fabric sits better, and the chair becomes something you actually want to use instead of just admire from across the room like a museum piece.
Color choice is another real-world lesson. What seems bold on the cap of a spray paint can can look much softer on a full chair. Black tends to feel classic and forgiving. White looks beautiful but shows every little scuff and every single life decision. Green, blue, and warm neutrals often strike a nice balance between character and practicality. On the fabric side, small prints hide wear well, while solids look more modern but reveal tension mistakes faster. In other words, the chair will expose your shortcuts, but it will also reward your patience.
Perhaps the best part of the whole experience is the last step: setting the finished rocking chair in place and giving it that first test rock. That moment feels bigger than it should. The chair is still the same chair, technically speaking, but it no longer carries the same energy. It looks intentional. It belongs in the room. And because you handled the cleaning, sanding, painting, and fabric yourself, the makeover has a little story in it now. Not a dramatic television story where sparks fly and a host gasps every four minutes, but a better one: the practical satisfaction of making something old useful and beautiful again.
That is really why this kind of DIY project stays popular. It is not only about saving furniture. It is about changing your relationship with the piece. Once you redo a rocking chair successfully, you stop seeing worn furniture as junk. You start seeing frames, shapes, and possibilities. Which is great news for your home and slightly dangerous news for every thrift store within driving distance.
Final Thoughts
If you want to redo a rocking chair with spray paint and fabric, the winning formula is simple: clean thoroughly, sand lightly, prime correctly, spray in thin coats, let the finish cure, and use durable fabric with careful stapling. That is the whole game. You do not need a massive workshop or elite upholstery skills. You just need patience, a little planning, and the willingness to trust that an ugly chair can still have a comeback season.
Done right, a rocking chair restoration can give you a custom accent piece that feels cozy, looks fresh, and costs much less than buying new. And unlike many impulse home upgrades, this one gives you a place to sit down and admire your work afterward. Honestly, that feels fair.