Note: This article is written as publish-ready HTML based on current real-world Google Slides behavior, official product documentation, and reputable software resources. No source links or citation placeholders are inserted so the content can be copied cleanly into a website editor.
Introduction: Google Slides Can Play Audio, But Recording Is the Plot Twist
Learning how to record audio on Google Slides sounds like it should be as simple as clicking a shiny microphone button and saying, “Hello, slide number one, please behave.” In reality, Google Slides is excellent for presenting, collaborating, inserting media, and making your bullet points look less like they were assembled during a caffeine emergency. But recording audio directly into a slide is not always built into the basic workflow.
The good news? You can absolutely add narration, voiceovers, music, sound effects, or instructional audio to a Google Slides presentation. The slightly less magical news is that you usually record the audio with another tool first, upload the file to Google Drive, and then insert it into your slide deck. For some Google Workspace users, Google Slides also includes a built-in recording feature that records a slideshow as a video and saves it to Drive.
This guide explains the practical way to record audio for Google Slides, the best recording tools to use, and how to avoid common mistakes like muffled narration, missing Drive permissions, autoplay surprises, and the dreaded “Why can nobody hear my audio?” moment. Whether you are a teacher creating lesson slides, a student building a presentation, a business owner preparing a pitch, or a content creator making training material, the right workflow can make your slides sound polished without requiring a professional studio or a suspiciously expensive microphone shaped like a spaceship.
Can You Record Audio Directly in Google Slides?
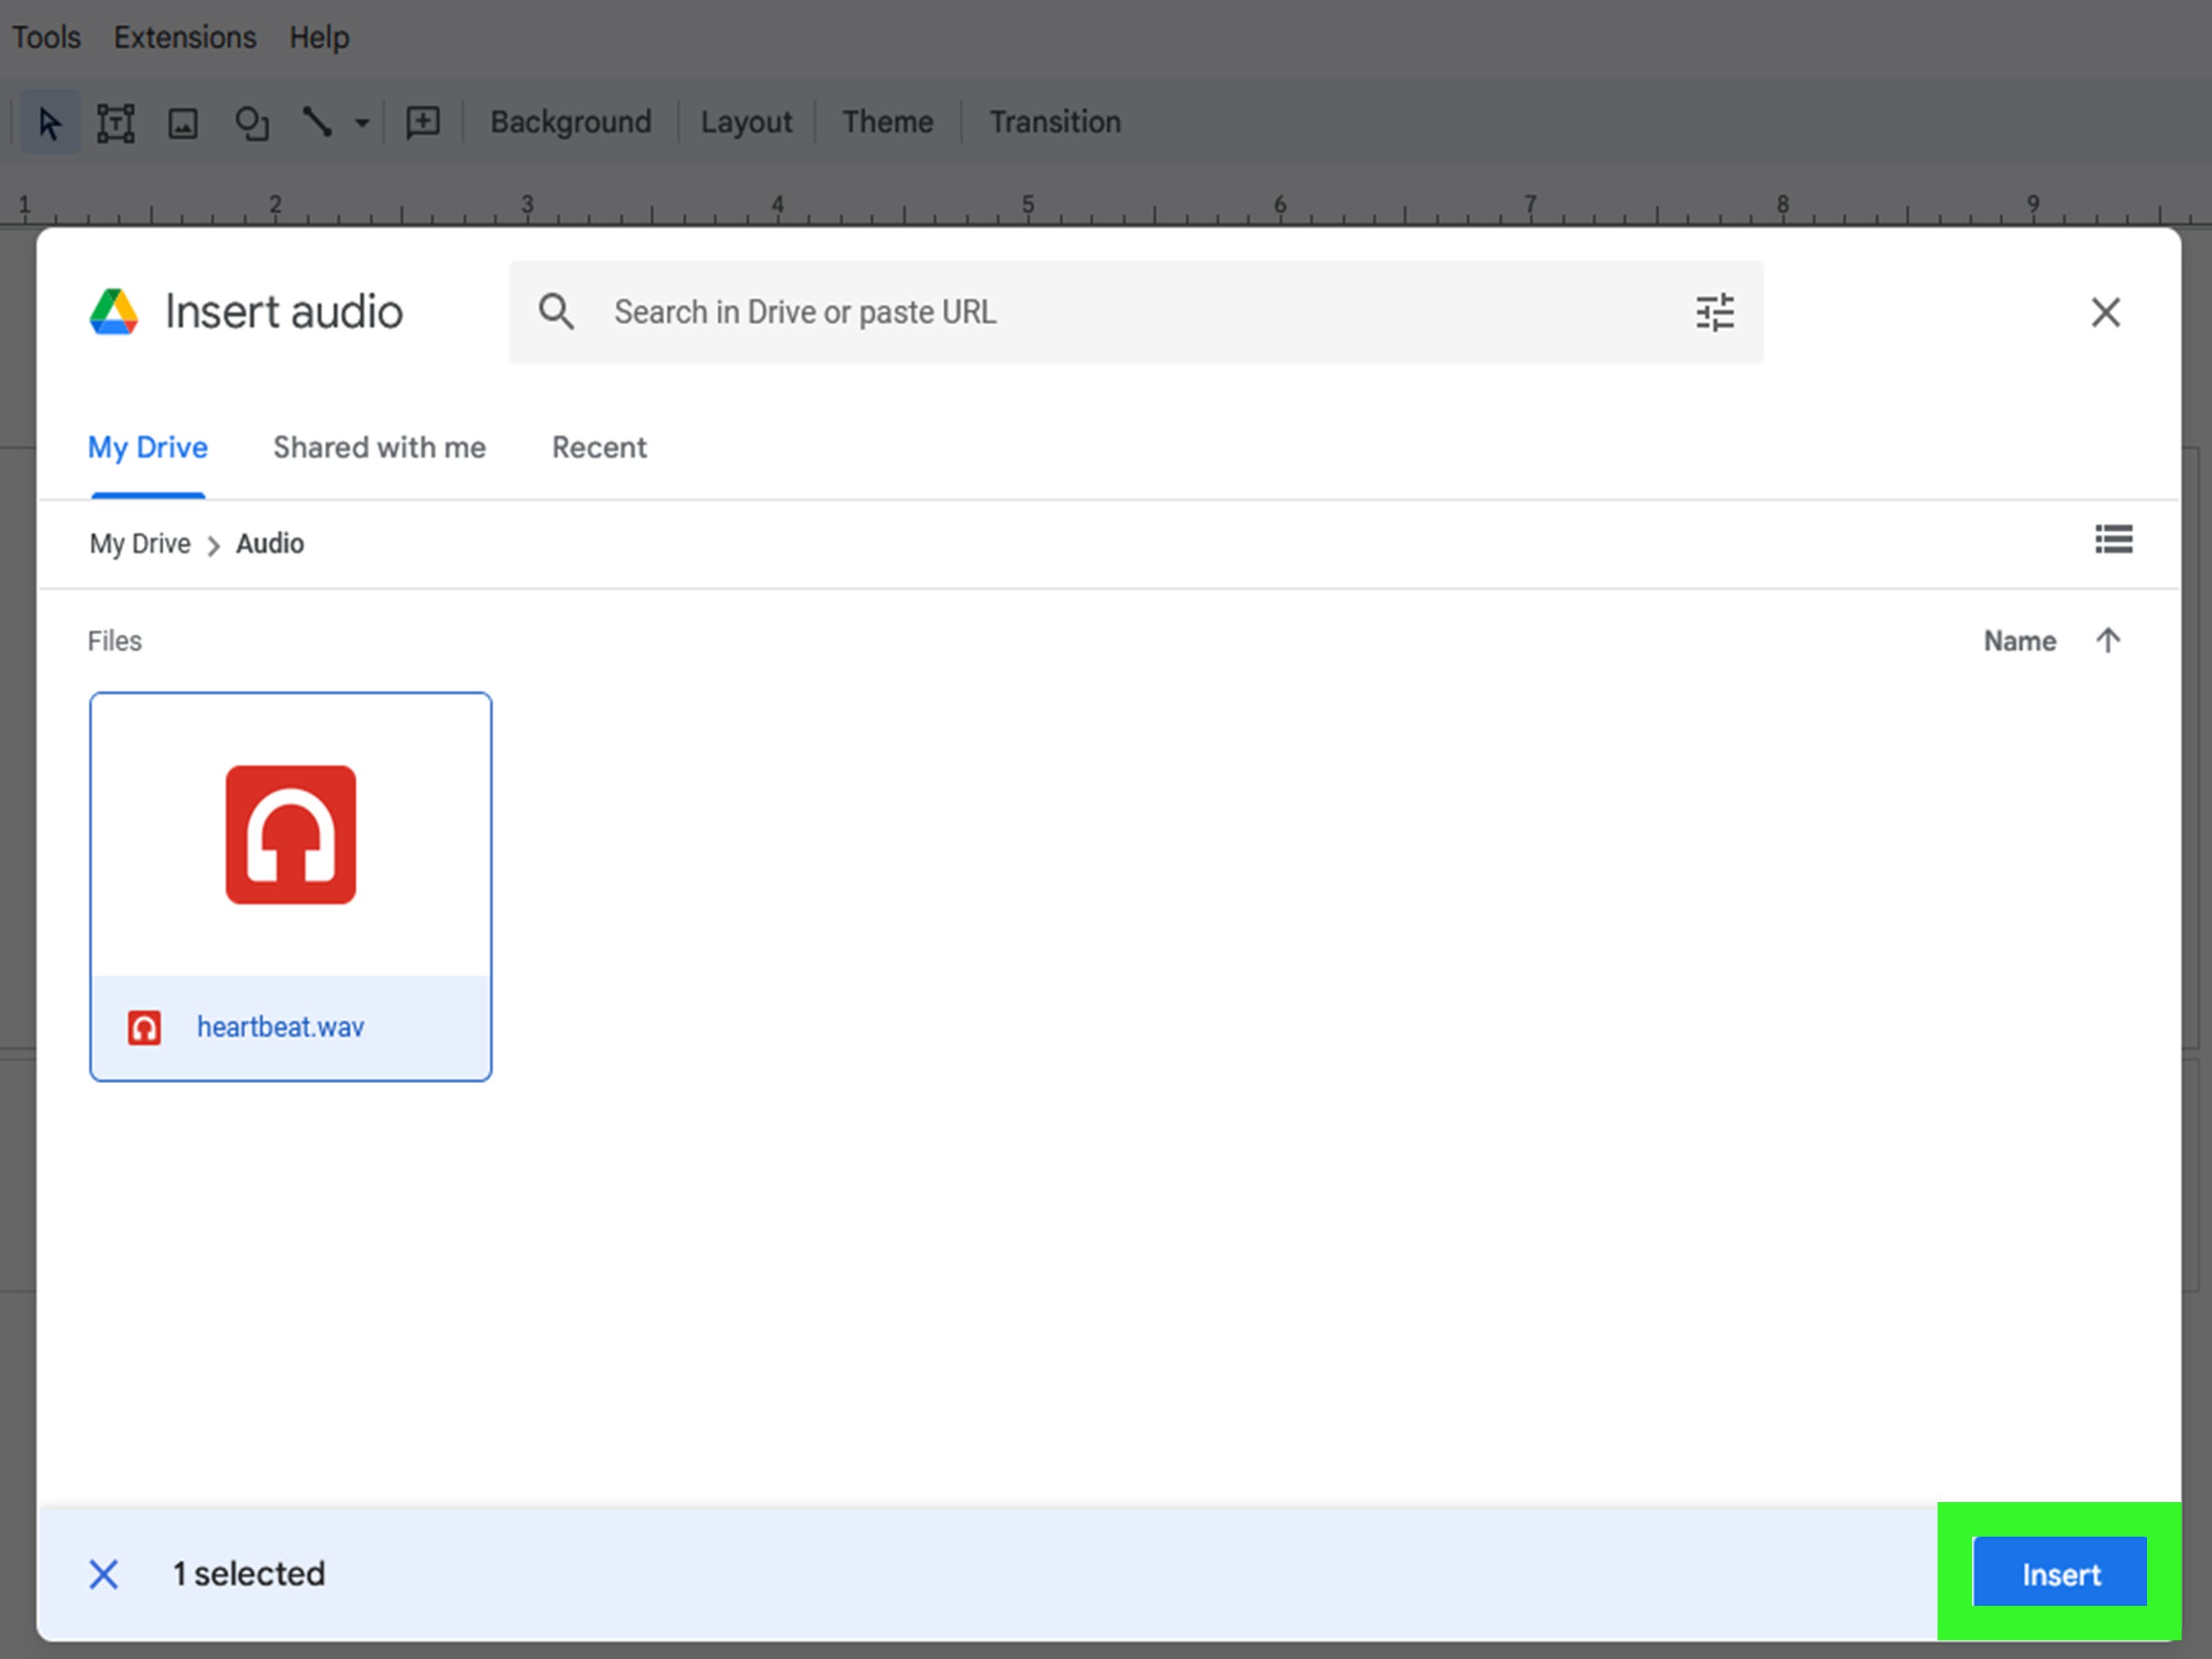
The answer depends on what you mean by “record audio.” Google Slides lets users insert audio files from Google Drive into individual slides. The usual method is to record your voice using a separate app, save the file as a supported audio format, upload it to Google Drive, and then choose Insert > Audio inside Google Slides.
Google Slides also has a presentation recording feature for eligible Google Workspace plans. This feature records your slideshow as a video, can use your microphone and camera, and saves the recording to a Drive folder. That is useful when you want to share a full narrated presentation, but it is different from inserting a small audio clip onto one specific slide.
So, here is the simplest rule: if you want audio attached to a slide, record an audio file first and insert it from Drive. If you want a full narrated presentation video, use the Slides recording feature if your account supports it, or use a screen recording tool such as Loom.
How to Add Recorded Audio to Google Slides
Step 1: Record Your Audio
Use one of the five recording tools listed below. For the cleanest Google Slides experience, export or save your recording as an MP3 or WAV file whenever possible. MP3 is smaller and easier to manage. WAV is larger but often higher quality. For spoken narration, MP3 is usually more than enough unless your presentation is secretly auditioning for a documentary soundtrack.
Step 2: Upload the Audio File to Google Drive
Open Google Drive, click New, choose File upload, and upload your audio file. Give the file a clear name such as “Slide 3 Product Demo Narration.mp3” instead of “audio-final-final-reallyfinal-v7.mp3.” Future you deserves kindness.
Step 3: Insert the Audio in Google Slides
Open your Google Slides presentation, select the slide where the audio belongs, click Insert, then choose Audio. Select the file from Google Drive. Google Slides will place a small speaker icon on the slide.
Step 4: Adjust Playback Settings
After inserting the audio, use the formatting sidebar to control how it plays. You can usually choose whether audio starts on click or automatically, adjust volume, hide the speaker icon while presenting, loop audio, or stop playback when the slide changes. These settings matter. A dramatic intro song that follows you through all 18 slides may feel less “cinematic” and more “haunted elevator.”
5 Best Recording Tools for Google Slides Audio
1. Google Slides Built-In Recording
Best for: recording a full narrated slideshow video.
Google Slides’ built-in recording feature is useful when you want to record yourself presenting the entire deck. Instead of creating separate audio files for each slide, you present your slideshow, record your narration, and save the result to Google Drive. This is especially helpful for remote lessons, training modules, internal company updates, and asynchronous presentations.
The main advantage is convenience. You do not need to stitch audio clips together or manually insert narration slide by slide. You can record the presentation in context, which makes pacing feel natural. You can also use an external microphone if your computer recognizes it. For presenters who want a complete video-style result, this is one of the cleanest options.
The limitation is availability. Slides recording is tied to certain Google Workspace plans, so not every personal Google account will see the same recording option. Also, this feature creates a video recording rather than a small audio clip embedded into a slide. If your goal is to add a 15-second voice note to slide five, a separate audio recorder may be easier.
Example use: A teacher records a 10-minute lesson explaining a science diagram. Instead of adding separate audio to each slide, the teacher records the full deck once and shares the video with students through Google Drive or Classroom.
2. Audacity
Best for: high-quality voiceovers, editing, noise reduction, and precise audio control.
Audacity is a free, open-source audio editor that works well for Google Slides narration because it gives you control over recording and editing. You can record your voice, cut mistakes, remove long pauses, adjust volume, reduce background noise, and export the finished file. It is a strong choice for educators, podcasters, trainers, and anyone who wants the final narration to sound cleaner than a quick phone recording.
Audacity has more buttons than a microwave from the future, so beginners may need a few minutes to get comfortable. But the basic workflow is simple: choose your microphone, press record, speak clearly, stop recording, trim the rough edges, and export the audio. For Google Slides, MP3 is a practical export choice because it keeps file sizes manageable.
One of Audacity’s biggest strengths is editing. If you stumble over a word, cough, or accidentally say “next slide” while still on the previous slide, you can fix the recording instead of starting over. This makes Audacity ideal for longer narrations or polished business presentations.
Example use: A marketing manager records a two-minute product pitch, removes background hum, normalizes the volume, exports the file as MP3, uploads it to Drive, and inserts it on the opening slide.
3. Windows Sound Recorder
Best for: quick voice recordings on Windows without installing extra software.
Windows Sound Recorder is a convenient option for anyone using a Windows PC. It is designed for simple audio capture and can run side by side with other apps, which means you can keep your Google Slides speaker notes open while recording. That is perfect for short narrations, student presentations, meeting summaries, and quick slide explanations.
The biggest benefit is simplicity. Open the app, choose your microphone if needed, press record, speak, stop, and save. You do not have to learn a full audio editing suite. For many users, that is exactly the point. Not every presentation needs studio-level production. Sometimes you just need a clear voice explaining why the quarterly numbers look like they went on a roller coaster.
However, basic recorders usually offer fewer editing features. If you need to remove background noise or combine multiple clips, Audacity or another editor may be better. Still, for fast narration, Windows Sound Recorder is one of the easiest tools available.
Example use: A student records a 30-second explanation for each history slide, saves each clip with a slide number, uploads the files to Drive, and inserts them into the correct slides.
4. Apple Voice Memos or QuickTime Player
Best for: Mac, iPhone, and iPad users who want fast, clean recordings.
Apple users have two excellent built-in options: Voice Memos and QuickTime Player. Voice Memos is great for quick narration on a Mac, iPhone, iPad, or Apple Watch. It can use the built-in microphone, supported headsets, or external microphones. Recordings can sync across Apple devices when the same Apple account is used, which is handy if you record on your phone and finish the presentation on your Mac.
QuickTime Player is another useful Mac option for audio-only recording. It lets you choose a microphone and quality setting, then save the recording to your chosen location. QuickTime is especially convenient if you want a simple file saved directly on your Mac before uploading it to Google Drive.
The main thing to remember is file format. Apple recordings may save in formats such as M4A, depending on the app and settings. Google Slides workflows are usually smoother with MP3 or WAV, so you may need to convert the file before inserting it. Many audio converters can do this, and Audacity can also help if you want to edit and export in a Slides-friendly format.
Example use: A teacher records vocabulary pronunciation clips on an iPhone using Voice Memos, transfers them to Google Drive, converts them if needed, and inserts one pronunciation clip per slide.
5. Loom
Best for: recording your screen, microphone, camera, and full presentation walkthroughs.
Loom is popular because it records more than audio. It can capture your screen, voice, camera bubble, or a combination of these. For Google Slides, Loom is useful when you want to explain the whole presentation while viewers see exactly where you click, pause, or point. It is less about embedding audio inside a slide and more about creating a narrated presentation video.
Loom works on Mac, Windows, Chrome, iOS, and Android, depending on the version you use. It also makes sharing easy because videos can be shared with a link. That is useful for business updates, classroom feedback, software tutorials, and client presentations where the speaker’s walkthrough matters as much as the slides themselves.
There are a few practical considerations. If you need system audio, tab audio, or meeting audio, check the correct recording settings before you start. Also, if you only need a short audio clip for one slide, Loom may be more than you need. But for presentation explainers, it is a friendly and efficient tool.
Example use: A startup founder records a Google Slides pitch deck with voice narration and webcam turned on, then sends the Loom link to investors who could not attend the live meeting.
Which Recording Tool Should You Choose?
The best tool depends on your goal. If you want a complete narrated presentation, use Google Slides recording or Loom. If you want polished audio clips inserted into individual slides, use Audacity. If you want the fastest possible recording on your computer, use Windows Sound Recorder or Apple Voice Memos. If you are recording on a Mac and want control over microphone and quality settings, QuickTime Player is a strong option.
For most beginners, the easiest workflow is this: record with your computer’s built-in recorder, save the file, upload it to Drive, and insert it into Google Slides. For more professional results, record and edit in Audacity first. For full presentation walkthroughs, use Slides recording or Loom.
Best Practices for Recording Audio for Google Slides
Write a Short Script First
You do not need to write a Hollywood screenplay. A few bullet points are enough. A script helps you avoid rambling, repeating yourself, or ending every slide with “so yeah.” Keep sentences short and conversational. Audio for slides should guide the viewer, not wrestle them into a lecture marathon.
Record in a Quiet Space
Background noise is the villain of slide narration. Close windows, silence notifications, turn off loud fans, and avoid recording near barking dogs unless your presentation is about barking dogs. Soft furniture, curtains, and rugs can reduce echo. If your room sounds like an empty gymnasium, move closer to the microphone and lower your speaking volume slightly.
Use an External Microphone When Possible
Your laptop microphone can work, but an external USB microphone or headset often sounds clearer. You do not need an expensive setup. Even a basic headset can reduce room noise and keep your voice consistent. Place the microphone a few inches from your mouth and slightly off to the side to avoid popping sounds.
Keep Audio Clips Short
For individual slides, shorter is usually better. Aim for 20 to 60 seconds per slide unless the topic needs more explanation. Long audio clips can make a slide feel frozen. If you have a lot to say, consider splitting the content across multiple slides or recording the whole presentation as a video.
Name Files Clearly
Use names such as “Slide 01 Introduction.mp3,” “Slide 02 Problem Overview.mp3,” and “Slide 03 Solution.mp3.” This simple habit prevents chaos when you insert files from Drive. Nothing drains motivation faster than opening a folder full of mystery recordings named “untitled,” “new recording,” and “pleasework.”
Common Problems and How to Fix Them
The Audio File Does Not Appear in Google Slides
First, confirm the file is uploaded to Google Drive. Then check the format. MP3 and WAV are usually the safest choices for Google Slides audio. If the file was recorded as M4A or another format, convert it to MP3 before uploading. Also make sure you are signed into the same Google account that owns or has access to the file.
Viewers Cannot Play the Audio
This is often a sharing-permission issue. If the slide deck is shared but the audio file in Drive is private, viewers may see the slide but not hear the sound. Open the audio file in Drive, check sharing settings, and make sure the intended audience has access. For school or company accounts, domain restrictions may also affect playback.
The Audio Is Too Quiet
Record closer to the microphone and check your input level before recording. In editing tools like Audacity, you can amplify or normalize the audio. Avoid boosting volume too aggressively, because that can create distortion. Clear and slightly quiet is better than loud and crunchy.
Autoplay Does Not Work as Expected
Autoplay can behave differently depending on browser settings, presentation mode, account permissions, and how the file is inserted. If autoplay is essential, test the presentation in the same environment your audience will use. When in doubt, use “start on click” and design the slide so the presenter knows when to trigger the audio.
SEO-Friendly Summary: The Smartest Way to Record Audio on Google Slides
To record audio on Google Slides, start by choosing the right recording tool for your purpose. Use Audacity for polished voiceovers, Windows Sound Recorder for quick PC narration, Apple Voice Memos or QuickTime Player for Mac and iPhone workflows, Loom for screen-and-voice walkthroughs, and Google Slides recording for full presentation videos when available. Then upload your audio file to Google Drive, insert it into your deck, adjust playback settings, and test everything before sharing.
The process is not difficult once you understand that Google Slides is usually the place where audio is inserted, not where simple per-slide audio is recorded. Think of Google Slides as the stage, and your recording tool as the microphone backstage. When they work together, your presentation becomes more engaging, more accessible, and much easier to follow.
Real Experience: What Actually Works When Recording Audio for Google Slides
After working with narrated presentations, lesson decks, client explainers, and student-style slide projects, one thing becomes obvious: the tool matters, but the workflow matters more. Many people start by searching for a hidden “record audio” button inside Google Slides, then spend 20 minutes clicking menus like they are trying to unlock a secret level. The smoother approach is to separate the job into two parts: record first, insert second.
For short educational slides, recording one audio file per slide often works best. This gives viewers control. They can replay the explanation for slide three without scrubbing through an entire video. It also helps the creator fix mistakes quickly. If the narration for one slide is wrong, only that one file needs to be re-recorded. This is much less painful than redoing a full 15-minute presentation because someone coughed during minute fourteen.
For business presentations, however, a full video recording can feel more professional. Tools like Loom or Google Slides recording are useful when tone, pacing, facial expression, and screen movement add context. A sales pitch, project update, onboarding walkthrough, or remote training session often benefits from a full narrated video. Viewers can watch it as if they attended the presentation live, minus the awkward “Can everyone see my screen?” opening ritual.
One practical lesson is to test audio permissions before sharing. This is the mistake that catches even experienced users. The slide deck may be public, but the audio file may still be locked inside Google Drive. When that happens, the presenter hears everything perfectly, while the audience hears silence and begins questioning their speakers, internet connection, and possibly life choices. The fix is simple: check Drive sharing settings for every inserted audio file.
Another experience-based tip is to record in small batches. Do not record 30 slide narrations in one exhausted session unless you enjoy sounding like a sleepy GPS by the end. Record five to seven slides, take a short break, drink water, and continue. Your voice will stay more consistent, and editing will be easier.
It also helps to create a “recording folder” in Google Drive before starting. Store all audio files for one presentation in that folder. This keeps the project organized and makes permission management easier. If the deck is for a class, client, or team, share the folder with the same audience as the Slides file. Organization is not glamorous, but neither is hunting for “Recording 12” at 1:00 a.m.
Finally, do not chase perfection. Clear, helpful audio beats overproduced audio almost every time. A friendly voice explaining the slide naturally is more valuable than a flawless recording that sounds stiff. Smile while speaking, keep your script nearby, and imagine explaining the topic to one real person. That small mindset shift makes the narration warmer, more confident, and easier to listen to.
Conclusion
Recording audio for Google Slides is not complicated once you choose the right tool and follow a reliable process. Google Slides can insert audio from Drive, while tools like Audacity, Windows Sound Recorder, Apple Voice Memos, QuickTime Player, Loom, and Slides recording help you create the narration. The best choice depends on whether you need a quick voice note, polished audio clips, or a complete presentation video.
For the best results, keep recordings short, use clear file names, check sharing permissions, test playback, and record in a quiet space. Your slides do not need blockbuster-level sound design. They just need audio that is clear, useful, and easy for viewers to play. Do that, and your Google Slides presentation will instantly feel more personal, professional, and engaging.