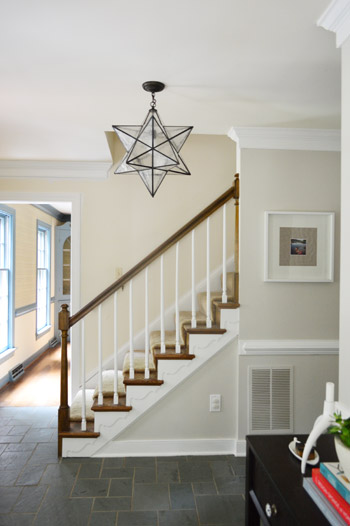
Painting stair balusters white is one of those home projects that looks small until you meet the 47 tiny curves, corners, grooves, and mysterious dust pockets living on each spindle. But the payoff is huge. A fresh coat of white paint can make a staircase feel cleaner, brighter, and more updated without ripping out a single board or apologizing to your bank account.
Whether your balusters are stained oak, outdated honey wood, chipped builder-grade trim, or already painted but looking tired, this guide walks you through how to paint stair balusters white the right way: prep, primer, paint, drying time, touch-ups, and all the little “why is there paint on my elbow?” moments in between.
Why Paint Stair Balusters White?
White stair balusters are popular because they work with almost every interior style. They can soften a dark handrail, brighten a narrow entryway, and make a staircase look more architectural instead of simply “the thing we climb while carrying laundry.” White also pairs beautifully with black railings, natural wood treads, painted risers, farmhouse trim, coastal interiors, traditional foyers, and modern minimalist spaces.
The best part is that painting staircase spindles is usually far less expensive than replacing them. New balusters can be beautiful, but if your existing ones are structurally sound, paint can deliver a dramatic stair railing makeover for the cost of supplies and a weekend of patient brushwork.
Before You Start: Safety, Surface, and Sanity Checks
Check for lead paint in older homes
If your home was built before 1978, do not start sanding old painted balusters until you know whether lead-based paint may be present. Disturbing old paint can create hazardous dust. Use a lead test kit, consult local safety rules, or hire an EPA lead-safe certified professional if needed. This is not the fun part of the project, but it is the part that keeps your home safe.
Decide whether the balusters are wood, metal, or composite
Most interior stair balusters are wood, but some homes have metal or composite spindles. Wood usually needs cleaning, scuff sanding, primer, and trim enamel. Metal may require a bonding or metal primer. Composite or factory-primed balusters may need only a light sanding and a compatible paint. When in doubt, test a small hidden area before committing to the whole staircase.
Plan for drying time
Balusters are high-touch, high-traffic features. People grab them, brush against them, and occasionally use them as emotional support while carrying a vacuum upstairs. Give primer and paint enough time to dry between coats, and avoid heavy contact until the finish has cured. Dry paint and cured paint are not the same thing; cured paint is tougher, less sticky, and less likely to chip.
Tools and Supplies You Will Need
- Painter’s tape
- Drop cloths or rosin paper
- Mild dish soap or degreasing cleaner
- Microfiber cloths or lint-free rags
- 120- to 150-grit sanding sponge
- 220-grit sanding sponge for smoothing
- Tack cloth or damp cloth for dust removal
- Wood filler or paintable caulk, if needed
- Stain-blocking primer or bonding primer
- High-quality white trim paint, preferably satin or semi-gloss enamel
- 1-inch or 1.5-inch angled sash brush
- Small artist brush for tight details
- Small foam roller or foam brush, optional
- Disposable gloves
Do not buy the cheapest brush in the bin unless your design plan includes bristles fossilized into the finish. A good angled brush gives you control around tiny curves and helps reduce visible brush marks.
Step-by-Step: How To Paint Your Stair Balusters White
Step 1: Protect the stairs, wall, handrail, and floor
Start by covering the stair treads, risers, landing, and nearby flooring. Use painter’s tape where the balusters meet the handrail and base rail. If the handrail is stained wood and you want to keep it that way, tape carefully and press the tape edge down with a plastic putty knife or clean finger.
Balusters have a talent for hiding paint drips until they appear later in the exact spot guests will notice. Protection saves time, flooring, and your relationship with future you.
Step 2: Clean every baluster
Stair railings collect hand oils, dust, pet hair, furniture polish, and the general atmosphere of daily life. Paint does not bond well to grime, so wash each baluster with mild soap and warm water or a suitable degreasing cleaner. Wipe with a clean damp cloth afterward and let everything dry completely.
This step feels boring. Do it anyway. Skipping cleaning is how you end up with paint that scratches off like lottery-ticket coating.
Step 3: Fill dents, cracks, and gaps
Inspect the balusters closely. Fill nail holes, dents, or deep scratches with wood filler. Use paintable caulk only where small gaps meet rails or trim, not as a substitute for repairing damaged wood. Let filler dry, then sand it smooth.
If your staircase has decorative turned balusters, do not overfill the carved details. Keep the original profile crisp so the finished white paint highlights the shape instead of making everything look like it was dipped in frosting.
Step 4: Scuff sand the surface
Use 120- to 150-grit sandpaper or a sanding sponge to dull the existing finish. You are not trying to remove every bit of stain or old paint. The goal is to create a slightly rough surface so primer can grip. For glossy varnished wood, this step is especially important.
After scuff sanding, use 220-grit sandpaper for a smoother feel if needed. Then remove every trace of dust with a tack cloth, vacuum brush attachment, or damp lint-free cloth. Dust left behind will show up in white paint like pepper in mashed potatoes.
Step 5: Choose the right primer
Primer is the peace treaty between the old surface and the new white finish. If your balusters are stained wood, use a stain-blocking primer to reduce tannin bleed-through. If the existing finish is glossy or questionable, use a bonding primer. If the balusters are bare wood, primer helps create an even base and improves paint adhesion.
White paint over dark wood often needs more help than you expect. A good primer can reduce the number of paint coats and prevent yellowish stains from sneaking through later like tiny ghosts of oak past.
Step 6: Prime with a small angled brush
Apply primer in thin, even coats. Work from the top of each baluster down, brushing with the grain where possible. On turned spindles, rotate your brush angle as you go around curves and grooves. Use an artist brush for the tight spots where balusters meet the rail.
Avoid loading the brush with too much primer. Thick coats drip, sag, and take longer to dry. Two thin coats are usually better than one heroic blob coat. Let the primer dry according to the label before lightly sanding any rough spots.
Step 7: Apply the first coat of white trim paint
For stair balusters, choose a durable interior trim paint. Satin, semi-gloss, or gloss finishes are easier to clean than flat wall paint and usually hold up better on trim. A waterborne alkyd or cabinet-and-trim enamel can be a smart choice because it levels nicely and dries to a harder finish than basic wall paint.
Use a small angled brush and apply thin coats. Brush in the same direction whenever possible. On square balusters, you can paint one side, then move to the next. On round or turned balusters, work in small sections and watch for drips hiding underneath curves.
Step 8: Lightly sand between coats
Once the first coat is fully dry, inspect the surface. If you feel bumps, raised grain, or brush texture, lightly sand with 220-grit sandpaper. Wipe away dust before the next coat. This step is what separates “I painted it” from “Wait, did you hire someone?”
Step 9: Add the second coat
Apply a second thin coat of white paint. Most stair balusters need at least two coats after primer, especially when covering dark wood or old color. If you still see shadows, streaks, or uneven sheen, add a third coat after proper drying time.
Do not panic if the first coat looks terrible. First coats are dramatic. They lie. The second coat is where the staircase starts acting like it has a trust fund.
Step 10: Remove tape carefully and touch up
Remove painter’s tape before the paint fully hardens, or score the edge lightly with a utility knife if the paint has dried. Pull tape slowly at an angle. Then inspect the handrail, base rail, and stair treads for tiny smudges. Touch up with a detail brush.
Let the finish cure before scrubbing, leaning furniture against it, or allowing backpacks, pets, and small humans to test its durability with Olympic-level enthusiasm.
Best Paint Finish for White Stair Balusters
The best paint for stair balusters is usually a durable trim enamel in satin or semi-gloss. Satin gives a softer, modern look and hides minor imperfections better. Semi-gloss reflects more light, feels classic, and is easier to wipe clean. Gloss can look beautiful in formal homes, but it shows surface flaws more clearly.
Avoid flat wall paint on balusters. It may look nice for a week, but stairs are working architecture. They need a finish that can handle fingerprints, dusting, cleaning, and the occasional runaway laundry basket.
Choosing the Right Shade of White
Not all white paint is the same. Some whites are cool and crisp, while others are warm and creamy. If your walls are gray, blue, or bright white, a cooler white may look clean. If your home has beige walls, warm wood floors, or traditional decor, a softer warm white may feel more natural.
Before painting every baluster, test your white paint near the handrail, stair tread, wall color, and flooring. White changes throughout the day. Morning light, evening shadows, and warm bulbs can make the same paint look fresh, yellow, blue, or surprisingly bossy.
Common Mistakes To Avoid
Skipping prep work
Paint failure usually starts before the paint can is even opened. Dirty, glossy, or dusty balusters will not hold paint well. Clean, sand, and prime if you want a finish that lasts.
Using too much paint
Balusters are narrow and detailed, so excess paint creates drips fast. Load the brush lightly, spread the paint thinly, and check the underside of each curve before moving on.
Rushing the drying time
Touch-dry paint can still be soft underneath. If you paint the next coat too soon, the finish can drag, wrinkle, or stay tacky. Follow the product label for recoat time.
Forgetting the viewing angle
Stair balusters are seen from above, below, and sideways. After each coat, walk up and down the stairs and look from different angles. You will spot missed strips that were invisible from your original position.
How Long Does It Take To Paint Stair Balusters White?
For an average staircase, expect this project to take two to three days of working time when you include cleaning, sanding, priming, two coats of paint, and drying time. The actual brushing may only take a few hours per coat, but the waiting is part of the job.
If you have many ornate balusters, add extra time. Decorative spindles are beautiful, but they behave like tiny architectural mazes. Put on music, work in sections, and accept that patience is one of the supplies.
Should You Paint the Handrail Too?
Many homeowners paint the balusters white and leave the handrail stained wood for contrast. This combination looks timeless and hides wear better on the handrail. Another popular option is white balusters with a black handrail for a crisp, modern farmhouse or transitional look.
If your handrail is damaged, orange-toned, or mismatched with your floors, painting it can create a full stair railing makeover. Just remember that handrails get touched constantly, so they need excellent prep, a tough finish, and enough curing time before daily use.
Cleaning and Maintaining White Balusters
White balusters are not hard to maintain, but they do show dust and smudges sooner than stained wood. Use a microfiber cloth for routine dusting. For fingerprints, wipe gently with a damp cloth and mild soap. Avoid harsh cleaners until the paint has fully cured.
Keep a small labeled jar of leftover paint for touch-ups. Staircases live in busy zones, so a chip here or there is normal. A five-minute touch-up once in a while keeps the whole staircase looking freshly finished.
Real-World Experience: What Painting Balusters Actually Feels Like
The most honest thing to say about painting stair balusters white is this: it is not technically hard, but it does test your patience in a very personal way. The first few balusters feel exciting. You clean them, sand them, prime them, and think, “Look at me, improving property value with a brush.” By baluster number twelve, you start negotiating with the staircase. By number twenty, you understand why professional painters own knee pads and quiet personalities.
One practical experience-based lesson is to work in zones instead of trying to conquer the entire staircase at once. For example, tape and prep the lower half first, then prime those balusters before moving to the upper section. This keeps the project from swallowing the whole foyer and gives you visible progress. A staircase full of half-painted spindles can make a home feel chaotic, but a finished section gives you motivation to keep going.
Another lesson is that lighting matters more than expected. White paint can hide missed spots when the room is dim, then reveal them the next morning like it has been keeping secrets. A portable work light helps you see the underside of curves, the back edge of square balusters, and the tiny line where the spindle meets the base rail. Checking from both upstairs and downstairs is also important because stair parts are visible from strange angles.
The biggest mistake many DIY painters make is rushing the second coat. When the first coat looks streaky, the natural instinct is to fix it immediately. Resist. Let the first coat dry properly, sand lightly if needed, then apply the next coat. The finish will look smoother, brighter, and more professional. Thin coats may feel slower, but they prevent drips that require sanding and repainting later.
Brush choice also changes the experience. A small angled brush gives control, while a tiny artist brush saves your sanity around joints and grooves. A foam roller can speed up flat square balusters, but it can leave awkward buildup near the top and bottom if you are not careful. For turned balusters, a brush is usually easier because it follows the curves.
Finally, the emotional reward is real. Once the tape comes off and the white balusters visually connect with the trim, baseboards, or risers, the staircase suddenly looks intentional. The entry feels brighter. The wood tones look cleaner. Even old stairs can feel updated. It is the kind of project guests may not immediately identify, but they will sense that the house looks fresher. And you will know exactly why, because you personally painted every tiny spindle like a determined hero with primer on your sleeve.
Conclusion
Painting your stair balusters white is one of the best DIY staircase updates for homeowners who want a cleaner, brighter, more polished entry without a full renovation. The secret is not fancy equipment. It is careful cleaning, scuff sanding, the right primer, thin coats of durable trim paint, and enough patience to treat every baluster like it matters.
White stair balusters can modernize dated wood, sharpen a traditional railing, and make your staircase feel connected to the rest of your trim. Take your time, respect the drying process, and do not skip prep. Your future staircase will thank you by looking fresh every time you walk through the door.