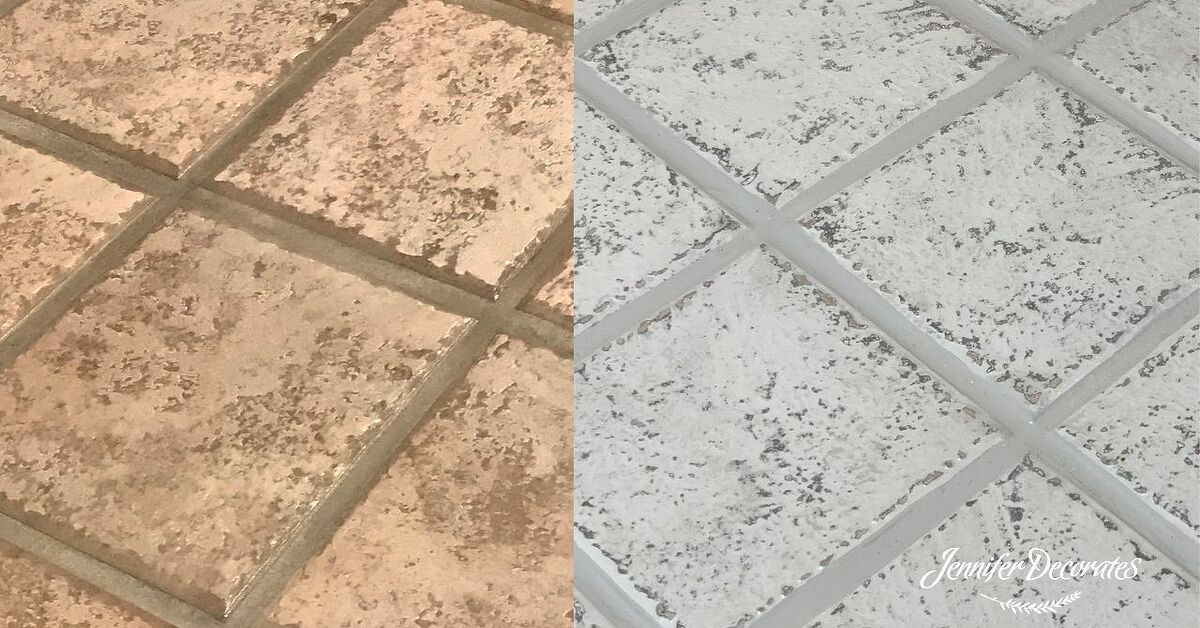
Old stone has a personality problemin the best possible way. It is moody, imperfect, slightly dramatic, and somehow makes a room feel as if it has been quietly judging everyone since 1897. The good news? You do not need to rip out your existing tile or hire a mason with mysterious ancient tools to get that aged limestone, weathered slate, or European cottage-floor look. With the right surface prep, bonding primer, paint layering, and sealing method, you can paint tile to look like old stone DIY-style and give your space a charming, timeworn finish.
This project works especially well on ceramic or porcelain tile in low- to moderate-use areas such as backsplashes, fireplace surrounds, powder rooms, laundry rooms, decorative floor sections, and accent walls. It can also work on floors if you use durable tile paint and a protective topcoat, but painted tile floors need more care than actual stone. Translation: your new “old stone” floor can look like it belongs in a Tuscan villa, but it still does not want to be attacked daily by muddy boots, chair legs, and one very enthusiastic golden retriever.
Below is a practical, beginner-friendly guide to creating a faux old stone tile finish using paint, glaze, sponges, dry brushing, and a little artistic chaos. The goal is not perfection. In fact, perfection is the enemy here. Real old stone is blotchy, uneven, cloudy, chipped-looking, softly veined, and full of tonal variation. That means this is one DIY project where your “oops” moments can become texture. Finally, a craft that appreciates us for who we are.
Can You Really Paint Tile to Look Like Old Stone?
Yes, you can paint tile to look like old stone, but success depends on two things: adhesion and realism. Adhesion comes from cleaning, sanding, priming, and using the right paint. Realism comes from layering multiple soft colors instead of rolling on one flat gray and calling it “castle floor.”
Tile is usually slick and nonporous, especially glazed ceramic and porcelain tile. Regular wall paint does not naturally want to stick to it. For a durable finish, use a bonding primer designed for glossy surfaces and a tile-friendly paint, enamel, epoxy acrylic coating, porch and floor paint, or a specialty tile refinishing product. For floors, durability matters even more, so choose products made for foot traffic and finish with a clear protective topcoat.
The old stone effect is created after the base layer is secure. You will build mottled color using sponging, ragging, stippling, dry brushing, and translucent glaze. Think of it like makeup for tile: primer is skincare, base coat is foundation, glaze is contour, and speckling is the tiny beauty mark that makes everything believable.
Best Tile Areas for a Faux Old Stone Finish
Great Candidates
This DIY faux stone painting technique works beautifully on kitchen backsplashes, bathroom accent walls outside the shower, fireplace tile surrounds, laundry room floors, mudroom tile, entry tile, stair risers, tabletops, and decorative wall tile. These areas let you enjoy the antique stone look without exposing the finish to constant standing water.
Use Caution With Floors
Painting tile floors is possible, but floors are high-contact surfaces. Shoes, furniture, pets, grit, and cleaning products all challenge the finish. If you are painting a floor, plan on extra prep, multiple thin coats, a strong topcoat, rugs in heavy-use zones, and occasional touch-ups.
Avoid Constantly Wet Shower Floors
Shower floors and areas that stay wet are not ideal for a decorative faux stone paint finish. Even high-quality coatings can struggle under constant water, soap, heat, and abrasion. For showers, professional refinishing or replacement is usually the smarter long-term choice.
Supplies You Will Need
Before you begin, gather your materials so you are not running through the house with wet primer on your hands looking for painter’s tape like a character in a renovation sitcom.
- Degreasing cleaner or TSP substitute
- Scrub brush, sponge, and microfiber cloths
- Painter’s tape and plastic drop cloths
- 220- to 240-grit sandpaper or sanding block
- Vacuum or tack cloth
- Bonding primer for glossy tile
- Tile paint, enamel, porch and floor paint, or epoxy acrylic coating
- Paint tray, angled brush, and high-density foam roller
- Sea sponge, cellulose sponge, or lint-free rags
- Acrylic craft paints or sample-size paints in stone colors
- Clear glaze or water-based glazing medium
- Small artist brushes for veining and chips
- Water-based polyurethane or tile-safe clear topcoat
- Knee pads if painting a floor, because your knees have filed a complaint
Choosing Colors for an Old Stone Tile Look
The secret to a convincing old stone effect is using several related colors. Natural stone rarely has one flat shade. It has undertones, mineral marks, cloudy patches, worn edges, darker pits, pale highlights, and soft shadows.
For Aged Limestone
Use warm white, beige, greige, taupe, putty, mushroom, and a tiny touch of charcoal or raw umber. This palette creates a soft European courtyard look.
For Weathered Slate
Use charcoal, blue-gray, pewter, soft black, smoky green, and pale gray. Add light dry brushing to keep the surface from looking too heavy.
For Old Travertine
Use cream, tan, honey beige, warm gray, caramel, and muted brown. Add small pitted marks for realism.
For Rustic Fieldstone
Use gray, brown, clay, moss, sand, off-white, and muted rust. This is the most forgiving style because real fieldstone already looks like nature had several paint samples and no final decision.
Step-by-Step: How to Paint Tile to Look Like Old Stone DIY
Step 1: Clean the Tile Like You Mean It
Paint will not stick well to grease, dust, soap scum, wax, or mystery kitchen film. Scrub the tile with a degreasing cleaner or TSP substitute. Pay special attention to grout lines, corners, and areas near sinks or stoves. Rinse thoroughly with clean water and allow everything to dry completely.
This is not the glamorous part, but it is the part that keeps your project from peeling like a sunburned tomato. If the tile still feels slick or oily after cleaning, clean it again. The surface should feel dry, dull, and residue-free.
Step 2: Repair Chips, Cracks, and Grout Problems
Old stone looks charming when it has visual texture, but structural damage under paint is not charming. It is future regret wearing a tiny hat. Repair cracked grout, loose caulk, or chipped tile before priming. Use paintable caulk or a suitable patching compound for small chips. Let repairs cure fully according to the product directions.
If grout is crumbling or missing in large areas, regrout before painting. Painting over failing grout will not magically stabilize it. It will simply make the failure more color-coordinated.
Step 3: Sand the Tile Lightly
Use 220- to 240-grit sandpaper to scuff the glossy surface. You are not trying to grind the tile into dust; you are creating tiny scratches so the primer has something to grip. Sand evenly, wipe away dust with a damp cloth, and vacuum if you are working on a floor.
Wear a dust mask and eye protection while sanding. If the tile or old coatings may contain hazardous materials, stop and investigate before disturbing the surface.
Step 4: Tape and Protect Surrounding Areas
Use painter’s tape along walls, cabinets, trim, fixtures, outlets, and any surface you do not want decorated with “accidental medieval stone.” Cover counters, floors, appliances, and nearby furniture with drop cloths. Good taping makes the finished project look intentional rather than emotionally spontaneous.
Step 5: Apply Bonding Primer
Apply a thin, even coat of bonding primer using a foam roller for broad areas and an angled brush for edges and grout lines. Do not overload the roller. Thick primer can dry unevenly and create ridges that show through the finish.
Let the primer dry according to the manufacturer’s directions. Some products need several hours before recoating, while others require longer. For slick tile, a second thin coat of primer can improve adhesion, especially on floors or high-use backsplashes.
Step 6: Paint the Base Stone Color
Choose a mid-tone base color, not the lightest or darkest shade in your palette. For old limestone, a warm greige base works well. For slate, use medium gray. For travertine, try sandy beige. Roll on a thin coat and let it dry. Apply a second coat if needed for even coverage.
At this stage, your tile may look plain. Do not panic. The base coat is only the quiet opening act. The drama arrives with glazing, sponging, and layering.
Step 7: Create Mottled Stone Texture With a Sponge
Mix a small amount of paint with clear glaze or water-based glazing medium. Start with one shade slightly lighter than your base color. Dip a sea sponge lightly into the mixture, blot most of it off on a paper towel, then dab randomly over the tile.
Rotate your wrist as you work so the pattern does not repeat. Real stone does not have identical sponge stamps marching across it like a tiny army. Keep the color uneven and soft. Step back often to check the overall effect.
Repeat with a darker shade, then a warmer or cooler accent shade. For example, on a limestone look, sponge on pale cream, taupe, and a whisper of charcoal. On slate, layer soft black, pewter, and blue-gray. Let some areas remain lighter and others darker.
Step 8: Add Clouding and Age With Ragging
Ragging softens the sponge pattern and makes the tile look naturally weathered. Mix a thin glaze using a neutral gray-brown or beige. Apply it lightly with a rag in circular or dragging motions, then immediately blot it back. This leaves a cloudy, uneven veil of color.
Focus more glaze near edges, corners, grout lines, and random patches. Old stone darkens where dirt, moisture, and time collect. If the tile starts looking too dark, use a damp rag to lift some glaze while it is still workable.
Step 9: Paint Faux Chips, Pits, and Mineral Marks
Use a small artist brush to add tiny imperfections. A few short lines, dots, crescent shapes, and irregular specks make the finish look more like stone and less like painted tile. Keep these marks subtle. If every tile has seventeen dramatic cracks, your floor may begin to resemble an archaeological emergency.
For pitted travertine, add small tan and brown dots, then soften them with a sponge. For slate, add thin pale gray lines and smoky dark streaks. For limestone, add faint beige veins and chalky highlights.
Step 10: Dry Brush the Edges
Dry brushing creates the look of worn, raised stone edges. Dip a dry brush into a light paint color, wipe almost all of it off, then lightly drag it over tile edges and texture. The brush should barely leave color behind. This technique catches the surface and gives the illusion of age, wear, and dimension.
On square tile, dry brushing each tile edge can help separate the pieces visually and make them look more like individual stone blocks. If your grout lines are painted over, you can also use a narrow brush to darken or lighten them depending on the stone style you want.
Step 11: Adjust Until It Looks Natural
This is the “stand back and squint” phase. Look at the tile from different angles and in different lighting. If the finish looks too flat, add more contrast. If it looks too busy, soften it with a translucent glaze close to the base color. If one tile looks like it is auditioning for attention, calm it down with a sponge and a little base paint.
The best faux stone finishes have variation but still feel unified. Aim for controlled randomness. It should look aged, not attacked.
Step 12: Let the Paint Cure Before Sealing
Dry paint and cured paint are not the same thing. Paint may feel dry to the touch in a few hours, but it can take days or longer to harden fully. Follow the product directions before sealing. Rushing the topcoat can trap moisture, dull the finish, or weaken durability.
Step 13: Seal the Painted Tile
Apply a clear water-based polyurethane, floor sealer, or tile-safe topcoat in thin, even layers. For backsplashes and walls, two coats may be enough. For floors, use three or more light coats, allowing proper dry time between coats. Choose matte or satin for the most realistic old stone effect. High gloss can make the surface look more like plastic than ancient limestone.
A clear coat protects the painted finish from scratches, moisture, stains, and cleaning. It also makes the surface easier to wipe down. Just remember that even sealed painted tile is not indestructible. Treat it kindly, and it will stay pretty longer.
Pro Tips for a More Realistic Old Stone Finish
Use Odd Numbers of Colors
Three to five related colors usually look more natural than two. A base, highlight, shadow, warm accent, and cool accent can create depth without visual clutter.
Keep the Grout Believable
Old stone grout is rarely bright white. Use warm gray, taupe, sand, or charcoal depending on your tile style. If you want a block-stone look, slightly darken the grout lines. If you want a softer aged floor, blend grout and tile tones together.
Make a Sample Board First
Practice on spare tile, cardboard, or a hidden corner before attacking the whole room with artistic confidence. A sample helps you test color, sponge pressure, glaze transparency, and sealer sheen.
Work in Small Sections
Glaze dries quickly. Work a few tiles at a time so you can blend before the paint sets. This keeps the old stone texture soft and natural.
Do Not Make Every Tile Identical
Give each tile a slightly different personality. One can be warmer, one cloudier, one more speckled, one almost plain. Real stone is a family reunion of related but not identical cousins.
Common Mistakes to Avoid
Skipping Primer
Primer is the handshake between tile and paint. Without it, the finish may peel, scratch, or chip prematurely. Use a bonding primer made for glossy or difficult surfaces.
Using Wall Paint Alone
Standard wall paint is not tough enough for tile by itself, especially on floors or backsplashes. Use tile paint, enamel, epoxy acrylic coating, or a durable floor paint system.
Applying Thick Coats
Thick paint takes longer to cure and can peel more easily. Thin coats are stronger, smoother, and easier to control.
Choosing Too Much Contrast
Old stone has variation, but it is usually subtle. If your tile looks like camouflage pants from 1998, blend it back with a soft glaze.
Sealing Too Soon
Let paint cure before adding a topcoat. When in doubt, wait longer. Patience is cheaper than redoing the whole floor while muttering things your neighbors should not hear.
How to Care for Painted Tile That Looks Like Old Stone
After the final topcoat cures, clean the tile gently. Use mild soap and water or a pH-neutral cleaner. Avoid abrasive scrubbers, harsh chemicals, bleach-heavy cleaners, and steam mops. On floors, use felt pads under furniture and rugs in high-traffic areas.
If a chip happens, do not panic. Keep a small container of your base color and glaze colors for touch-ups. Lightly sand the damaged spot, dab on matching paint, recreate the texture, and reseal that area. One benefit of a faux old stone finish is that small repairs blend in easily. Real stone is imperfect, so your touch-up does not have to be flawless.
Cost and Time Estimate
A DIY faux old stone tile painting project can often be completed for a fraction of replacement cost. Basic supplies may cost less if you already own brushes, tape, drop cloths, and sandpaper. Specialty primers, tile paints, glaze, and sealer will make up most of the budget.
For timing, expect a small backsplash to take a weekend, including cleaning, priming, painting, decorative layering, and sealing. A floor may take several days because each layer needs drying time and the final surface needs curing time before heavy use. The actual painting is not difficult; waiting is the real villain.
of Real-World Experience: What This Project Feels Like in Practice
Painting tile to look like old stone is one of those DIY projects that starts with confidence, briefly passes through “what have I done,” and ends with you standing barefoot in the room admiring your work like you personally discovered limestone. The first lesson is that prep takes longer than painting. Cleaning grout lines, sanding glossy tile, wiping dust, taping edges, and waiting for primer can feel slow, but those steps are what separate a charming faux stone finish from a flaky craft project with commitment issues.
The second lesson is that your first sponge layer may look terrible. This is normal. A single layer of sponged gray or beige can look fake, spotty, or oddly reptilian. Do not judge the project too early. Faux stone becomes believable through layering. The magic usually appears around the third or fourth color, when the surface stops looking painted and starts looking weathered. It is a little like soup: one ingredient is suspicious, but several together become dinner.
When I have seen this technique work best, the DIYer uses restraint. The temptation is to add more veins, more speckles, more cracks, more drama. But old stone is often quiet. It has movement, but it does not scream. A faint gray wash along the grout, a pale dry-brushed edge, and a few darker mineral dots can do more than heavy black lines everywhere. If you accidentally overdo an area, do not panic. Let it dry, then sponge a bit of base color over it to push it back into the background.
Lighting also changes everything. A tile that looks perfectly aged at night under warm bulbs may look too yellow in morning sunlight. That is why testing colors in the actual room matters. Paint a sample tile or a hidden corner and look at it throughout the day. Old stone colors are usually muted, so when choosing between two shades, the slightly grayer or softer one often looks more realistic.
Another practical experience: foam rollers are your friend for smooth primer and base coats, but sponges and rags create the soul. A roller gives coverage; a sponge gives age. Keep a damp rag nearby at all times. It lets you lift glaze, soften marks, blur edges, and rescue sections that become too bold. That rag will become your tiny emergency department.
For floors, the biggest lesson is to respect cure time. Even if the surface feels dry, avoid dragging furniture or walking on it with shoes too soon. Give it time to harden. Add felt pads under furniture and use rugs where people pivot, such as near sinks or doorways. Painted tile can be durable, but it is not the same as fired ceramic or real stone. Treat it as a decorative finish, not a superhero cape.
The best part of this DIY is that old stone is forgiving. A perfect modern painted finish shows every flaw. A faux aged stone finish welcomes variation. Slight streaks become mineral movement. Uneven blotches become weathering. Tiny chips become character. In a world of high-pressure home projects, this one lets you relax a little. The final result can make basic tile feel warmer, older, softer, and far more customwithout demolition dust, tile saws, or explaining to your family why the bathroom has been missing a floor for three weeks.
Conclusion
Learning how to paint tile to look like old stone DIY-style is a budget-friendly way to transform plain ceramic or porcelain tile into something with texture, history, and charm. The key is not just paintit is preparation, adhesion, layering, and sealing. Clean thoroughly, sand lightly, use a bonding primer, apply a durable base coat, then build stone-like depth with sponge painting, glaze, dry brushing, and subtle imperfections.
This project is ideal for homeowners who want the look of aged limestone, slate, travertine, or rustic fieldstone without the cost and mess of replacement. While painted tile requires gentle care and may need touch-ups over time, it can dramatically refresh backsplashes, fireplace surrounds, powder rooms, laundry areas, and low-traffic floors. Best of all, the old stone look does not demand perfection. It rewards patience, layering, and a little creative bravery. In other words, your tile can finally look ancient without you feeling ancient by the end of the project.
Note: This article is written for web publication in standard American English and is based on practical tile-painting, surface-preparation, primer, coating, and decorative faux-finish guidance from reputable U.S. home improvement and paint resources.