Sony auto-set alarm clocks are wonderfully convenientuntil they are not. One day, your dependable bedside cube says it is 3:17 a.m. when your phone, microwave, laptop, car dashboard, and nervous system all insist it is 7:42. Suddenly, the phrase “auto-set” feels less like a feature and more like a tiny electronic prank.
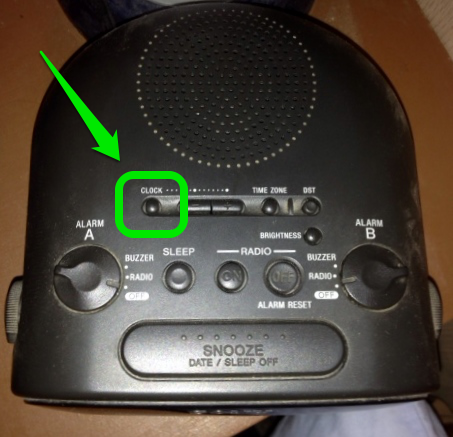
The good news: manually adjusting the time and date on a Sony auto-set alarm clock is usually simple once you know which buttons matter. Depending on your model, you may see labels such as CLOCK, SET TIME/DATE, DISPLAY/CLOCK, TIME ZONE, DST, TIME SET +, TIME SET –, VOL/SET +, or SNOOZE/BRIGHTNESS/ENTER. The names vary, but the logic is nearly always the same: enter clock-setting mode, adjust the flashing value, confirm it, then move to the next value.
This guide explains how to manually set the time and date on common Sony auto-set alarm clock models, including Sony Dream Machine and clock radio units such as the ICF-C1, ICF-C1PJ, ICF-C218, ICF-C318, ICF-C414, and ICF-C717PJ. It also covers daylight saving time, time zone errors, backup battery issues, and what to do when the display refuses to behave like a responsible adult.
Why a Sony Auto-Set Alarm Clock May Need Manual Adjustment
Many Sony auto-set alarm clocks arrive from the factory with the current Eastern time stored internally. A backup battery helps preserve the clock and alarm settings during shipping, storage, and short power interruptions. When everything works perfectly, you plug the clock into the wall, select your time zone, and enjoy the rare luxury of not arguing with a blinking display.
Manual adjustment becomes necessary when the clock is off by several minutes, stuck in the wrong time zone, confused by daylight saving time, or reset after a power interruption. It can also happen if the backup battery is weak, if the clock sat in storage for years, or if you moved from one time zone to another and forgot to tell the poor little box that it no longer lives in New Jersey.
Another common reason is daylight saving time. Most of the United States changes clocks in March and November, and many Sony models include automatic DST adjustment. However, if you live in an area that does not observe daylight saving time, or if the DST setting was turned off, the clock may need manual correction.
Before You Start: Find Your Model and Button Names
Turn the clock around or check the bottom label to find the model number. This matters because Sony reused similar clock-setting patterns across models, but not always the same button labels. A Sony ICF-C1PJ may use SET TIME/DATE and VOL/SET + or –, while an older Dream Machine model may use CLOCK and + or –. A projector model such as the ICF-C717PJ may use DISPLAY/CLOCK with TIME SET + or –.
Common Sony clock-setting button labels
- CLOCK: Often used on older Dream Machine models to enter and confirm clock settings.
- SET TIME/DATE: Common on newer models such as the ICF-C1PJ.
- DISPLAY/CLOCK: Used on some projection clock radios.
- TIME SET + / TIME SET -: Used to increase or decrease year, month, day, hour, or minute.
- VOL/SET + / VOL/SET -: Used on some models for both volume and clock adjustment.
- SNOOZE/BRIGHTNESS/ENTER: Often used as the confirmation button.
- DST: Controls daylight saving time adjustment on many Sony clock radios.
- TIME ZONE or DATE/TIME ZONE: Used to select your geographic time zone.
Quick Answer: How to Manually Adjust the Time and Date
For many Sony auto-set alarm clocks, the basic process is:
- Plug the clock into a working wall outlet.
- Press and hold CLOCK, SET TIME/DATE, or DISPLAY/CLOCK for about two seconds.
- Wait for the year, hour, or another value to flash.
- Use +, –, TIME SET +, TIME SET –, or VOL/SET + or – to adjust the flashing number.
- Press CLOCK, SET TIME/DATE, DISPLAY/CLOCK, or SNOOZE/BRIGHTNESS/ENTER to confirm.
- Repeat the same pattern for the month, day, hour, and minute.
- After the final confirmation, listen for a beep or watch the display return to normal time mode.
If you pause too long during the process, the clock may exit setting mode. That is not a disaster; it is merely the clock’s way of saying, “We had momentum, and you broke it.” Start again from the first step.
How to Set the Time and Date on Sony ICF-C1 and ICF-C1PJ Models
The Sony ICF-C1 and ICF-C1PJ are popular compact auto-set clock radios. The ICF-C1 is the simple cube-style model, while the ICF-C1PJ includes a time projector and nature sounds. Both are designed to make setup easy, but button labels can still feel like a secret handshake.
Manual time setting on Sony ICF-C1PJ
- Make sure the clock is plugged into a wall outlet.
- Press and hold SET TIME/DATE for more than two seconds.
- When the year flashes, press VOL/SET + or VOL/SET – until the correct year appears.
- Press SNOOZE/BRIGHTNESS/ENTER to confirm.
- Repeat the same process for the month, day, hour, and minute.
- After the final setting, the clock should beep and return to the normal display.
On this model, the date matters because the clock uses it for calendar and daylight saving calculations. Do not skip the month and day unless you enjoy being surprised twice a year by a clock that thinks March is still February.
How to show the date or year
On many Sony models with a date display feature, pressing SET TIME/DATE once shows the month and day. Pressing it again shows the year. After a few seconds, the display returns to the current time automatically.
How to switch between 12-hour and 24-hour time
On the ICF-C1PJ, you can switch between the standard 12-hour display and 24-hour time by holding ALARM RESET/OFF and SNOOZE/BRIGHTNESS/ENTER together for about three seconds. In 12-hour mode, midnight appears as AM 12:00. In 24-hour mode, midnight appears as 0:00.
How to Set Older Sony Dream Machine Models
Older Sony Dream Machine models such as the ICF-C218, ICF-C318, and ICF-C414 often use a CLOCK button plus + and – buttons. These models may look more old-school, but the setup process is refreshingly direct.
- Press and hold CLOCK for more than two seconds.
- Wait for the year to flash.
- Press + or – until the correct year appears.
- Press CLOCK to confirm.
- Repeat the process to set the month, day, hour, and minute.
- After the final confirmation, the clock starts counting from zero seconds.
Tip: Holding the + or – button usually scrolls through values faster. This is especially helpful if the year has wandered dramatically into the past, as though your alarm clock has been writing historical fiction.
How to Set the Time on Sony ICF-C717PJ Projection Clock Radio
The Sony ICF-C717PJ uses a slightly different button layout. If your clock has a projector, temperature display, or wider rectangular body, check whether your model uses DISPLAY/CLOCK.
- Plug in the unit.
- Press and hold DISPLAY/CLOCK for at least two seconds.
- When the year flashes, press TIME SET + or TIME SET – to select the correct year.
- Press DISPLAY/CLOCK to confirm.
- Repeat the same steps to set the month, day, hour, and minute.
- After the minute is confirmed, the seconds begin from zero.
Because some rear buttons are small, hold the unit steady while pressing them. Otherwise, the clock may slide across your nightstand like it is trying to escape the responsibility of being accurate.
Set the Correct Time Zone First
If your Sony clock is exactly one, two, or three hours off, the problem is probably not the minute setting. It is likely the time zone. Auto-set Sony clocks are often preset to Eastern time, so users in Central, Mountain, Pacific, Alaska, or Hawaii time must select the correct zone.
Typical Sony time zone numbers
- 1: Atlantic Time
- 2: Eastern Time
- 3: Central Time
- 4: Mountain Time
- 5: Pacific Time
- 6: Yukon or Alaska-style setting on some models
- 7: Hawaiian Time
On some newer models, the time zone appears as UTC-style offsets such as -5:00 for Eastern, -6:00 for Central, -7:00 for Mountain, and -8:00 for Pacific. The exact labels vary, but the goal is the same: tell the clock where it lives.
Daylight Saving Time: The Tiny Button That Causes Big Confusion
In most of the United States, daylight saving time begins at 2:00 a.m. on the second Sunday in March and ends at 2:00 a.m. on the first Sunday in November. Many Sony auto-set models automatically adjust for this schedule. When the DST feature is active, the clock moves forward or backward automatically.
If your clock is one hour wrong, check the DST setting before manually changing every number. On many models, pressing or holding DST turns daylight saving adjustment on or off. Some models display Aut On or Aut OFF to confirm whether automatic daylight saving time is active.
When to turn off automatic DST
Turn off automatic DST if you live in a place that does not observe daylight saving time, such as Hawaii or most of Arizona. You may also need to turn it off if your region follows a different DST schedule than the one programmed into the clock.
Model-specific DST notes
- Some Sony ICF-C1PJ units use the DST button held for more than two seconds to cancel or reactivate automatic DST.
- Some older Dream Machine models use DST held for about three seconds to toggle automatic DST.
- Some projection models use a combination such as DISPLAY/CLOCK plus SNOOZE/BRIGHTNESS to cancel or reactivate automatic DST.
If the exact button combination does not match your clock, check the model number and look for the words DST, TIME ZONE, or DISPLAY/CLOCK. Sony’s naming system is mostly logical, with just enough variation to keep humanity humble.
What to Do If the Clock Will Not Set Correctly
If the time does not advance, the display is frozen, or the buttons seem ignored, try a basic reset before assuming the clock has retired from public service.
- Remove the backup battery if your model uses one and if it is easy to access.
- Unplug the clock from the wall outlet.
- Wait at least 30 seconds.
- Plug the clock back into the wall outlet.
- Reinstall or replace the backup battery if needed.
- Set the time, date, time zone, and DST preference again.
This reset can clear small electronic glitches caused by power interruptions, weak backup batteries, or confused settings. If the display still will not respond, the clock may need service or replacement.
Backup Battery: Small Coin, Big Responsibility
Many Sony auto-set alarm clocks use a CR2032 coin battery to preserve the time and alarm settings during power interruptions. If the battery is weak or dead, the clock may lose time, flash AM 12:00, or forget alarm settings after an outage.
When replacing the backup battery, keep the clock plugged into the wall if your model instructions say to do so. That helps prevent the current date, time, alarm settings, and radio presets from being erased. Always install the battery with the correct polarity, and keep coin batteries away from children and pets. A tiny battery is useful inside a clock and absolutely not useful anywhere else.
Common Mistakes When Setting a Sony Auto-Set Alarm Clock
Mistake 1: Setting the hour but not the date
If the date is wrong, automatic daylight saving time may trigger incorrectly. Always set the year, month, and day when the clock asks for them.
Mistake 2: Confusing alarm time with clock time
Buttons labeled ALARM SET or ALARM TIME SET usually adjust the wake-up alarm, not the current clock time. If your alarm is now set for 4:30 a.m. and your clock is still wrong, this is probably what happened. We have all been there emotionally, if not electronically.
Mistake 3: Ignoring AM and PM
On 12-hour models, check the AM or PM indicator carefully. A clock set to 7:00 p.m. will not wake you at 7:00 a.m., although it may judge you silently.
Mistake 4: Forgetting the time zone after moving
If you moved from Eastern to Pacific time, do not simply subtract three hours manually. Set the correct time zone first, then adjust the date and time only if needed.
Mistake 5: Taking too long between steps
Several Sony models cancel clock-setting mode if no button is pressed for about a minute. Gather your patience, your reading glasses, and your best button-pressing finger before you begin.
Example: Moving a Sony Auto-Set Clock from New York to Los Angeles
Imagine you bought a Sony auto-set clock in New York, packed it in a moving box, and unpacked it in Los Angeles. You plug it in and it proudly displays Eastern time, because emotionally it never left Manhattan.
Here is what to do:
- Find the TIME ZONE or DATE/TIME ZONE button.
- Press and hold it until the time zone value flashes.
- Select Pacific Time, often area number 5 or offset -8:00.
- Confirm the setting.
- Check whether the displayed time is now correct.
- If it is still off by minutes or the date is wrong, enter manual clock-setting mode and correct the year, month, day, hour, and minute.
Once the time zone is right, the clock should behave much better during normal use and daylight saving transitions.
How to Confirm the Clock Is Set Correctly
After setting the time and date, compare the Sony display with a trusted source such as your phone, computer, or another connected device. Then check three things:
- The hour and minute are correct.
- The AM or PM indicator is correct.
- The date and year are correct if your model displays them.
If your clock has a projector, test the projection after setting the clock. Some projector functions will not work properly until the clock has been set. Adjust the focus and rotation only after the time is correct, unless you enjoy projecting the wrong time onto the ceiling with dramatic confidence.
Mini Troubleshooting Guide
The clock is exactly one hour off
Check the DST setting. Automatic daylight saving time may be turned on when it should be off, or off when it should be on.
The clock is several hours off
Check the time zone. The factory default may be Eastern time, and your local time zone may not be selected.
The clock loses settings after unplugging
Replace the CR2032 backup battery if your model uses one. A weak battery can cause the time and alarm settings to disappear after a power interruption.
The buttons do nothing
Unplug the clock for 30 seconds, reconnect it, and try again. Also make sure the alarm is not sounding and snooze is not active, because some models limit certain settings during alarm operation.
The alarm does not sound
Check that the alarm indicator appears on the display, confirm the alarm time, verify AM/PM, and make sure the volume is high enough if using the radio alarm.
Real-Life Experience: Resetting One Without Losing Your Mind
Manually adjusting a Sony auto-set alarm clock feels like one of those household tasks that should take 20 seconds but somehow becomes a small relationship test between you and a plastic rectangle. The first time I reset one, I assumed the word “auto-set” meant I would plug it in, step back, and watch the device gracefully synchronize itself like a tiny NASA control room. Instead, it showed the wrong hour with complete confidence. Confidence, unfortunately, is not the same as accuracy.
The first lesson is to slow down and identify the buttons before pressing everything at random. Random button pressing is tempting, especially when the display starts blinking, but it usually leads to accidentally changing the alarm instead of the clock. Suddenly, the current time is still wrong, but you have created a mysterious 12:00 p.m. buzzer alarm that waits silently for its moment of chaos.
The second lesson is that the date matters more than most people expect. With old digital clocks, setting the hour and minute was enough. With Sony auto-set models, the date helps the clock understand daylight saving time. If the year is wrong, the clock may behave strangely when March or November arrives. It is like giving the clock a bad calendar and then blaming it for missing Thanksgiving.
The third lesson is to watch the AM and PM indicator like a hawk. This is the classic alarm clock trap. You set the time to 6:30, admire your work, and later discover you set it to evening instead of morning. The clock did exactly what you told it to do, which is somehow more irritating than if it had malfunctioned.
The best approach is to treat the process like entering a short passcode. Press and hold the clock-setting button until something flashes. Adjust only the flashing number. Confirm it. Move to the next flashing number. Repeat. Do not rush, but do not wander off to make coffee either, because many models exit setting mode after about a minute. The clock has patience, but only in small consumer-electronics quantities.
Once the time, date, time zone, and DST setting are correct, the clock becomes boring again, which is exactly what an alarm clock should be. A good alarm clock is not supposed to be exciting. It is supposed to sit there, glow politely, wake you when asked, and otherwise stay out of your personal development journey. After you set it once properly, you will probably not need to touch the clock settings again unless you move, replace the backup battery, or suffer a power outage long enough to make every appliance in the kitchen start blinking like a low-budget spaceship.
Conclusion
Manually adjusting the time and date on a Sony auto-set alarm clock is mostly a matter of finding the right button sequence for your model. Newer units may use SET TIME/DATE or DISPLAY/CLOCK, while older Dream Machine clocks often use CLOCK. The process is usually simple: hold the setting button, adjust the flashing value, confirm it, and repeat until the date and time are correct.
For the most reliable result, set the time zone first, confirm daylight saving time settings, replace a weak CR2032 backup battery when needed, and double-check AM/PM before trusting the alarm. Once everything is set, your Sony clock should go back to doing its humble but heroic job: glowing in the dark and making sure you do not sleep through Tuesday.