Making sushi rolls at home sounds like one of those kitchen projects reserved for people with knife skills, perfect countertops, and a calm personality. Good news: you do not need to be a sushi chef, own a restaurant-grade rice cooker, or whisper motivational quotes to your nori sheets. With the right rice, fresh fillings, clean hands, and a little rolling confidence, homemade sushi rolls are completely achievable.
This guide walks you through how to make your own sushi rolls at home, from choosing ingredients to rolling, slicing, serving, and fixing the little disasters that happen when rice decides to glue itself to your soul. Whether you want classic California rolls, veggie sushi rolls, shrimp tempura-style rolls, spicy tuna-inspired cooked alternatives, or simple cucumber maki, the process is friendly, flexible, and surprisingly fun.
What Are Sushi Rolls?
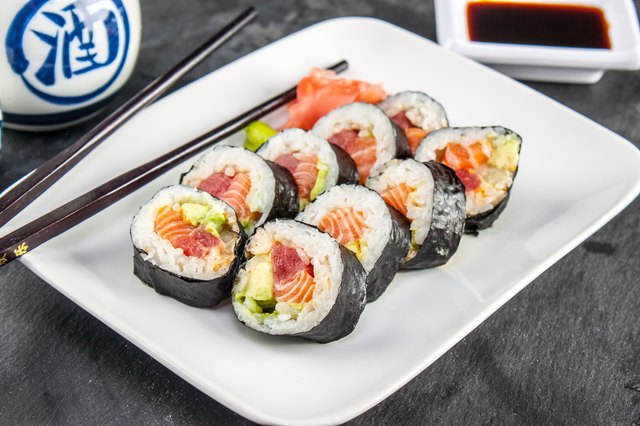
Sushi rolls, often called maki rolls, are made by spreading seasoned sushi rice over a sheet of nori, adding fillings, rolling everything into a tight cylinder, and slicing it into bite-size pieces. The word “sushi” actually refers to the vinegared rice, not necessarily raw fish. That means you can make excellent homemade sushi rolls with cooked shrimp, crab stick, smoked salmon, tofu, egg, avocado, cucumber, carrots, mushrooms, or roasted vegetables.
This is excellent news for beginners. Raw fish requires careful sourcing and handling, but cooked and vegetarian sushi rolls are easier, safer, and still taste restaurant-worthy. Your first roll does not need to be a dramatic tuna masterpiece. In fact, your first roll may look like a burrito that took a yoga class. That is normal. The second one will be better.
Essential Ingredients for Homemade Sushi Rolls
1. Sushi Rice
Short-grain Japanese-style rice is the best choice for homemade sushi because it becomes sticky enough to hold its shape without turning into paste. Avoid long-grain rice, jasmine rice, or basmati rice for sushi rolls. They are delicious in other dishes, but in sushi they behave like rebellious confetti.
For about 4 to 5 rolls, use:
- 2 cups short-grain sushi rice
- 2 cups water, or the amount recommended by your rice cooker
- 1/4 cup rice vinegar
- 2 tablespoons sugar
- 1 teaspoon fine salt
2. Nori Sheets
Nori is roasted seaweed used to wrap sushi rolls. Look for full-size sheets labeled for sushi. Fresh nori should feel crisp, smell pleasantly ocean-like, and not be limp. Store leftover sheets in an airtight bag because humidity is nori’s arch-nemesis.
3. Fillings
The best fillings are thin, even strips that roll neatly. Popular beginner-friendly options include cucumber, avocado, cooked shrimp, imitation crab, cream cheese, carrots, asparagus, tofu, omelet strips, and smoked salmon. Keep fillings modest. A sushi roll is not a moving truck; overloading it will make rolling messy.
4. Sauces and Toppings
Classic sushi rolls do not need much sauce, but homemade sushi is your kitchen, your rules. Try soy sauce, spicy mayo, eel-style sauce, sesame seeds, pickled ginger, wasabi, sriracha, or ponzu. Use sauces lightly so the roll still tastes clean and balanced.
Tools You Need to Make Sushi Rolls at Home
You do not need a professional sushi station, but a few basic tools make the job easier:
- A bamboo sushi mat
- Plastic wrap to cover the mat
- A sharp knife
- A cutting board
- A rice paddle or wooden spoon
- A small bowl of water for your hands
- A clean towel for wiping the knife
If you do not have a bamboo mat, you can use parchment paper or a clean kitchen towel wrapped in plastic. It will not be quite as precise, but it works in a “college apartment innovation lab” kind of way.
Step-by-Step: How to Make Sushi Rice
Step 1: Rinse the Rice
Place the rice in a bowl and rinse it with cool water. Swirl gently with your fingers, drain, and repeat several times until the water looks mostly clear. This removes excess surface starch and helps the rice cook into glossy, separate grains instead of a sticky brick.
Step 2: Cook the Rice
Cook the rinsed rice in a rice cooker or pot according to package directions. If using a pot, bring the rice and water to a boil, reduce the heat to low, cover, and cook until tender. Let it rest covered for about 10 minutes after cooking. Do not keep opening the lid to check. Rice is shy; let it steam in peace.
Step 3: Make the Sushi Vinegar
In a small bowl, stir together rice vinegar, sugar, and salt until dissolved. You can warm the mixture slightly to help the sugar dissolve, but do not boil it. The goal is seasoning, not vinegar soup.
Step 4: Season and Cool the Rice
Transfer hot rice to a wide bowl. Drizzle the vinegar mixture over it and fold gently with a rice paddle or wooden spoon. Use slicing motions instead of mashing. Cool the rice until it is warm or room temperature before rolling. Hot rice can make nori soggy, and soggy nori is the culinary equivalent of a sad handshake.
Food Safety Before You Roll
Homemade sushi rolls should be fun, but food safety matters. Wash your hands before and after handling seafood. Keep raw and cooked ingredients separate. Clean cutting boards, knives, and counters with hot soapy water after contact with raw foods. Keep seafood cold until you are ready to use it.
If using raw fish, buy it from a reputable fishmonger and ask whether it has been handled for raw consumption. The term “sushi-grade” is commonly used in stores, but it is not a magic spell. For a safer beginner approach, choose cooked seafood, vegetarian fillings, or fully cooked proteins. Children, pregnant people, older adults, and anyone with a weakened immune system should avoid raw or undercooked seafood.
For cooked seafood, fish and shellfish should be cooked to a safe internal temperature of 145°F, or until the flesh is opaque and separates easily. Cooked shrimp, crab stick, canned tuna, smoked tofu, and egg strips are excellent choices for homemade sushi rolls because they reduce risk and still taste great.
How to Assemble a Basic Sushi Roll
Step 1: Set Up Your Rolling Station
Place your bamboo mat on a flat surface and cover it with plastic wrap. Put a sheet of nori on top, shiny side down. Keep a bowl of water nearby so you can dampen your fingers. Sushi rice is sticky enough to qualify as a minor household adhesive.
Step 2: Spread the Rice
Wet your fingers lightly and spread a thin, even layer of sushi rice over the nori. Leave about 1 inch of uncovered nori at the top edge so the roll can seal. Do not press the rice down too hard. Gentle spreading keeps the texture light.
Step 3: Add Fillings
Place fillings in a horizontal line across the lower third of the rice. For a beginner roll, try cucumber, avocado, and imitation crab. Use thin strips and avoid stacking too high. A neat filling line creates a neat roll.
Step 4: Roll It Up
Lift the bottom edge of the mat with your thumbs while holding the fillings in place with your fingers. Roll forward until the nori and rice wrap around the fillings. Press gently to shape the roll, then continue rolling until sealed. Think firm hug, not wrestling move.
Step 5: Slice the Roll
Use a sharp knife dipped in water. Wipe the blade between cuts. Slice the roll in half, then cut each half into three or four pieces. This keeps the pieces even and prevents the roll from squishing.
Easy Sushi Roll Ideas for Beginners
California Roll
Fill your roll with imitation crab, avocado, and cucumber. Add a tiny bit of mayo to the crab if you like a creamy texture. Sprinkle sesame seeds on top for a classic American sushi-bar flavor.
Vegetable Sushi Roll
Use cucumber, carrot, avocado, bell pepper, and pickled radish. This roll is colorful, crunchy, budget-friendly, and perfect for anyone who wants sushi without seafood.
Cooked Shrimp Roll
Add cooked shrimp, cucumber, avocado, and a thin line of spicy mayo. This tastes rich and satisfying without requiring raw fish.
Smoked Salmon Roll
Use smoked salmon, cucumber, cream cheese, and scallions. It is not traditional, but it is popular for a reason. It tastes like a bagel took a vacation to Tokyo and came back fancy.
Tofu Teriyaki Roll
Pan-sear tofu strips until golden, brush them lightly with teriyaki sauce, then roll with avocado and cucumber. This is a hearty vegetarian option with excellent texture.
How to Make Inside-Out Sushi Rolls
Inside-out rolls, also called uramaki, have rice on the outside and nori on the inside. They are popular in American sushi restaurants, especially for California rolls. To make one, cover your bamboo mat with plastic wrap, place nori down, spread rice over the whole sheet, sprinkle sesame seeds on the rice, then flip the nori so the rice faces down. Add fillings to the nori side and roll as usual.
Inside-out rolls can be trickier because the rice sticks to everything. Keep your hands damp, use plastic wrap, and do not panic if the first one looks slightly abstract. Abstract sushi still tastes like sushi.
Common Mistakes and How to Fix Them
The Roll Falls Apart
You may have used too much filling, too little rice, or failed to leave a sealing edge. Use a thinner filling line and press gently as you roll.
The Rice Is Mushy
The rice may have too much water or may have been stirred too aggressively. Rinse well, measure carefully, and fold the seasoning in gently.
The Nori Is Soggy
The rice may have been too hot, or the roll sat too long before serving. Cool the rice first and assemble rolls shortly before eating.
The Knife Crushes the Roll
Your knife may be dull or dry. Use a sharp blade, wet it before slicing, and wipe it after every few cuts.
Serving Homemade Sushi Rolls
Arrange sliced rolls on a platter with soy sauce, pickled ginger, and wasabi. Add edamame, miso soup, seaweed salad, or cucumber salad for a complete meal. Serve sushi rolls soon after making them for the best texture. Rice gets firmer in the refrigerator, and nori loses its crispness over time.
If you must store leftovers, wrap them tightly and refrigerate them, but enjoy them as soon as possible. Rolls with cooked or vegetarian fillings hold up better than rolls with delicate seafood or avocado. Avocado, as everyone knows, has only two moods: rock and brown.
How to Plan a Sushi Night at Home
Homemade sushi is ideal for a casual dinner party. Prepare the rice, fillings, sauces, and toppings before guests arrive. Set everything out buffet-style and let people roll their own combinations. This turns dinner into an activity, and it saves you from pretending you can roll twenty perfect maki rolls under pressure.
For a balanced sushi night, offer at least one cooked seafood filling, one vegetarian filling, one creamy filling, one crunchy vegetable, and one spicy sauce. For example: cooked shrimp, tofu, avocado, cucumber, carrots, spicy mayo, and sesame seeds. Everyone can build something they like.
Budget Tips for Making Sushi at Home
Sushi restaurants charge for skill, quality, labor, and ambiance. At home, you can save money by using affordable fillings and buying pantry ingredients in larger packages. Sushi rice, nori, rice vinegar, soy sauce, and sesame seeds can make many batches.
Cooked imitation crab, canned tuna mixed with mayo, egg omelet strips, cucumber, carrots, and tofu are budget-friendly options. Save premium seafood for special occasions. The secret to great homemade sushi is not expensive fish; it is well-seasoned rice, clean cuts, balanced fillings, and not trying to stuff an entire salad bar into one roll.
Flavor Balance: The Secret to Better Sushi Rolls
A good sushi roll balances soft, crisp, salty, sweet, tangy, and savory elements. Sushi rice provides gentle acidity and sweetness. Nori adds roasted ocean flavor. Fillings bring texture and personality. Soy sauce adds salt. Wasabi adds heat. Pickled ginger refreshes the palate between bites.
When inventing your own roll, use this simple formula: one creamy ingredient, one crunchy ingredient, one protein or hearty vegetable, and one light sauce. For example, avocado plus cucumber plus shrimp plus spicy mayo works beautifully. Cream cheese plus smoked salmon plus scallions plus cucumber also works. Peanut butter plus tuna plus gummy bears does not. Some doors should remain closed.
Extra Experience: What Making Sushi at Home Really Teaches You
The first time you make sushi rolls at home, you may discover that the hardest part is not the rolling. It is patience. You rinse rice, wait for it to cook, season it gently, let it cool, slice fillings neatly, and only then begin assembling. Sushi rewards calm preparation. It is not a “throw everything in a pan and hope” meal. It is more like building a tiny edible log cabin.
One of the best experiences is realizing how much control you have. At a restaurant, you choose from a menu. At home, you decide everything: more avocado, less rice, no wasabi, extra sesame, cooked shrimp instead of raw fish, tofu instead of crab, cucumber cut thicker for crunch. You can make sushi rolls that match your taste exactly. This is especially useful for families, picky eaters, or anyone who has ever paid too much for a roll and thought, “I love this, but why is there one lonely cucumber matchstick inside?”
Another lesson is that appearance improves quickly. The first roll may be uneven. The rice layer may be too thick. The end pieces may look like they lost an argument. But by the third roll, your hands understand the motion. You learn how much filling is enough. You learn to tuck the first turn tightly. You learn that a damp knife is not optional. Small adjustments make a huge difference.
Homemade sushi also makes you respect sushi chefs more. A clean, balanced, beautiful roll looks simple, but simplicity takes skill. The rice must be seasoned, the fillings must be cut evenly, the roll must be firm without being smashed, and every slice should hold together. Even when your homemade version is rustic, you gain appreciation for the craft behind the restaurant version.
There is also a social magic to sushi night. People gather around the counter, compare combinations, laugh at messy rolls, and proudly present their creations like edible trophies. Kids can help with vegetable rolls. Adults can experiment with sauces. Everyone becomes slightly competitive. Someone will claim they invented the best roll of the night. Someone else will use too much filling and create a seaweed suitcase. Both people will be happy.
Most importantly, making sushi rolls at home teaches you that good food does not have to be intimidating. Start with cooked and vegetable fillings. Keep the rice balanced. Roll with confidence. Slice with a wet knife. Serve immediately. Your rolls may not look like they belong in a luxury omakase restaurant, but they will taste fresh, fun, and personal. That is the real victory: dinner that feels like an event, costs less than takeout, and gives you permission to play with your food like a responsible adult with a bamboo mat.
Conclusion
Learning how to make your own sushi rolls at home is easier than it looks and far more entertaining than ordering delivery again. Start with short-grain sushi rice, crisp nori, simple fillings, and a clean rolling setup. Focus on food safety, especially if seafood is involved. For beginners, cooked shrimp, imitation crab, tofu, egg, smoked salmon, and vegetables are smart, delicious choices.
The key is balance: lightly seasoned rice, thin fillings, gentle pressure, and a sharp wet knife. Once you master the basic roll, you can create endless variations, from classic California rolls to colorful vegetable maki and spicy cooked shrimp rolls. Homemade sushi is part recipe, part craft project, and part dinner party trick. And unlike many kitchen hobbies, you get to eat the evidence.