If you want a bracelet that looks fancy but behaves like a golden retriever (friendly, eager, and not complicated),
meet the Chinese Staircase bracelet. It’s a beginner classic: repetitive knots, satisfying spiral
texture, and endless ways to remix it with colors, beads, and different cords. You can make one while watching a show,
waiting for your laundry, or pretending you’re “just resting your hands” when you’re actually crafting.
This tutorial teaches the traditional embroidery floss version (soft, lightweight, very giftable) and also shows
how the same idea works with plastic lacing (a.k.a. gimp/boondoggle/lanyardchunky, nostalgic, and basically designed
for keychains and camp crafts). By the end, you’ll know the core knot, how to keep the spiral neat, how to switch
colors cleanly, and how to finish it so it doesn’t unravel the second you look away.
What Is a Chinese Staircase Bracelet?
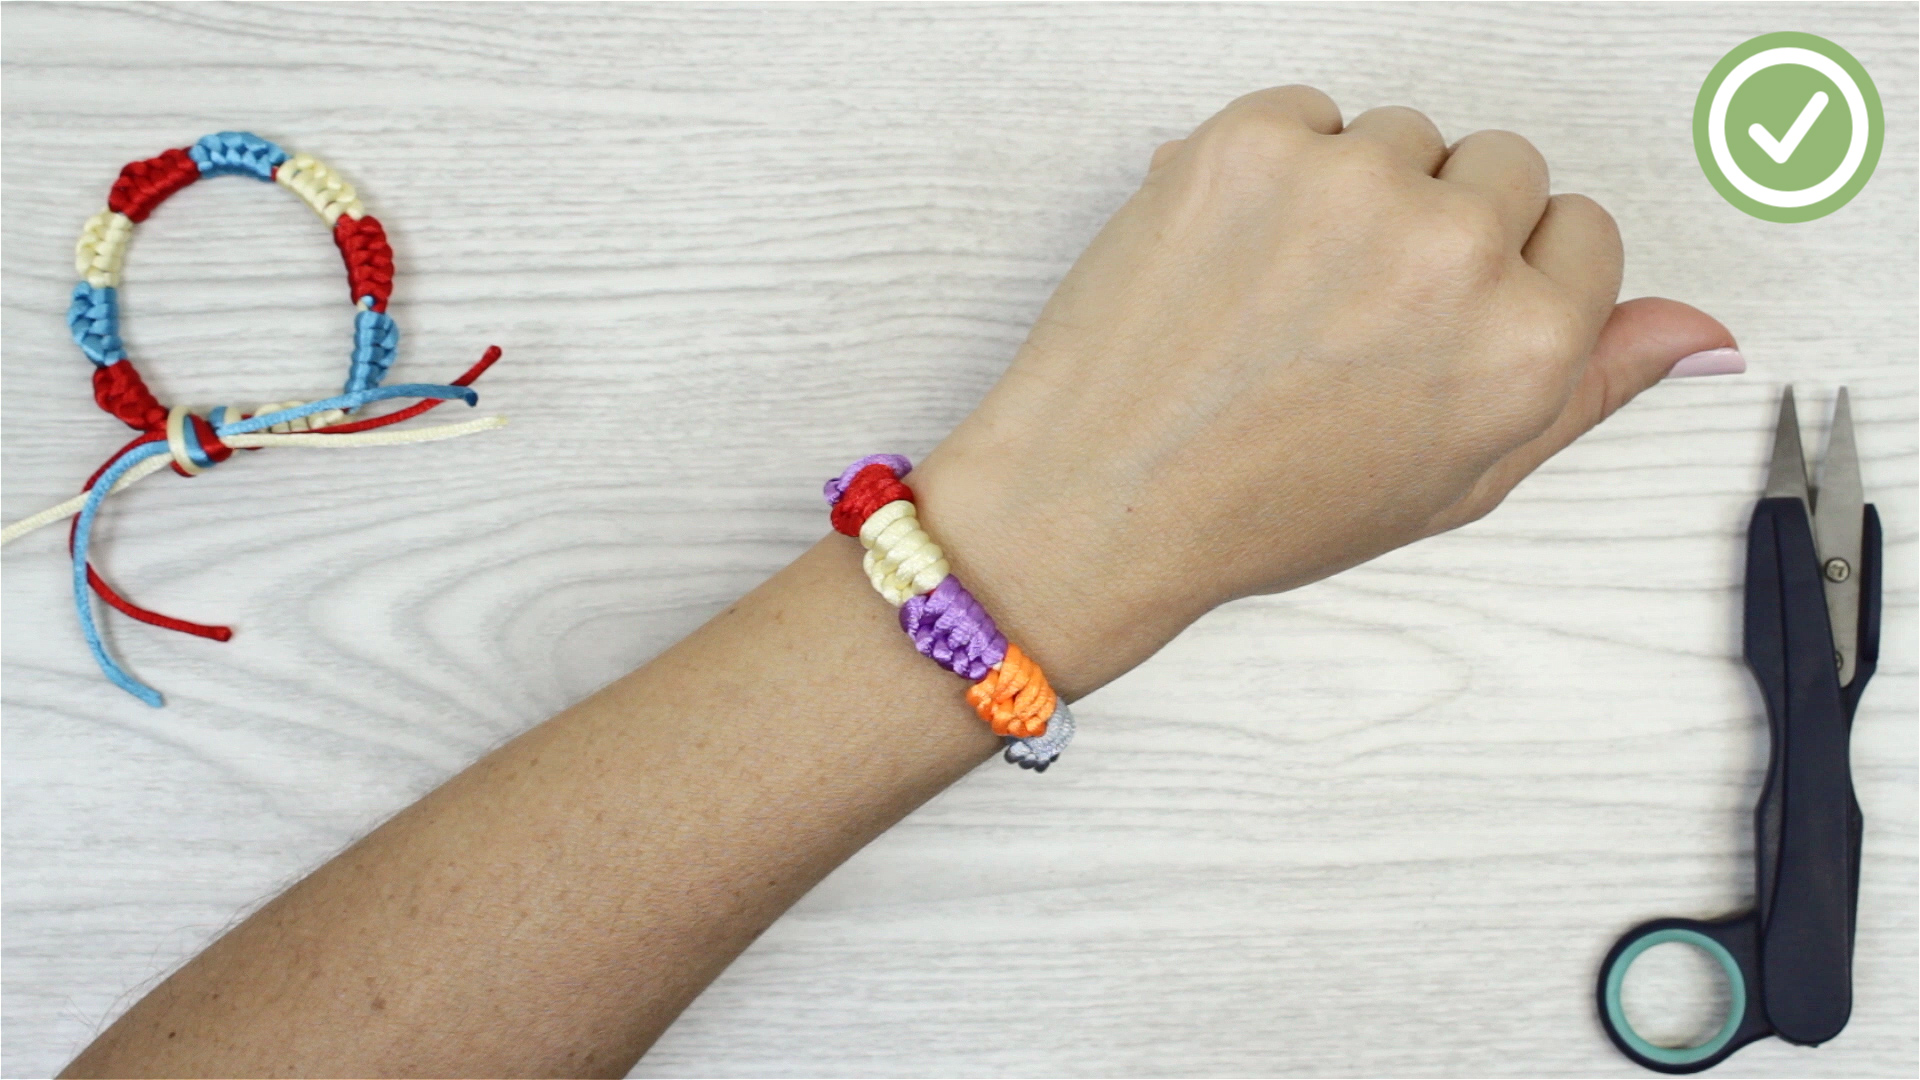
The Chinese Staircase is a spiral friendship bracelet made by tying the same knot repeatedly in the
same direction. One “working” strand wraps around a bundle of “core” strands, and the knots stack into a twist that
looks like a tiny rope staircase. Depending on who taught you (camp counselor, older sibling, or the Internet at 2 a.m.),
you might also hear it called a Chinese Ladder or a spiral bracelet.
Why it spirals (the quick nerdy part)
Knots are basically organized tension. When you keep tying the same knot direction around the same core, each knot
nudges the previous one slightly, and the whole stack rotates. If your tension stays consistent, you get a smooth spiral.
If your tension is chaotic, you get… “abstract art.” (Still valid. Just less predictable.)
Materials and Tools
You can make a Chinese Staircase bracelet with minimal supplies. Choose your material based on the look you want.
Option A: Embroidery floss (classic friendship bracelet)
- Embroidery floss (3–6 strands; 4–5 strands is a sweet spot)
- Scissors
- Tape, safety pin, or clipboard (to anchor the bracelet while you knot)
- Optional: ruler or measuring tape, beads, needle/threader for beads
Option B: Plastic lacing (gimp/boondoggle/lanyard)
- Plastic craft lace (2 strands for a simple stitch, or more strands for a thicker spiral)
- Scissors (or craft snips)
- Optional: key ring or clasp (if you’re making a keychain-style bracelet)
How much string do you need?
For embroidery floss, a practical starting point is 24–36 inches per strand for a wrist bracelet.
If you want an anklet or you knot tightly, go longer. For plastic lacing, many instructions use one strand much longer
than the other(s) because only the working strand does most of the wrapping.
Before You Start: The One Knot You Need
The Chinese Staircase bracelet is built from the same basic move over and over:
a forward knot (embroidery floss) or a half-knot/loop wrap (plastic lacing).
Different sites explain it with different doodlessome call it a “4,” others call it a “D.”
Either way, it’s the same idea: one strand loops over the bundle, then pulls through and tightens.
Forward knot (embroidery floss) in plain English
- Pick your working strand (the strand that will do the wrapping).
- Lay it over the core bundle to form a “4” shape.
- Pass the working strand under/through the loop you made.
- Pull upward to tighten the knot snugly against the top.
- Repeat once more (many friendship bracelet “knots” are actually two half-hitches).
Tip: If you can tie a forward knot consistently, you can make this bracelet. That’s it. That’s the whole secret.
(Please use this power responsibly.)
Step-by-Step: Classic Chinese Staircase Bracelet (Embroidery Floss)
Step 1: Choose colors and cut your strands
Choose 3 to 6 strands. More strands = thicker bracelet. Fewer strands = slimmer, more delicate spiral.
Cut each strand roughly 24–36 inches long for a bracelet.
Example setups:
• 4 strands (2 colors x 2 strands) = balanced, easy to manage.
• 5 strands (5 different colors) = classic rainbow spiral vibe.
• 6 strands (3 colors x 2 strands) = thicker, bolder, very “look what I made.”
Step 2: Tie a starting knot and anchor your work
Line up your strands evenly and tie an overhand knot about 2–3 inches from the top.
This creates a tassel you can braid later for tying.
Anchor the knot to something stable:
tape it to a table, pin it to jeans with a safety pin, or clip it to a clipboard.
Your goal is to keep the top from sliding around while you knot.
Step 3: Decide which strand is the “working” strand
Spread the strands out like a tiny sunburst. Choose one strand to be your working strand.
The rest become the core (they mostly just sit there and get wrapped).
If you want a spiral where one color dominates, make that color the working strand.
If you want a multi-color spiral, you’ll switch the working strand later.
Step 4: Bundle the core strands and start knotting
Hold the core strands together as one bundle. With your working strand:
- Make a “4” over the core bundle.
- Pull the end through the loop and tighten upward.
- Repeat to complete the forward knot.
- Slide the knot up snug against the previous knot.
Keep repeating forward knots around the same bundle. After a few knots, you’ll see the spiral begin.
After 10–20 knots, it becomes obviousand slightly addictive.
Step 5: Keep your spiral neat (tension + positioning)
This is where beginners level up fast:
- Pull in the same direction each time (usually upward toward the anchored knot).
- Use consistent tightness: snug, not “trying to crush a soda can.”
- Push knots up occasionally so there are no gaps.
- Let the bracelet twist naturally; don’t fight it into being flat.
Step 6: Switching colors (two easy methods)
The fun part: color changes.
Method A: Switch working strands (clean spiral stripes)
- Do a set number of knots with one working strand (try 12–20 knots).
- Lay that strand back into the core bundle.
- Pick a new strand to become the working strand.
- Continue forward knots with the new working strand.
This creates a spiral where color blocks rotate around the bracelet.
Method B: One working strand only (single-color dominant spiral)
Keep the same working strand the entire time. The core colors show up subtly in the spiral “ridges,”
while the working strand becomes the main character.
Step 7: Check length as you go
Wrap it around your wrist every so often (without unpinning the top if you can avoid it).
Aim for the knotted section to be long enough that your ties can still knot comfortably.
Most bracelets finish best when you still have at least 2–3 inches of loose strand at the end.
How to Finish the Bracelet (So It Stays on Your Wrist)
Finish Option 1: Simple braided ties
- Stop knotting when the bracelet is the right length.
- Group strands into 2–3 sections and braid each section.
- Tie a small knot at the end of each braid to prevent unraveling.
- Tie the bracelet onto your wrist using the braided ends.
This is the fastest finish and works great for friendship bracelets and party crafts.
Finish Option 2: Loop start + braided end (more secure)
If you want a cleaner closure, start the bracelet with a loop (instead of a top knot) and finish with a braid:
the braid slips through the loop to close the bracelet.
This method takes a little planning at the start, but it feels more “finished.”
Finish Option 3: Adjustable sliding knot (grown-up bracelet energy)
If you want it adjustable, you can overlap the ends and tie a sliding closure (often called a sliding square knot).
It’s great if you’re gifting or selling bracelets and don’t want to guess wrist size.
Variations That Make It Look Like You Know What You’re Doing
Make it thicker (more core strands)
The Chinese Staircase gets thicker as you add strands to the core. If your spiral looks too skinny,
move from 3 strands to 5 or 6. You’ll get a chunkier, more rope-like bracelet with deeper spiral texture.
Add beads without losing your mind
Beads look amazing on a spiral bracelet because they pop out in different directions like confetti with a plan.
A beginner-friendly way:
- Choose a bead-friendly floss strand (or thin cord) as your working strand.
- After a set of knots, thread on a bead.
- Slide the bead up to the bracelet and tie the next knot to “lock” it in place.
- Repeat every few color rounds for a balanced look.
Try the “double” look (two working strands)
Once you’re comfortable, you can alternate two working strands to create a fuller spiral or a more complex twist.
It’s still the same basic knot logicjust with more intentional switching.
Use plastic lacing (gimp/boondoggle style)
The plastic-lacing version uses the same concept: one long strand wraps repeatedly around a core strand.
It makes a bolder spiral that’s great for bracelets, zipper pulls, and keychains.
A common setup is one short core strand and one long working strand.
Tie them together at the top. Then loop the long strand around the short strand, pull through, tighten, and repeat.
The “tiny knots” curl around the core and create the staircase effect as you push the work upward.
Troubleshooting (Because Knots Have Opinions)
My spiral looks lumpy
- Check your tensiontry to pull with the same strength each time.
- Make sure each knot is pushed snugly against the previous knot.
- If you’re using multiple strands, keep the core bundle aligned (don’t let one strand wander off).
It’s not spiralingit’s just a sad straight line
- Make sure you’re tying the same knot direction every time.
- Don’t alternate forward and backward knots unless you’re intentionally trying to flatten it.
- Give it a few more knotssometimes it needs 8–12 to show the twist clearly.
My bracelet keeps twisting while I work
That’s normal. It’s literally the point. Let it twist like it’s showing off.
If it becomes hard to manage, untwist your loose strands occasionally to prevent tangles.
I ran out of string too early
It happens. Next time, start longer. If you’re close to the end, you can sometimes add a new strand
by tying it onto the working strand with a very tight knot and trimming the tailsbut for gift-quality work,
it’s usually better to restart with longer strands.
Care Tips (So It Survives Real Life)
- Embroidery floss: Avoid soaking it for long periods; it can fuzz. If it gets dirty, spot-clean gently.
- Plastic lacing: More water-friendly. Keep it away from high heat (it can warp).
- General: If you’re gifting it, remind people not to yank it like they’re starting a lawn mower.
Conclusion
The Chinese Staircase bracelet is popular for a reason: it’s easy to learn, hard to mess up completely, and endlessly customizable.
Once you’ve got the basic knot rhythm, you can scale it up (more strands), dress it up (beads), or switch materials (gimp)
for a totally different vibe. Make one for yourself, make one for a friend, make ten because you “just wanted to test colors.”
That’s not a problem. That’s a hobby.
Experiences While Making a Chinese Staircase Bracelet (The Real-Life Part)
Making a Chinese Staircase bracelet has a funny way of turning into a tiny ritual. You start with good intentions“I’ll make one quick bracelet”
and suddenly you’re ten minutes deep, staring at a growing spiral like it’s a progress bar for your mood. The early stage is always the most awkward:
the strands feel too long, the knot looks suspiciously like “nothing,” and your brain wonders if you invented a new kind of failure. Then the twist appears.
That’s the moment most people get hooked. It’s like your bracelet finally says, “Relax, I’m working.”
The best part is how forgiving it is. If you’ve ever tried patterns where one wrong move nukes the whole design, the Chinese Staircase feels like a vacation.
You’re basically repeating one knot while your hands learn the rhythm. It becomes the kind of craft you can do while chatting, watching videos,
or listening to musicthough you’ll still want to glance down occasionally so you don’t accidentally tie your working strand into a dramatic overhand knot
that you swear “wasn’t there a second ago.”
Color choices also become a whole experience. In theory, you pick a few cute shades and go. In reality, you lay out floss like a tiny fashion show:
“Is this blue more ‘ocean’ or more ‘dentist office’?” A fun discovery is that spiral bracelets make even random color combos look intentional.
Switching the working strand every 12–20 knots creates those rotating bands that feel way more advanced than they actually arelike wearing glasses
just to look smarter while you’re still Googling how to boil eggs.
There’s also a small, universal struggle: tension. If you pull too tight, your bracelet gets stiff and narrow, and your knots crowd together like they’re
fighting for a spot in line. If you pull too loose, you get gaps, and the spiral looks a bit sleepy. Most people find their “just right” tension
after a short stretch of experimentingusually right after making the first bracelet slightly too tight and declaring it a “prototype.”
That’s not wasted effort; it’s how your hands learn what your eyes want.
The finishing step is where pride kicks in. The bracelet looks done, but you still need it to behave on a wrist.
Braiding the tails is simple, but it feels strangely satisfyinglike putting a frame on your art.
If you try an adjustable closure for the first time, expect a small victory moment when it actually slides and locks.
And if you add beads, you’ll probably have a phase where you add “just one more” bead and then realize you’ve built a bracelet that jingles like it’s
announcing your arrival. Again: valid. (Just maybe not for quiet classrooms.)
Finally, the most “real” experience: gifting one. Chinese Staircase bracelets are lightweight, personal, and clearly handmade.
People tend to react like you gave them something way fancier than it was, because the spiral texture looks intricate.
You’ll hear things like “You MADE this?” and you’ll get to nod casually like you’re not already planning your next one.
It’s one of those crafts that rewards you twiceonce while making it (calm hands, happy brain) and again when someone wears it like it matters.