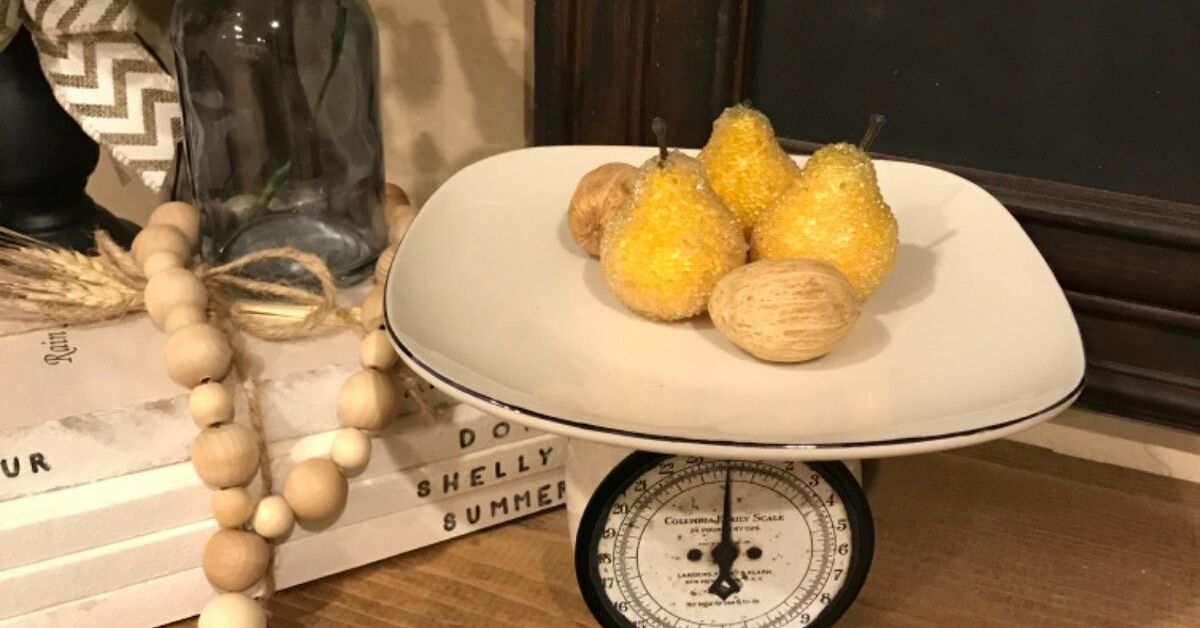
There is something wildly satisfying about turning a handful of dollar-store odds and ends into décor that looks like it once lived in a cheerful DIY has all the vintage charm of an old market scale, minus the rust, the mystery crumbs, and the need to explain why you brought home another “important craft supply.”
With a few inexpensive materials, basic paint, and some creative confidence, you can make a miniature farmhouse kitchen scale for a tiered tray, coffee bar, open shelf, faux bakery display, dollhouse scene, or seasonal centerpiece. The best part: it does not need to actually weigh anything. It simply needs to look adorable while holding a tiny faux apple, mini pumpkin, faux greenery, or a suspiciously expensive decorative lemon.
Note: This project creates decorative farmhouse décor only. It is not designed to weigh food, hold heavy objects, or settle disputes about whether someone really ate “just one cookie.”
Why a Mini Farmhouse Scale Is Such a Great Dollar Store DIY
A vintage kitchen scale has an instantly recognizable silhouette: a sturdy base, a raised body, a round dial, and a shallow tray on top. Even when you reduce those details into miniature form, people immediately understand what it is supposed to be. That makes it one of the most forgiving DIY projects for beginners.
You do not need a woodworking shop, fancy resin molds, or a degree in Tiny Architecture. You need a simple shape, a few layers, and a finish that suggests age. Farmhouse style is not about making everything perfect. It is about making things feel collected, useful, warm, and just a little weatheredas though they have survived several generations of biscuit-making.
Dollar stores are especially useful for this kind of project because their craft aisles often include foam board, wood shapes, small signs, painter’s brushes, jute twine, floral wire, mini containers, acrylic paint, foam sheets, decorative stickers, and seasonal embellishments. Availability changes from store to store, so treat your shopping list as a treasure map rather than a legal contract.
What You Need for This Mini Farmhouse Dollar Store Scale DIY
Before you begin, gather your supplies and place them on a clean table. Mini projects have a special talent for making tiny pieces disappear into another dimension, usually right before you need them.
Basic Materials
- Small unfinished wood plaque, wood block, mini canvas, thick cardboard, or foam board
- Craft sticks, bamboo skewers, thin wood strips, or coffee stirrers
- One small shallow plastic bowl, metal lid, jar lid, or miniature tray
- Cardstock, chipboard, or thin cardboard for the dial
- Acrylic paint in cream, white, black, gray, muted green, red, or pale blue
- Hot glue gun and glue sticks
- Craft glue or wood glue for lighter pieces
- Jute twine, floral wire, thin rope, or string
- Sandpaper or a nail file
- Scissors and a craft knife
- Ruler and pencil
Optional Farmhouse Details
- Mini faux apples, lemons, pumpkins, eggs, or pears
- Artificial greenery or tiny flowers
- Mini alphabet stickers
- Small wooden beads
- Black-and-white gingham ribbon
- Paper labels or printable vintage graphics
- Brown wax, antiquing medium, or watered-down dark acrylic paint
You can make this project almost entirely from cardboard if that is what you have. The secret is not expensive materials; it is creating enough layers and shadows that the finished piece looks dimensional.
Choose the Right Size Before You Build
For a tiered tray or countertop vignette, aim for a finished mini scale that is about 6 to 8 inches tall and 4 to 6 inches wide. That size gives you enough room for a readable dial and a small tray without turning the project into a full-scale appliance audition.
For a dollhouse or fairy garden, reduce the measurements by half. For a larger shelf display, increase the base and tray size while keeping the same proportions. A farmhouse scale looks most believable when the body is slightly wider at the bottom, the dial sits near the center, and the tray is broad enough to hold a small decorative object.
Simple Mini Scale Proportions
- Base: approximately 5 inches wide by 3 inches deep
- Scale body: approximately 3 inches wide by 2 inches deep
- Dial circle: approximately 2 inches across
- Top platform or tray: approximately 4 inches wide
- Overall height: approximately 6 to 7 inches
Do not panic if your numbers are not exact. Vintage décor has survived plenty of wonky measurements. In fact, a slightly imperfect shape often looks more handmade and charming than something that appears to have been designed by a robot with a ruler addiction.
Step-by-Step: How to Make a Mini Farmhouse Scale
Step 1: Build a Sturdy Base
Start with a rectangular base made from a small wood plaque, thick cardboard, stacked foam board, or several craft sticks glued side by side. For a more substantial look, glue two layers together. A thicker base makes your mini farmhouse scale look intentional instead of like a craft accident that became emotionally attached to you.
If you are using craft sticks, trim them to equal lengths and glue them onto a piece of cardboard or foam board. Once dry, lightly sand the edges. You do not need furniture-grade smoothness, but you do want to remove obvious splinters and dried glue blobs.
Step 2: Create the Scale Body
Cut a rectangular or slightly tapered scale body from foam board, a wood block, a small unfinished box, or layered cardboard. A body measuring about 3 inches wide by 2 inches deep works well for a medium-size decorative scale.
For a more vintage silhouette, make the lower section wider than the upper section. You can create this shape by gluing a smaller box or block on top of a larger one. The front should be flat enough to hold the dial later.
Glue the body firmly onto the base, keeping it centered from left to right. Let the glue dry completely before moving on. A crooked scale body can be fixed, but it is much easier to prevent it than to perform tiny emergency construction surgery later.
Step 3: Add the Upright Support
Most old-fashioned kitchen scales have a central support that lifts the tray above the dial. Use a short wood block, a stack of cardboard squares, a thick bottle cap, a mini wood cube, or several craft sticks glued together.
Attach the support to the top center of the body. Keep it straight and level. Place your tray on top without gluing it yet so you can check the height and balance. The scale should look stable, even though its entire job is to sit politely on a shelf and look pretty.
Step 4: Make the Top Tray
A shallow plastic bowl, metal jar lid, candle lid, small sauce dish, mini plate, or plastic ornament half can become the scale tray. Choose something with a low profile. Deep bowls can make the project look more like a birdbath than a kitchen scale, which is not necessarily bad, but it is a different craft journey.
Paint the tray in matte white, black, galvanized gray, pale blue, or aged cream. If the item is plastic, clean it first and use thin paint coats. Let each coat dry before applying the next one.
Once the tray is dry, glue it to the center support. Press gently and make sure it sits level. Add a small piece of cardboard or foam beneath the tray if you need a wider gluing surface.
Step 5: Create a Vintage-Style Dial
The dial is the part that makes people say, “Wait, you made that?” Cut a circle from cardstock, chipboard, cereal-box cardboard, or a round craft shape. A two-inch circle works well for most mini scales.
Paint the dial face cream or white. Once dry, add simple tick marks around the edge using a fine black marker. You can write numbers such as 0, 5, 10, 15, and 20, or keep the design simple with lines and a tiny center dot.
For a farmhouse look, use words such as “FARMHOUSE,” “MARKET,” “PANTRY,” “FRESH,” “BAKERY,” or “HOMEGROWN.” Avoid trying to make the dial too mathematically accurate. This is not a science fair project. It is a tiny decorative scale with a full-time job in looking charming.
Make a small pointer from black cardstock, floral wire, a sliver of painted craft stick, or a triangle cut from cardboard. Glue it in the center of the dial. Then attach the dial to the front of the scale body with hot glue or strong craft glue.
Step 6: Paint the Main Body
Choose a farmhouse-friendly palette. Classic options include distressed white, warm cream, matte black, muted sage green, vintage red, pale robin’s-egg blue, or soft gray. A white body with black lettering is a safe choice, but do not feel trapped by it. Farmhouse style has room for color, especially when it looks slightly faded or timeworn.
Apply two thin coats of acrylic paint rather than one thick coat. Thin layers dry more evenly and help preserve the texture of the materials underneath. Paint the base, body, support, and tray separately if possible. That prevents your fingers from becoming permanent members of the project.
Step 7: Distress the Finish for Farmhouse Character
Once the paint is dry, lightly sand the edges, corners, tray rim, and raised details. Focus on places where an old object would naturally show wear. The goal is a gentle worn finish, not a scale that looks like it escaped a tornado.
You can also mix a little dark brown or black acrylic paint with water. Brush it into cracks and corners, then wipe away most of it with a paper towel. This adds depth and gives the piece a soft antique effect.
For a weathered metal look, dab gray paint onto the tray with a dry brush. Add a small amount of black around the edges. Use a light hand. The best faux-aging technique is usually “one more tiny dab,” followed by stopping before you turn your cute craft into a haunted relic.
Step 8: Add Decorative Details
Now comes the fun part. Add a tiny bow of jute twine around the base, glue on a miniature faux pumpkin, place small faux eggs in the tray, or tuck in a few sprigs of greenery. You can use mini letter stickers to spell “FRESH EGGS,” “MARKET,” “BAKERY,” or “FARM TO TABLE.”
For a coffee bar display, place tiny faux coffee beans or a mini mug in the tray. For fall, use pumpkins and leaves. For spring, add mini eggs and moss. For Christmas, fill the tray with bottle-brush trees, ornaments, or faux cranberries. One simple scale can work all year if you change what sits on top.
How to Make Your Dollar Store Scale Look More Expensive
The difference between “cute dollar-store craft” and “wait, where did you buy that?” is usually in the finishing details. You do not need more supplies. You need restraint, layering, and a willingness to let glue dry before touching it every fourteen seconds.
Use Matte Finishes
Glossy paint can make plastic pieces look more plastic. Matte acrylic paint, chalk-style paint, or a matte clear sealer gives the project a softer, more vintage appearance.
Add Depth With Layers
Layered bases, raised trim, stacked cardboard, wood strips, and dimensional dials create shadows. Shadows make simple materials look more substantial. Even a plain cardboard body can look convincing when it has a raised front panel and a separate dial.
Keep the Color Palette Simple
Choose two or three main colors. For example, use cream, black, and natural jute. Or use soft green, white, and aged brown. Too many competing colors can make the scale look more carnival than farmhouse.
Hide the Obvious Glue
Hot glue is useful, but it has the social grace of a glitter bomb. Pull away glue strings, paint over visible seams, and use twine, trim, or small embellishments to cover awkward joins.
Creative Ways to Style Your Mini Farmhouse Scale
Once your mini farmhouse scale is finished, the decorating possibilities multiply faster than craft supplies during a clearance sale.
Tiered Tray Display
Place the mini scale on the top or middle tier, then add small rolling pins, faux books, mini signs, tiny mugs, and greenery around it. Keep at least one neutral element nearby so the scale remains the star.
Farmhouse Kitchen Shelf
Style the scale beside a small cutting board, faux bread, mini jars, or a framed printable. A white scale against warm wood shelving creates an especially cozy contrast.
Coffee Bar Décor
Add a tiny scoop, faux coffee beans, mini marshmallows, or a small “But First, Coffee” sign. A black scale with a cream dial works beautifully in a coffee-themed vignette.
Seasonal Centerpiece
Use the tray as a stage for seasonal décor. Fresh-looking faux strawberries work for summer, miniature pumpkins work for fall, tiny evergreen trees work for winter, and moss with faux eggs works for spring.
Common Mini Farmhouse Scale DIY Mistakes to Avoid
Even simple crafts can become dramatic if you let impatience take the wheel. Here are the most common problems and how to avoid them.
The Tray Is Too Heavy
If the tray is large or made from metal, use a wider base and stronger support. A small lightweight plastic bowl is usually easier to balance than a heavy lid or dish.
The Dial Is Too Small to Notice
The dial should be large enough to read from a short distance. If it disappears into the body, increase its size or add a dark border around it.
The Paint Looks Streaky
Use thin coats and allow drying time between layers. Foam brushes can help create a smoother finish on flat surfaces, while small bristle brushes are useful for corners and details.
The Project Looks Too New
Add light sanding, a dry-brushed darker color, or a watered-down antiquing wash. Farmhouse décor usually benefits from a little visual history, even if that history began on your kitchen table last Tuesday.
Mini Farmhouse Dollar Store Scale DIY Experiences and Lessons Learned
Making miniature farmhouse décor teaches a surprising number of useful lessons, mostly about proportion, patience, and how much personality a tiny object can have. The first time you build a mini scale, you may spend half the project wondering whether it looks like a vintage kitchen scale or an extremely confident mailbox. That is normal. Miniature crafting often looks strange in the middle stages because the pieces have not yet gained their final details.
The most important lesson is to build the basic silhouette before worrying about decoration. When the base, body, dial, and tray are in the right places, the project reads as a scale almost immediately. Once that happens, every extra detail becomes a bonus rather than a rescue mission. If the shape is not working, adding more twine will not solve it. Twine is charming, but it cannot perform structural miracles.
Another helpful experience is learning how different materials behave. Foam board is quick to cut and lightweight, but it can dent if you press too hard. Cardboard is easy to find and perfect for layering, though it needs paint and trim to hide its humble origins. Wood pieces create a more durable finish but may require sanding. Plastic bowls and lids make excellent trays, especially when painted with matte acrylic paint, but they need enough glue coverage to stay secure.
Painting is where the project really begins to transform. A plain plastic lid may look like it belongs under a jar of pasta sauce, but a coat of muted white paint can turn it into a convincing little market-scale tray. Add a touch of gray dry brushing, and suddenly it has “been in the family for years” energy. The transformation is not magic, although it can feel suspiciously close when a random lid stops looking random.
Many crafters discover that the best farmhouse finish is not perfectly distressed. It is controlled. Lightly sand the spots where hands would naturally touch the scale: tray edges, corners, dial borders, and the base. Add too much sanding, and your tiny kitchen scale starts looking like it survived a barn fire. Add just enough, and it looks pleasantly weathered.
There is also a creative advantage to making mini décor instead of full-size décor. A large DIY project requires commitment, wall space, and possibly a conversation with someone who asks why the dining table has become a workshop. A mini scale requires very little space, very few supplies, and almost no emotional recovery time if you decide to repaint it. You can try a vintage red version, then a matte black version, then a pale green version, all without needing to reorganize your house.
Mini farmhouse crafts are also wonderfully flexible. A scale made for a spring tiered tray can become a fall centerpiece with a few tiny pumpkins. The same piece can become Christmas décor with miniature trees or faux berries. You are not creating a one-season item; you are making a small stage that changes costumes throughout the year.
Perhaps the nicest part of this DIY is that it encourages creative problem-solving. Maybe your dollar store does not have a wood plaque, but it has foam board. Maybe it does not have a shallow bowl, but it has a jar lid. Maybe it does not have a mini sign, but you can print a tiny “Fresh Eggs” label from your computer. The best craft projects do not depend on finding one exact item. They depend on recognizing possibilities in ordinary objects.
Once you finish your first mini farmhouse scale, you may start looking at every cap, lid, craft stick, and cardboard scrap as potential décor. This is both the joy and the danger of DIY. Suddenly, nothing is trash. Everything is a future tiny treasure. Your family may not understand why you are saving a bottle cap “for architectural reasons,” but you will know that greatness sometimes begins in the recycling bin.
Final Thoughts
A mini farmhouse Dollar Store scale DIY proves that charming décor does not need a designer price tag or advanced crafting skills. With simple supplies, a layered design, and a little paint magic, you can create a decorative vintage-style scale that looks right at home in a farmhouse kitchen, tiered tray, coffee bar, seasonal display, or miniature scene.
Start with the basic shape, keep your colors cohesive, add a readable dial, and finish with a little gentle distressing. Then fill the tray with whatever suits the season. The result is a small handmade piece with big personalityand, unlike a real scale, it will never judge your snack choices.