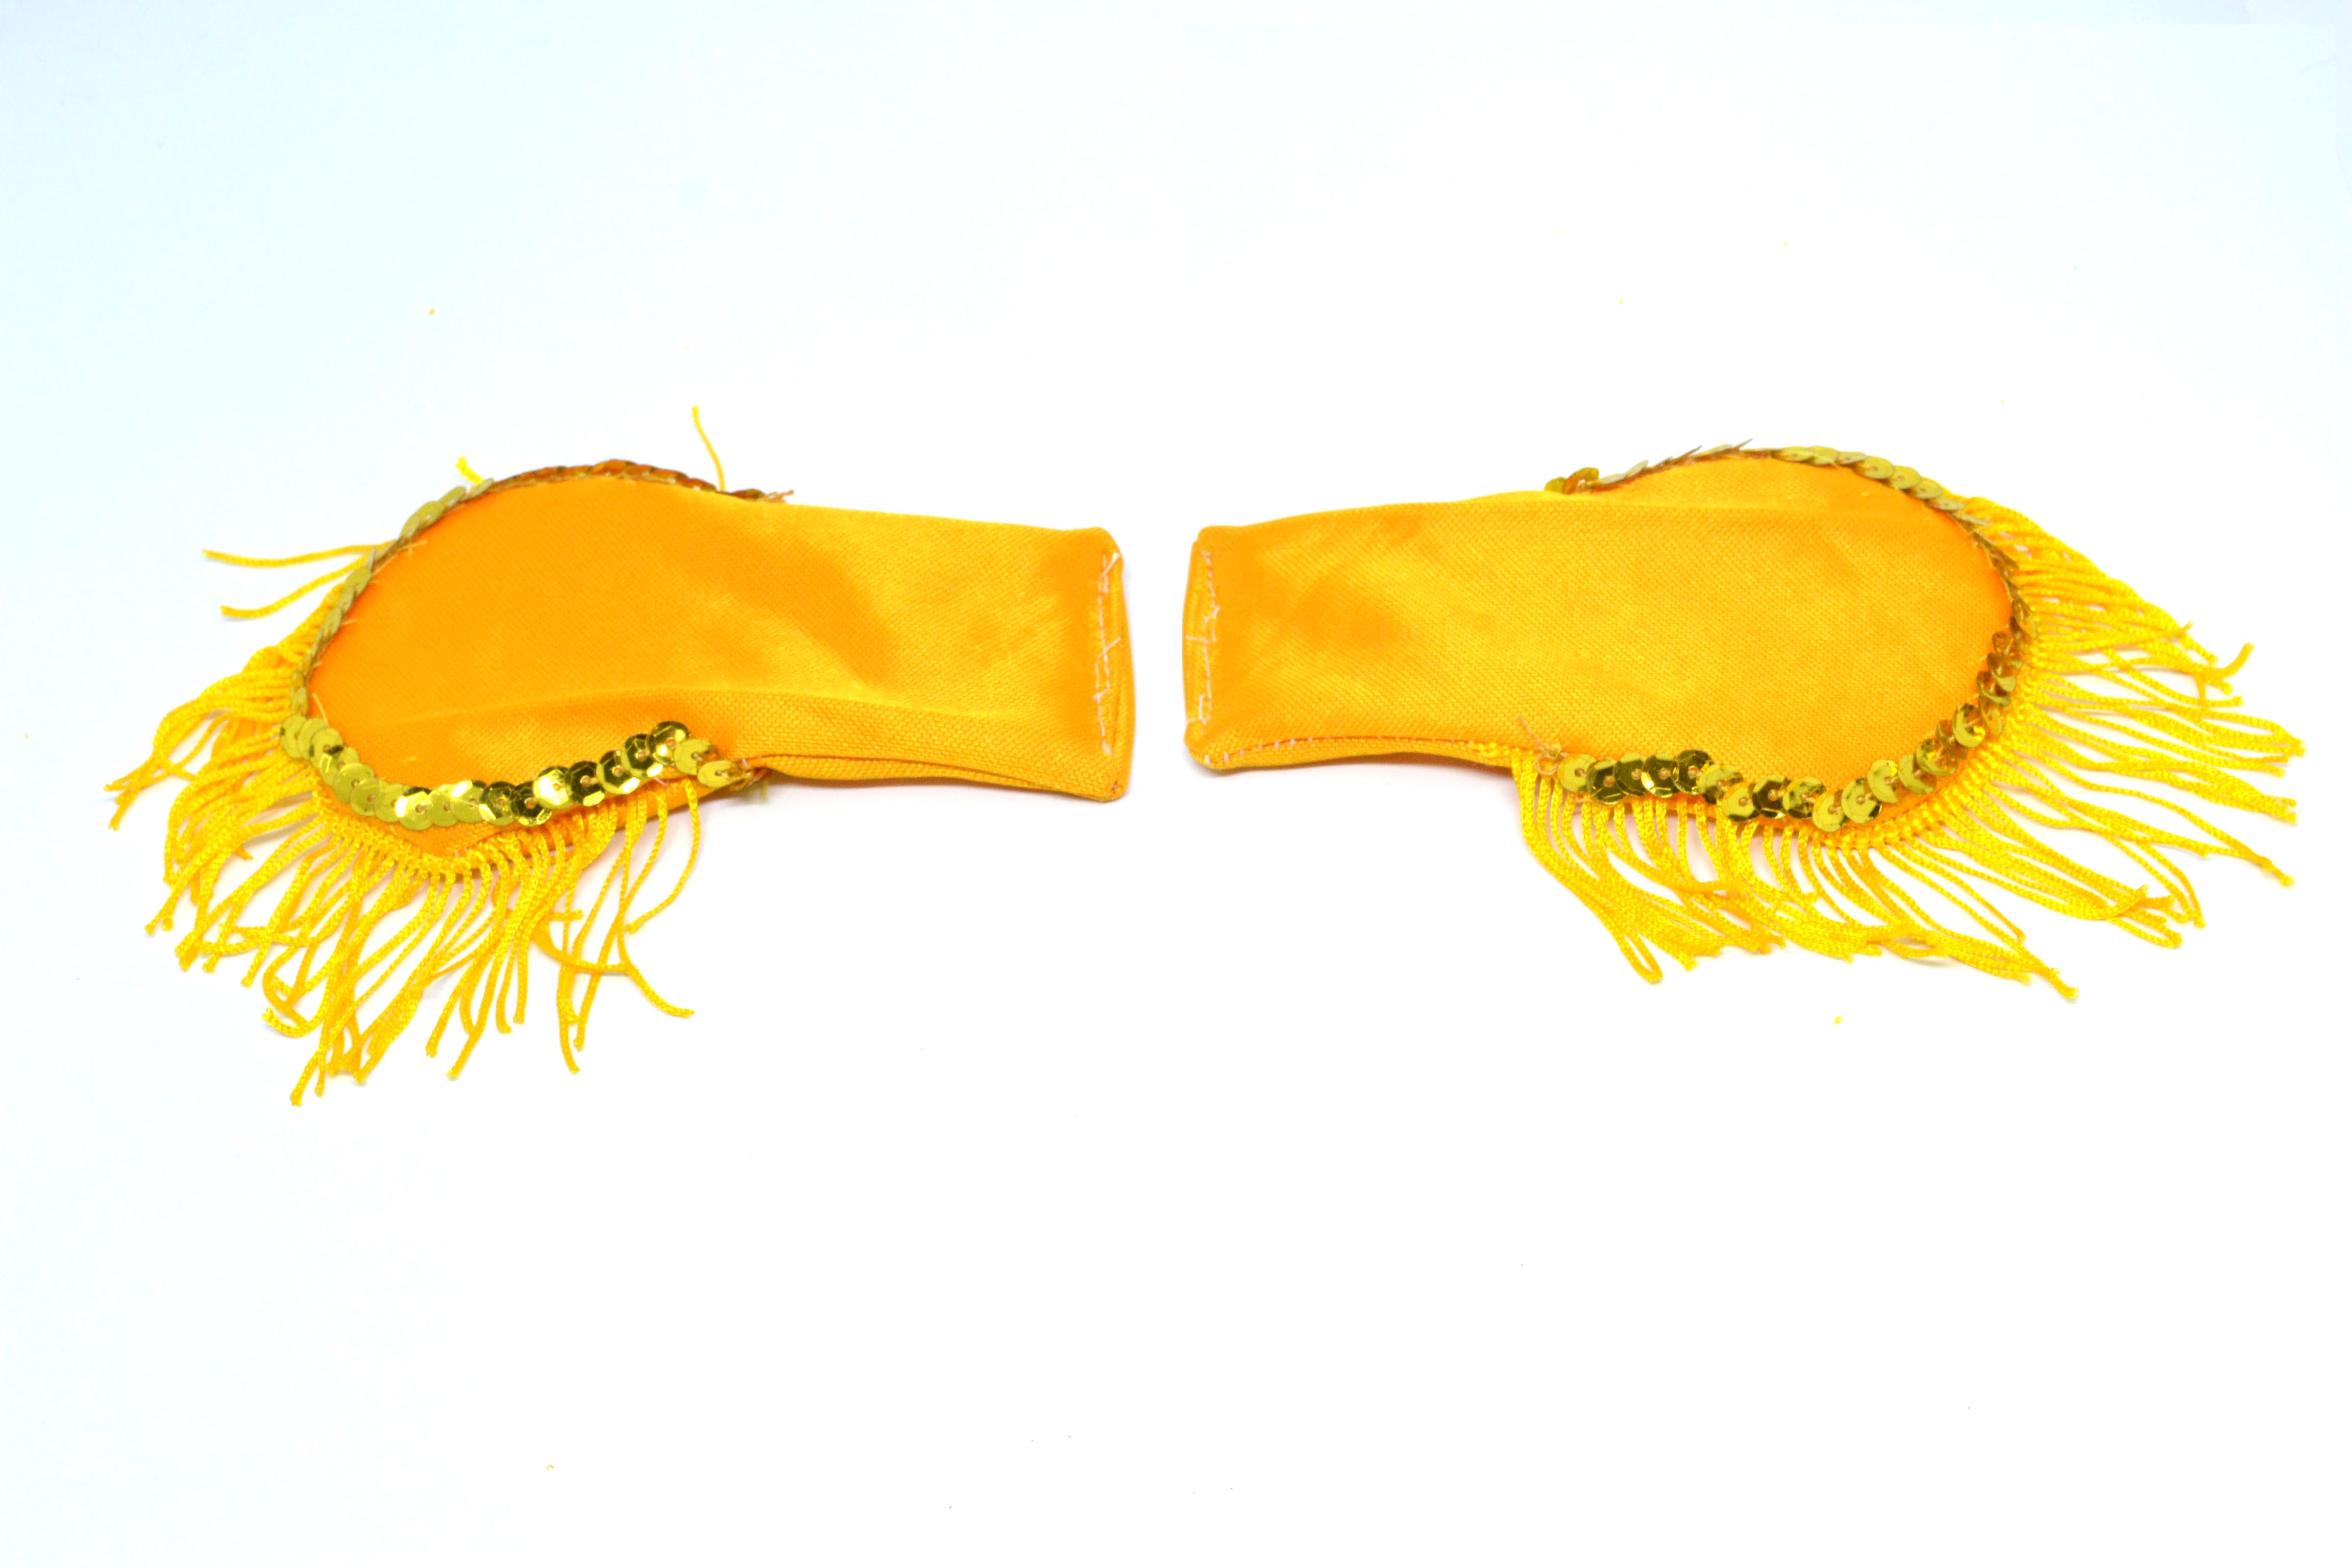
Epaulettes are tiny shoulder pieces with the confidence of a marching band, a royal guard, and a Broadway understudy all rolled into one. Add them to a plain jacket, blazer, costume coat, trench, cosplay uniform, or performance outfit, and suddenly the garment has posture. It stands up straighter. It looks more intentional. It may even ask for a spotlight.
In simple terms, an epaulette is a decorative shoulder ornament or strap, traditionally associated with military uniforms and later adopted by fashion, theater, dancewear, marching band jackets, cosplay, and DIY costume design. Some epaulettes are flat fabric tabs held by buttons. Others are dramatic shoulder pieces with fringe, braid, metallic trim, tassels, chains, beads, or embroidered patches. The good news? You do not need a royal tailor, a military supply warehouse, or a sewing room the size of Rhode Island to make your own.
This guide explains how to make epaulettes from scratch using accessible materials, beginner-friendly pattern drafting, and practical finishing techniques. You will learn how to design the shape, stabilize the base, add decorative trim, attach fringe, and secure the finished piece to a garment. Whether you want crisp military-style shoulder tabs or full costume epaulettes with gold fringe and theatrical flair, the process is very doable once you break it into small steps.
What Are Epaulettes?
Epaulettes, also spelled epaulets in American English, are decorative pieces worn on the shoulders of garments. Historically, they appeared on military and naval uniforms as ornaments, rank indicators, and formal dress details. Traditional ceremonial epaulettes often included a flat shoulder strap, a rounded or oval end, metallic thread, bullion fringe, and sometimes stars, buttons, or insignia. In fashion, the term has expanded to include shoulder tabs, shoulder straps, removable costume shoulder pieces, and decorative shoulder pads.
For a DIY project, it helps to think of epaulettes in three main styles:
- Shoulder tabs: narrow fabric straps sewn into or placed along the shoulder seam, usually buttoned near the neckline.
- Decorative costume epaulettes: structured shoulder ornaments with fringe, braid, sequins, chain, beads, or tassels.
- Removable fashion epaulettes: detachable shoulder pieces attached with snaps, hooks, Velcro, brooch pins, or hand stitches.
The best style depends on the garment and the mood. A trench coat may need a clean fabric tab. A marching-band costume may need gold trim and fringe. A pirate captain jacket may need drama. A pop-star costume may need sparkle visible from three neighborhoods away.
Materials and Tools You Will Need
The materials for making epaulettes are inexpensive and flexible. You can use fabric scraps, felt, faux leather, wool, cotton twill, velvet, satin, brocade, or upholstery remnants. The most important rule is to choose a fabric that can hold a shape. A floppy epaulette is not a tragedy, but it does look like it gave up halfway through the parade.
Basic Materials
- Main fabric, such as wool, cotton twill, felt, faux leather, velvet, satin, or brocade
- Lining fabric or matching fabric for the underside
- Fusible interfacing, craft felt, buckram, foam, or thin plastic canvas for structure
- Fringe trim, chainette fringe, bullion fringe, tassel trim, lace, braid, or ribbon
- Decorative cord, soutache braid, metallic trim, sequins, beads, patches, or buttons
- Thread matching the fabric or trim
- Snaps, Velcro, hooks and eyes, brooch pins, or buttons for attachment
Helpful Tools
- Fabric scissors
- Paper scissors
- Ruler or measuring tape
- Pencil, tailor’s chalk, or washable fabric marker
- Iron and pressing cloth
- Sewing machine or hand-sewing needle
- Clips or pins
- Point turner, chopstick, or blunt knitting needle
- Hot glue gun or fabric glue for no-sew embellishments
A sewing machine gives the cleanest and most durable result, but many costume epaulettes can be made with a combination of hand stitching and glue. If the piece is for stage, cosplay photos, Halloween, or a one-day event, glue can be your cheerful little assistant. If the garment will be worn often, sewn construction is stronger.
Step 1: Decide the Epaulette Style
Before cutting anything, choose the shape and purpose of your epaulettes. Are you making a subtle shoulder tab for a jacket? A classic military-inspired strap? A dramatic fringed shoulder piece for a costume? The design choice affects the size, structure, trim, and attachment method.
For a clean jacket or shirt, use a long narrow tab, usually 1.5 to 2 inches wide and 4.5 to 6 inches long. The outer end is often pointed, curved, or angled, and the inner end buttons near the collar. For a costume epaulette, draft a wider shape with a rounded outer edge. A common pattern looks like a rectangle that extends from the neckline toward the shoulder, then ends in a half circle or oval cap.
If you are making epaulettes for an existing jacket, place a piece of paper over the shoulder and sketch the size directly on the garment. The base should sit comfortably along the shoulder seam without poking into the neck or hanging too far down the sleeve. When in doubt, make a paper mockup first. Paper is cheaper than velvet and far less dramatic when it goes wrong.
Step 2: Measure the Shoulder
Put the garment on a hanger or have someone wear it while you measure. Measure from near the neckline to the shoulder point, following the shoulder seam. Most adult epaulettes fall between 4.5 and 6.5 inches long. The width depends on the style: narrow tabs may be 1.5 inches wide, while costume epaulettes can be 3 to 5 inches wide at the outer end.
Make sure both shoulders match. Symmetry matters because epaulettes sit high on the body, right where people notice details. A slightly crooked hem can hide near the floor. A crooked epaulette waves at everyone from shoulder height.
Step 3: Draft a Simple Epaulette Pattern
On paper, draw a rectangle the length and width you want. For a pointed tab, angle one end into a triangle. For a classic costume epaulette, draw a straight inner strap and a rounded outer end. Add a 1/4-inch to 1/2-inch seam allowance around the shape if you plan to sew and turn it.
Easy Pattern Formula
- Length: shoulder seam length minus 1/2 inch
- Neck end width: 1.5 to 2 inches
- Outer end width: 3 to 5 inches for costume styles
- Seam allowance: 1/4 inch for light fabric, 1/2 inch for thick fabric
Cut the paper pattern and test it on the garment. Adjust the width, length, or curve until it looks balanced. For dramatic fringed epaulettes, make the outer rounded edge slightly wider so the fringe has enough room to hang gracefully instead of bunching up like it missed its coffee.
Step 4: Cut the Fabric and Stabilizer
For each epaulette, cut one top fabric piece, one lining piece, and one stabilizer piece. If you are making a pair, cut two mirrored sets. For fabric with nap, such as velvet, make sure both pieces face the same direction. For patterned fabric, align motifs so the two shoulders look related, not like cousins who met once at a wedding.
The stabilizer is the secret to a professional-looking epaulette. Fusible interfacing works well for light or medium fabric. Felt gives soft structure. Buckram creates a crisp costume base. Thin craft foam adds raised shape. Plastic canvas works for bold costume epaulettes but should be covered carefully so it does not show through.
If you are using fusible interfacing, apply it to the wrong side of the top fabric according to the manufacturer’s instructions. Always test on a scrap first. Too much heat can flatten velvet, scorch delicate synthetics, or make shiny fabric look like it has been personally insulted.
Step 5: Add Embellishments Before Assembly
Some decorations are easier to add before the top and lining are sewn together. Centered patches, embroidered motifs, heat-transfer designs, flat braid, and rows of ribbon should be placed on the top fabric first. Mark guidelines lightly with chalk so the trim stays straight.
For a classic military-inspired look, sew metallic braid around the edge and place a decorative button near the neck end. For a royal costume style, layer gold cord, sequins, and fringe. For a modern fashion look, try black faux leather with chain trim, silver studs, or tone-on-tone embroidery. For a circus ringmaster or nutcracker costume, red fabric with gold fringe is practically required by the laws of theatrical happiness.
Step 6: Sew the Epaulette Base
Place the top fabric and lining right sides together. Sew around the edges, leaving the inner neck end or underside open for turning. Trim bulky seam allowances, clip curves, and carefully reduce extra fabric at corners. Turn the epaulette right side out using a point turner or chopstick. Press the shape flat with a pressing cloth.
For a very crisp edge, topstitch around the epaulette 1/8 inch from the edge. This keeps the layers from shifting and gives the piece a polished finish. If the base is thick, use clips instead of pins to avoid dents. Go slowly around curves, because trim and thick fabric can make the machine grumble like it has opinions.
Step 7: Attach Fringe or Tassel Trim
Fringe turns a basic shoulder piece into an epaulette with personality. Place the fringe along the outer curved edge so the decorative part hangs beyond the fabric. The band of the fringe should sit on the epaulette base. Pin or clip it in place, then stitch across the band securely. For heavy bullion fringe, use two rows of stitching or hand stitch through the band with strong thread.
If the fringe is slippery, baste it first. If it is bulky, use a zipper foot or hand stitching. If you are using hot glue for a costume version, apply glue in small sections and press the trim carefully. Do not drag glue across the fringe, unless your design goal is “golden spaghetti accident.”
Step 8: Finish the Edges With Braid or Cord
After attaching fringe, cover the raw band with decorative braid, ribbon, cord, or flat trim. This hides stitching and gives the epaulette a finished look. Metallic gimp braid, soutache cord, grosgrain ribbon, lace, and sequined trim all work well.
Sew the braid by machine if it is flat and stable. Hand stitch curved or raised trim for better control. For no-sew epaulettes, fabric glue or hot glue can work, but use a light hand. Too much glue creates lumps, and lumps are not a design feature unless you are making a very specific alien admiral costume.
Step 9: Choose an Attachment Method
There are several ways to attach epaulettes to a garment. The right method depends on whether you want them permanent or removable.
Permanent Attachment
For permanent epaulettes, hand stitch the underside of the epaulette to the shoulder seam and near the neckline. Use small, strong stitches and match the thread to the fabric. If the garment is still under construction, you can sew one end of a shoulder tab into the armhole seam before attaching the sleeve, then secure the other end with a button near the collar.
Removable Attachment
For removable epaulettes, use snaps, Velcro, hooks and eyes, or brooch pins. Snaps look cleaner than Velcro and are good for jackets. Velcro is easy for costumes and children’s clothing. Brooch pins are convenient for fashion epaulettes but should be backed with felt or fabric so they do not scratch the wearer or sag under heavy trim.
If the epaulette includes heavy fringe, use at least two attachment points. One point near the neckline and one near the shoulder edge will keep it from twisting. Heavy epaulettes need support, just like dramatic friends.
Step 10: Press, Shape, and Test the Fit
Once the epaulettes are finished, place them on the garment and check the angle. They should follow the shoulder line and sit flat without buckling. If they lift at the outer edge, the base may be too stiff or too wide. If they droop, add a firmer stabilizer underneath or shorten the fringe.
Try the garment on and move your arms. Reach forward, lift your elbows, and turn from side to side. Costume pieces often look wonderful on a table and then behave like small decorative pancakes when worn. Testing prevents surprises.
No-Sew Epaulettes for Costumes
If you need fast DIY epaulettes for Halloween, cosplay, a school play, a parade, or a themed party, a no-sew version can save the day. Cut the base from felt, craft foam, or faux leather. Glue a second layer underneath for strength. Add fringe to the outer edge with hot glue, then cover the glued band with ribbon or braid. Attach brooch pins, Velcro, or safety pins to the underside.
No-sew epaulettes are best for occasional wear. They are lightweight, affordable, and surprisingly effective from a few feet away. For stage costumes, that is often enough. The audience will see shine, shape, and movement, not whether your seam allowance won a tailoring award.
Design Ideas for DIY Epaulettes
Classic Military-Inspired Epaulettes
Use navy, black, red, or white fabric with gold or silver trim. Add a rounded outer end, bullion-style fringe, and a decorative button. This style works beautifully for nutcracker costumes, ringmaster jackets, marching band looks, and historical-inspired outfits.
Fashion Epaulettes
Use faux leather, satin, denim, or wool. Skip the long fringe and add chain, studs, pearls, embroidery, or flat braid. Keep the shape narrower so it looks stylish instead of costume-heavy. Fashion epaulettes can transform a blazer, dress, or cropped jacket.
Cosplay Epaulettes
Cosplay epaulettes may need exaggerated scale, bright colors, foam structure, or removable attachment. Study the character’s shoulder line and decide whether the epaulettes should sit flat, curve upward, or extend beyond the shoulder. Make a paper prototype before using final materials.
Kid-Friendly Costume Epaulettes
Use felt, soft fringe, and Velcro. Avoid sharp pins, heavy chains, or scratchy metallic trim. Children move constantly, and their costumes must survive running, spinning, snack breaks, and mysterious floor contact.
Common Mistakes to Avoid
- Skipping stabilizer: fabric alone often collapses, especially under fringe.
- Making the pair uneven: cut both epaulettes from the same pattern and check placement carefully.
- Using too much glue: excess glue stiffens trim and creates visible bumps.
- Choosing fringe that is too heavy: heavy trim can pull the shoulder piece forward.
- Attaching with only one point: removable epaulettes need support near the neck and shoulder edge.
- Forgetting movement: test the garment while worn, not just flat on a table.
How to Care for Handmade Epaulettes
Removable epaulettes are easier to care for because you can take them off before washing the garment. Store them flat in a box or hang the garment on a padded hanger so the shoulder shape stays intact. If your epaulettes include metallic fringe, sequins, beads, or glue, avoid machine washing. Spot clean gently with a damp cloth and let them air dry.
For sewn fabric epaulettes without delicate trim, press lightly with a cloth if they wrinkle. Do not press directly on synthetic fringe, metallic braid, faux leather, or sequins. Heat can melt, dull, or flatten decorative materials.
Hands-On Experience: What Makers Learn When Making Epaulettes
The first practical lesson in making epaulettes is that small accessories can demand big attention. An epaulette may be only a few inches long, but it sits in one of the most visible places on the body. That means every crooked line, uneven curve, and mismatched piece announces itself quickly. The easiest way to avoid frustration is to treat the pattern like the boss of the project. Make one paper pattern, fold it in half to check symmetry, and use it for both shoulders. This one habit prevents the classic beginner problem: one epaulette looks like a general, while the other looks like it took a wrong turn through the craft drawer.
The second lesson is that structure matters more than sparkle. Sparkle is delightful, obviously. Sparkle is the extrovert of the trim family. But if the base is weak, even expensive fringe will look tired. A layer of fusible interfacing, felt, buckram, or thin foam gives the epaulette the firmness it needs to sit properly. Many makers discover that the best epaulettes are not the heaviest ones; they are the ones with balanced weight. A light base with neatly applied trim often looks better than a heavily loaded shoulder piece that drags the garment down.
Another useful experience is learning when to sew and when to glue. Sewing is best for the base, attachment points, and any trim that will be pulled or handled. Glue is helpful for quick decorative placement, especially with braid, sequins, or costume-only pieces. The trick is to use glue as support, not as a flood. A thin line of glue can secure trim beautifully. A thick blob of glue creates ridges that show through ribbon and make the finished epaulette feel stiff in strange places.
Placement is also a bigger deal than beginners expect. An epaulette placed too close to the neck can feel crowded and uncomfortable. One placed too far down the shoulder can look droopy or oversized. The sweet spot is usually along the shoulder seam, with the inner end near the collar area and the outer end resting close to the shoulder point. Always pin or clip both epaulettes onto the garment before final attachment, then step back and look in a mirror. Better yet, take a quick photo. Photos reveal uneven angles faster than the human eye, probably because cameras have no mercy.
Makers also learn that trim has a personality. Chainette fringe moves beautifully and feels light. Bullion-style fringe looks formal but can be heavier. Flat braid hides stitching and adds polish. Cord creates raised borders. Sequins bring shine but can scratch skin if they sit too close to the neckline. When combining trims, choose one main feature and let the others support it. If fringe, chain, beads, braid, buttons, rhinestones, feathers, and tassels all fight for attention at once, the epaulette may start looking less “military chic” and more “craft store thunderstorm.”
Finally, the most satisfying experience is seeing how quickly epaulettes change the attitude of a garment. A plain blazer becomes a statement jacket. A simple costume becomes recognizable. A thrifted coat becomes theatrical. Epaulettes are small, but they carry visual authority. They frame the shoulders, sharpen the silhouette, and give the wearer a little extra confidence. That is the real charm of making them: you are not just adding trim. You are adding posture, character, and a tiny bit of parade energy.
Conclusion
Learning how to make epaulettes is a smart DIY skill for anyone interested in costume design, sewing, cosplay, fashion customization, or military-inspired jackets. The process is simple once you understand the basic structure: draft the shape, stabilize the base, sew or glue the layers, add fringe or trim, and attach the finished piece securely to the garment.
Start with a paper pattern, choose materials that match the purpose, and test the placement before final stitching. For everyday fashion, keep the design clean and balanced. For costumes, embrace fringe, braid, buttons, and shine. Epaulettes may be small, but they know how to make an entrance.