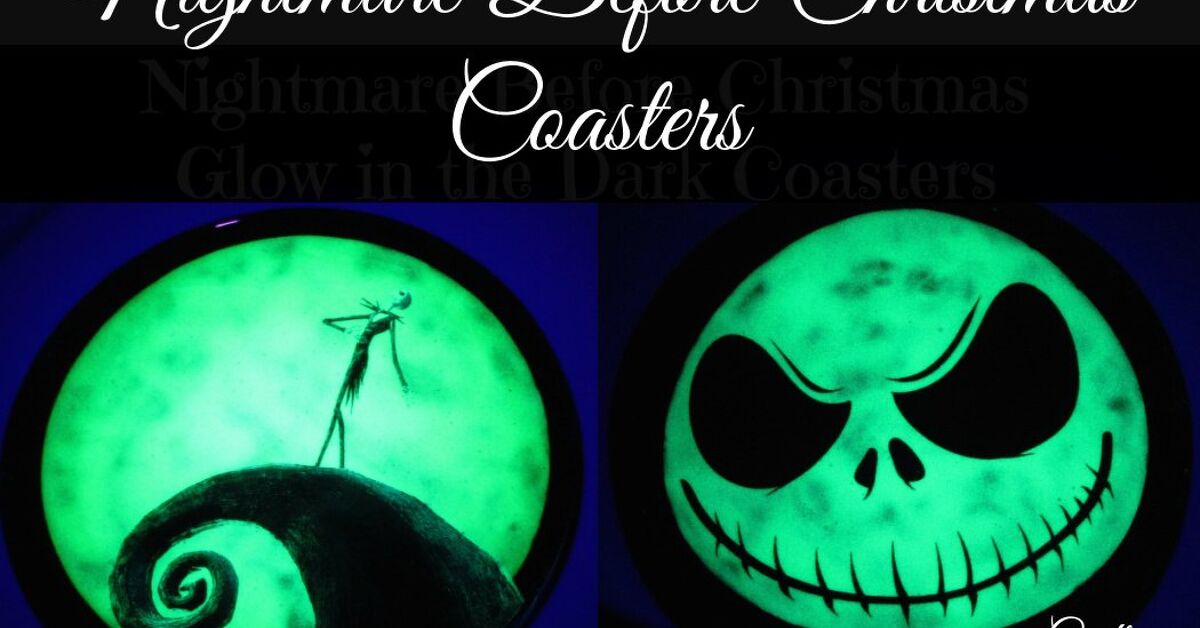
If your idea of the perfect Halloween-to-Christmas crossover is something a little spooky, a little whimsical, and very useful, these DIY Nightmare Before Christmas glow-in-the-dark coasters are a sweet spot. Resin coasters are a classic beginner project because they are small, customizable, and easy to gift, while glow pigments and mica powders make it simple to create dramatic effects without needing a huge supply list. Equal-part epoxy mixes, silicone molds, and a clean working surface are the backbone of most coaster tutorials, and glow pigments can be charged with sunlight or UV light for that after-dark reveal.
This project works especially well for fans of the spooky holiday aesthetic because the movie’s signature look translates beautifully into silhouette art: Jack’s grin, Sally-style patchwork patterns, moonlit backgrounds, bats, stars, striped borders, and spiral-hill-inspired curves. You are not trying to recreate a movie scene frame by frame. You are building a tabletop mood piece that looks magical under daylight and even better when the lights go down. That is the whole trick.
Why This Project Works So Well
The best coaster designs are the ones that combine strong contrast with a simple base. In resin, that usually means a clear or dark background, a small amount of colorant, and a detail layer that pops. Home Depot’s resin guide recommends adding color with mica powder or alcohol ink, then pouring into the mold and using a heat gun to release bubbles; ResinObsession also emphasizes the usefulness of a silicone mat and a protective dome while the coaster cures. Those basics make the craft cleaner, safer, and much easier to manage.
Glow-in-the-dark pigment is the real star here. Michaels describes glow powders and liquid pigments as craft colorants that glow after being charged by UV light or sunlight, which is exactly what you want for coasters that feel normal by day and theatrical by night. Britannica explains the science behind phosphorescent pigments in plain language: they glow after exposure to light. That means the “wow” effect does not require electricity, batteries, or a complicated setup.
Materials You Will Need
- Two-part epoxy resin and hardener
- Silicone coaster molds
- Glow-in-the-dark pigment powder or liquid pigment
- Mica powder or alcohol ink for accents
- Mixing cups, stir sticks, and disposable gloves
- Silicone mat or protected work surface
- Small heat gun or torch for bubbles
- Vinyl sticker, stencil, or hand-painted design for the Nightmare Before Christmas look
- Clear topcoat resin if you want extra depth
- Optional: fine glitter, black pigment, white pigment, and gold leaf accents
Resin tutorials consistently stress a few practical details: measure carefully, mix thoroughly, and keep your workspace protected. The Spruce notes that coaster projects are a friendly introduction to resin because you can add all sorts of elements to the pour, while a separate resin letter tutorial points out that the resin-to-hardener ratio matters because an off ratio can leave the finished piece sticky. That is the kind of mistake that turns a cute craft into a frustrating science experiment, so accuracy matters here.
Step-by-Step: Make the Coasters
1. Choose a design theme
Pick one design direction before you pour anything. A good coasters set looks cohesive, not crowded. For a Nightmare Before Christmas theme, choose one of these approaches:
- Black background with glowing spiral-hill silhouettes
- Milky white base with thin stitched lines inspired by Sally
- Deep purple or midnight blue base with a glowing moon and bats
- Split design: half spooky Halloween, half winter holiday
- Jack-inspired face outlines with glow accents in the eyes and borders
HGTV’s craft coverage often leans into layered pours and complementary colors for high visual impact, and that is a useful mindset here: keep the palette tight so the glow details do not get lost.
2. Prep the mold and the workspace
Set the silicone coaster molds on a level surface covered with a silicone mat or other protected barrier. ResinObsession specifically recommends a silicone mat and a dome or cover while curing, which helps keep dust and lint off the finished surface. If you are adding a sticker, decal, or painted insert, make sure it is fully dry and cut to the exact size of the mold before you begin.
3. Mix the resin
Follow the instructions on your resin kit carefully, especially the mixing ratio. Many craft resins use a one-to-one mix, and that exact proportion is repeatedly emphasized in beginner resin tutorials because it affects cure quality. Stir slowly and scrape the sides and bottom of the cup so the liquid becomes fully blended. If you stir too fast, you will create bubbles; if you rush the ratio, the coaster may never cure the way it should.
4. Add glow and color
Divide the resin into small cups for your colors. Add glow pigment to one cup and your accent colors to the others. Michaels lists glow powders and glow pigments in multiple colors, and ArtResin explains that resin colorants are highly concentrated, so a little goes a long way. That is important because glow powders can clump if overloaded, and a heavy pigment load can make the resin cloudy instead of luminous.
For the darkest and most dramatic result, use a black or very deep navy base, then keep the glow pigment for lines, symbols, or edges. If you want a softer look, use translucent color with just a little glow powder layered on top. Mica powder works beautifully for metallic details, while alcohol ink gives you smoke-like swirls and marbled movement.
5. Pour in layers
Pour a thin base layer first. Then add the design layer: a moon shape, Jack-inspired grin lines, stitched curves, or a spiral hill outline. Resin tutorials from Home Depot and ResinObsession both encourage experimenting with pour patterns, because the same mold can create dramatically different looks depending on how you layer the colors. That freedom is what makes the project fun instead of repetitive.
If you are using decals or vinyl, place them gently into the first layer before the resin fully thickens. If you are hand-painting details, let them dry completely so the resin does not smear the art. This is especially important for clean lines like stars, stripes, or facial outlines. A crisp silhouette is what makes the spooky holiday theme instantly recognizable.
6. Remove bubbles and cure
After pouring, pass a heat gun lightly over the surface to release trapped bubbles. Home Depot lists this step as part of the standard coaster workflow, and it matters because even a small bubble can show up like a pothole once the coaster is cured. Do not overheat the resin; a quick pass is enough. Then cover the piece and let it cure undisturbed according to the resin instructions.
7. Unmold, finish, and test the glow
When the resin is fully cured, pop the coasters out of the molds and inspect the edges. If needed, sand lightly with fine-grit paper and wipe clean. Charge the glow pigment with a lamp, sunlight, or a UV light, then take the coasters into a dark room and enjoy the payoff. Phosphorescent pigments glow after light exposure, so the brighter the charge, the stronger the reveal.
Design Ideas That Look Amazing
A few themes work especially well for this style of coaster. A moon-and-bats set gives you a dramatic look without needing advanced drawing skills. A spiral-hill set creates instant recognition because the curves read well even in a small circle. A stitched Sally-inspired set feels playful and handmade. If you want the coasters to look more polished, use one signature element on each coaster and repeat a border pattern around the set. Consistency will make the collection feel intentional instead of random.
For example, one coaster could feature a glowing moon, another a silhouette of a crooked tree, another a bat wing border, and another a stitched heart. The key is to repeat one or two colors across the whole set. A little black, a little white, and one glow color is usually enough. More than that can turn your coasters into a visual circus.
Troubleshooting and Pro Tips
If your resin stays sticky, the most likely culprit is an incorrect ratio or under-mixing. If the glow looks weak, the pigment may have been too diluted or not charged long enough. If you see bubbles, you probably poured too quickly or skipped the heat-gun pass. Resin tutorials from The Spruce, Home Depot, and ResinObsession all point toward the same lesson: clean prep and patience matter more than clever tricks.
One useful habit is to make a test coaster first. Use the test piece to check your glow intensity, pigment load, and cure behavior. That way, if something needs adjusting, you will know before you use your best mold. It is a small step that saves a lot of disappointment.
How to Care for the Finished Coasters
Once the coasters are finished, treat them like the decorative resin pieces they are. Wipe them with a soft damp cloth and avoid harsh abrasives. Do not soak them for long periods, and avoid placing extremely hot cookware on them. Because the design is meant to be both decorative and functional, gentle care will keep the glossy finish and glow details looking sharp for a long time.
Experience Notes From Making This Kind of Project
The biggest lesson with a glow-in-the-dark coaster set is that the design always looks better when you respect the scale. A coaster is not a poster. Small details matter, but tiny details can disappear once resin adds depth. That is why strong silhouettes, clean borders, and simple repeated motifs work so well. The first version of this project can feel a little too ambitious if you try to include every favorite character cue at once. Once the mold fills, the best shapes are the ones your eye reads in half a second. That is especially true for a theme like this, where the mood is more important than realistic portrait detail.
Another helpful realization is that glow resin rewards restraint. If you overload the pigment, the surface can become chalky and lose that glassy finish people love in resin work. A lighter hand often creates a better result because the glow particles stay distributed without making the piece look dusty. In the same way, metallic accents are most effective when they are used like punctuation, not like wallpaper. One thin silver outline around a moon or one gold edge on a dark coaster can make the whole set look more expensive.
Working in layers also changes the way the project feels. The first layer is practical and a little boring: it is just the foundation. The second layer is where the personality begins. The third layer is where the piece becomes cinematic. That pacing is useful because it keeps the resin from looking flat. It also gives you time to correct mistakes before they become permanent. If a line looks too thick, you can soften the next layer. If a section feels too dark, you can brighten the next pour with white or a pale glow color. Small corrections like that are what separate a decent craft from one that looks intentional.
Temperature and timing matter more than most beginners expect. Resin that is too cold can move sluggishly and trap bubbles, while resin that is too warm can rush toward gel stage before you are ready. The safest rhythm is to prepare everything before mixing: molds level, pigments open, stir sticks ready, gloves on, and your design plan decided. Once the cup is mixed, the clock starts. That is not a reason to panic; it is simply a reason to stay organized. Organized crafters tend to get smoother pours and fewer surprises.
Another thing that becomes obvious after a few tries is that the curing reveal is half the fun. During the day, the coasters can look stylish and understated. At night, after a good charge, they suddenly turn theatrical. That change is the magic trick. A well-designed glow coaster makes people lean in and smile, because it feels like the object has a secret. That is exactly the kind of reaction this theme deserves. A good spooky-holiday craft should feel charming, a little weird, and just polished enough that someone might ask where you bought it.
Finally, this is one of those projects where imperfections can actually help. A slightly uneven silhouette can look handmade in a good way. A tiny swirl in the background can feel like fog. A few air bubbles near the edge can read as texture if the rest of the coaster is smooth. The goal is not factory perfection. The goal is to make something that feels personal, festive, and fun to use in real life. That is why these coasters are such a satisfying weekend project: they are useful, seasonal, and just dramatic enough to make a plain coffee table feel like part of the celebration.
Conclusion
DIY Nightmare Before Christmas glow-in-the-dark coasters are a smart mix of seasonal decor and practical craft. They start with the same basics found in reliable resin tutorialsaccurate mixing, clean molds, pigment control, and careful curingbut they become memorable because of the theme. Use strong silhouettes, keep the palette focused, and let the glow pigment do the theatrical work. The result is a set of coasters that looks stylish in daylight and delightfully eerie at night.
Note: This copy is body-only HTML for easy publishing.