If you have ever heard a sharp little clack-clack and thought, “Wow, those shoes sound like confidence and hardwood,” you were probably hearing geta. These traditional wooden sandals are simple, practical, and surprisingly stylish. They also happen to be a fantastic small woodworking project: compact, customizable, and much more memorable than yet another cutting board.
The beauty of making your own pair is that you can keep the design classic or make it a little more you. Go traditional with a clean rectangular profile and fabric thong strap, or lean modern with softened edges, brighter straps, and a smoother finish. Either way, the goal is the same: build a pair that feels solid, balanced, and wearablenot like two tiny coffee tables tied to your feet.
This guide focuses on a beginner-friendly, hand-tool-first approach. If you are under 18 or new to woodworking, have an experienced adult handle or supervise any cutting and drilling. Geta may be simple, but your fingers still deserve a long and prosperous future.
What Makes Geta Different From Regular Sandals?
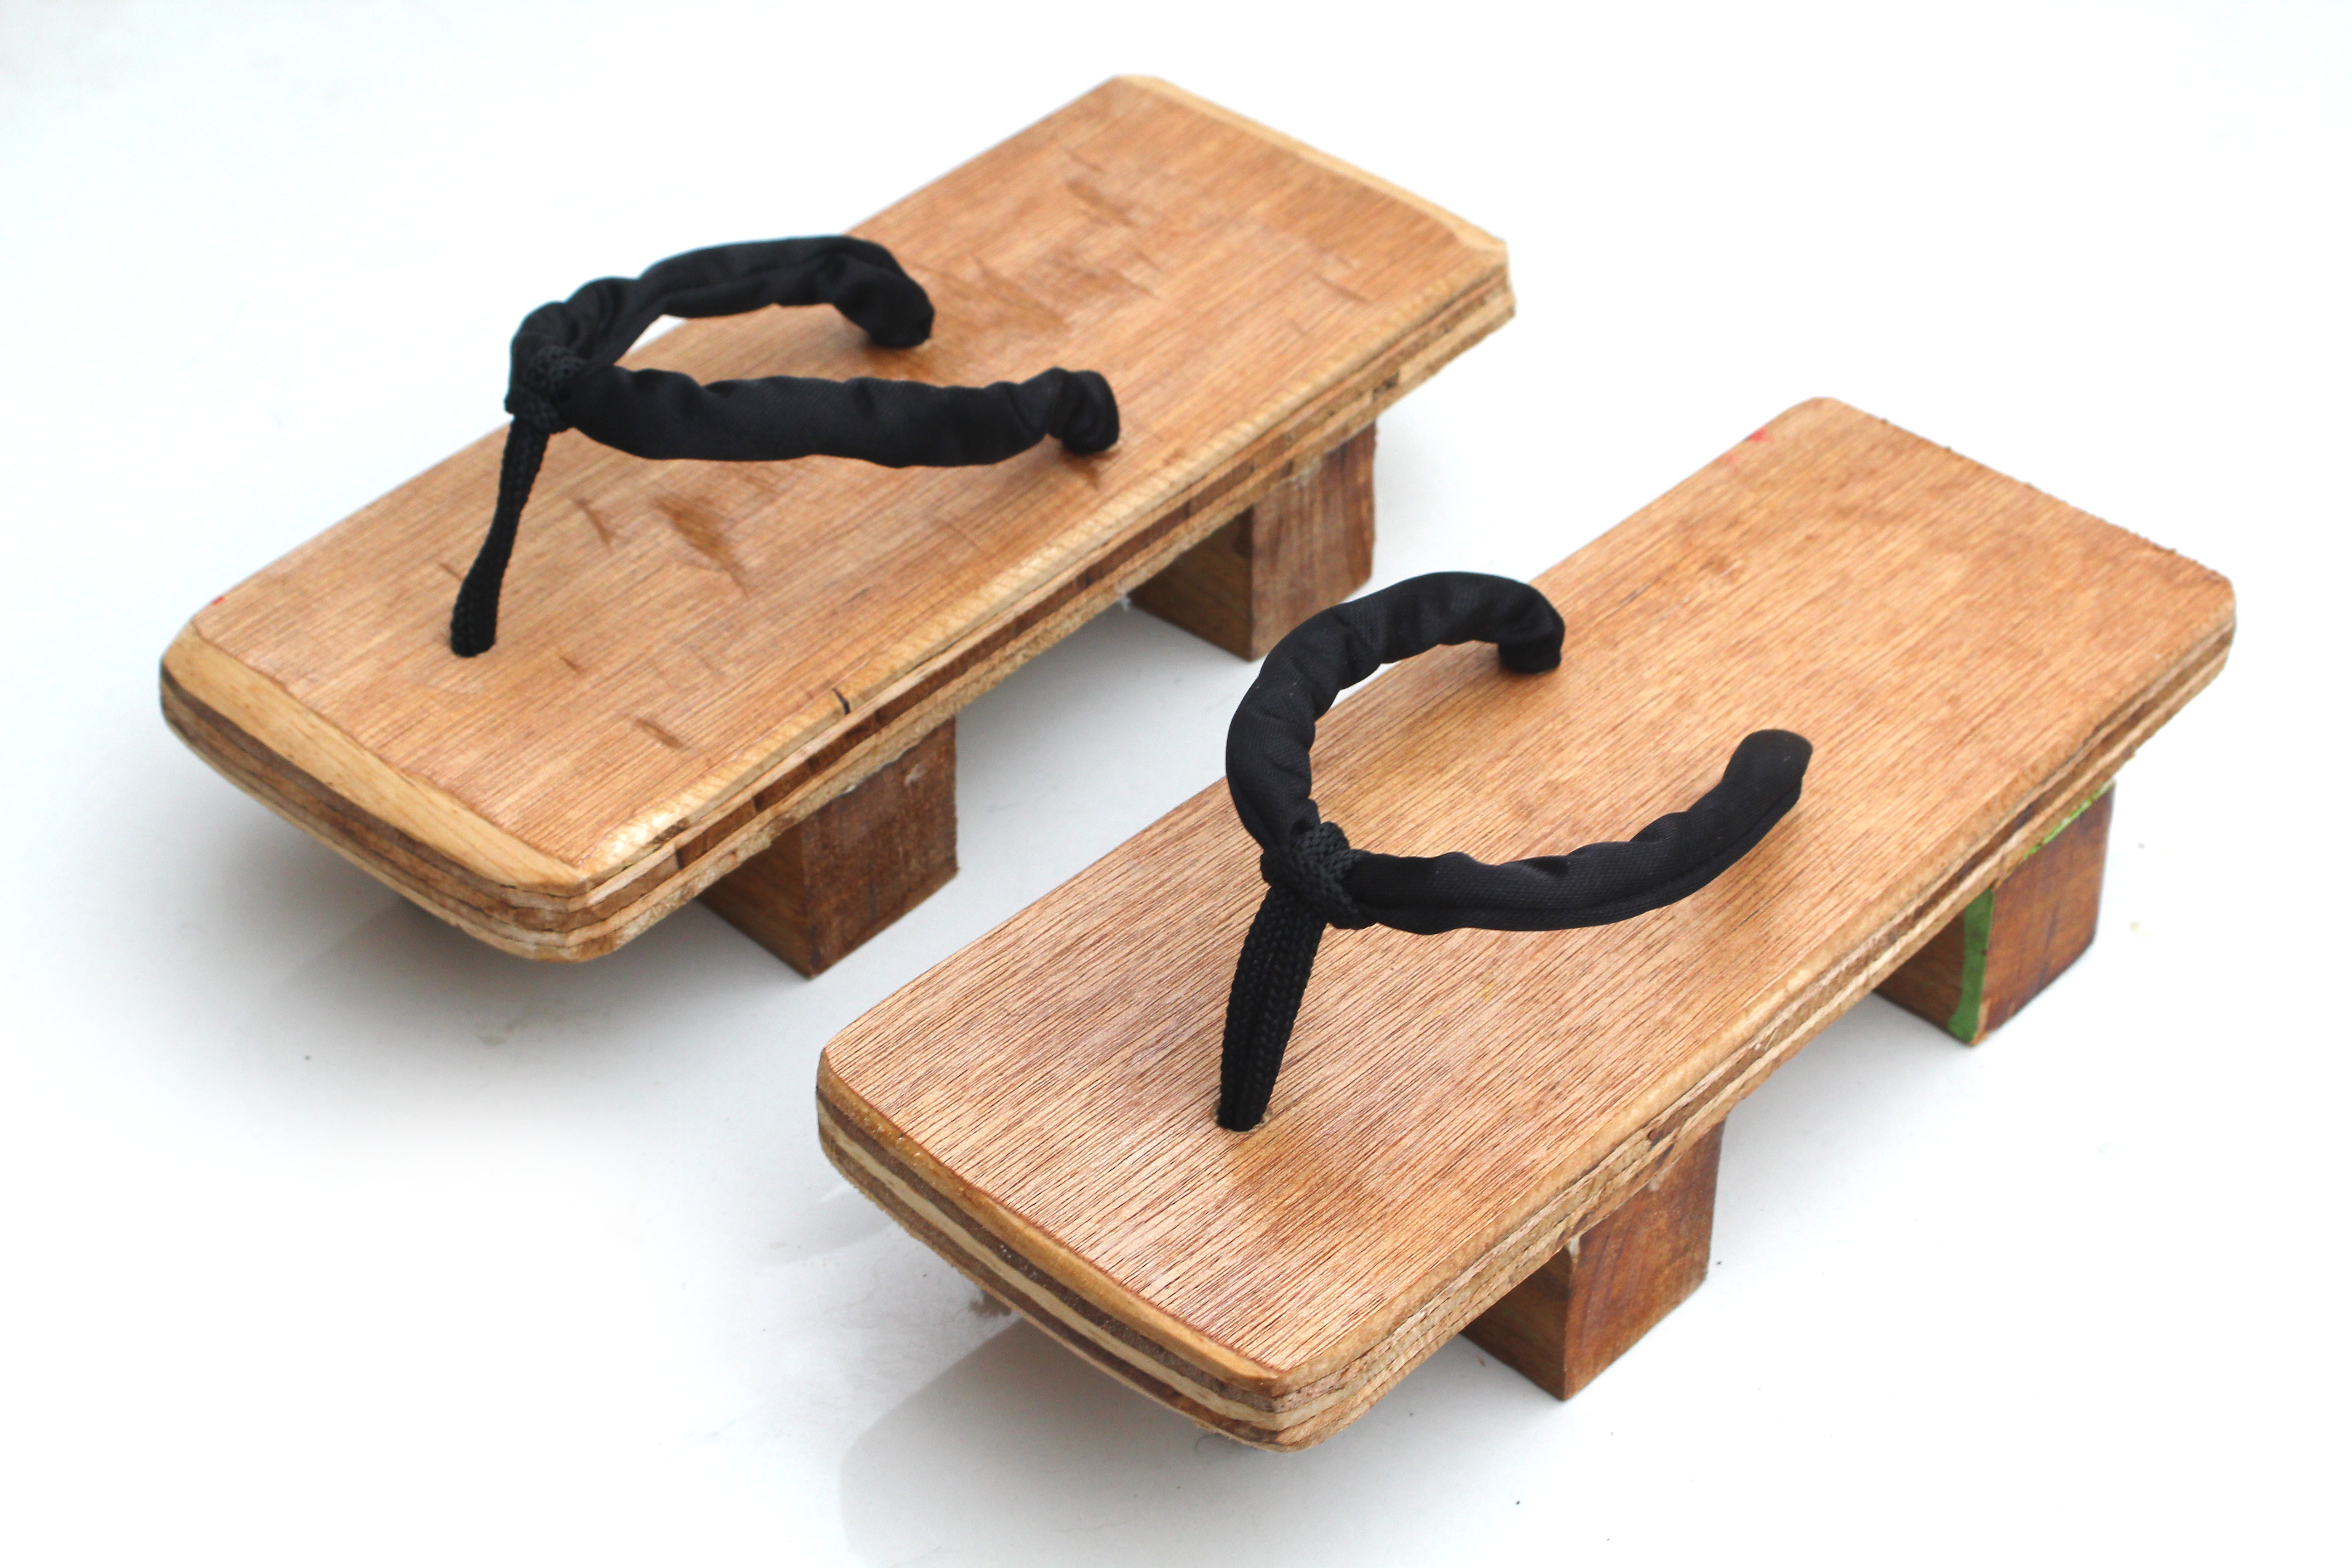
Geta stand out because the foot sits on a raised wooden platform rather than a flexible sole. Underneath are elevated supports, often called “teeth” or risers, that lift the sandal off the ground. That height is part of the charm, but it is also part of the function: it helps keep feet above damp ground, dirt, and light debris.
A classic pair includes three basic elements: the wooden top, the bottom risers, and a fabric thong-style strap. The finished sandal should feel sturdy underfoot, balanced from heel to toe, and just snug enough to stay on without forcing your foot into a wrestling match with the strap.
Before You Build: A Smart Plan Beats Fancy Regret
Before you grab wood and launch into your “samurai cobbler” era, decide what kind of geta you want to make. Are these for costume wear, indoor use, summer lounging, or occasional outdoor use? That decision affects your wood choice, finish, and how much detail you want to add.
Good Materials for a Beginner Pair
- Wood for the sandal tops, about 1 to 1 1/2 inches thick
- Wood for the risers, or thicker stock if you want to shape them from the same blank
- Cotton webbing, padded cord, or fabric-covered rope for the straps
- Wood glue
- Short wood screws
- Sandpaper in 80, 120, 180, and 220 grit
- Optional finish: water-based polyurethane, hardwax oil, or another light wood finish
Helpful Tools
- Ruler or tape measure
- Pencil
- Square
- Hand saw, coping saw, or pre-cut wood blanks
- Hand drill or supervised drill use
- Rasp, file, or sanding block
- Clamps
- Optional countersink or counterbore bit
For indoor or display use, an easy-to-shape wood like basswood or poplar works well. For a pair that may occasionally go outdoors, consider a more durable wood such as cedar or cypress, or make sure you seal the wood well. Avoid badly knotted boards, cracked pieces, or anything warped enough to look like it has already lost an argument with humidity.
How to Make a Pair of Geta in 13 Steps
-
Step 1: Measure Your Feet and Decide on the Final Size
Start by tracing each foot on paper while standing naturally. Measure the length and the widest part near the ball of the foot. For a comfortable first pair, make each sandal slightly longer and wider than your foot rather than trying to carve a precision foot-shaped sculpture. A good starting point is about 1/4 to 1/2 inch extra at the front and sides.
Many traditional wooden sandals are fairly straight in outline, so you do not need a dramatic left and right shape. In fact, keeping both sandals nearly symmetrical makes the project easier and gives the pair a classic look.
-
Step 2: Choose the Wood Based on How You Will Use the Sandals
If this is your first try, choose wood that is straight-grained, stable, and easy to shape. Basswood is wonderfully cooperative for beginners. Poplar is also workable and widely available. If you want a lighter outdoor-friendly pair, cedar or cypress can be smart choices because they handle moisture better than many softer interior woods.
Try to use boards that are dry, flat, and free of big knots. Beautiful wood grain is nice, but structural drama is not. This is footwear, not abstract expressionism.
-
Step 3: Prepare Two Sole Blanks
Cut or have an experienced adult cut two matching rectangular blanks for the tops of the sandals. A practical beginner thickness is about 1 inch for the top piece, plus separate risers underneath. This method is easier than shaping the entire sandal from one thick block.
Lay the blanks side by side and make sure they match as closely as possible. If one sandal is noticeably larger than the other, you have not invented artful asymmetry. You have invented mild annoyance.
-
Step 4: Draw the Shape of Each Sandal
On each blank, sketch a simple outline. A classic geta-inspired shape usually has a gently rounded toe, straight-ish sides, and a rounded or squared heel. Keep both soles matched. You can trace one finished template onto the second blank so they stay consistent.
Do not go too narrow. A slim silhouette may look elegant, but a stable walking surface matters more than fashion when you are balancing on wood.
-
Step 5: Shape the Tops and Soften the Edges
After the sole shape is cut, smooth the perimeter with a rasp, file, or coarse sandpaper. Round over the top edges enough that they feel pleasant against bare feet. You can also slightly soften the bottom edges for a cleaner look.
Do not carve a deep footbed on your first pair. Geta traditionally have a flatter platform, and a light edge round-over is usually enough. A shallow, comfortable top surface is easier to finish and easier to walk on.
-
Step 6: Mark the Placement of the Two Bottom Risers
Flip each sole over and mark where the two risers will sit. One should land closer to the heel and one closer to the front half of the sandal, leaving a space between them. Keep both risers centered side to side so the sandal feels balanced.
Do not place the front riser too close to the toe edge. You want enough material at the front to stay strong and enough support under the ball of the foot when walking.
-
Step 7: Make the Risers
Cut four matching riser blockstwo for each sandal. Their exact shape can be simple rectangles with slightly softened edges. The important part is consistency: same height, same width, same length for matching pieces.
If you want a more traditional look, you can taper the risers slightly or round their corners. If you want the easiest route, keep them straight and neat. Nobody has ever looked at a first woodworking project and said, “Shame it lacked a museum-grade undercarriage.”
-
Step 8: Attach the Risers Securely
Glue the risers in place first, then reinforce them with short screws from the top side of the sandal down into the risers. Predrill pilot holes so the wood is less likely to split. If you want a cleaner appearance, use a countersink or shallow counterbore so the screw heads sit below the surface.
Once the screws are in, you can leave them visible, cover them with wood plugs, or fill them depending on the look you want. Let the glue cure fully before testing the sandals. Wooden footwear should inspire confidence, not suspense.
-
Step 9: Drill the Three Strap Holes
Each sandal needs three holes for the thong-style strap: one near the toe area and two on the sides closer to the midfoot. Mark them carefully so the strap will sit evenly. The front hole should align with the space between the big toe and second toe. The side holes should mirror each other.
Before drilling the real piece, test your layout on cardboard or scrap wood. Strap placement affects comfort more than almost any other design detail. A sandal can be beautiful and still be unwearable if the strap lands in exactly the wrong place.
-
Step 10: Sand Everything Smooth
Now sand the entire project thoroughly. Start with 80 grit if the wood is rough, then move through 120, 180, and finally 220 grit for a smoother touch. Keep the edges crisp where you want structure, but make sure any area that touches skin feels pleasant.
Pay extra attention to the footbed, strap holes, and the lower edges of the risers. Any roughness here will be very obvious later. Wooden sandals have a talent for broadcasting every shortcut directly to your feet.
-
Step 11: Apply a Finish That Protects Without Making the Footbed Slippery
If you plan to wear the pair outdoors, a light protective finish helps the wood resist moisture and dirt. Water-based polyurethane keeps the color fairly natural. Hardwax oil can give a softer, hand-rubbed look. On the bottom and risers, durability matters. On the top surface, traction matters too.
A good strategy is to seal the bottoms and sides well, then use a lighter coat on the footbed or leave the top with a more natural feel. Let everything dry fully before threading the straps.
-
Step 12: Make and Install the Hanao-Style Strap
For the strap, use padded fabric cord, cotton webbing wrapped around filler, or soft rope covered in cloth. You want something firm enough to hold shape and soft enough not to punish your toes. Thread one end through the front hole and the other two through the side holes, then knot securely underneath.
Test the tension before trimming anything. The strap should hold your foot in place while still letting you slide in and out without drama. Too loose, and the sandal flops. Too tight, and your toes file a formal complaint.
-
Step 13: Test Walk, Adjust, and Wear Them In
Try your geta on a flat indoor surface first. Stand still, then take a few slow steps. Notice where your foot sits, whether the strap pulls too hard, and whether the risers feel balanced. Small adjustments make a big difference: a slightly tighter side knot, a softened edge, or a touch more sanding around the toe strap can turn “interesting” into “actually wearable.”
Do not expect them to feel like sneakers on day one. Wooden sandals have a learning curve. Start with short practice walks, let your feet adapt, and enjoy the rhythm. That click-clack is the sound of progress.
Common Mistakes to Avoid
- Making the sandals too narrow: Stability matters more than a sleek profile.
- Skipping pilot holes: Wood can split, especially near the ends of the risers.
- Using rough strap material: If it feels scratchy in your hand, it will feel worse between your toes.
- Leaving sharp edges: A beautiful edge that attacks your foot is not a beautiful edge.
- Rushing the fit test: Even a well-built pair may need strap adjustment after the first try-on.
Ways to Customize Your Geta
Once the basic pair works, you can personalize the look. Stain the wood darker for a dressier vibe, paint motifs on the sides, use patterned fabric for the straps, or add woodburned details if you have the skill and proper supervision. You can also experiment with slightly taller risers, though beginners should stay modest on height. This is footwear, not a small architectural project.
If you want the sandals mostly for decoration, cosplay, or display, you can go all in on appearance. If you want them wearable, keep comfort at the center of every choice. Great design is not just what looks good in a photo. Great design is what still feels good ten minutes later.
Final Thoughts
Making your own pair of geta is one of those rare projects that feels both old-school and delightfully specific. You are working with simple materials, basic joinery, and a design that has endured because it actually makes sense. The finished result is practical, sculptural, and full of personality.
And that is the real joy of the project: not just ending up with sandals, but ending up with sandals that you made with your own hands. Every rounded edge, every strap adjustment, every slightly over-thought sanding session becomes part of the final pair. They may not be perfect. They may, in fact, teach you humility. But they will be yours, and they will sound magnificent crossing a wooden floor.
Experience: What It’s Really Like to Make and Wear Your First Pair of Geta
The first experience most people have when making geta is surprisesurprise at how simple the parts seem, and surprise at how much the tiny details matter. At first, the project looks almost suspiciously easy. Two wooden tops, a few bottom risers, three holes for a strap, and done. Then reality arrives in a very polite but firm voice and says, “Yes, but are they balanced?” That is when the project becomes fun.
One of the most memorable parts of the build is the moment the sandals stop looking like lumber and start looking like footwear. It usually happens after the edges are rounded and the risers are attached. Suddenly, the pieces have posture. They look intentional. Even before the straps go in, you can imagine how they will sound and feel. That is a satisfying shift, especially for beginners who are used to projects looking ugly right up until the final five minutes.
Then comes the strap fitting, which is usually where confidence and confusion meet for coffee. A strap that seems perfect in your hand can feel completely wrong on the foot. Too loose, and your foot slides around like it is trying to escape the assignment. Too tight, and every step feels like your toes are negotiating under pressure. The good news is that this stage teaches patience. The better news is that a small knot adjustment can completely change the comfort level.
Wearing the finished pair for the first time is its own experience. You do not just walk in geta; you become aware that you are walking. The raised base changes your rhythm. Your step becomes shorter, more deliberate, and more balanced. For many people, that is part of the appeal. The sandals ask you to slow down a little. They turn an ordinary walk across the room into a tiny performance, complete with a soundtrack.
There is also something unexpectedly rewarding about the sound. The famous click-clack is not just charming; it is feedback. It tells you whether the sandals are landing evenly and whether your stride is relaxed. When the sound is steady, the pair is probably fitted well. When one sandal sounds odd, it may be a sign that something needs a quick tweak.
Most first-time makers also discover that geta teach restraint. You do not need exotic joinery, a dozen specialty tools, or a heroic amount of decoration. A clean shape, smooth finish, and comfortable strap are enough to make the project feel successful. That simplicity is part of what makes the experience so enjoyable. You are not fighting the design. You are learning from it.
And finally, there is the best part: wearing something handmade that feels unmistakably personal. Even if your first pair has one riser a hair off-center or one knot tucked underneath in a slightly awkward way, the sandals carry your decisions in every inch. They become more than footwear. They become proof that useful, beautiful things can still begin as a board, a pencil line, and a good idea.