Important safety note: A front walkover is a real gymnastics skill, not a party trick to force in your bedroom between homework and dinner. Learning the basic pattern in one day may be possible if you already have the right foundation: a solid handstand, a comfortable bridge, open shoulders, strong wrists, and a coach or trained spotter nearby. If you are brand-new to tumbling, your one-day goal should be safer and smarter: understand the steps, test your readiness, practice drills, and build confidence without rushing your body.
The good news? A front walkover looks like magic, but it is built from very learnable pieces. Think of it as a graceful recipe: one part lunge, one part split handstand, one part bridge, one part stand-up, and a large scoop of patience. The bad news? Skipping the basics is like baking cookies without flour. You may still create something, but nobody wants to explain it to urgent care.
This guide breaks down how to learn to do a front walkover in 1 day using 13 practical steps. It is written for beginners and developing gymnasts who want a safe, structured, realistic approach. Use a padded gymnastics mat, clear space, adult supervision, and a qualified coach whenever possible. Stop if you feel sharp pain, dizziness, wrist pain, back pain, or fear that makes you lose control.
What Is a Front Walkover?
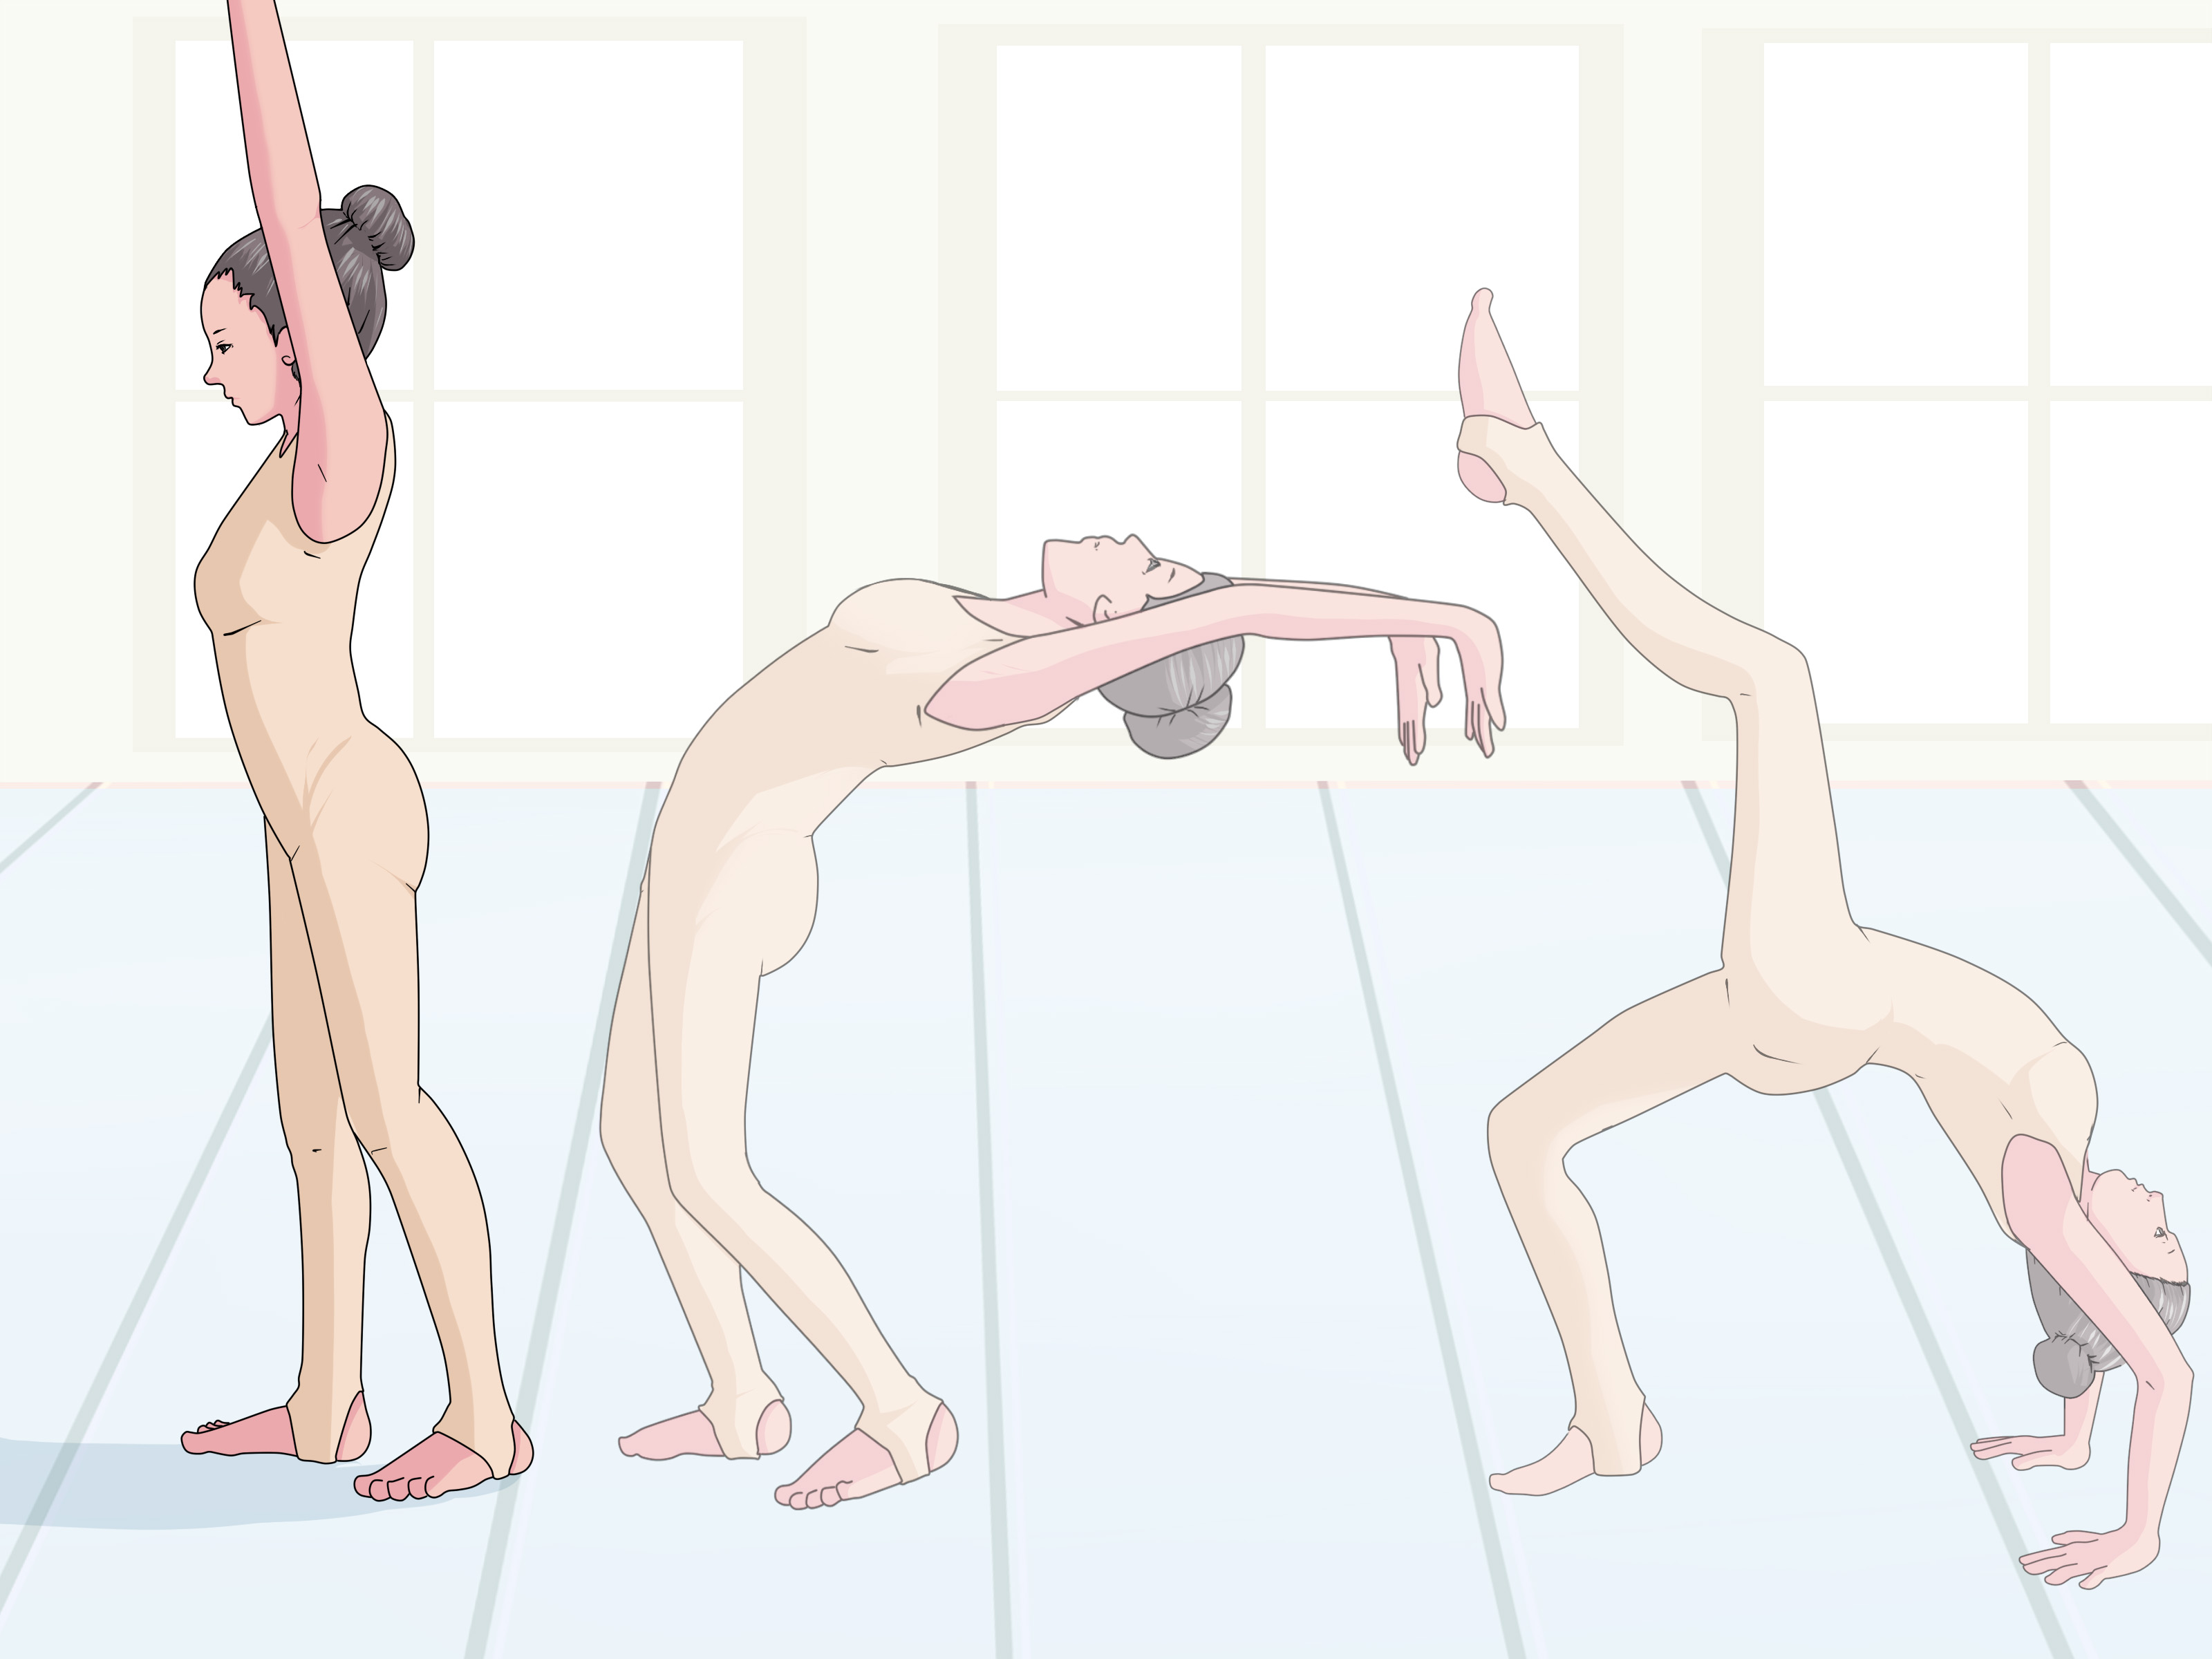
A front walkover is a forward tumbling skill where you begin in a lunge, kick into a split handstand, pass through a bridge shape, and stand up one foot at a time into a controlled finish. It appears in gymnastics, cheerleading, acro dance, and floor choreography because it combines strength, flexibility, balance, and body control.
Unlike a cartwheel, your hands move forward and your body passes through a deeper backbend. Unlike a front handspring, a front walkover is slower, more controlled, and does not require a powerful block off the hands. That makes it look gentle, but gentle does not mean easy. The skill asks your wrists, shoulders, back, hip flexors, legs, and core to work together like a tiny acrobatic orchestra.
Can You Really Learn a Front Walkover in 1 Day?
Yes, but only under the right conditions. If you can already hold a handstand, push into a strong bridge, lift one leg in bridge, and stand up from a backbend with control, you may be able to connect the movement in one focused practice session with a coach. If you cannot do those prerequisites yet, one day is enough to learn the roadmap, not necessarily the full skill.
A better goal is this: by the end of the day, you should know exactly which part of the front walkover is ready and which part needs more training. That is still progress. In gymnastics, “almost” is not failure; it is usually the stage right before the body says, “Oh, I understand the assignment now.”
Before You Start: Your One-Day Front Walkover Checklist
Before practicing, make sure you have a padded surface, open space, water, comfortable athletic clothing, and someone qualified to supervise. Avoid practicing on tile, concrete, hardwood, beds, couches, wet grass, or any surface that shifts under your hands. A front walkover needs predictable support. Your living room rug is not a gymnastics floor, no matter how inspirational your playlist is.
You should also warm up before stretching. Light cardio, dynamic movement, wrist circles, shoulder mobility, lunges, and controlled bridges prepare your body much better than dropping into cold splits and hoping for the best. The goal is to feel warm, alert, and springynot exhausted.
How to Learn to Do a Front Walkover in 1 Day: 13 Steps
-
Step 1: Start With a Safety-First Mindset
Decide before you begin that you will not force the skill. A front walkover requires trust, but trust should come from preparation, not from pretending fear does not exist. Tell your spotter or coach what you are working on, clear the area, remove jewelry, tie back long hair, and choose a mat with enough room for your hands and feet to land safely.
-
Step 2: Warm Up for 15 to 20 Minutes
Begin with light cardio such as jogging in place, jumping jacks, skipping, or high knees. Then move into dynamic stretches: arm circles, leg swings, walking lunges, inchworms, and gentle back-body movements. Add wrist rocks on hands and knees, shoulder shrugs, and hollow-body holds. Your warm-up should make you feel ready, not tired. If your muscles still feel stiff, keep warming up before attempting bridges or handstand drills.
-
Step 3: Test Your Bridge
A strong bridge is one of the biggest front walkover requirements. Lie on your back, place your hands beside your ears, bend your knees, and press up into a bridge. Your arms should be straight or close to straight, your shoulders open, and your breathing steady. If your bridge feels painful or collapsed, do not attempt a full front walkover yet. Practice bridge holds, shoulder mobility, and gentle bridge rocks instead.
-
Step 4: Check Your Handstand
A front walkover passes through a split handstand, so your handstand matters. Practice kicking up to a controlled handstand against a wall or with a coach. Focus on straight arms, active shoulders, tight core, pointed toes, and hands pressing evenly into the floor. You do not need a circus-level handstand, but you should be comfortable supporting your weight on your hands.
-
Step 5: Practice the Lunge Entry
Stand tall with your arms by your ears. Step your dominant leg forward into a lunge, keeping your front knee bent and your back leg straight. Your arms should stay strong, not floppy. The lunge is your launch pad. If it is too short, you may not create enough momentum. If it is too wild, you may lose control before your hands touch the mat.
-
Step 6: Drill the T-Lever Shape
From your lunge, tip your chest forward while lifting your back leg behind you, creating a long line from fingertips to toes. This is sometimes called a T-lever. It teaches control before your hands reach the floor. Keep your hips square and your eyes looking toward the mat. The more controlled your T-lever, the cleaner your front walkover entry will feel.
-
Step 7: Kick Into a Split Handstand
With supervision, move from the lunge into a split handstand. Place your hands shoulder-width apart and kick your back leg overhead while the front leg follows. Keep the legs split rather than snapping them together. Your shoulders should push tall, your elbows should stay straight, and your fingers should grip the mat lightly for balance. This step builds the upside-down control needed for the full walkover.
-
Step 8: Learn Handstand to Bridge With Help
This is a major bridge between drills and the actual skill. With a coach or trained spotter supporting you, practice moving from handstand into a bridge. The goal is not to crash down; it is to lower with control. Your first foot reaches toward the floor while your shoulders remain active. If your elbows bend or your back feels jammed, return to bridge and shoulder mobility work.
-
Step 9: Practice Bridge With One Leg Lifted
Push into a bridge and lift one leg toward the ceiling. This teaches the split bridge position used in a front walkover. Keep both hands pressing firmly into the mat and avoid letting one shoulder twist open. Switch legs so both sides develop strength. If one side feels much weaker, that is useful information. Your body is not being dramatic; it is giving you a training note.
-
Step 10: Work on Standing Up From a Bridge
The stand-up is where many beginners get stuck. From a bridge, shift your weight toward your feet, push your hips forward, press through your legs, and bring your chest up. A coach may have you practice on an incline mat or with support at your back. Do not yank your neck or throw your head. The stand-up should come from legs, hips, core, and shoulder opening.
-
Step 11: Connect the Skill With a Spotter
Once the pieces feel comfortable, try connecting them with a qualified spotter. Start in a lunge, pass through the split handstand, lower into the bridge shape, shift your weight, and stand up into a lunge finish. Your spotter should help guide your hips and back safely, not fling you through the movement like a human shopping cart.
-
Step 12: Clean Up the Finish
A front walkover is not finished just because your feet found the floor. The ending matters. Aim to stand tall with arms by your ears, one foot in front, one foot behind, and your eyes forward. Avoid stumbling, twisting sideways, or dropping your arms early. A clean finish shows control, and control is what separates a skill from a lucky escape.
-
Step 13: Decide Whether You Are Ready to Try Without Assistance
Only remove the spot when your coach says you are ready. You should be able to complete the movement smoothly, without pain, panic, bent arms, or collapsing shoulders. If you still need help, that is normal. Keep practicing the drills. The safest one-day win may be a beautifully spotted front walkover, not an unassisted one.
Common Front Walkover Mistakes
Bending the Arms
Bent arms make the skill less stable and place extra stress on the wrists, elbows, and shoulders. Think about pushing the floor away throughout the handstand and bridge phases.
Closing the Shoulders
If your shoulders are tight, your bridge may feel cramped. Add shoulder mobility drills, wall bridges, and gentle chest-opening stretches after warming up. Never bounce in a stretch or force your shoulders past their natural range.
Kicking Too Hard
A front walkover needs momentum, but more power is not always better. Kicking too hard can make you overshoot the bridge or twist sideways. Controlled energy beats chaotic enthusiasm every time.
Looking Around
Your head should stay neutral and controlled. Looking sideways can throw off your alignment. Keep your attention on your hands during the inverted phase and let your body follow the line of the skill.
Trying It Alone Too Soon
This is the big one. A front walkover may look easy on video, but videos do not show the months of flexibility, strength, and coaching behind the scene. Practice with proper supervision, especially if you are still growing, new to gymnastics, or unsure about your bridge.
Best Drills for Learning a Front Walkover Fast
If you want faster progress, drill the building blocks instead of repeating messy attempts. Try wall handstands, bridge holds, bridge rocks, one-leg bridge lifts, lunges, split handstand entries, and handstand-to-bridge drills with a spotter. Incline mats, panel mats, and barrels can help reduce the amount of back flexibility required while you learn the pathway.
Strength training also matters. Add plank holds, hollow-body rocks, glute bridges, calf raises, lunges, and shoulder taps. These exercises may not look as exciting as tumbling, but they are the quiet heroes. Nobody cheers for a wrist-conditioning drill until it saves your handstand.
How Long Should a One-Day Practice Session Be?
Quality matters more than hours. A smart session might include 15 to 20 minutes of warm-up, 15 minutes of flexibility and mobility, 20 minutes of prerequisite drills, 20 minutes of spotted progressions, and a short cool-down. Take water breaks. Rest if your wrists, shoulders, or back feel tired. Fatigue makes technique sloppy, and sloppy technique is where injuries like to sneak in wearing tap shoes.
What to Do If You Do Not Get It in One Day
Do not panic. Not getting a front walkover in one day does not mean you are bad at gymnastics. It usually means one piece needs more time. If you cannot stand up from the bridge, work on leg strength and shoulder flexibility. If you twist sideways, practice square hips and split handstand drills. If you are afraid to lower from handstand to bridge, use a spotter, a barrel, or an incline mat.
The fastest gymnasts are not always the ones who rush. They are the ones who practice the right thing consistently. A front walkover may take one day, one week, one month, or longer. Your timeline should respect your body, not someone else’s highlight reel.
Front Walkover Experience Notes: What a One-Day Practice Can Feel Like
Many learners begin the day thinking the hardest part will be going upside down. Surprisingly, the upside-down part often feels familiar if they already know handstands. The real surprise is the bridge-to-stand-up section. That moment requires confidence, open shoulders, flexible hip flexors, and enough leg strength to bring the chest forward. It is common for a beginner to land in the bridge and then freeze, as if the floor has suddenly become a very comfortable but inconvenient bed.
A productive one-day session usually has three emotional stages. First comes excitement. The gymnast warms up, tries a few bridges, kicks into handstands, and thinks, “This might actually happen today.” Then comes the puzzle stage. The handstand feels okay, the bridge feels okay, but connecting them feels awkward. One foot lands too far away. The arms bend. The finish disappears. This is where coaching helps most, because a small correction can change everything.
The third stage is either connection or clarity. Some learners connect the full spotted front walkover and feel the movement click. Others realize they need more work on a specific piece. Both outcomes are useful. A gymnast who leaves knowing, “I need a stronger bridge stand-up,” is much better off than one who keeps throwing attempts without understanding the problem.
One helpful experience is practicing with a simple checklist. After each attempt, ask: Were my arms straight? Did I keep my legs split? Did my first foot land softly? Did I shift my hips forward? Did I finish in a lunge? This turns practice into feedback instead of frustration. It also keeps the session from becoming a dramatic negotiation with gravity.
Another real-world tip: video can help, but only when used carefully. A short clip lets you see whether your shoulders are closing or your legs are bending. However, do not chase the camera. The goal is not to make a perfect social media clip by sunset. The goal is to learn safely and build a skill you can repeat tomorrow, next week, and under pressure.
Finally, the best one-day front walkover experience usually ends with a cool-down and a plan. Stretch gently, hydrate, and write down what improved. Maybe your bridge got stronger. Maybe your split handstand became cleaner. Maybe you learned that your wrists need conditioning. That is all progress. Gymnastics rewards patient repetition, and every polished skill begins as a wobbly first draft.
Conclusion
Learning how to do a front walkover in 1 day is possible for some athletes, but it should never become a risky challenge. The safest path is to warm up properly, check your prerequisites, practice the pieces, use a mat, work with a coach or trained spotter, and stop when your body sends warning signs. A beautiful front walkover is not just about flexibility. It is about control, timing, strength, awareness, and patience.
If you connect the skill today, celebrate it. If you only master the drills, celebrate that too. Gymnastics progress is still progress even when it arrives wearing knee-length socks and a confused facial expression. Keep practicing smart, stay consistent, and let the front walkover become a skill you ownnot one you survived by luck.