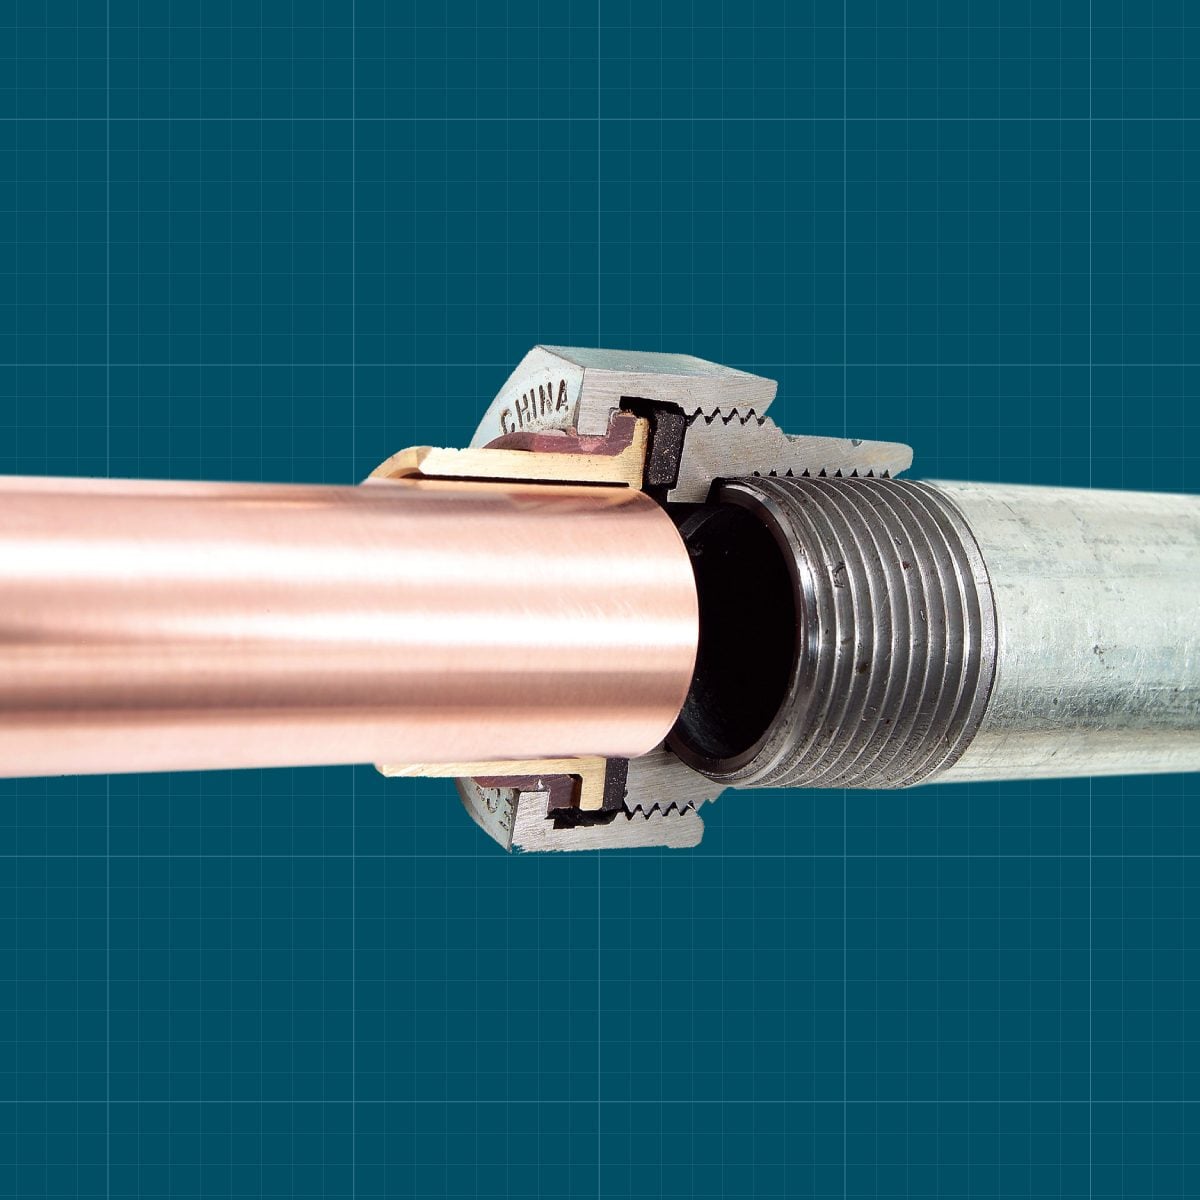
Connecting galvanized steel pipe to copper pipe sounds like a simple matter of finding two fittings that screw together. Unfortunately, plumbing has a habit of turning “simple” into “Why is there water dripping through the ceiling?”
The problem is not merely making the two pipes fit. Copper and galvanized steel are dissimilar metals. When they touch while carrying water, the connection can become vulnerable to galvanic corrosion. Over time, the galvanized side may rust, clog, weaken, or leak around the threads.
The correct solution is to use an approved transition fitting, such as a dielectric union or a listed copper-alloy fitting, and to install it without damaging the existing galvanized pipe. This guide explains the safest methods, the tools you need, common mistakes to avoid, and how to test the finished repair.
Why Copper and Galvanized Pipe Need a Proper Transition
Galvanic corrosion is the real enemy
Galvanized pipe is steel coated with zinc. The zinc helps protect the steel from ordinary rust, but it does not make the pipe indestructible. Copper sits at a different position in the galvanic series, meaning the two metals have different electrochemical properties.
When copper and galvanized steel make direct electrical contact in the presence of water, the water acts as an electrolyte. A small electrochemical reaction can develop between the metals. The more active material, generally the zinc-coated steel side of this combination, may deteriorate faster than it would on its own.
This process does not usually create a dramatic shower of sparks. It is quieter and more annoying. The joint may slowly form rust, mineral buildup, greenish staining, restricted flow, or a persistent leak that returns after repeated tightening.
Thread sealant does not isolate the metals
PTFE plumber’s tape and pipe-joint compound help seal tapered pipe threads. They fill microscopic spaces where water might escape. They are not, however, reliable substitutes for an approved transition fitting.
Even if tape covers part of the threads, the metals can still make contact as the fitting is tightened. Sealant keeps water inside the pipe; a dielectric component is intended to separate dissimilar metals. Those are two different jobs.
What plumbing codes generally require
Model plumbing codes commonly call for an approved copper-alloy fitting, dielectric fitting, or dielectric union when copper tubing is joined to galvanized steel pipe. Local requirements may be different depending on which code edition your city, county, or state has adopted.
Before buying parts, confirm that the fitting is approved for the pipe size, water temperature, pressure, and intended location. Potable-water components should also carry appropriate lead-free and drinking-water certifications.
The Best Ways to Connect Galvanized Pipe to Copper
Method 1: Use a dielectric union
A dielectric union is the classic transition fitting for joining galvanized steel to copper. It typically has a threaded steel or galvanized side, a copper-alloy or sweat side, a union nut, and a nonconductive gasket or sleeve between the two metal sections.
The insulating component prevents direct metal-to-metal contact while the gasket forms a watertight seal. Because the union can be opened later, it also makes future repairs less acrobatic. Your future self may appreciate not having to rotate six feet of rigid pipe inside a wall.
Dielectric unions are available with several copper-side connection types, including:
- Sweat or solder connections
- Copper press connections
- Female or male threaded connections
- Compression-style connections in certain listed products
Always follow the union manufacturer’s installation instructions. The pieces from different brands are not necessarily interchangeable, even when they appear to be the same size.
Method 2: Use an approved brass or bronze transition fitting
Some plumbing codes allow a listed copper-alloy fitting between copper tubing and galvanized steel pipe. Brass and bronze are copper alloys commonly used in plumbing adapters, valves, nipples, and unions.
A typical arrangement might use a lead-free brass female adapter threaded onto galvanized pipe, with copper tubing soldered, pressed, or pushed into the other end. This approach can be compact and convenient where a bulky dielectric union will not fit.
However, a standard brass fitting does not necessarily provide the same electrical isolation as a true dielectric union. Do not assume that any random brass nipple automatically solves every corrosion concern. Use a fitting listed for the application and accepted by the local plumbing authority.
Method 3: Use a flame-free press transition
A press-style dielectric union is useful where soldering would be difficult or unsafe. The galvanized side threads onto the existing pipe, while a compatible press tool secures the copper side.
Press fittings avoid an open flame and can save time in cramped mechanical rooms, near framing, or close to combustible materials. The trade-off is that the tool is expensive, and the correct jaw, fitting profile, insertion depth, and pipe preparation are essential.
Method 4: Use a threaded adapter with a copper-compatible push fitting
A listed brass threaded adapter may connect to the galvanized threads on one side and accept copper tubing with a push-to-connect socket on the other. This can be useful for a small repair when soldering is impractical.
Do not push a standard galvanized pipe directly into a push-to-connect fitting designed for copper, PEX, or CPVC. Galvanized pipe has different dimensions and surface characteristics. The push side must be used only with pipe materials specifically listed by the manufacturer.
Tools and Materials You May Need
The exact shopping list depends on the transition method, but a typical soldered dielectric-union installation requires:
- A correctly sized dielectric union
- Two pipe wrenches
- An adjustable wrench or large pliers
- A copper tubing cutter
- A reaming or deburring tool
- Emery cloth, abrasive mesh, or fitting brushes
- Lead-free solder and compatible plumbing flux
- A propane or MAP-Pro torch
- A flame-resistant heat shield
- Potable-water-rated PTFE tape or pipe-joint compound
- Replacement copper tubing and couplings
- Safety glasses and heat-resistant gloves
- A fire extinguisher
- Dry towels and a bucket
For a press connection, replace the torch, solder, and flux with the approved press tool and jaw. For a push-to-connect adapter, use the manufacturer’s depth gauge, deburring tool, and disconnect tool.
How To Join Galvanized to Copper Pipes Step by Step
Step 1: Confirm that the line carries water
This guide applies to residential water piping. Do not use these instructions for gas piping, fuel lines, refrigeration systems, fire-sprinkler systems, or high-pressure industrial piping. Those systems have different codes, fittings, testing procedures, and licensing requirements.
If the pipe connects to a water heater or boiler, turn off the appliance according to its manufacturer’s instructions. Electric heating elements can be damaged if energized in an empty tank, and gas-fired equipment requires appropriate shutdown procedures.
Step 2: Inspect the galvanized pipe before touching it
Look closely at the pipe and fitting. Heavy rust, swollen threads, deep pitting, flaking metal, or a pipe that appears nearly closed by mineral deposits may indicate that a small repair is no longer sensible.
Galvanized pipe often corrodes internally before the exterior looks alarming. If nearby fixtures have weak pressure, rusty water, or repeated leaks, replacing a longer section may be wiser than attaching shiny new copper to a pipe that is already auditioning for retirement.
Step 3: Shut off and drain the water
Close the main water shutoff or the nearest functioning branch valve. Open a faucet at a lower elevation to relieve pressure and drain the line. Keep a bucket and towels nearby because old pipes enjoy saving one final surprise for the person holding the wrench.
The copper must be completely dry if you plan to solder. Even a small amount of water can absorb heat and prevent the fitting from reaching soldering temperature.
Step 4: Cut the copper pipe squarely
Use a tubing cutter to remove the damaged copper connection or create enough working space for the new union. Tighten the cutter gradually as you rotate it. Cranking it down too aggressively can deform the tube.
After cutting, ream the inside edge and remove the exterior burr. A clean, square cut improves water flow and helps soldered, press, and push-fit connections seat correctly.
Step 5: Hold the galvanized system with two wrenches
Place one pipe wrench on the fitting you are removing and another on the adjacent pipe or fitting. The second wrench acts as a backup and prevents twisting force from traveling deeper into the plumbing system.
This step is especially important with old galvanized pipe. Twisting one joint may loosen another joint inside a wall, behind a ceiling, or under a floor. That is how a twenty-minute repair becomes an educational weekend.
Step 6: Remove the old fitting carefully
Turn the old fitting counterclockwise while supporting the stationary pipe with the backup wrench. If it refuses to move, do not apply unlimited force. Excessive leverage can crack a fitting or break a weakened pipe.
Penetrating oil and controlled pressure may help on accessible exterior threads, but products not approved for potable-water contact should not be allowed inside the waterway. When the fitting remains frozen, cutting back to a sound threaded section or calling a plumber is usually safer.
Step 7: Examine and clean the galvanized threads
Brush away loose rust and old sealant. Inspect the remaining threads for thinning, flattening, cracks, missing sections, or severe corrosion. Threads that crumble under light cleaning cannot make a dependable joint.
If the threads are sound, clean them without grinding away the remaining zinc coating. If they are damaged, replace the nipple or pipe section rather than trying to bury the problem under an impressive sculpture of thread tape.
Step 8: Prepare the threaded side of the union
Apply potable-water-rated PTFE tape, compatible pipe-joint compound, or the combination recommended by the fitting manufacturer. Wrap tape in the same direction the fitting will turn so it does not unravel during assembly.
Keep excess compound away from the first thread and out of the waterway. More sealant is not automatically better. A thick glob inside the pipe can break loose and clog faucet cartridges, aerators, or valves.
Step 9: Install the galvanized half
Thread the steel side of the dielectric union onto the galvanized pipe by hand. It should turn several threads before requiring a wrench. If it immediately binds or sits crooked, back it off and start again to avoid cross-threading.
Tighten it firmly with two wrenches, following the manufacturer’s guidance. Do not overtighten. Old galvanized threads can split, and excessive force can distort a fitting.
Step 10: Prepare the copper side
Measure the required copper length carefully. Account for the insertion depth of every coupling, adapter, and union socket. Dry-fit the pieces before soldering or pressing.
For soldering, polish the outside of the copper tubing and the inside of the fitting until both surfaces are clean and bright. Apply a thin, even coat of compatible flux. Do not smear flux several inches down the pipe as though frosting a birthday cake.
Step 11: Protect the dielectric gasket from heat
Remove the union’s rubber or plastic gasket before soldering the copper half unless the manufacturer specifically instructs otherwise. Heat can harden, melt, or deform the gasket.
Solder the copper components away from the assembled dielectric section whenever possible. Use a heat shield, maintain a fire watch, and keep a fire extinguisher within reach. Never direct a torch toward insulation, wiring, wood framing, stored chemicals, or painted surfaces.
Step 12: Let the fitting cool naturally
Allow the soldered section to cool before reinstalling the gasket. Do not pour water onto a hot joint. Rapid cooling can stress the connection, and water may interfere with inspection.
Wipe away excess flux with a damp cloth after the joint has cooled sufficiently. Flux residue is acidic and should not be left on the copper surface.
Step 13: Assemble the union
Position the insulating sleeve and gasket exactly as shown in the manufacturer’s instructions. Bring the two halves together without pinching or twisting the gasket, then tighten the union nut.
The gasket, not heroic wrench pressure, creates the seal. Tighten the nut evenly and stop before deforming the insulating parts.
Step 14: Support the pipes
Install or adjust pipe hangers so the union is not carrying the weight of the piping. Copper and galvanized steel expand at different rates, and unsupported pipes can place unnecessary stress on the transition.
Use hangers and isolating materials appropriate for the pipe type. Avoid positioning copper directly against unprotected steel supports in damp locations.
Step 15: Restore water slowly and test
Close the open faucets, then reopen the shutoff valve gradually. A slow refill reduces pressure shock and gives you time to notice a developing leak.
Dry the union thoroughly and inspect every joint with a clean paper towel. A towel reveals tiny beads of water that may be difficult to see on shiny metal. Check again after several minutes, after the water reaches operating temperature, and later the same day.
Never test a questionable joint by tightening it repeatedly under full pressure. Shut the water off, relieve the pressure, and correct the underlying problem.
Common Mistakes to Avoid
Connecting copper directly to galvanized threads
A copper female adapter screwed directly onto galvanized pipe may fit mechanically, but it creates an undesirable dissimilar-metal transition. Use an approved fitting designed for the job.
Using a standard push fitting on galvanized pipe
Push-to-connect fittings made for copper, PEX, CPVC, or PE-RT should not be pushed over galvanized pipe unless the manufacturer specifically lists that use. The threaded end of a suitable adapter is the part that connects to galvanized piping.
Heating the assembled dielectric union
Soldering while the insulating gasket remains installed can ruin the component that separates the metals and seals the joint. Disassemble or protect the fitting as directed by its manufacturer.
Overtightening old threads
More wrench pressure does not repair weakened steel. It may split the fitting, crush the gasket, strip threads, or disturb another joint farther down the line.
Ignoring pipe bonding
Metal water piping may be involved in the building’s electrical bonding system. A dielectric union interrupts electrical continuity at the connection. Have a qualified electrician verify that the piping remains correctly bonded when required. Do not improvise an electrical jumper without understanding the applicable electrical code.
Closing the wall immediately
Test the joint under normal pressure and temperature before covering it. When local rules require an inspection, obtain approval before installing drywall, insulation, or permanent finishes.
When You Should Call a Licensed Plumber
A careful homeowner with plumbing experience may be able to install an accessible transition fitting. Professional help is the better choice when:
- The galvanized pipe is badly rusted or nearly blocked
- The fitting is hidden inside a finished wall or ceiling
- The main shutoff does not close completely
- The pipe supplies a water heater, boiler, or commercial system
- The existing threads are damaged or frozen
- The repair requires new pipe threading
- The piping may be part of the electrical grounding system
- Local law requires a permit or licensed installer
- The line could carry gas or another non-water substance
A plumber can also determine whether the visible leak is only one symptom of a larger galvanized-pipe problem. In many older homes, replacing a single connection restores the seal but does nothing for restricted flow or corrosion throughout the rest of the system.
Frequently Asked Questions
Can copper pipe touch galvanized steel?
Direct contact should generally be avoided in a water-piping system. Use an approved transition fitting that complies with local code and is listed for the intended service.
Is a brass nipple enough between galvanized and copper?
A listed copper-alloy transition fitting may be allowed by an adopted plumbing code, but a generic brass nipple should not automatically be treated as a dielectric fitting. Confirm the product listing, manufacturer instructions, and local requirements.
Can I solder copper directly to galvanized pipe?
No. Galvanized steel and copper require different joining methods. The galvanized side is normally threaded, while the copper side may be soldered, pressed, compressed, or connected with an approved push fitting.
Should I use tape or pipe dope?
Either may be appropriate for tapered water-pipe threads when the product is rated for potable water and compatible with the fitting. Some manufacturers permit both together. Follow the sealant and fitting instructions rather than relying on a universal rule.
Why is my dielectric union rusting?
Rust can result from a leaking gasket, condensation, damaged coating, incorrect assembly, stray electrical current, poor support, or corrosion in the nearby galvanized pipe. Rust on the exterior does not always prove that the dielectric component failed, but it deserves investigation.
Can a dielectric union be hidden inside a wall?
That depends on the fitting listing and local code. Some jurisdictions require unions or certain mechanical joints to remain accessible. Verify the rules before enclosing the connection.
Practical Experiences and Lessons From Galvanized-to-Copper Repairs
The connection that looked better than it was
A common repair scenario begins with a small rust stain around a copper-to-steel joint. The outside may look solid enough, but removing the old fitting reveals galvanized threads that have become thin and jagged. The lesson is simple: never judge old galvanized pipe only by the visible exterior.
When the threads are badly deteriorated, installing a new union may stop the leak temporarily but leave very little metal supporting the connection. Cutting back to a sound nipple or replacing the entire corroded section creates a more dependable repair.
The repair that loosened a hidden fitting
Another frequent experience involves using one large pipe wrench to remove a stubborn fitting. The visible fitting finally turns, everyone celebrates, and then water appears several feet away. Torque has traveled through the rigid galvanized line and loosened a concealed elbow inside the wall.
This is why experienced installers use two wrenches. One turns the fitting, while the other holds the neighboring pipe stationary. The backup wrench may seem like extra work, but it can prevent an accidental demolition project.
The perfect solder joint that still leaked
Sometimes the copper side is beautifully soldered, yet the union leaks as soon as the water returns. The cause is often the mechanical portion of the union rather than the solder. The gasket may be reversed, pinched, overheated, contaminated with flux, or tightened unevenly.
A dielectric union must be treated as both a metal fitting and a gasketed mechanical joint. Clean copper and proper solder technique matter, but so do the small insulating pieces in the middle. Losing one plastic sleeve on the basement floor can defeat the entire purpose of the fitting.
The “quick fix” that exposed a whole-house problem
Replacing one galvanized-to-copper transition occasionally improves a leak without improving water pressure. That is because decades-old galvanized supply lines often accumulate corrosion and mineral deposits on the inside. The remaining opening may be far smaller than the pipe’s original diameter.
Homeowners sometimes blame the new copper section because pressure remains weak after the repair. In reality, the new connection may be the least restrictive part of the system. Comparing flow at several fixtures and inspecting removed galvanized pipe can reveal whether a partial or complete repipe is more economical than repeated spot repairs.
The flame-free repair that still required careful preparation
Press and push-fit adapters are sometimes described as effortless alternatives to soldering. They certainly remove the torch, but they do not remove the need for accurate preparation. Crooked cuts, scratches, burrs, incomplete insertion, unsupported piping, and incorrect fitting selection can still cause failure.
The practical lesson is that “no flame” does not mean “no technique.” Measure insertion depth, deburr the copper, verify compatibility, support the pipe, and follow the exact installation instructions. Convenience is valuable, but it is not a substitute for craftsmanship.
The best long-term lesson
The most successful galvanized-to-copper repairs begin with diagnosis rather than shopping. Determine why the old connection failed, inspect the nearby galvanized piping, choose a listed transition method, protect electrical bonding, and pressure-test before closing the wall.
A good transition fitting is inexpensive compared with water damage. Taking another fifteen minutes to clean threads, protect a gasket, add proper support, and inspect the joint can add years to the repair. Plumbing rarely rewards impatience, but it frequently sends invoices for it.
Conclusion
The safest way to join galvanized to copper pipes is to prevent an improper direct-metal connection. A listed dielectric union is often the clearest solution because it separates the dissimilar metals while providing a serviceable mechanical joint. Depending on local code, an approved copper-alloy, press, compression, or threaded-to-push transition fitting may also be acceptable.
The quality of the repair depends on more than the fitting. Old galvanized threads must be structurally sound, copper must be cut and prepared correctly, threaded joints need compatible sealant, dielectric gaskets must be protected from heat, and the completed line must be supported and carefully tested.
When the galvanized pipe is severely corroded, replacing more of the system may be safer and less expensive than repairing one leak at a time. Sometimes the smartest plumbing repair is knowing when the pipe has already submitted its retirement paperwork.