Installing Microsoft Office 2010 feels a little like opening a time capsule from the golden age of DVDs, product keys, and software boxes that somehow always ended up in a drawer with old phone chargers. Even though Office 2010 is no longer Microsoft’s recommended productivity suite, many people still need it for an older computer, a legacy business workflow, a school archive, a specialized template, or simply because Word 2010 still does exactly what they need without asking for a monthly subscription.
This guide explains how to install Office 2010 in six practical steps, including how to prepare your computer, enter the product key, choose the right installation type, activate the software, and avoid common problems. The process is not difficult, but because Office 2010 is an older program, there are a few important details you should know before clicking “Install” like a caffeinated squirrel.
Before we begin, a quick reality check: Microsoft ended support for Office 2010 on October 13, 2020. That means there are no new security updates, bug fixes, or official technical support extensions for this version. Office 2010 may still open and run, but using unsupported software can expose your files and computer to security risks. If you are installing it for everyday internet-connected work, consider a newer version of Microsoft Office, Microsoft 365, LibreOffice, or another actively supported productivity suite.
What You Need Before Installing Office 2010
To install Office 2010 successfully, gather everything first. This prevents the classic mid-installation panic where you are staring at a product key box while whispering, “Where did I put that card?”
Office 2010 Installation Media
You need either an original Office 2010 DVD, a legitimate downloaded installer, or installation files provided through a licensed source. Avoid random download websites, cracked installers, key generators, or “pre-activated” versions. Besides being illegal, they are often bundled with malware, browser hijackers, and other digital gremlins nobody invited.
A Valid 25-Character Product Key
Office 2010 requires a 25-character product key in this format: XXXXX-XXXXX-XXXXX-XXXXX-XXXXX. You may find it on the DVD case, product key card, confirmation email, retail packaging, or documentation from the organization that originally provided the license. Make sure the key matches the exact edition you are installing, such as Office Home and Student 2010, Office Home and Business 2010, or Office Professional 2010.
Enough Disk Space and Administrator Access
You should install Office 2010 from an administrator account. If your Windows account cannot install programs, you may need to right-click the installer and choose “Run as administrator.” Also, close other programs before beginning. Office installation is not usually dramatic, but giving it a clean runway helps avoid unnecessary errors.
How to Install Office 2010: 6 Steps
Step 1: Check Your Computer and Remove Conflicting Office Versions
Before installing Office 2010, check whether another version of Microsoft Office is already installed. Running multiple Office versions on the same computer can cause problems with file associations, Outlook, shared components, add-ins, and shortcuts. It is possible in some cases, but it is not ideal for most users.
Open the Control Panel, go to “Programs,” then “Programs and Features,” and look for Microsoft Office entries. If you see a newer or older Office version that you no longer need, uninstall it first. After uninstalling, restart your computer. Yes, restarting is boring. It is also one of the oldest and most effective computer repair rituals, right up there with “check if it is plugged in.”
Also decide whether you need the 32-bit or 64-bit version of Office 2010. For most users, the 32-bit version is the safer choice because it works well on both 32-bit and 64-bit versions of Windows and tends to be more compatible with older Office add-ins. The 64-bit version may help with very large Excel workbooks or Access databases, but it can create compatibility issues with older plug-ins.
Step 2: Insert the Office 2010 Disc or Open the Installer
If you have a DVD, insert the Office 2010 installation disc into your computer. On many older Windows PCs, the setup window may open automatically. If it does not, open “Computer” or “This PC,” double-click the DVD drive, and look for a file named “setup.exe.”
If your computer does not have a DVD drive, you may need to use a legitimate USB copy of the installation files or an external USB DVD drive. Do not simply download an installer from an unknown website because Office installers from unofficial sources can be unsafe. A cheap external DVD drive is usually less painful than spending an afternoon removing malware named something cheerful like “PC Booster Deluxe.”
When you find the installer, double-click “setup.exe.” If Windows asks whether you want to allow the program to make changes to your computer, choose “Yes.”
Step 3: Enter Your Office 2010 Product Key
The installer will ask for your 25-character product key. Type it carefully. Office product keys use letters and numbers, and it is easy to confuse characters such as B and 8, G and 6, or O and 0. If the key does not work, check the edition. A key for Office Home and Student 2010 will not activate Office Professional 2010.
Once the key is accepted, the installer may show a green check mark or confirmation message. Click “Continue” to move forward. If the key is rejected, do not keep hammering random combinations into the box like you are trying to open a secret vault. Recheck the packaging, email receipt, or product key card.
Step 4: Accept the License Terms and Choose Your Installation Type
After entering the product key, you will see the Microsoft Software License Terms. Read them if you want the full legal experience, or at least review the basics. Then check the box to accept the terms and click “Continue.”
You will usually see two main installation options: “Install Now” and “Customize.” For most users, “Install Now” is the easiest choice because it installs the default Office applications included with your edition. If you are installing Office Home and Student 2010, for example, that usually includes Word, Excel, PowerPoint, and OneNote.
Choose “Customize” if you want more control. This option lets you select which Office programs and features to install. For example, if you never use OneNote or certain Office tools, you can choose not to install them. This can save disk space and reduce clutter. However, if you are unsure, the default installation is usually the safest route.
Step 5: Let Office 2010 Install and Restart If Prompted
Once you click the installation button, Office 2010 will copy files, configure components, and set up shortcuts. This may take several minutes depending on your computer. Older machines may take longer, so this is a good moment to stretch, refill your coffee, or stare intensely at the progress bar as if your gaze will make it move faster.
During installation, do not shut down your computer. Avoid opening a dozen other programs or pulling out the disc. If Windows asks you to restart after installation, restart the computer before launching Office. Skipping the restart can lead to odd behavior, missing shortcuts, or activation issues.
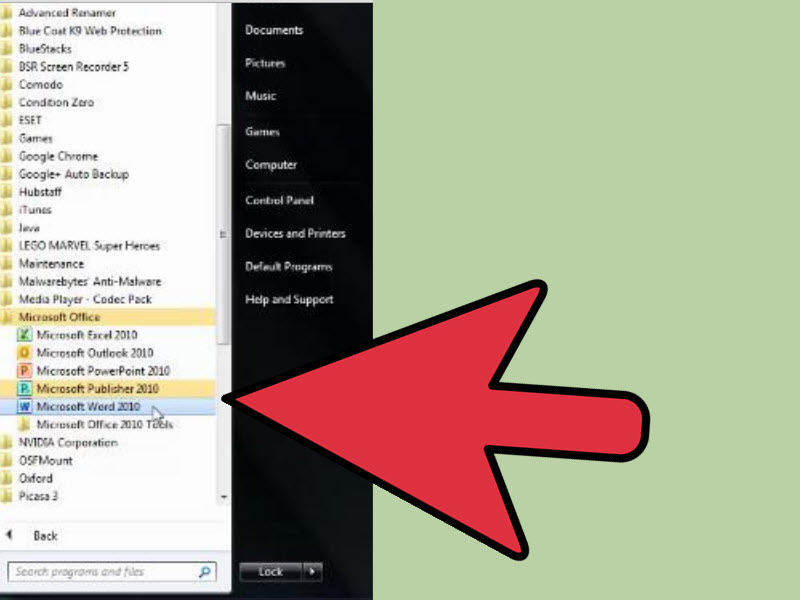
After the installation finishes, you should see Office 2010 programs in the Start menu. Open Word 2010 first because it is often the easiest way to complete initial setup and activation.
Step 6: Activate Office 2010 and Install Available Updates
When you open an Office 2010 app for the first time, the Activation Wizard may appear. Choose online activation if available. If online activation does not work, Office 2010 may offer telephone activation or a modern activation workaround depending on your license and Microsoft’s current activation systems.
Activation confirms that your copy of Office is genuine and properly licensed. Without activation, Office may eventually enter reduced functionality mode, meaning you may be able to view files but not edit them normally.
After activation, check for available Office updates. Office 2010 Service Pack 2 is especially important because it includes performance, stability, and earlier update rollups. However, remember that Office 2010 no longer receives new security updates. Installing old service packs can help bring a fresh installation up to its final supported state, but it does not make Office 2010 a modern secure product.
Common Office 2010 Installation Problems and Fixes
The Product Key Is Not Accepted
If your Office 2010 product key is not accepted, confirm that you are installing the correct edition. Product keys are edition-specific. Also check whether the key came from a Product Key Card, retail box, volume license, employer program, or preinstalled trial. Some cards required users to redeem the key through a specific Microsoft process when Office 2010 was current.
If you bought the license secondhand, the key may already be used, blocked, or tied to another installation. Be cautious with online marketplaces that sell old Office keys at suspiciously low prices. When a deal looks too good to be true, it often comes with a side order of disappointment.
The Installer Will Not Start
If setup.exe does not run, right-click it and choose “Run as administrator.” You can also copy the installation files from the DVD to a folder on your computer or USB drive, then run setup from there. If the disc is scratched or the drive is failing, copying files may reveal read errors.
On newer versions of Windows, compatibility can vary. Office 2010 was built for older Windows environments, so installation may not be smooth on every modern system. If you need Office 2010 for legacy work, using an older supported machine or a virtual machine may be more reliable.
Office 2010 Conflicts With Another Office Version
If Word, Excel, or Outlook behaves strangely after installation, you may have a conflict with another Office version. Uninstall unused versions, restart the computer, and repair the remaining Office installation from Control Panel. Running different Office versions side by side can work in limited scenarios, but it is not the best setup for ordinary users.
Activation Fails After Installation
Activation problems can happen when a license has been used too many times, the wrong installer edition is used, or Microsoft’s old activation workflow no longer behaves exactly as it did in 2010. Try online activation first. If the wizard provides alternative instructions, follow them carefully. Keep your product key and installation ID available.
Is It Safe to Use Office 2010 Today?
Office 2010 can still be useful for opening old documents, working offline, or maintaining compatibility with a legacy office environment. But for daily use, especially on an internet-connected computer, it is not ideal. Unsupported Office software can be risky because attackers often target document files, macros, attachments, and outdated components.
If you must use Office 2010, reduce your risk by avoiding unknown email attachments, disabling macros unless absolutely necessary, using updated antivirus protection, keeping Windows patched, and not using Office 2010 as your main productivity suite for sensitive work. For business, legal, financial, or healthcare files, an actively supported Office version is the smarter choice.
Best Practices After Installing Office 2010
Save Your Product Key Somewhere Safe
Once Office 2010 is installed, store your product key in a secure place. A password manager, printed license folder, or protected business inventory file is better than a sticky note under the keyboard. That sticky note has seen things.
Create a Restore Point
Before making additional changes, create a Windows restore point if your version of Windows supports it. This gives you a recovery option if later software installations cause problems.
Test Word, Excel, PowerPoint, and Outlook
Open each Office application you plan to use. Create a test document, save it, close it, and reopen it. If you use Outlook, configure your email account and confirm that sending and receiving works. Outlook 2010 may not work smoothly with all modern mail providers because authentication and security standards have changed over time.
Keep Old Installers Organized
If you are maintaining a legacy setup, keep the installer, license documentation, and notes in one folder. Add details such as the edition, product key location, install date, and computer name. Future you will be grateful. Future you may even forgive present you for naming files “final_final_really_final.docx.”
Personal Experience: What Installing Office 2010 Still Teaches Us
Installing Office 2010 today is more than a simple software task. It is a reminder of how much computer setup has changed. Modern software often installs through cloud accounts, automatic updates, web dashboards, and subscription portals. Office 2010 belongs to a different era: physical discs, typed product keys, offline installers, and activation wizards that felt very official, like a tiny software customs officer checking your passport.
One common experience with Office 2010 is that preparation matters more than speed. Many users rush straight to setup.exe, only to discover that they have the wrong product key, a missing disc, an incompatible 64-bit version, or a half-uninstalled copy of Office already sitting on the computer. The best installations usually start with a checklist: confirm the edition, locate the key, remove conflicting versions, restart Windows, and then install. It sounds basic, but basic steps prevent most installation headaches.
Another lesson is that older software often depends on context. Office 2010 may install perfectly on one computer and complain loudly on another. A Windows 7 desktop with a DVD drive may handle it like an old friend. A newer Windows laptop with no optical drive, stricter security settings, and existing Microsoft 365 apps may treat it like a confused houseguest. This does not mean the software is broken; it means the computing world around it has moved on.
The product key step is also where many people learn the difference between owning software and being able to reinstall software. A valid-looking key is not always enough. The key must match the correct edition, installation media, and license type. For example, a key from Office Home and Student 2010 will not unlock Office Professional 2010. A volume license key may behave differently from a retail key. A product key card may have required a redemption process. In other words, the key is not just a password; it is tied to a specific licensing story.
Activation is another memorable part of the Office 2010 experience. When it works, it is quick and forgettable. When it fails, it can become a detective case involving old receipts, retired email addresses, previous computers, and support pages. This is one reason it is wise to document everything after a successful install. Write down the edition, license source, activation status, and where the installer is stored. That little note can save hours later.
Office 2010 also teaches a practical security lesson. Software can still function after support ends, but “it opens” is not the same as “it is safe.” Many users keep old Office versions because they are familiar, fast, and comfortable. That is understandable. Word 2010 and Excel 2010 still feel clean and capable. But unsupported software does not receive modern security fixes, which matters when documents arrive by email, downloads, shared drives, or unknown sources.
For legacy work, Office 2010 can still have a place. It may be useful for opening older templates, supporting a retired database workflow, preserving document formatting, or working on a machine that never touches the internet. But for everyday productivity, the better experience usually comes from a supported version. Newer Office versions handle modern file formats, cloud storage, security updates, collaboration, and authentication more smoothly.
The biggest takeaway from installing Office 2010 is simple: slow down, use legitimate files, keep your license information organized, and understand the risks. The six steps in this guide are not just installation instructions; they are a small survival manual for working with legacy software without turning your afternoon into a troubleshooting soap opera.
Conclusion
Installing Office 2010 is straightforward when you have the right installer, a valid 25-character product key, administrator access, and a clean computer without conflicting Office versions. The essential process is to prepare your PC, run setup.exe, enter the product key, accept the license terms, choose your installation options, activate Office, and install any final available updates such as Service Pack 2.
However, Office 2010 is no longer supported by Microsoft. That does not mean it instantly stops working, but it does mean you should treat it as legacy software. Use it carefully, avoid risky files, and consider upgrading if you need secure daily productivity tools. Office 2010 may still get the job done, but it should not be your first choice for sensitive, connected, modern work.