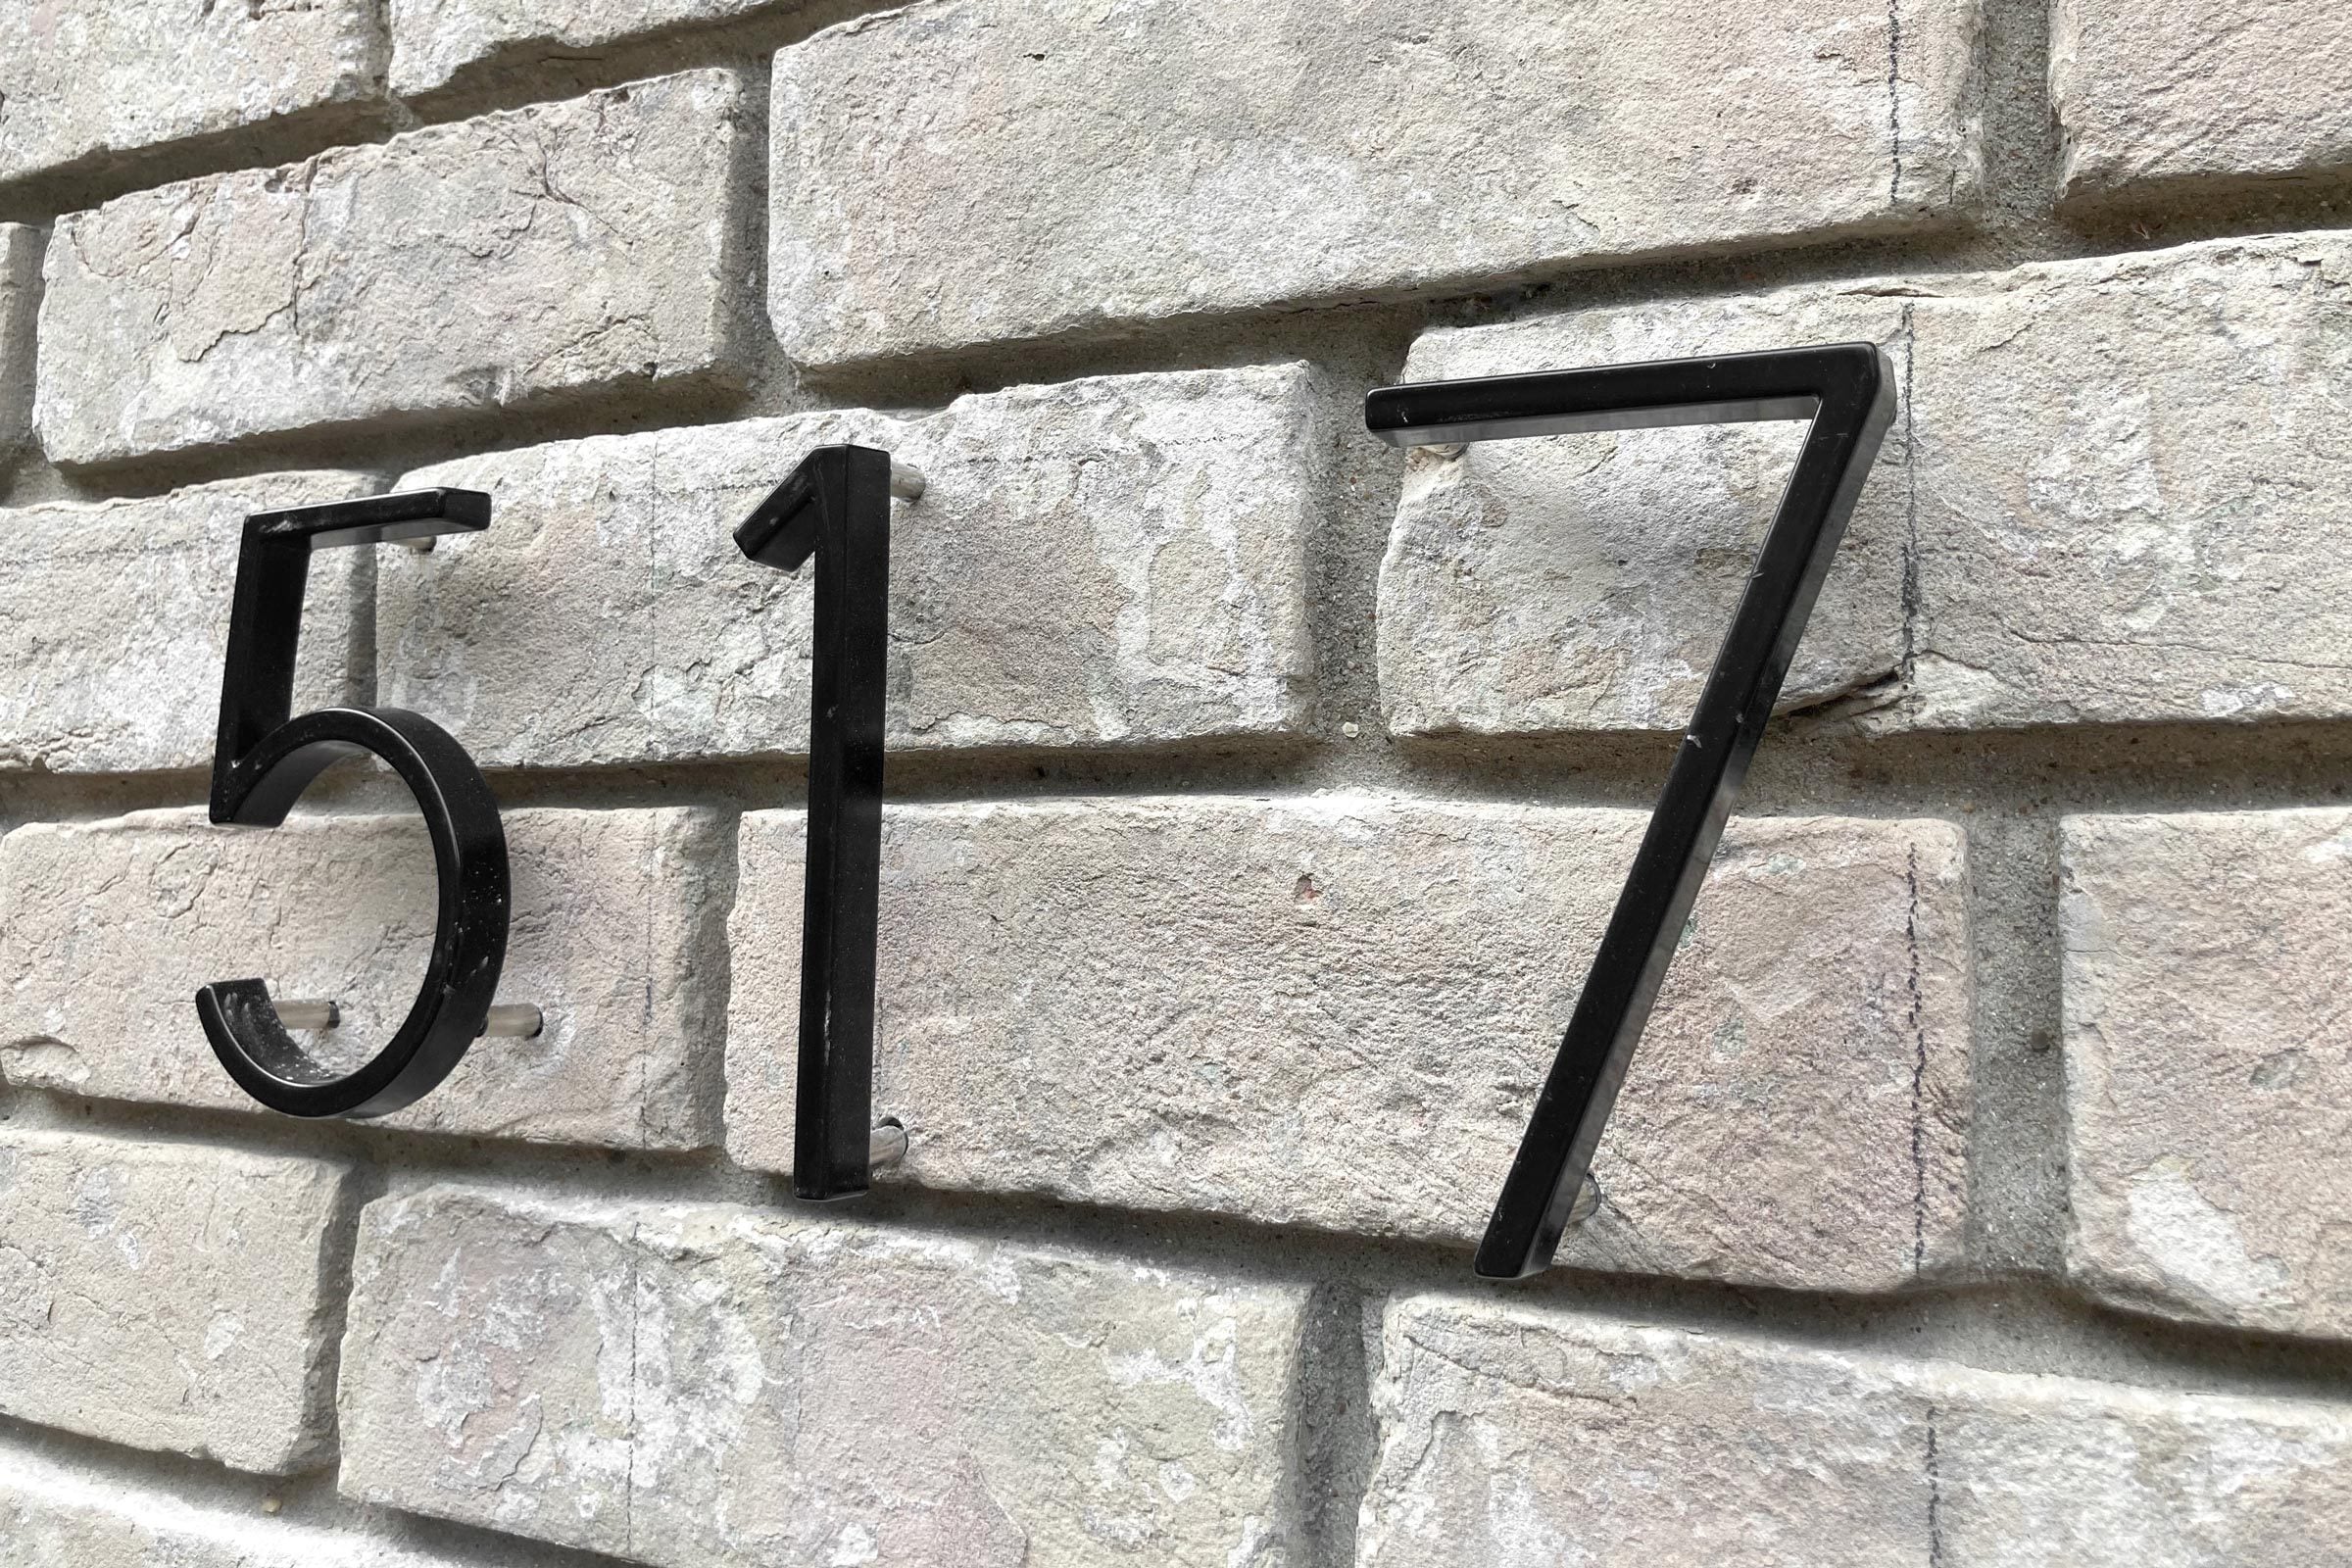
Floating house numbers can make an ordinary brick entry look sharper, more modern, and considerably easier for delivery drivers to identify. The concealed mounting studs hold each number slightly away from the wall, creating a subtle shadow that changes throughout the day. It is a small architectural detail with surprisingly large curb-appeal energy.
The installation is manageable for a confident DIYer, but brick is less forgiving than wood or vinyl siding. Accurate measurements, the correct masonry bit, clean mounting holes, and a patient dry fit matter more than brute force. Follow this guide to install floating house numbers securely without turning your brick facade into an accidental game of connect-the-dots.
How Floating House Numbers Work
Most floating address numbers have threaded holes on the back. Metal studs screw into those holes, while spacers slide over the studs to hold the numbers approximately 1/4 to 1/2 inch away from the mounting surface. The exposed ends of the studs fit into drilled holes in the brick and are secured with exterior-grade adhesive.
Some products use masonry anchors and screws instead. Others can be installed either flush against the wall or in a floating position. Open every package before drilling and identify which system you actually purchased. Discovering that your mounting hardware works differently after drilling six holes is an excellent way to expand your vocabulary, but not your happiness.
Stud-and-adhesive mounting
This common system hides all hardware behind the numbers. The studs are bonded into clean holes with exterior-rated two-part epoxy or another adhesive approved by the manufacturer. Spacers create the floating effect.
Anchor-and-screw mounting
With this system, masonry anchors are inserted into the brick before screws or threaded hardware secure the numbers. The pilot holes must match the supplied anchors precisely. A hole that is too small can damage the anchor, while an oversized hole may not hold it securely.
Tools and Materials You Will Need
- Floating house numbers with studs, spacers, or supplied anchors
- Manufacturer-provided paper mounting template
- Hammer drill or variable-speed drill with a hammer setting
- Sharp carbide-tipped masonry bit in the specified diameter
- Smaller masonry bit for optional starter holes
- Bubble level or laser level
- Tape measure and fine-tip marker
- Painter’s tape
- Rigid cardboard if the paper template needs reinforcement
- Shop vacuum with a narrow nozzle
- Nylon hole-cleaning brush, if recommended for the adhesive
- Exterior-grade two-part epoxy or specified masonry adhesive
- Rubber mallet and clean, soft cloth
- Safety glasses, hearing protection, and suitable dust protection
- Stable ladder or step stool, if required
A hammer drill is generally the most efficient tool for brick because it combines rotation with a light hammering action. A regular drill may work on softer masonry, but it will usually take longer. Do not substitute a standard wood or metal bit for a masonry bit; carbide-tipped masonry bits are designed to cut brick without surrendering halfway through the first hole.
Choose the Best Location and Layout
House numbers should be readable from the street, visible in both daylight and darkness, and unobstructed by shrubs, columns, seasonal wreaths, or an open storm door. Contrast matters. Matte-black numbers usually stand out well against pale brick, while stainless steel, white, or brass may be easier to see on dark masonry.
Check local address-display requirements before choosing a size or location. Municipal rules may specify minimum numeral height, placement, illumination, or visibility from the road. If your home sits far from the street, numbers on the building may need to be supplemented with a clearly visible mailbox or driveway marker.
Horizontal layouts are generally the easiest to read. A vertical arrangement can look striking on a narrow column, but make sure the reading order remains obvious. Before committing, tape full-size paper cutouts to the brick and view them from the curb. Something that looks enormous from three feet away can appear surprisingly shy from across the street.
Should you drill into brick or mortar?
Mortar is usually softer and easier to repair, but it may also be weak, weathered, or poorly positioned for the mounting template. Modern floating numbers often have fixed stud locations, so all the holes may not land neatly in mortar joints.
For lightweight numbers, sound brick typically provides a dependable mounting surface. Position holes near the solid central area of each brick and avoid edges, corners, cracks, spalled faces, and damaged units. If the brick is antique, unusually soft, hollow, or already deteriorating, consult a masonry professional before drilling. Aggressive hammering can fracture fragile material.
How To Install Floating House Numbers on Brick
Step 1: Inspect and assemble the hardware
Lay the numbers face down on a clean towel. Match every stud and spacer to its number, then compare them with the installation instructions. Thread the studs into the backs by hand, keeping them straight. They should be secure, but there is no prize for tightening them with the force of an industrial robot.
If the manufacturer requires adhesive where the studs enter the numbers, apply it as directed and allow the connection to set before continuing. Confirm that every stud projects the same distance and that all spacers have a consistent thickness.
Step 2: Prepare the drilling template
Use the supplied full-size template whenever possible. If it is thin or flexible, attach it to rigid cardboard so it will not sag over textured brick and recessed mortar joints. Never resize a digital template unless the manufacturer specifically instructs you to do so. Printer scaling can shift the hole spacing just enough to create a very permanent alignment problem.
Mark the centerline of the intended installation area. Position the template, check its height from several reference points, and use a level to align its printed horizontal or vertical guide. Secure all edges with painter’s tape.
Step 3: Mark the exact hole centers
Use a fine-tip marker to transfer every drill point. A small awl can be used to puncture the template first, but do not hammer a center punch aggressively against brick. Remove the template and verify each mark against the actual stud pattern.
Check the layout from a distance before drilling. Confirm the reading order, spacing, height, and level. Also look for doorbell wiring, exterior lights, electrical boxes, plumbing, or other services that could be concealed behind the veneer. Stop and seek professional help if the proposed drilling area may contain utilities.
Step 4: Set the drilling depth
Follow the house-number manufacturer’s specified hole depth. In general, the hole must accept the exposed portion of the stud without bottoming out, but it should not penetrate unnecessarily through the brick veneer. Mark the required depth on the masonry bit with painter’s tape or use a drill stop.
Do not guess the bit diameter. Many stud-mounted systems call for a masonry bit near 3/16 inch, while some anchor-based kits specify sizes such as 7/32 inch. Those examples are not interchangeable instructions. Measure the hardware and follow the documentation for your particular kit.
Step 5: Drill slowly and squarely
Put on eye, hearing, and dust protection. Hold the drill perpendicular to the wall in both directions. Begin at low speed so the bit establishes a small recess without walking away from the mark. Once centered, gradually increase speed and engage the hammer function if the brick and tool instructions allow it.
Use steady pressure, but let the carbide tip do the cutting. Forcing the drill can overheat the bit, enlarge the hole, or crack the brick. Withdraw the spinning bit periodically to clear accumulated dust. If the brick is brittle, begin with the hammer function off or drill a smaller starter hole before enlarging it.
Stop immediately if you encounter metal, unexplained resistance, electrical components, or a hollow area that does not match your expectations. Do not casually drill deeper to “see what happens.” Walls are famously unamused by curiosity.
Step 6: Clean every mounting hole
Remove the template and vacuum the holes thoroughly. Masonry dust can prevent a stud from seating fully and can weaken the bond of an adhesive anchor. If the epoxy instructions call for brushing and repeated vacuuming, follow that sequence exactly.
Hold the vacuum nozzle near the work while drilling to limit airborne dust. Clean brick dust from nearby windowsills and finished surfaces promptly because the particles can be abrasive. Avoid blowing dust toward your face or spreading it over the entryway with uncontrolled compressed air.
Step 7: Perform a complete dry fit
Install the studs and floating spacers on the first number, then gently insert the studs into the corresponding holes without adhesive. Repeat with the remaining numbers. Every piece should enter without severe pressure, sit at a consistent depth, and remain level with its neighbors.
If one hole is slightly misaligned, remove the number and correct that hole carefully. Do not bend the studs or pound the number sideways. Forcing misaligned hardware can crack the brick, distort the number, or leave it permanently tilted like it has strong opinions about gravity.
Once everything fits, remove the numbers and arrange them in installation order. Mark their backs with removable tape if similar digits could be confused.
Step 8: Apply the approved exterior adhesive
Mix or prepare the exterior-grade epoxy according to its label. Pay attention to working time, application temperature, moisture limitations, and curing conditions. Use only enough adhesive to coat the required portion of each stud or fill the hole to the specified level. Overfilling can force epoxy onto the brick face and spacers.
Two-part exterior epoxy generally provides a strong, durable hold. Exterior silicone may be appropriate when the number manufacturer recommends a more removable installation, but it should not be treated as a universal substitute. Adhesives vary significantly in their compatibility with metal, masonry, moisture, and temperature changes.
Step 9: Install and align the numbers
Slide the spacers onto the studs, apply the adhesive, and press the first number into position. Keep pressure even so the studs enter together. If gentle tapping is necessary, cover the face with a folded soft cloth and use a rubber mallet. Never strike the finished metal directly.
Install the remaining digits, checking the top edges, baselines, spacing, and projection from several angles. Remove excess adhesive immediately using the cleanup method listed on the product label. Avoid smearing solvents over powder-coated or painted finishes unless the number manufacturer confirms they are safe.
Step 10: Support the numbers while they cure
Use strips of painter’s tape to hold each number in its correct position while the adhesive cures. Do not allow the tape to pull a number sideways or compress one spacer more than another. Recheck the level after taping.
Leave the installation untouched for the full curing periodnot merely until the adhesive feels dry on the surface. Temperature and humidity can extend the cure time. Remove the support tape carefully, clean the area, and admire the result from the sidewalk, where it can deliver its full architectural swagger.
Common Installation Mistakes to Avoid
Drilling before checking the template scale
A template printed at 97% can ruin an otherwise flawless installation. Compare a printed measurement guide with a real ruler or place the numbers over the template before marking the wall.
Using the wrong masonry bit
An ordinary bit may dull quickly and wander across the brick. An oversized masonry bit can leave the stud or anchor loose. Match the bit to the hardware specification rather than choosing whichever one happens to be closest to the top of the toolbox.
Skipping the dry fit
Epoxy removes the luxury of leisurely adjustment. Test every number simultaneously before mixing adhesive so you know the studs, spacers, and holes cooperate.
Leaving masonry dust in the holes
Dust can block the stud and interfere with adhesion. Thorough vacuuming is a structural step, not merely enthusiastic housekeeping.
Installing numbers with poor contrast
Beautiful address numbers are not especially useful if emergency responders and visitors cannot read them. Choose a finish and size that remain legible from the street, and consider nearby exterior lighting for nighttime visibility.
Using too much adhesive
More epoxy does not automatically mean more strength. It often means glossy blobs on porous brick. Use a controlled amount and keep cleanup materials ready before opening the adhesive.
Maintenance After Installation
Inspect the house numbers once or twice a year. Look for loose digits, cracked spacers, rusting studs, failed adhesive, water staining, or deterioration around the drilled holes. Correct small problems before wind and weather turn them into missing-number mysteries.
Clean the numbers with mild soap, water, and a soft cloth. Abrasive pads, harsh solvents, and strong acidic cleaners can damage paint, powder coating, plated metal, or the surrounding masonry. If a number becomes loose, remove it carefully, clean away failed adhesive, inspect the brick, and reinstall it according to the original hardware instructions.
Real-World Experience: Lessons That Make the Job Easier
The most useful lesson from real-world floating house number installations is that layout usually takes longer than drillingand that is a good thing. A careful installer may spend 30 minutes positioning a template for a drilling process that lasts only a few minutes. The numbers must relate visually to the door, trim, light fixture, brick courses, and viewing angle from the street. Centering them mathematically on a wall does not always make them look centered from the sidewalk. Taping up paper replicas and stepping back repeatedly is not indecision; it is inexpensive insurance.
Uneven brick creates another surprise. A paper template can dip into mortar joints, shifting marks even when its printed level line looks perfect. Reinforcing the template with cardboard helps it bridge the irregular surface. It is also worth checking the marks with the actual hardware before drilling. When several studs must enter simultaneously, even a small cumulative error becomes obvious.
Drill-bit wandering is probably the most common source of frustration. Starting at full speed can send the tip skating across the brick face. A slow trigger, a square stance, and a shallow starter recess give much better control. On hard brick, a fresh carbide bit makes a dramatic difference. If progress becomes unusually slow, the bit may be dull rather than the wall being personally hostile.
Dust management also affects more than cleanup. One installation may appear perfectly drilled yet refuse to accept a stud because packed brick dust occupies the bottom of the hole. Marking the depth on the bit, drilling slightly beyond the required stud insertion only when the manufacturer allows it, and vacuuming thoroughly produces a much more predictable fit. The same cleaning step helps exterior epoxy bond to the masonry instead of bonding mostly to loose powder.
Dry fitting all the digits at once is another experience-earned habit. Testing one number at a time does not reveal whether the complete address shares a straight baseline or consistent spacing. Place every number without adhesive, photograph the arrangement, and examine the picture. Photographs make small tilts surprisingly easy to spot.
Adhesive work rewards preparation. Open the package, identify the cleanup method, cut painter’s tape, arrange the numbers in order, and rehearse the installation before mixing fast-setting epoxy. Once the clock starts, searching for a missing spacer feels much more dramatic than it should. Use modest amounts of adhesive, since porous brick can be difficult to clean after overflow.
Finally, resist the urge to remove support tape early. A number can feel stable while the adhesive is still vulnerable to movement. Let it cure for the full label-specified period, particularly in cool or humid weather. The best finished installations are not the ones completed fastest. They are the ones that look level from the street, remain secure through changing seasons, and never again cause a delivery driver to text, “Which house is yours?”
Conclusion
Installing floating house numbers on brick is a practical weekend upgrade that combines curb appeal with better address visibility. The professional-looking result depends on a few unglamorous details: a correctly scaled template, accurate hole centers, a sharp masonry bit, controlled drilling, spotless mounting holes, and a complete dry fit.
Work patiently, respect the brick, and follow the hardware and adhesive manufacturers’ specifications. Once the epoxy has cured, your new address numbers should look as though they were part of the original architectureonly cleaner, more modern, and much less likely to confuse the pizza delivery person.