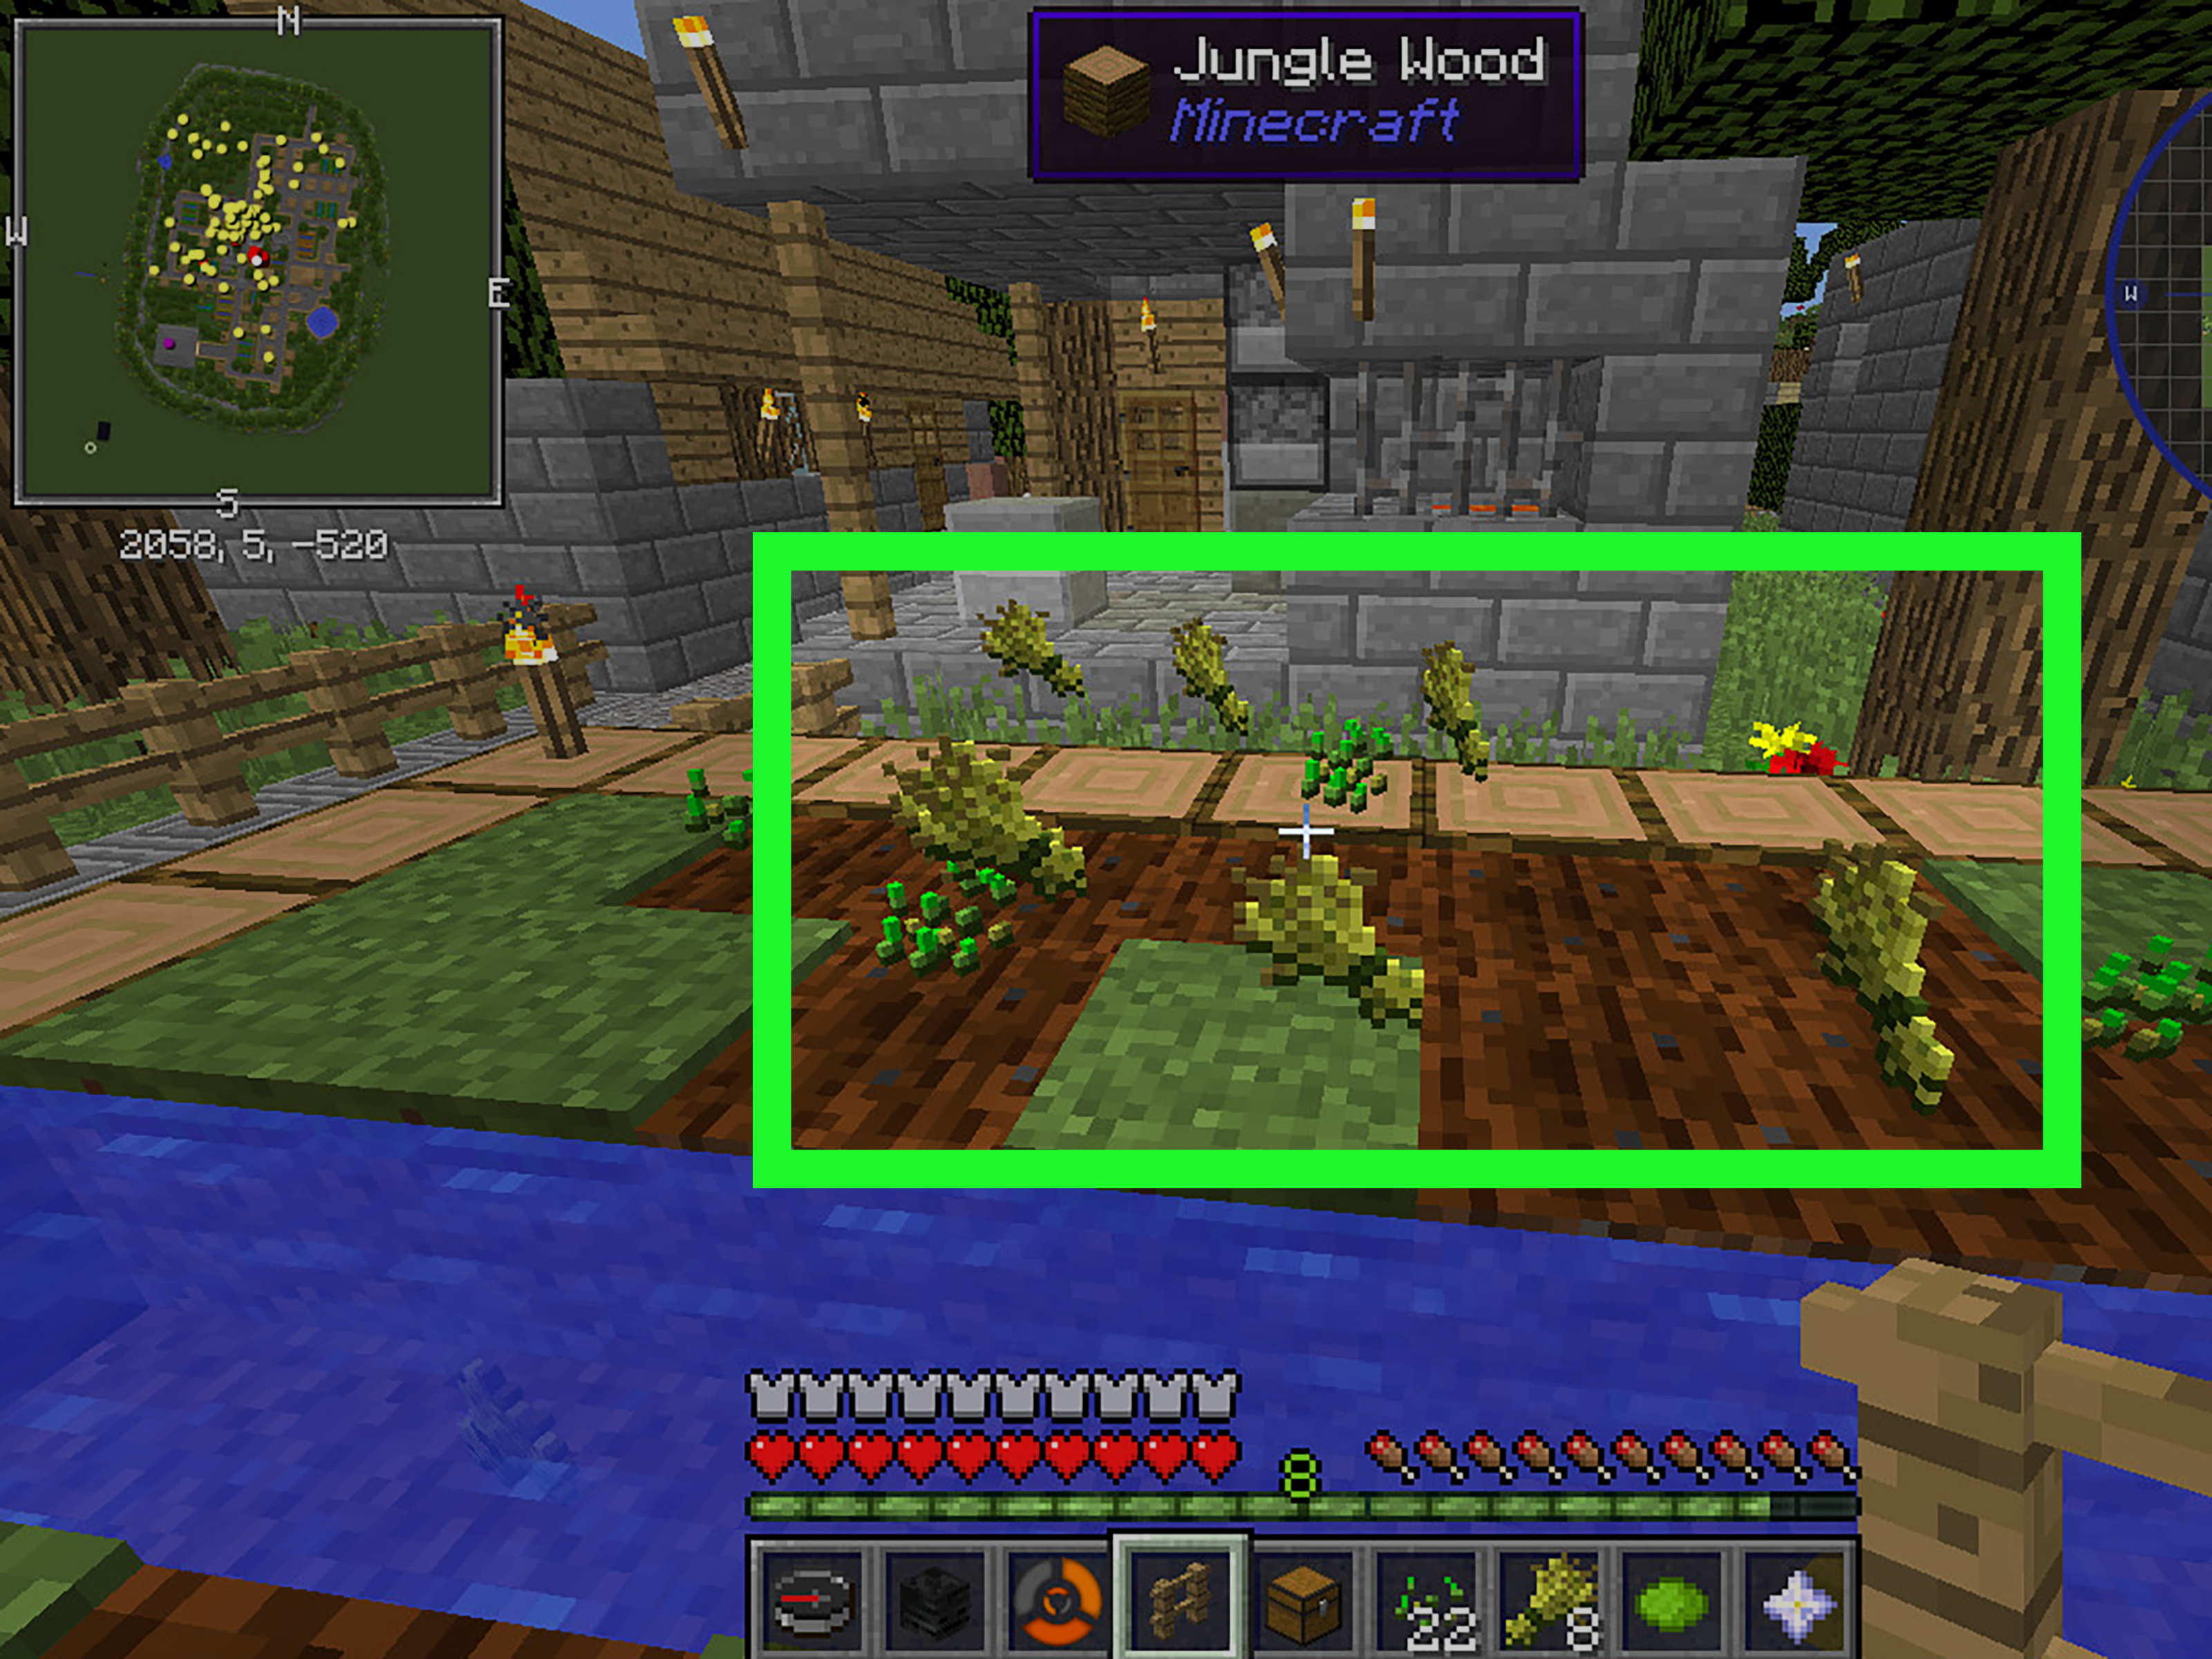
Note: This guide is written for vanilla Minecraft survival gameplay and focuses on practical wheat farming for beginners, returning players, and anyone tired of surviving on panic-snacked rotten flesh.
Wheat is one of the most useful early-game crops in Minecraft. It feeds you, helps you breed animals, supports village-style farming, and gives your base that charming “I am now a responsible block farmer” energy. Whether you are playing Java Edition, Bedrock Edition, survival, peaceful mode, or a cozy world where the biggest threat is falling into your own irrigation trench, learning how to grow wheat in Minecraft is a skill worth mastering.
The good news is that wheat farming is simple. You need seeds, a hoe, dirt or grass blocks, water, light, and a little patience. The better news is that once your first wheat farm is running, it becomes self-sustaining because mature wheat usually gives you more seeds when harvested. In other words, Minecraft wheat is the gift that keeps giving, unlike that creeper who gave you a surprise basement remodel.
In this guide, you will learn exactly how to grow wheat in Minecraft in 9 steps, how to speed up wheat growth, how to design an efficient starter farm, what mistakes to avoid, and how to use wheat after harvest. Let’s turn those lonely grass blocks into a proper food factory.
Why Grow Wheat in Minecraft?
Wheat is one of the best crops to grow early because it has several uses. You can craft bread with three wheat, breed cows and sheep, attract certain animals, trade or work with farmer villagers depending on your setup, craft hay bales, and decorate builds with rustic farm charm. A wheat field outside your starter house also makes your base look less like a dirt emergency shelter and more like a place with a five-year plan.
Wheat is especially helpful because it starts from wheat seeds, which are easy to find. Break grass, collect seeds, plant them on farmland, and wait for them to mature. Once harvested, mature wheat provides wheat plus more seeds, letting you expand your farm without constantly running around punching grass like a lawn-obsessed goblin.
How to Grow Wheat in Minecraft: 9 Steps
Step 1: Collect Wheat Seeds
To grow wheat, you need wheat seeds. In Java Edition, these are called wheat seeds. In Bedrock Edition, they may simply appear as seeds. You can get them by breaking grass, looting village farms, or collecting them from mature wheat crops after harvesting. Early in a new survival world, breaking grass is usually the fastest method.
A smart beginner goal is to collect at least 10 to 20 seeds before building your first farm. You can technically start with one seed, but that is the Minecraft version of opening a restaurant with one potato and a dream. More seeds mean faster expansion and a better chance of having bread before your hunger bar starts filing complaints.
Step 2: Choose a Good Farm Location
Pick a flat area near your base. A good wheat farm should be easy to reach, safe from mobs, and close enough that you will actually remember to harvest it. Wheat grows over time while the area is loaded, so putting your farm near your house, mine entrance, animal pen, or village is practical.
Avoid building your first farm too far away. If you plant wheat across the map and then spend all day mining, the farm may not grow as quickly because you are not nearby enough to keep that area active. For a starter farm, simple and close beats huge and forgotten.
Also look for water nearby if possible. You can carry water in a bucket later, but in the beginning, building near a river, pond, lake, or village farm saves effort. Flat land is easier, but you can also terrace farms into hillsides if you enjoy making your base look like a medieval agricultural postcard.
Step 3: Craft or Get a Hoe
You need a hoe to turn dirt or grass blocks into farmland. Craft a basic wooden hoe with two planks and two sticks, or use stone, iron, gold, diamond, or netherite if you want your wheat farm to have luxury tools. For most players, a stone hoe is plenty for early farming.
Use the hoe on dirt or grass blocks to create farmland. Farmland looks darker and grooved compared with regular dirt. That is your planting surface. Without farmland, wheat seeds cannot grow properly. You cannot just toss seeds onto random dirt and hope the game respects your agricultural enthusiasm.
Step 4: Add Water for Hydrated Farmland
Water is not always strictly required for crops to exist, but hydrated farmland is much better because it supports faster and more reliable growth. In Minecraft, one water source block can hydrate farmland up to four blocks away horizontally, creating a useful 9×9 farming area with the water in the center.
The classic wheat farm layout is simple: place one water source block in the middle, then hoe the surrounding dirt in a 9×9 square. That gives you 80 plantable farmland blocks around one water block. It is compact, efficient, and easy to fence. It is basically the Minecraft starter farm equivalent of discovering sliced breadwhich you can now craft because you are growing wheat. Beautiful circle of life.
You can cover the center water block with a slab, trapdoor, lily pad, carpet, or another suitable block depending on your version and design. Covering water helps prevent you from falling in while harvesting. Because nothing says “professional farmer” like spending half the morning bobbing in your own irrigation system.
Step 5: Make Sure the Farm Has Enough Light
Wheat needs enough light to grow. Outdoor farms usually get plenty of sunlight during the day, but adding torches, lanterns, glowstone, or other light sources helps crops continue growing in darker conditions and protects the area from hostile mobs.
For a simple starter farm, place torches around the edges and near the middle. If you build underground, inside a greenhouse, or in a cave base, lighting becomes even more important. Do not rely on vibes. Crops do not grow because your cave “feels bright enough.” They need actual light.
Good lighting also makes harvesting safer. A wheat farm surrounded by zombies, skeletons, and creepers is not a farm; it is a buffet with workplace hazards.
Step 6: Plant the Wheat Seeds
Once you have hydrated farmland and enough light, plant your wheat seeds by using them on the farmland blocks. Each seed becomes a small green crop. Over time, the crop passes through several growth stages before becoming mature wheat.
New players often harvest too early. If the wheat is still green, it is not ready. Mature wheat turns golden yellow and looks tall and full. If you break immature wheat, you usually get seeds back but no wheat. That is disappointing, like opening a treasure chest and finding only beetroot seeds. Technically useful, emotionally complicated.
For best results, plant rows neatly so you can see which crops are mature. Some players like planting wheat in alternating rows with other crops or empty farmland because crop growth mechanics can reward varied spacing. However, for most beginner farms, a simple full 9×9 wheat field works perfectly well.
Step 7: Wait for the Wheat to Grow
Wheat takes time to grow naturally. It does not mature instantly unless you use bone meal. The growth rate depends on factors such as hydration, light, and random tick updates. Hydrated farmland and good lighting give your crops a better environment, so set up those basics before blaming the wheat for being lazy.
You can continue mining, building, crafting, or organizing your suspiciously chaotic chest system while the wheat grows. Return occasionally and check for golden mature crops. If your farm is close to your base, this becomes part of your natural routine: wake up, avoid creepers, check wheat, question why you still have 47 stacks of cobblestone, repeat.
If crops seem slow, check three things: Is the farmland hydrated? Is there enough light? Are you spending enough time near the farm for the area to stay active? Most wheat problems come from one of those issues.
Step 8: Use Bone Meal to Speed Up Growth
Bone meal can speed up wheat growth. You can get bone meal by crafting it from bones, using a composter, or collecting it through certain farms. Apply bone meal to a wheat crop, and it advances growth stages. Sometimes you may need more than one bone meal to fully mature a crop.
Bone meal is useful when you urgently need wheat for bread, breeding animals, or expanding your farm. For example, if you have only a few seeds, you can bone meal them, harvest mature wheat, collect extra seeds, and replant. This is a quick way to bootstrap a small farm into a larger one.
Still, do not waste all your bone meal if you do not need instant wheat. Natural growth is free. Bone meal is best saved for emergencies, early expansion, tree growth, flower farming, or that dramatic moment when you want to feel like a blocky garden wizard.
Step 9: Harvest Mature Wheat and Replant
When the wheat turns golden yellow, harvest it. Mature wheat drops wheat and seeds. Collect both. Use the wheat for crafting or animal breeding, and immediately replant the seeds. Replanting is the secret to a stable wheat supply. Forgetting to replant is how many Minecraft farms become sad dirt museums.
A good habit is to harvest row by row. Break mature crops, collect drops, and replant before moving on. This keeps your field organized and prevents random empty spaces. If you have a large farm, carry extra seeds in your hotbar so replanting is fast.
Over time, your seed supply will grow. Once you have more seeds than you need, you can expand the farm, compost extras for bone meal, feed chickens with seeds, or store them for later. Wheat farming starts small, but it scales beautifully.
Best Starter Wheat Farm Design
The best beginner wheat farm is the classic 9×9 layout. Place one water source block in the center, hoe the 80 surrounding blocks, plant wheat seeds, and fence the area. Add torches around the fence and one or two light sources near the middle. This design is efficient because one water block hydrates the whole square.
Here is a simple example:
- Farm size: 9 blocks by 9 blocks
- Water: 1 source block in the center
- Plantable blocks: 80 farmland blocks
- Protection: fence, wall, or enclosed greenhouse
- Lighting: torches, lanterns, glowstone, or other light blocks
This setup is easy to build on day one or day two of a survival world. Once you have more resources, you can decorate it with paths, scarecrow-style armor stands, barrels, composters, hay bales, and a small barn. None of those decorations make the wheat grow faster, but they do make you feel like the mayor of a very square farming village.
Common Wheat Farming Mistakes
Harvesting Too Early
The most common mistake is breaking wheat before it is mature. Green wheat is still growing. Golden wheat is ready. If you harvest early, you may get seeds but no wheat, which is not ideal when you are trying to craft bread or breed cows.
Forgetting Water
Dry farmland can still exist for a while, but hydrated farmland is much better for crop growth. Keep water within four blocks of your crops. If your farm keeps turning back into dirt, check hydration and make sure crops are planted.
Letting Mobs or Players Trample Crops
Farmland can be damaged if entities jump or fall on it. Fence your farm and avoid sprint-jumping across your crops. You may be the hero of the world, but your wheat does not appreciate parkour.
Building in the Dark
Low light can slow or prevent growth and may cause problems depending on conditions and edition. Add torches. They are cheap, helpful, and dramatically reduce the chance of a skeleton interrupting your peaceful harvest with unsolicited archery.
What to Do With Wheat After Harvest
Once you have wheat, you have options. The most obvious use is bread. Put three wheat in a row on a crafting grid to make bread, a reliable early-game food. Bread is not the strongest food in Minecraft, but it is easy to produce, stackable, and perfect for early survival.
You can also use wheat to breed cows, sheep, goats, and mooshrooms. Hold wheat near these animals, and they will follow you. Feed wheat to two adults of the same compatible animal, and they can enter breeding mode. This makes wheat essential for building animal farms, collecting leather, wool, milk, and food resources.
Nine wheat can be crafted into a hay bale. Hay bales are useful for storage, decoration, feeding or healing certain animals in specific cases, and reducing fall damage when landed on. They also look fantastic around barns and villages. A stack of hay bales beside a wheat field tells visitors, “Yes, I farm. Yes, I own overalls emotionally.”
How to Expand Your Wheat Farm
After your starter field is working, expansion is easy. Build more 9×9 plots, connect them with paths, and add water in the center of each. You can create a large farm grid near your base or build separate themed farms around a village.
If you want faster harvesting, create water-harvest channels using trapdoors, pistons, or dispensers. These semi-automatic farms release water to break mature crops and push drops into a collection point. You still need to replant wheat manually in many simple designs, but harvesting becomes quicker and more satisfying.
For advanced players, villager-based farms can automate parts of crop management. Farmer villagers can plant and harvest crops under the right conditions. However, wheat farms involving villagers can behave differently than carrot or potato farms because farmer villagers may craft wheat into bread. For beginners, manual wheat farming is easier to understand and control.
Extra Tips for Faster, Cleaner Wheat Farming
Keep a composter near your wheat farm. Extra seeds can go into the composter to make bone meal. This creates a nice loop: wheat gives seeds, seeds make bone meal, bone meal grows more wheat, and suddenly you are running a tiny agricultural economy.
Place storage nearby. A barrel or chest beside the farm helps you store wheat, seeds, bone meal, hoes, and hay bales. Add a crafting table too, so you can turn wheat into bread or hay bales without walking back to your main base.
Use fences or walls to protect crops from mobs and animals. Keep gates convenient, and light the area well. A beautiful farm is nice, but a functional farm that does not get trampled by wandering chaos is better.
If you enjoy building, make your wheat farm part of your base design. Add a windmill, barn, farmhouse, scarecrow, irrigation canals, stone paths, or lantern posts. Minecraft farming is not only about food; it is also about creating a world that feels lived in.
Personal Experience: What Wheat Farming Teaches You in Minecraft
Growing wheat in Minecraft seems tiny at first. You break grass, get seeds, hoe dirt, plant them, and wait. That is it. But after playing survival for a while, wheat farming starts to feel like one of the first real signs that your world is becoming stable. Before the farm, you are usually wandering around eating whatever you can find. After the farm, you have a plan. A slightly muddy plan, but a plan.
One of the best experiences with wheat farming is building your first field beside a starter house. Maybe the house is made of oak planks, maybe it is a dirt rectangle with a door, maybe the roof looks like a staircase had a bad day. But once you add a small wheat patch, the entire base changes. It feels warmer. It feels safer. It feels like you might survive long enough to finally label your chests instead of dumping everything into one wooden box called “miscellaneous sadness.”
Wheat also teaches rhythm. Minecraft can be chaotic. One minute you are mining iron, the next minute you are lost in a cave, and five minutes later you are negotiating with a skeleton using only a stone pickaxe and hope. Farming slows the game down in a good way. You come back, check the crops, harvest the golden ones, replant seeds, craft bread, and head out again. That routine makes survival feel manageable.
Another satisfying moment is when your wheat farm becomes big enough to support animals. The first time you lead cows or sheep into a pen with wheat, it feels like progress. The animals follow you with intense snack-based loyalty, and suddenly your base has wool, leather, milk, and future food security. Wheat becomes more than a crop. It becomes the foundation of your little survival ecosystem.
There is also a design joy to wheat farming. A plain square farm works, but decorating it turns it into a landmark. Add paths between fields. Put lanterns on fence posts. Build a barn with hay bales stacked outside. Place a composter beside a farmer villager. Add a windmill if you are feeling ambitious. Before long, your wheat farm becomes one of the prettiest parts of the base, and you may find yourself expanding it even when you already have enough bread to feed a small kingdom.
My favorite wheat-farming habit is replanting immediately. It sounds simple, but it prevents the classic problem of harvesting everything, getting distracted, and returning later to a field that looks like it retired. Keeping seeds in the hotbar and replacing crops row by row makes the farm feel clean and efficient. It is not glamorous, but neither is running out of food in a cave because you forgot to plant breakfast.
For new players, wheat farming is one of the easiest ways to understand Minecraft’s survival loop. You gather, build, grow, harvest, craft, and expand. For experienced players, it remains useful because wheat supports animal farms, trading setups, decoration, and food storage. Even in late-game worlds with golden carrots, villager halls, and giant automated farms, a simple wheat field still feels classic. It is the Minecraft equivalent of comfort food: practical, familiar, and always welcome.
Conclusion
Learning how to grow wheat in Minecraft is one of the smartest early-game moves you can make. With seeds, a hoe, water, light, and farmland, you can create a steady food source that grows into much more than bread. Wheat helps you breed animals, craft hay bales, decorate your base, and build a stronger survival routine.
Start small with a 9×9 hydrated farm, protect it with fences, light it properly, harvest only mature golden wheat, and replant right away. Once your farm is running, expand it, decorate it, and connect it to animal pens or village builds. Before long, you will have more wheat than you know what to do withand honestly, that is a very good Minecraft problem to have.