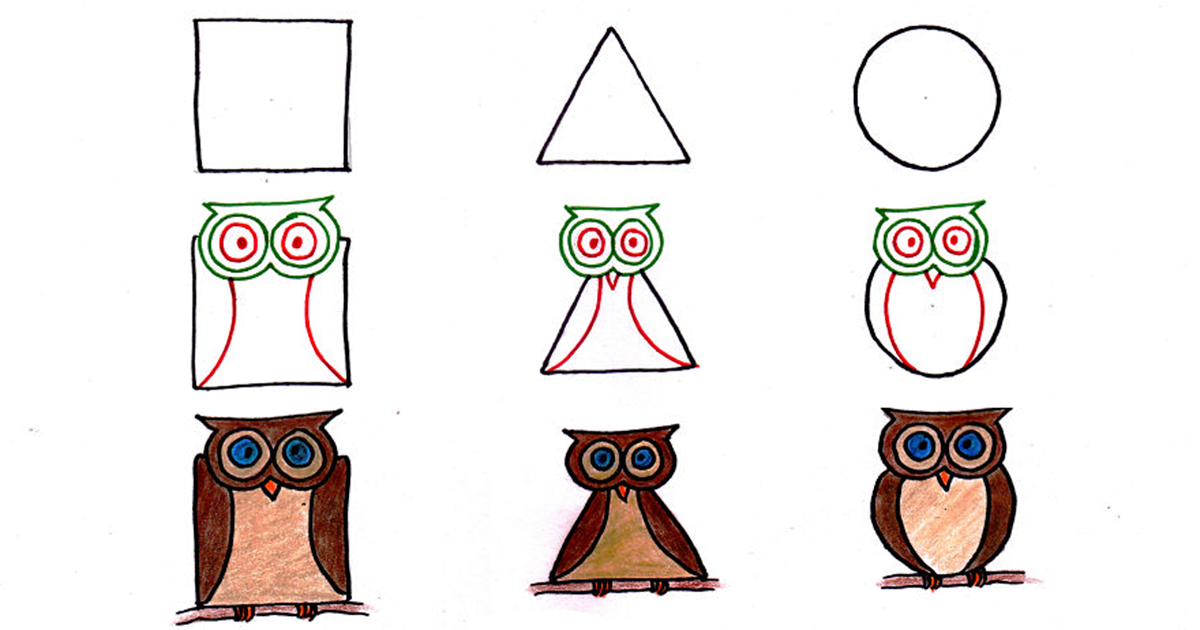
Here is the secret that makes drawing animals much less intimidating: a tiger is not really a tiger at first. It is a few circles, a couple of triangles, a wobbly rectangle, and a bold little attitude problem waiting to happen.
Whether you want to sketch a sleepy cat, a leaping deer, a round-bellied penguin, or an alligator that looks like it pays taxes, learning to draw animals with basic shapes is one of the most useful skills a beginner artist can develop. Instead of trying to copy every whisker, feather, or scale immediately, you build the animal from simple parts first. Then you refine those parts into something alive.
This approach works because animals are made of large masses, smaller forms, connecting limbs, and recognizable features. A circle can become a head. A triangle can become an ear, beak, snout, claw, or tail tip. A square can become a sturdy torso, a broad jaw, or the boxy chest of a bulldog who has clearly seen things.
Grab a pencil, an eraser, and some paper. You do not need expensive art supplies, a mysterious artist cape, or a personal friendship with a wolf. You just need to look carefully, simplify what you see, and build one shape at a time.
Why Basic Shapes Make Animal Drawing Easier
When beginners try to draw an animal by tracing its outside edge, the result can feel stiff or strangely flat. The outline may look fine in one corner, then suddenly turn into a creature that resembles a sock puppet during a windy day. That happens because outlines alone do not explain the animal’s structure.
Basic shapes give you a framework. They help you decide where the head sits, how large the body should be, where the spine bends, and how long the legs need to look. A rough construction drawing also gives you permission to make mistakes early, when mistakes are cheap and easy to erase.
Think of shapes as the animal’s backstage crew. The audience may not see them in the final drawing, but they are doing all the heavy lifting. Once the big forms are believable, the eyes, fur, spots, horns, and dramatic eyebrow expressions become much easier to add.
Shape Versus Form: The Small Difference That Changes Everything
A shape is flat. A circle, square, and triangle are shapes. A form feels three-dimensional. A circle can become a sphere, a square can become a box, and a triangle can become a cone or wedge.
When drawing animals, try to imagine your shapes as solid objects. A bear’s head is not just a circle pasted on paper; it is closer to a rounded ball with a muzzle attached. A horse’s body is not a rectangle; it is a large barrel-like mass. This tiny mental shift helps your animals look less like stickers and more like creatures that could wander off the page and steal your sandwich.
The Only Shape Vocabulary You Need
You can draw an astonishing number of animals with a short list of geometric building blocks. The goal is not to make every animal look robotic. The goal is to use simple shapes as a starting point, then gently reshape them until they become organic.
Circles and Ovals
Circles and ovals are the workhorses of animal drawing. Use them for heads, rib cages, hips, paws, eyes, cheeks, bellies, and joints. A long oval can become a fish body, a rabbit torso, or the middle section of a dachshund. A tilted oval can suggest movement before you add a single detail.
Squares and Rectangles
Squares and rectangles are excellent for animals with sturdy, blocky forms. Use them for snouts, jaws, chests, necks, legs, hooves, and long bodies. A rectangle can become a crocodile’s face, a corgi’s torso, or a horse’s long head. It may not look glamorous at first, but neither does a cake pan until dessert appears.
Triangles
Triangles create direction and energy. They work beautifully for ears, beaks, claws, fins, horns, tails, and sharp facial features. Pointed triangles often make an animal look alert or wild, while rounded triangles can make a character look cute and friendly.
Lines and Curves
Lines connect your shapes. A curved line can show a spine, a tail, a leg, or the flow of a wing. Straight lines can show stiff limbs, bird legs, antlers, or the sharp planes of a reptile’s face. Before drawing details, use a simple line of action to show where the animal is leaning, turning, jumping, sleeping, or plotting revenge against the vacuum cleaner.
The Five-Step Method for Drawing Any Animal
Step 1: Find the Biggest Masses First
Look at your reference photo and ignore the details for a moment. Ask yourself: what are the two or three largest parts of this animal? Usually, they are the head, chest, and hips. Draw those masses as loose circles, ovals, or boxes.
For a cat, you may use one circle for the head, one oval for the chest, and another oval for the hips. For a bird, use a small circle for the head and a larger egg shape for the body. For a turtle, start with a large dome-like oval for the shell and a smaller oval for the head.
Keep these first marks light. You are not carving a monument. You are making a map.
Step 2: Compare Proportions Before Adding Features
Before drawing eyes or fur, compare the size of one shape to another. Is the head half the width of the body? Are the hips larger than the chest? Is the tail longer than the body? These relationships matter more than tiny details.
A useful trick is to pick one body part as your measuring unit. For example, if the head of a fox is one unit wide, estimate how many “head widths” fit into its body length. You do not need a ruler. You only need to compare.
This is especially helpful with animals that have unusual proportions. A giraffe has a surprisingly compact body beneath a very long neck. A flamingo has a tiny head, a curved neck, and legs that seem to have been designed by a committee of spaghetti noodles. Notice the relationship between parts before trying to make it pretty.
Step 3: Add the Spine and Gesture Line
Draw a simple curved line from the base of the head through the body. This is the spine or gesture line. It shows the animal’s pose and prevents your drawing from looking like a collection of shapes that accidentally met in a parking lot.
A relaxed cat may have a soft curve through its back. A running dog may have a long, stretched line. A perched bird may have a mostly upright curve. Even a standing animal has a slight directional flow, so do not make every body part perfectly vertical or perfectly horizontal unless you are drawing a very determined refrigerator magnet.
Step 4: Attach Smaller Shapes
Now add the smaller parts: muzzle, ears, legs, paws, wings, tail, horns, fins, or beak. Build each part from a simple shape before refining it.
For legs, begin with simple cylinders or tapered rectangles. Mark the major joints first, then connect them. For paws, start with small ovals or rounded blocks. For ears, use triangles, rounded triangles, or leaf-like forms. For tails, begin with a flowing line, then build thickness around it.
This is the stage where the animal becomes recognizable. It may still look a little strange, but that is normal. Nearly every successful drawing has a brief awkward phase. Trust the process. Even the best-looking golden retriever begins life as a potato with sticks.
Step 5: Carve, Refine, and Add Details
Once the construction looks correct, begin connecting the shapes with smoother contour lines. Remove unnecessary overlaps. Round a boxy chest, taper a muzzle, soften a belly, or sharpen a beak.
Only after the overall silhouette works should you add facial features, fur direction, scales, feather groups, spots, stripes, or shading. Details should support the larger form, not hide it.
When shading, look for one simple light direction. Darken the side facing away from the light, the underside of the body, and the areas where one form overlaps another. You do not need to shade every molecule of fur. A few clear value changes will do more than a thousand frantic pencil scratches.
How To Draw Popular Animals Using Simple Shapes
How To Draw a Cat
Start with a circle for the head and a slightly larger oval for the chest. Add another oval for the hips, then connect the two body shapes with a curved back line. Place two triangles on top of the head for ears. Add a small rounded triangle or oval for the muzzle.
For a sitting cat, draw two vertical cylinders or tapered rectangles for the front legs. Add compact ovals for paws. Curve the tail around the body like a question mark that has decided to take a nap.
When adding fur, follow the direction it grows. Keep the face simple: almond-shaped eyes, a tiny nose, a short mouth line, and a few confident whiskers. Do not draw 400 whiskers. Cats have enough opinions already.
How To Draw a Dog
Dogs come in every possible shape, including “small sofa with legs,” so begin by choosing a breed or a clear reference photo. Use a circle or rounded block for the head, an oval or rectangle for the rib cage, and a second oval for the hips.
Add a muzzle shape that matches the breed. A pug has a short, broad muzzle. A greyhound has a long, narrow one. A retriever has a medium-length muzzle with soft edges. Use triangles, floppy leaf shapes, or rounded wedges for ears.
For the legs, think about simple tubes. The front legs usually hang beneath the chest, while the back legs bend more noticeably at the knee and hock. Build the joints before drawing the final outline. This one habit will rescue many dogs from looking like they are wearing invisible snow boots.
How To Draw a Bird
A bird is one of the easiest animals to simplify. Draw a small circle for the head and a larger egg shape for the body. Tilt the egg shape depending on whether the bird is standing, flying, or looking suspiciously at your french fries.
Add a triangle for the beak, a curved wedge for the wing, and thin lines for the legs. The tail can be a simple triangle or fan shape. When refining the wing, group feathers into a few larger sections rather than drawing every single feather individually.
For a flying bird, stretch the body into a narrow oval and use long triangles or curved leaf shapes for the wings. Keep the wing shapes asymmetrical when the bird is mid-flap. Perfect symmetry can make a flying bird look more like a logo than a living creature.
How To Draw a Horse
Horses look complicated because they are elegant, muscular, and apparently built from springs. Break them down into a large oval rib cage, a smaller oval hip, a tapered rectangle for the neck, and a long wedge for the head.
Use circles to mark shoulder, hip, knee, and ankle joints. Then connect them with tapered lines. Horse legs are slim, but they are not straight drinking straws. Watch where each joint bends.
Add triangular ears, an oval muzzle, and a flowing line for the mane. Keep the neck broad where it meets the chest and narrower near the head. If the horse looks a little too much like a llama in the first draft, congratulations: you are noticing structure, which is how improvement starts.
How To Draw a Fish
Draw a long oval for the body. Add a triangle at one end for the tail and a smaller triangle or wedge for the mouth. Use curved triangles for the top and bottom fins. Place the eye near the front third of the body.
To make the fish feel more three-dimensional, curve the body slightly and use a light center with darker edges. For scales, suggest a few rows rather than covering the entire fish with identical half-circles. Texture should follow the form and stay secondary to the body shape.
How To Draw a Fox
A fox is an excellent animal for practicing triangles. Start with a circle or rounded diamond for the head, then add two large upright triangles for ears. Use a tapered triangle for the muzzle. The body can be a long oval, while the legs are slim rectangles that narrow toward the paws.
The signature feature is the tail: draw a long sweeping curve first, then build a thick, fluffy shape around it. A fox looks energetic when its body leans forward and its tail balances the pose behind it.
Use Reference Photos Without Becoming a Copy Machine
Reference photos are not cheating. They are visual information. Artists use references because memory is often terrible at anatomy. Your brain may remember that an owl has wings and a beak, but it may conveniently forget where the legs are hiding or how the head connects to the body.
When using a reference, do not start by tracing the edge. Instead, identify the large shapes, the line of the spine, the angle of the head, and the direction of the limbs. Check your drawing against the reference often, especially after adding each major shape.
Try the “squint test.” Squint at the reference photo until details blur. The biggest shapes and darkest areas will become easier to see. That is the information you should capture first.
Common Mistakes When Drawing Animals From Shapes
Starting With the Eyes
Eyes are fun, so many artists draw them first. Unfortunately, a beautifully shaded eye cannot save a head that is the wrong size for the body. Place the major masses before facial details.
Making Every Shape the Same Size
Animals become interesting through contrast. A tiny mouse has a large head compared with its body. A horse has a small head compared with its long torso. A bear may have a massive chest and comparatively small ears. Varying shape sizes creates personality and believable proportions.
Using Perfect Geometry for Too Long
Circles, squares, and triangles are scaffolding, not prison bars. Once your construction is working, soften, stretch, taper, overlap, and reshape those forms. Nature loves irregularity. Even a symmetrical butterfly has tiny differences from side to side.
Adding Texture Before Structure
Fur, feathers, and scales are tempting, but they can disguise proportion problems. Finish the body first. Then add texture in clusters that follow the surface of the animal.
A Simple 15-Minute Animal Drawing Practice Routine
Practice does not have to be dramatic. You do not need to spend six hours rendering one wolf’s eyebrow. A short, focused routine can teach you a great deal.
- Minutes 1–3: Draw circles, ovals, boxes, and triangles with light lines.
- Minutes 4–7: Choose one animal reference and block in the head, chest, hips, and spine.
- Minutes 8–11: Add limbs, ears, tail, wings, or other major features.
- Minutes 12–15: Refine the outline and add only the most important details.
Repeat this with different animals. Draw a round animal, a long animal, a winged animal, and an animal with unusual limbs. A penguin, dachshund, frog, giraffe, crab, snake, and squirrel will teach you very different lessons.
Experience: What Drawing Animals From Shapes Teaches You
The first time I seriously used squares, triangles, and circles to draw animals, I expected the process to feel childish. I thought real artists probably started with one confident, magical line and somehow produced a wolf that could sell scented candles on the internet. Instead, I learned that many strong drawings begin with awkward, barely recognizable shapes.
My first practice animal was a cat. The plan was simple: circle head, oval body, triangles for ears, curved tail. The result looked less like a cat and more like a suspicious potato wearing party hats. Still, it had a clear head, body, paws, and tail. That was enough. The next cat had better proportions. The one after that actually looked like it might judge me from a windowsill.
The biggest lesson was that a drawing can look wrong for several minutes and still become right later. Beginners often quit during the construction stage because the animal is not cute yet. But construction sketches are not supposed to be cute. They are supposed to be useful. A circle for the rib cage does not need to look impressive. It only needs to sit in the correct place and relate properly to the head and hips.
Another useful experience came from drawing dogs. Dogs are wonderful teachers because each breed changes the same basic blueprint. A chihuahua, basset hound, husky, bulldog, and poodle all have a head, chest, hips, legs, and tail. Yet a tiny adjustment in ear shape, muzzle length, chest width, leg height, or tail position can completely change the breed and mood.
I also learned that reference photos make the process calmer. Without a reference, I tended to draw what I thought an animal looked like. That usually meant a generic cartoon version assembled from old memories. With a photo nearby, I began noticing surprises: a rabbit’s hind legs are much larger than its front legs, birds often have feet positioned farther forward than expected, and a horse’s legs bend in ways that punish anyone who draws them as straight sticks.
Drawing from shapes also changed the way I looked at animals in daily life. A curled-up dog became a large oval wrapped around a smaller oval. A pigeon became a sphere balanced on an egg shape. A squirrel became a compact body, a tiny head, and an outrageously oversized tail. The world started to look like a sketchbook full of moving geometry.
There is something freeing about this method because it removes the pressure to “draw perfectly.” You are not trying to produce a finished masterpiece in the first thirty seconds. You are solving a visual puzzle. Where does the head sit? How long is the tail? Which part is widest? Which direction does the spine curve?
Over time, the shapes become almost invisible. You still use them, but you begin to see them automatically. A circle becomes a skull. An oval becomes a rib cage. A triangle becomes an ear with weight, direction, and personality. The animal develops naturally because the structure underneath makes sense.
Note: Keep your early construction lines light and loose. A sketch is allowed to be messy before it becomes convincing; that is not failure, that is the job.
Final Thoughts: Start With Shapes, Then Let the Animal Appear
Learning how to draw animals from squares, triangles, and circles is less about memorizing a formula and more about learning how to see. Every animal can be simplified into large forms, smaller attachments, directional lines, and a handful of memorable details.
Start broad. Check proportions. Build the pose. Add details last. With enough practice, you will stop seeing an overwhelming tangle of fur, feathers, limbs, and textures. You will see a simple structure waiting to be translated into your own style.
So draw the cat. Draw the horse. Draw the bird that looks like it knows a secret. Draw the shark, the frog, the raccoon, and the very judgmental alpaca. Begin with shapes, keep your pencil moving, and let the geometry do its quiet magic.