If you have an M4A audio file and need an MP3 version, welcome to one of the internet’s most common “this should be easier than it is” moments. The good news is that Apple’s built-in tools can still handle it just fine. The slightly annoying news is that the exact app depends on your device. On Windows, you’ll usually use iTunes. On newer Macs, iTunes has been replaced by the Music app, but the conversion idea is basically the same: pick an encoder, import the file if needed, and create a new version.
This guide walks you through how to convert M4A to MP3 with iTunes in 10 simple steps, plus a few smart tips to avoid quality loss, mystery duplicates, and those “where did my file go?” moments. If you want a practical, beginner-friendly tutorial in plain American English, you’re in the right place.
What Is an M4A File, Anyway?
Before we dive into the button-clicking adventure, let’s clear up the file-format alphabet soup. M4A is a common audio file format often associated with Apple. Many M4A files use AAC encoding, which is designed to deliver good sound quality at smaller file sizes. MP3, meanwhile, is the old reliable format that seems to work on almost everything from car stereos to ancient media players hiding in junk drawers.
So why convert M4A to MP3? Usually for compatibility. Maybe your car stereo likes MP3 better. Maybe you need the file for a device, app, or upload tool that doesn’t play nicely with M4A. Maybe you just want fewer format-related headaches in your life. All valid reasons.
Should You Convert M4A to MP3?
Sometimes yes, sometimes no. If your M4A file already plays everywhere you need it, there may be no reason to convert it. In many cases, M4A with AAC can actually sound very good while staying compact. But if you need a more universal format, MP3 is still the people’s champion.
One important note: converting from one lossy format to another can reduce audio quality. In other words, the file won’t magically sound better just because you turned it into an MP3. You’re mainly gaining compatibility, not audio wizardry. So think of conversion as a convenience move, not a sonic glow-up.
How to Convert M4A to MP3 with iTunes: 10 Steps
Here’s the full step-by-step process. These instructions work for iTunes on Windows. If you’re on a Mac, use the Music app; the menu names are very similar.
Step 1: Open iTunes
Launch iTunes on your Windows PC. If you do not already have it installed, you’ll need Apple’s desktop software before you can use this method. On a Mac, open the Music app instead, because iTunes officially retired from macOS a while ago and handed the keys to Music.
Step 2: Go to Preferences
In iTunes, click Edit > Preferences. This is where Apple hides the settings that decide how your files get imported and converted. Because apparently a simple “Convert Stuff Here” button would have been too straightforward.
Step 3: Open Import Settings
Under the General tab, click Import Settings. This small button controls the encoder that iTunes uses when creating a new audio version. It is much more powerful than it looks.
Step 4: Choose MP3 Encoder
In the Import Using drop-down menu, select MP3 Encoder. This tells iTunes that when you ask it to make a converted copy, it should create an MP3 rather than AAC, WAV, or something else.
Step 5: Pick Your Audio Quality
Still in the Import Settings window, choose a quality option. Higher bit rates usually mean better sound but larger files. If you want a practical middle ground, many people go with a standard or high-quality setting for everyday listening. If the file is important and you care about sound, do not automatically choose the smallest option just because it feels efficient. Tiny files are not always your friend.
Step 6: Click OK and Save the Settings
Click OK to close Import Settings, then click OK again to exit Preferences. Congratulations: you have told iTunes what kind of file you want. This is the setup phase, and it matters, because if you skip it, iTunes may create the wrong format and leave you questioning your life choices.
Step 7: Add the M4A File to Your Library If Needed
If your M4A file is not already in iTunes, add it first. You can usually do this by dragging the file into your library or using File > Add File to Library. Once imported, the file should appear in your Songs or Library view.
Step 8: Select the M4A File
Click the file you want to convert. You can also select multiple files if you are converting a batch, though it is wise to test one file first if you are experimenting with settings. No one enjoys accidentally converting half a music folder at potato quality.
Step 9: Convert the File
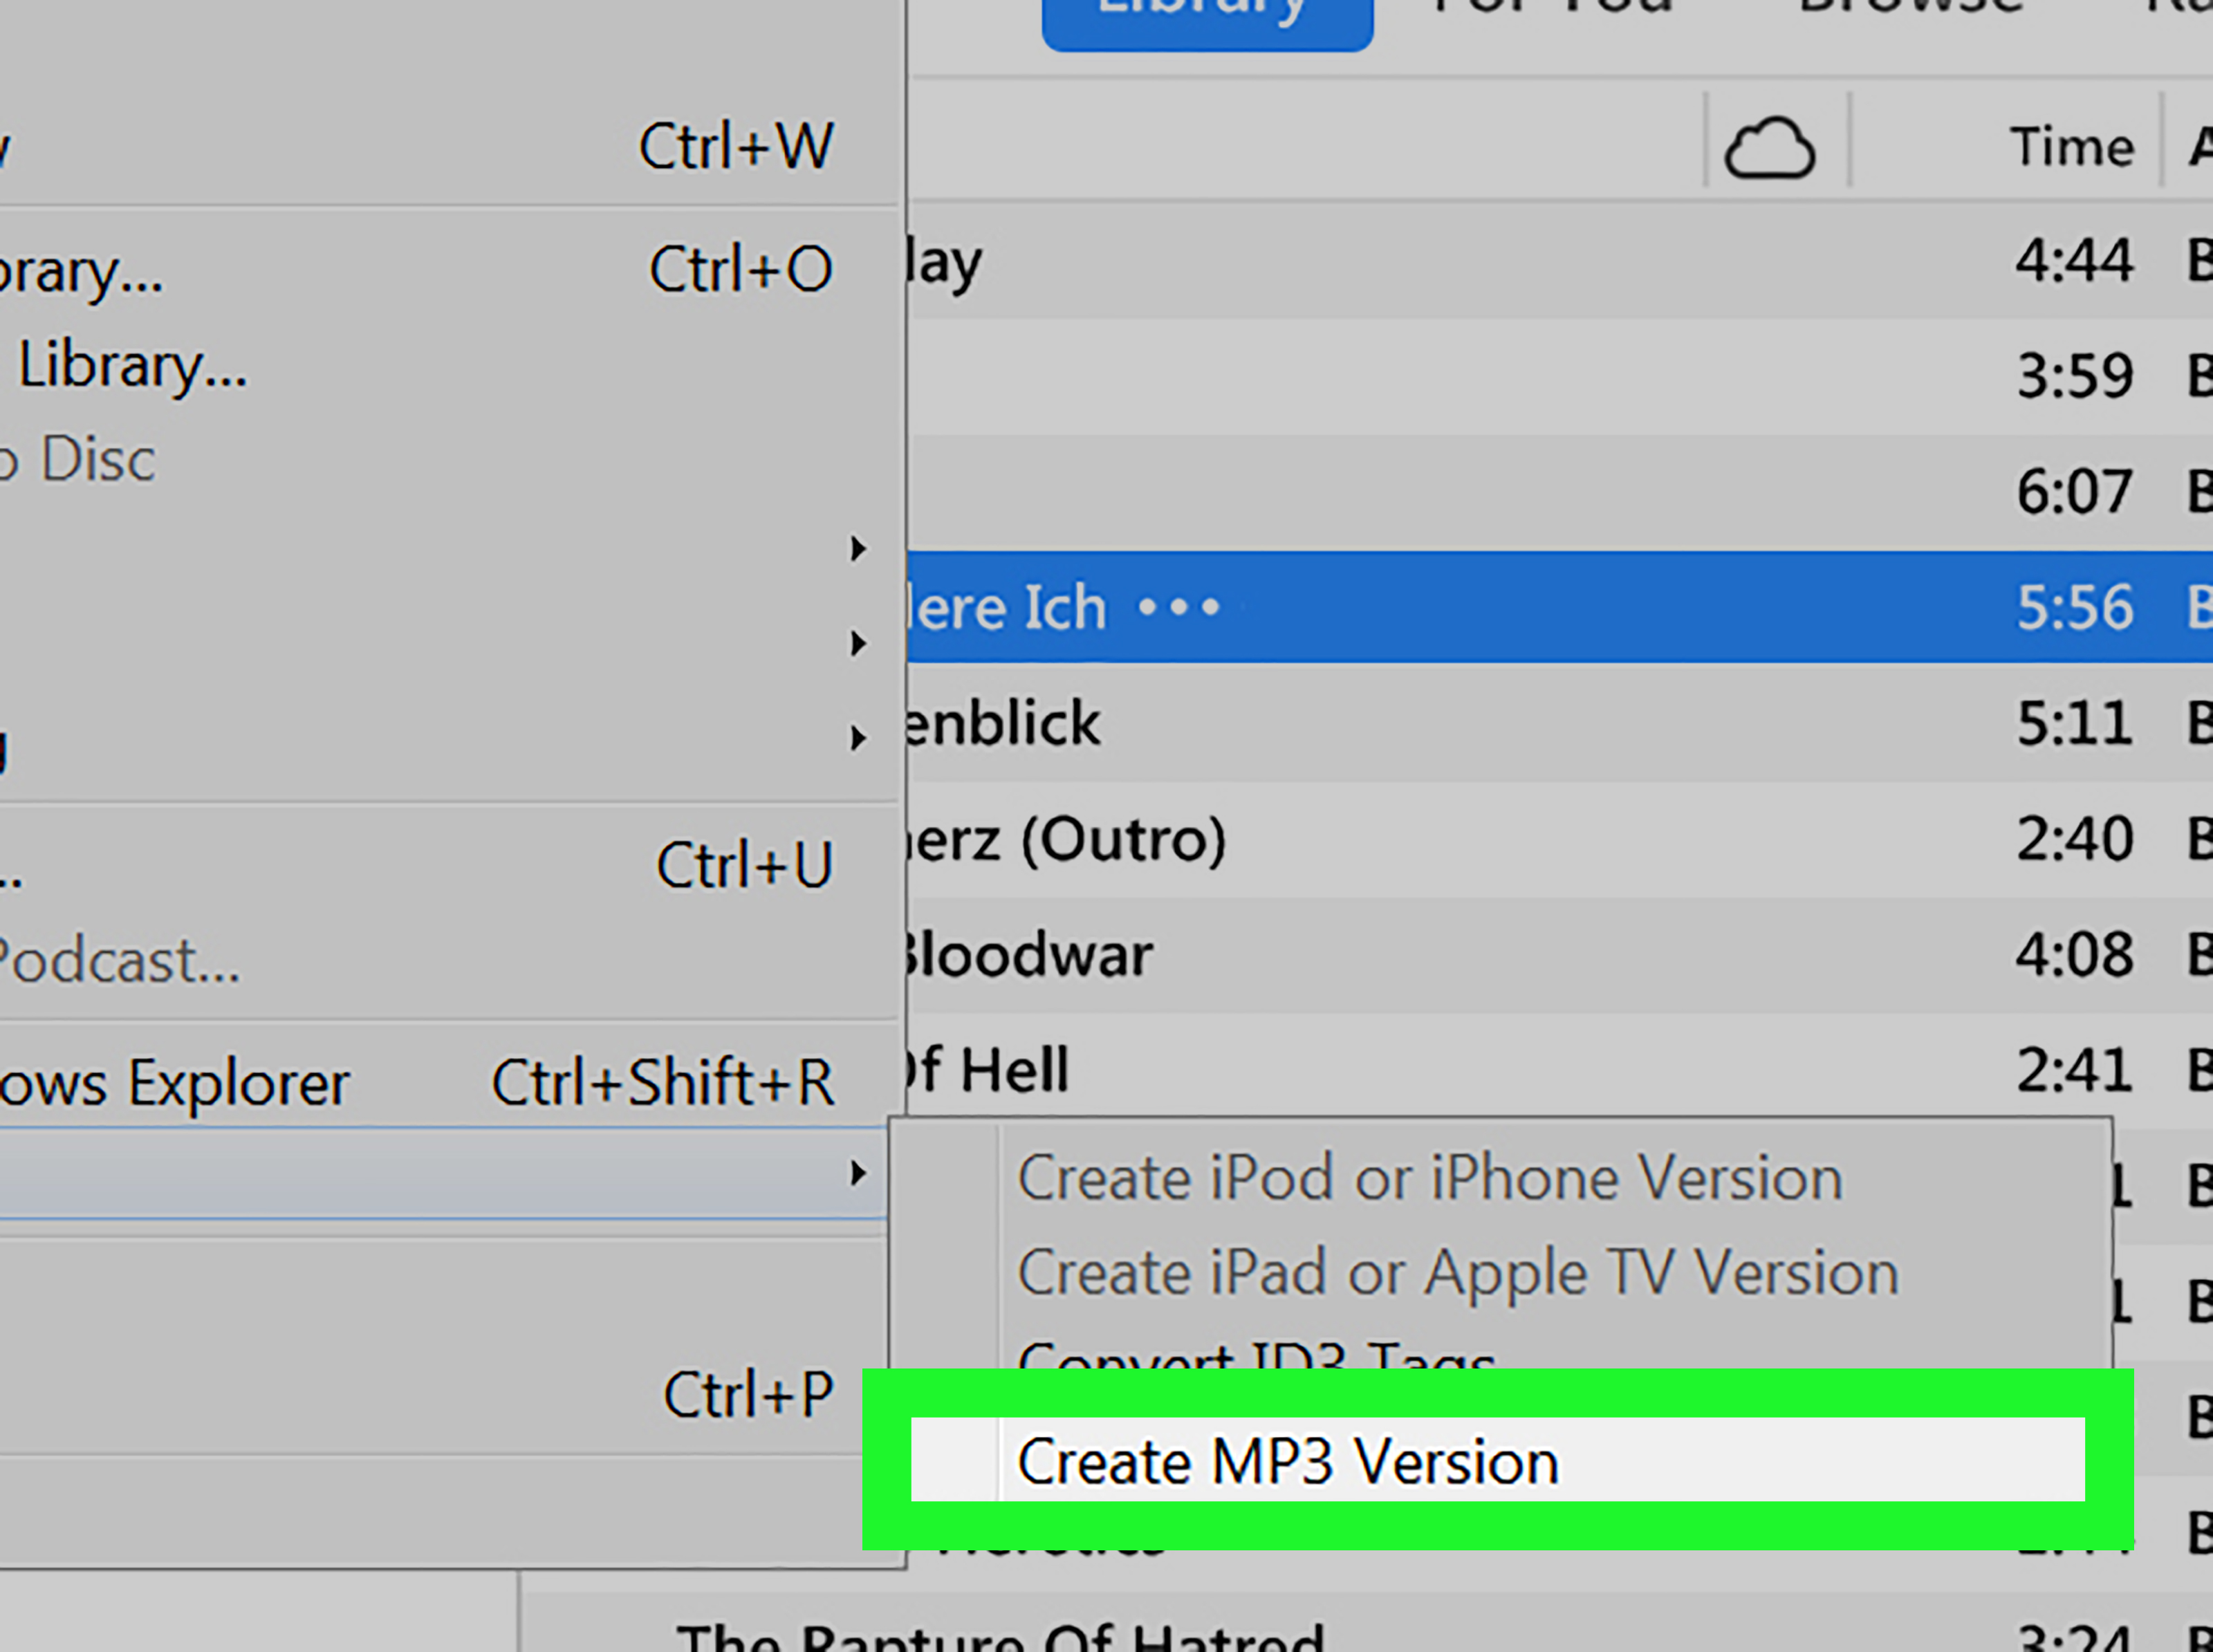
Now go to File > Convert > Create MP3 Version. iTunes will create a new MP3 copy and place it in your library alongside the original file. It does not usually replace the M4A version, which is good news if you like backups and bad news if you hate duplicates.
Step 10: Find and Use Your New MP3 File
Once the conversion finishes, you should see the new MP3 in iTunes. To locate it in File Explorer, right-click the track and look for an option like Show in Windows Explorer. From there, you can move it, rename it, upload it, or send it to whatever stubborn device demanded MP3 in the first place.
How to Convert M4A to MP3 on a Mac
If you searched for how to convert M4A to MP3 with iTunes on a Mac, here is the twist: you’ll use the Music app instead of iTunes. Open Music, go to Music > Settings, click Files, then Import Settings, choose MP3 Encoder, and convert the selected file from the File > Convert menu.
So yes, the method still works. Apple just changed the furniture and expected everyone to pretend that was not confusing.
Common Problems When Converting M4A to MP3
The “Create MP3 Version” option is missing
This usually means your import settings are not set to MP3 Encoder yet. Go back to Preferences and make sure you selected the right encoder. If iTunes is set to AAC or WAV, the Convert menu will offer that format instead.
The converted file sounds worse
That can happen. MP3 is a lossy format, and converting from a lossy M4A file to MP3 can trim away more detail. Try a higher bit rate if audio quality matters, but remember: once audio data is lost, conversion cannot magically restore it.
You can’t convert certain purchased files
Some protected or older purchased tracks may have restrictions. In general, not every file is equally convertible, especially if digital rights management enters the chat. If a file is protected, the built-in conversion method may not work.
You can’t find the MP3 afterward
That usually means the file was created but stored in your media folder instead of the place you expected. Use the track’s context menu to reveal the file location. This saves a surprising amount of dramatic folder-searching.
Best Settings for M4A to MP3 Conversion
If you are wondering which setting to choose, here is the practical answer:
- For casual listening: A standard MP3 setting is usually fine.
- For music you care about: Choose a higher bit rate for better sound.
- For speech, lectures, or voice notes: Lower settings may still sound perfectly acceptable while saving space.
The right choice depends on whether you value smaller file size, better audio quality, or a balance of both. There is no one-size-fits-all setting, no matter how badly the internet loves pretending otherwise.
M4A vs MP3: Which Format Is Better?
This depends on your goal. M4A can be more efficient and may offer strong quality at smaller sizes, especially when it uses AAC. MP3 wins on compatibility because nearly everything understands it. If you are archiving personal audio and your devices support M4A, you may not need to convert. If you are sharing files broadly or loading them onto older hardware, MP3 is often the safer bet.
In short, M4A is the sleek modern apartment. MP3 is the pickup truck that starts every morning. Different vibes, both useful.
When iTunes Is the Best Tool for the Job
There are plenty of online file converters and third-party apps out there, but iTunes remains a convenient choice if you already use Apple software and want a built-in way to create an MP3 version. It is especially handy when privacy matters and you would rather not upload your audio to a random site with a suspiciously cheerful homepage and zero explanation of what happens to your files afterward.
It is also a solid option for people who want quick results without learning professional audio software. No waveform editing. No codec rabbit hole. No existential crisis about export presets. Just a functional path from M4A to MP3.
Real-World Experience: What It’s Actually Like to Convert M4A to MP3 with iTunes
Here’s the honest experience part that most tutorials skip. The first time many people try converting M4A to MP3 with iTunes, they expect it to be a one-click affair. Instead, they end up poking around menus, wondering why the Convert option is missing, why the file duplicated itself, or why Apple decided the important setting should live inside another setting. It feels less like “audio conversion” and more like a scavenger hunt designed by a minimalist with a grudge.
That said, once you do it once, it gets much easier. The workflow becomes predictable. Open the app, set the encoder, add the file, create the MP3 version, done. The biggest surprise for beginners is that iTunes usually creates a new file rather than replacing the old one. That is actually helpful. If the MP3 sounds rough, you still have the original M4A. If you picked the wrong quality setting, no disaster. Just delete the MP3 and do it again.
Another common experience is discovering that the file sounds a little different after conversion. Not always dramatically different, but enough for picky ears to notice. That is especially true with music that has a lot of detail in the vocals, cymbals, or background layers. For voice memos, podcasts, and spoken audio, the change may be barely noticeable. For music lovers, though, encoder settings matter. The best approach is to treat the first conversion as a test run and listen before converting an entire folder.
People also run into the “where did the file go?” problem more often than they admit. iTunes shows the new MP3 in the library, but the actual file location is not always obvious if you are not used to Apple’s media organization. Once you learn to reveal the file in Explorer or Finder, that problem mostly disappears. Still, it can feel silly to spend two minutes converting a file and ten minutes searching for it like it has entered witness protection.
On the plus side, using iTunes or the Music app feels safer than handing your audio to a random online converter. If the file is personal, unpublished, or part of work, local conversion is usually the smarter move. No uploading, no waiting for a browser tool, no wondering whether your audio is being retained somewhere in the cloud. That peace of mind is a big reason many users stick with Apple’s built-in method even when flashier tools exist.
In everyday use, this conversion method shines for simple jobs: making a car-friendly copy of a song, converting a lecture recording for an older device, or preparing audio for a platform that prefers MP3. It is not glamorous. It will not make you feel like a studio engineer. But it works, and sometimes “works without drama” is exactly the feature people need.
The funniest part is that a lot of users start by searching specifically for how to convert M4A to MP3 with iTunes, only to learn that on modern Macs the answer is “well, technically, with Music.” Apple changed the app name, but not the basic logic. So the internet ends up full of tutorials using yesterday’s name for today’s process. Confusing? A little. Fatal? Not even close.
Overall, the experience is best described as mildly clunky but reliably effective. Once you know where the settings live and what kind of output you want, it becomes a quick routine rather than a puzzle. And if you only need occasional conversions, that is more than enough.
Final Thoughts
If you need a dependable way to convert M4A to MP3 with iTunes, Apple’s built-in software still gets the job done. The process is simple once you know where the settings are: choose MP3 Encoder, import the file, create an MP3 version, and track down the new file in your library.
The real decision is not whether the conversion works. It does. The real decision is whether you actually need MP3. If compatibility is your top priority, go for it. If sound quality and smaller file size matter more, keeping the original M4A may be the better move. Either way, now you know how to handle both options without breaking a sweat or yelling at your computer. Hopefully.