Some people see an empty wine bottle and think, “Recycling bin.” Garden people see the same bottle and think, “That could become a sparkling border, a sunburst in the soil, a flower-bed halo, or the beginning of my neighbors asking questions over the fence.” Welcome to the wonderfully thrifty world of buried bottle yard art.
Burying bottles in the garden is a simple DIY landscaping idea that turns glass bottles, wine bottles, beer bottles, soda bottles, and colorful recycled containers into outdoor art. The most common technique is to place bottles neck-down in the soil so the rounded bases create a decorative pattern above ground. The result can look rustic, bohemian, coastal, folk-art inspired, or surprisingly polisheddepending on your colors, spacing, and patience level.
This project works beautifully as garden edging, pathway borders, raised bed accents, mosaic-style yard art, bottle “flowers,” sunburst designs, or playful markers around trees and shrubs. It is inexpensive, eco-friendly, and forgiving enough for beginners. That said, it is still glass, not marshmallow. A little planning keeps the project safe, sturdy, and gorgeous instead of wobbly, sharp, and mildly dramatic.
Why Buried Bottle Yard Art Works So Well
Glass bottles bring three things most garden materials envy: color, shine, and personality. Green wine bottles add a cool woodland feel. Brown beer bottles create warm amber edges that glow in afternoon light. Blue bottles look magical, especially near herbs, lavender, white flowers, ornamental grasses, or water features. Clear bottles can sparkle like ice when grouped tightly, though they show dirt faster than darker glass.
Beyond beauty, bottle garden edging has practical value. A buried bottle border can visually separate lawn from planting beds, help keep mulch from wandering into paths, and give a garden bed a defined outline. It will not perform like commercial steel edging in every situation, but for decorative zones, cottage gardens, informal paths, herb beds, and upcycled yard art, it can be both useful and charming.
There is also a long tradition of using glass bottles outdoors. Bottle trees, especially blue bottle trees, are part of Southern folk-art history and are often associated with protection, color, and storytelling. Buried bottle borders have a similar spirit: they take ordinary objects and make them part of the landscape. It is recycling with a wink.
Best Bottles to Use for Garden Art
Choose Thick, Matching Bottles for Borders
For a clean, professional-looking bottle border, use bottles of the same size and shape. Wine bottles are popular because they are tall, durable, and consistent. Beer bottles work well for lower edging. Sparkling water bottles, cider bottles, and decorative soda bottles can add unusual shapes.
The strongest bottle yard art usually starts with thick glass. Avoid thin, delicate bottles that feel fragile in your hand. Do not use cracked, chipped, or previously broken bottles. If the rim is damaged, skip it. A free bottle is not free if it becomes a tiny glass dragon hiding in your flower bed.
Mix Colors for Patterns and Personality
Color is where this project becomes fun. You can create a single-color border for a calm design or alternate colors for rhythm. Try green and brown for a natural look, blue and clear for a coastal garden, or amber and emerald for a warm cottage feel.
For a sunburst or star design, place bottles in radiating lines with bases facing upward. Use one color for the center and another for the rays. Around a tree, alternate bottle colors in a circular pattern. Along a pathway, use repeating sectionsfive green bottles, five amber bottles, one blue accent bottleso it looks intentional, not like your recycling bin had a yard sale.
Where to Use Buried Bottles in the Yard
Garden Bed Edging
The easiest project is a bottle border around a flower bed. Bottles buried neck-down create a curved or straight edge that frames plants and adds texture. This works especially well around roses, herbs, zinnias, marigolds, salvia, lavender, ornamental grasses, and vegetable beds that need a little personality.
Pathway Borders
Use bottles along gravel paths, stepping-stone walkways, or mulch trails. The glass catches sunlight and makes the path feel more designed. Keep the exposed bottle height low enough that no one trips. For walkways used by children, pets, wheelbarrows, or guests carrying lemonade, choose a different edging material or keep bottles well outside the traffic zone.
Tree Rings and Shrub Circles
A bottle ring around a tree can look sculptural, especially when paired with mulch or low groundcover. Leave enough room around the trunk so the bottles and mulch do not crowd the tree flare. Trees do not like being tucked in like burritos. Keep mulch a few inches away from the trunk and avoid digging deeply through major roots.
Sunburst Yard Art
If you want art instead of edging, create a sun, flower, spiral, or star shape in an open bed. Mark the design with string, chalk, landscape paint, or a garden hose. Then bury the bottles along the lines. This approach is perfect for unused corners, bare patches near patios, or a garden area that needs a focal point.
Tools and Materials You Will Need
- Clean glass bottles of similar size
- Work gloves
- Safety glasses
- Shovel, trenching spade, or garden trowel
- Measuring tape or yardstick
- String, hose, or landscape paint for layout
- Sand or fine gravel for drainage and leveling
- Soil for backfilling
- Rubber mallet and scrap wood, optional
- Mulch, stones, or groundcover for finishing
Safety glasses and gloves are not optional decoration. Glass can chip, and soil can hide surprises. Wear closed-toe shoes, too. This is not the moment for flip-flops, no matter how emotionally ready you are for summer.
Step-by-Step: How to Bury Bottles for Yard Art
Step 1: Collect and Clean the Bottles
Remove labels if you want a polished look. Soak bottles in warm, soapy water, then scrape labels with a plastic scraper. A little baking soda paste can help with sticky residue. Rinse well and let the bottles dry.
You can leave labels on for a funky, casual look, but paper labels break down outdoors and may look messy after rain. Painted labels may last longer, but they can still fade. For most gardens, clean glass looks best and ages better.
Step 2: Plan the Design Before Digging
Lay the bottles on the ground first. This helps you judge spacing, curves, and quantity. For edging, place bottles shoulder to shoulder or leave small gaps of one-half inch to one inch. Tight spacing looks more finished; wider spacing feels casual and uses fewer bottles.
For curves, use a garden hose as a flexible guide. For circles, tie string to a stake and use it like a compass. For a sunburst design, mark a center point and radiate lines outward. Planning first prevents the classic DIY problem known as “Why is my circle shaped like a potato?”
Step 3: Dig a Trench
Dig a trench deep enough to hold at least one-third to one-half of each bottle below ground. For wine bottles, that often means burying the neck and part of the shoulder. For shorter beer bottles, bury enough glass to keep each bottle stable.
The trench should be slightly wider than the bottle neck and shoulder. Keep the bottom as even as possible. If your soil is heavy clay, add an inch or two of sand or fine gravel at the bottom to improve drainage and make leveling easier.
Step 4: Place Bottles Neck-Down
Set each bottle upside down with the neck buried and the base facing up. Press it into the trench gently. Do not hammer directly on glass. If you need to tap a bottle into place, put a scrap board over the base and use a rubber mallet lightly.
Check the height as you go. The exposed bottle bases should be roughly even, unless you intentionally want a wave pattern. Uneven bottles can still look artistic, but there is a fine line between “handmade charm” and “tiny glass skyline after an earthquake.”
Step 5: Backfill and Firm the Soil
Once the bottles are aligned, backfill around them with soil. Press the soil firmly by hand or with the end of a trowel. Add more soil as needed because loose soil settles after watering. The goal is to lock each bottle in place without stressing the glass.
Water the area lightly after installation. This helps soil settle around the bottles. After a day or two, check for wobbling and add more soil or sand where needed.
Step 6: Finish With Mulch, Gravel, or Plants
A buried bottle border looks best when the surrounding area is finished. Add mulch inside garden beds to reduce weeds and create contrast. Use pea gravel along paths for a crisp look. Plant creeping thyme, sedum, sweet alyssum, or low-growing annuals near the bottles to soften the edge.
Dark mulch makes green and blue bottles pop. Light gravel makes amber bottles glow. Flowers with silver foliage, such as lamb’s ear or dusty miller, look especially pretty next to colored glass.
Design Ideas for Stunning Bottle Yard Art
The Wine Bottle Garden Border
Use matching wine bottles buried neck-down around a flower bed. Keep the bases at the same height for a clean edge. This design looks great in cottage gardens, backyard patios, and informal vegetable gardens.
The Blue Bottle Moon
Create a crescent moon shape with cobalt or blue bottles. Fill the inside with white gravel or pale flowers. This is a beautiful focal point for a night garden or a meditation corner.
The Bottle Sunburst
Start with a circle of amber bottles, then create rays with green or clear bottles. Place this in a sunny part of the yard where the glass can catch light. Add drought-tolerant plants around it for a desert-meets-folk-art look.
The Herb Garden Halo
Use small beer or soda bottles to edge a circular herb bed. The low border helps define the space without overwhelming basil, thyme, oregano, parsley, or chives. Bonus: the garden will look like it has a tiny crown.
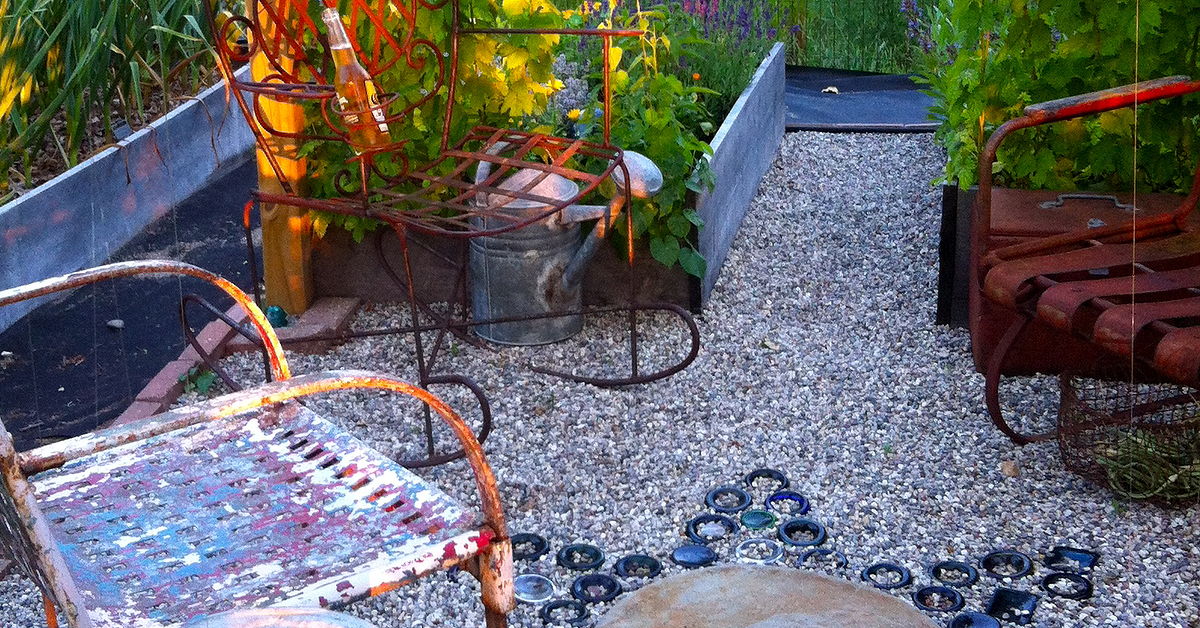
The Recycled Glass Path
Line both sides of a gravel path with buried bottles. Use one color on each side or alternate colors for a playful effect. Keep bottles low and stable to reduce tripping risks.
Safety Tips Before You Start
Only use intact bottles. Never bury broken glass, sharp shards, or cracked containers in the garden. Wear gloves, safety glasses, long pants, and closed-toe shoes when handling bottles and digging. If a bottle breaks during installation, remove every piece immediately with a broom, dustpan, or gloved hands, and dispose of it safely.
Avoid placing buried bottles in high-traffic lawn edges where mowers, string trimmers, bikes, or kids may hit them. Glass and weed whackers are not friends. If you must trim nearby grass, use hand shears around the bottles or leave a buffer strip of mulch or gravel.
Before digging deeply, check for irrigation lines, landscape lighting wires, and underground utilities. For larger projects or deeper digging, contact your local utility marking service before you start. It is much easier to wait for a marked line than to explain to your household why the internet disappeared during “art.”
How to Keep Bottle Garden Art Looking Good
Maintenance is simple. Rinse dusty bottles with a hose. Pull weeds that grow between bottles. Add soil if any bottle loosens after heavy rain, freeze-thaw cycles, or enthusiastic squirrel engineering. Refresh mulch once or twice a year to keep the border looking intentional.
In cold climates, frost heave can push objects upward as wet soil freezes and thaws. To reduce movement, install bottles deeply enough, use sand or gravel for drainage, and check the border in spring. If a bottle rises, gently remove it, reset the trench, and backfill firmly.
In hot climates, glass can become warm in full sun, though buried bottle bases usually do not create serious heat issues when spaced normally. Still, avoid placing glass where people or pets lounge barefoot. A decorative border belongs beside the path, not in the middle of the picnic blanket.
Common Mistakes to Avoid
Burying Bottles Too Shallow
If bottles wobble, they were probably not buried deeply enough. A shallow installation may look fine on day one and lean after the first storm. Bury at least one-third of the bottle, and more if the soil is loose.
Ignoring Drainage
Wet, compacted soil can shift. Add sand or fine gravel in the trench if your soil holds water. This makes the bottles easier to level and helps reduce movement.
Using Random Sizes Without a Plan
Mixed bottles can look amazing, but random heights need intention. Group similar sizes together, create repeating patterns, or use height differences as part of the design. Otherwise, the border can look like a glass marching band that forgot rehearsal.
Placing Bottles Too Close to Lawn Equipment
Keep glass away from mower blades and string trimmers. If the border touches grass, add a narrow mulch strip or stone buffer so you can maintain the area safely.
Eco-Friendly Benefits of Bottle Yard Art
Buried bottle yard art is a creative form of upcycling. Instead of buying new plastic edging or tossing attractive glass into the recycling bin, you give bottles a second life in the landscape. It can reduce waste, lower project costs, and make your garden feel more personal.
Of course, recycling is still a great option for bottles you cannot use. The best approach is selective: save the prettiest, thickest, most useful bottles for yard art, and recycle the rest. Your garden gets sparkle; your garage does not become a suspicious bottle museum.
Experience Notes: What This Project Teaches You in Real Life
The first lesson of burying bottles for yard art is that the ground has opinions. On paper, the project sounds simple: dig trench, insert bottles, admire masterpiece. In real life, you may meet roots, rocks, clay, mystery bricks, sprinkler tubing, and one earthworm who seems personally offended by your design vision. Start small. A three-foot test border teaches more than a 40-foot commitment made during a burst of weekend confidence.
One practical experience is that bottle height matters more than people expect. When bottles sit too high, they catch shoes, tools, hoses, and the occasional wandering garden cart. When they sit too low, the design disappears under mulch. The sweet spot is usually just enough exposed glass to show the round bottle bases clearly while keeping the structure stable. Stand back often while installing. Garden art is like eyeliner: symmetry is easier to fix before the whole face is done.
Another lesson is that sunlight changes everything. A bottle border that looks quiet in the morning may glow like stained glass by late afternoon. Before final installation, place a few sample bottles in the chosen area for a day. Watch how they look in morning light, harsh noon sun, golden hour, and shade. Blue glass can look dramatic in full sun and almost mysterious near dusk. Amber bottles shine warmly near brick, wood, and terracotta. Green bottles blend beautifully with foliage but may disappear in dense planting unless you contrast them with pale gravel or dark mulch.
Soil type also changes the project. Sandy soil is easy to dig but may need firmer backfilling to hold bottles upright. Clay soil grips bottles well but can become a sticky workout that makes you question your hobbies. In clay, a layer of sand or gravel at the trench bottom helps with leveling and drainage. In loose soil, tamp the backfill firmly and water it in stages. After the first rain, walk the border and straighten any bottles that shifted.
Cleaning bottles is surprisingly important. Labels left on the glass may look charming for about five minutes, then weather into sad confetti. Soaking bottles before installation makes the final project look cleaner and more intentional. If you want a rustic look, use color variation, not peeling paper. The garden already has compost; it does not need label sludge.
Finally, buried bottle art works best when it has a reason to be there. Use it to frame a bed, guide the eye toward a bench, circle a tree, highlight a birdbath, or add color to a dull corner. Random bottles stuck into random soil can feel cluttered. A clear shape, repeated color, or thoughtful border turns the same materials into art. The magic is not just the bottleit is the pattern.
Note: For safest results, use only undamaged glass bottles, keep buried bottle art away from active play areas and mower paths, and check local rules if your neighborhood or HOA regulates landscape materials.
Conclusion
Burying bottles to create stunning yard art is one of those rare DIY garden projects that is affordable, creative, sustainable, and genuinely fun. With clean bottles, a simple trench, solid backfilling, and a thoughtful design, you can turn ordinary glass into garden edging, pathway borders, sunbursts, tree rings, and colorful focal points.
The secret is balance. Make the bottles deep enough to stay stable, visible enough to sparkle, and organized enough to look intentional. Add mulch, gravel, or plants around the design, and your upcycled bottle garden art will feel like a charming feature instead of a recycling accident. Your yard gets color, your bottles get a second life, and you get to say, “Oh, that? I made it,” which is half the fun of gardening anyway.