Learning how to administer subcutaneous fluids to a dog can feel like being handed a medical supply kit and a tiny diploma from “Nervous Pet Parent University.” The bag looks official. The tubing looks like it belongs on a hospital drama. Your dog looks at you as if you have personally betrayed the snack-based foundation of your relationship.
Take a breath. Subcutaneous fluids, often called “sub-Q fluids,” are commonly prescribed by veterinarians for dogs who need extra hydration support at home. They may be used for chronic kidney disease, certain dehydration issues, ongoing fluid losses, or recovery plans after illness. The key phrase is prescribed by veterinarians. This is not a DIY wellness trend, not a “my neighbor’s dog did great on it” experiment, and definitely not something to start because the internet wore a lab coat today.
This guide explains what subcutaneous fluids are, why dogs may need them, what supplies are typically involved, how the process usually works, what problems to watch for, and how to make the experience calmer for both you and your furry patient. Your veterinarian’s instructions always come first, especially for the fluid type, amount, frequency, needle size, and any special precautions.
What Are Subcutaneous Fluids for Dogs?
Subcutaneous fluids are sterile fluids placed under a dog’s skin, usually over the shoulders or along the back where the skin is loose. “Subcutaneous” simply means “under the skin.” The fluid forms a temporary soft pocket, then gradually absorbs into the body over several hours.
Unlike intravenous fluids, which go directly into a vein and are usually given in a clinic or hospital, subcutaneous fluids are slower and less technically demanding. That is why some dogs with long-term medical needs can receive them at home after a veterinarian has trained the owner.
Why a Veterinarian May Prescribe Subcutaneous Fluids
Dogs may receive subcutaneous fluid therapy for several reasons, including:
- Chronic kidney disease or reduced kidney function
- Mild to moderate dehydration, when appropriate for home care
- Support after vomiting, diarrhea, or reduced water intake
- Certain metabolic or chronic illnesses
- Comfort-focused care for senior dogs under veterinary supervision
Sub-Q fluids are not suitable for every dog or every situation. A dog with severe dehydration, shock, collapse, breathing trouble, repeated vomiting, heatstroke, pale gums, or extreme weakness needs urgent veterinary care, not a home fluid session with hopeful background music.
Important Safety Rules Before You Begin
Before learning how to give subcutaneous fluids to a dog, understand the safety rules. They are not decorative. They are the guardrails that keep a helpful treatment from becoming a problem.
Use Only What Your Veterinarian Prescribed
Your veterinarian will decide which fluid your dog needs. Lactated Ringer’s solution is commonly used, but it is not the right choice for every patient. Some dogs may need a different fluid depending on kidney values, electrolytes, hydration level, heart health, or other conditions.
Never substitute fluids, reuse old supplies, add medications to the bag, or change the amount without veterinary approval. More fluid is not automatically better. Too much fluid can be dangerous, especially for dogs with heart disease, certain kidney problems, or trouble clearing fluid from the body.
Ask for a Live Demonstration
A written guide is useful, but your veterinarian or veterinary technician should demonstrate the process in person. Ask them to watch you do it once. This builds confidence and helps correct small issues, such as holding the needle at the wrong angle, letting the tubing touch an unclean surface, or choosing a spot that makes your dog uncomfortable.
Know When Not to Give Fluids
Call your veterinarian before giving fluids if your dog has coughing, labored breathing, a swollen belly, sudden weakness, collapse, severe lethargy, vomiting that will not stop, diarrhea with blood, or a fluid pocket from the last session that has not absorbed. Also call if your dog seems painful, unusually restless, or worse after previous treatments.
Supplies You Will Usually Need
Your veterinarian will provide or prescribe the correct supplies. A typical setup for subcutaneous fluid administration in dogs may include:
- A sterile fluid bag
- IV administration tubing or drip set
- Sterile needles
- A way to hang the fluid bag above your dog
- A clean towel or mat
- Treats, praise, or a favorite distraction
- A sharps container for used needles
- Your veterinarian’s written instructions
Do not use supplies that look cloudy, discolored, leaking, expired, or contaminated. If the bag, tubing, or needle touches something unclean, stop and replace the contaminated part. Sterility matters. Bacteria are not invited to this party.
How to Prepare the Fluid Bag and Tubing
Preparation makes the actual fluid session faster and calmer. Dogs are extremely talented at detecting hesitation. The more organized you are, the less time your dog spends wondering why the living room has become a tiny veterinary clinic.
Step 1: Wash Your Hands
Wash your hands with soap and water before handling the supplies. Choose a clean, quiet area with good lighting. Many owners use a kitchen counter for organizing supplies and the floor, couch, or dog bed for the treatment itself, depending on the dog’s size and comfort.
Step 2: Inspect the Fluid Bag
Check the label to confirm it is the correct fluid. Look at the expiration date. Make sure the fluid is clear unless your veterinarian told you otherwise. Do not use a bag that appears cloudy, has particles floating inside, or has been punctured in the wrong place.
Step 3: Attach the Drip Set
Close the roller clamp on the tubing before attaching it to the bag. Remove the protective cover from the spike end of the tubing without touching the sterile spike. Insert it into the correct port on the fluid bag using firm pressure. Your veterinarian can show you exactly which port to use.
Step 4: Prime the Line
Hang the bag above your dog’s level. Open the clamp and allow fluid to run through the tubing until air is cleared from the line. Then close the clamp. A few tiny bubbles are usually not a major concern for subcutaneous fluids, but the tubing should be mostly filled with fluid before you start.
Step 5: Warm the Fluids if Your Vet Recommends It
Many dogs tolerate fluids better when they are gently warmed to a comfortable temperature. Never microwave the bag. Microwaving can create hot spots and damage the fluid bag. If warming is recommended, your veterinary team may suggest placing the bag in warm water for a short time and checking that it feels lukewarm, not hot.
How to Administer Subcutaneous Fluids to a Dog
The exact technique may vary depending on your dog’s size, health condition, personality, and your veterinarian’s instructions. The general process below describes the common bag-and-drip-set method.
Step 1: Position Your Dog Comfortably
Choose a calm location. Some dogs do best lying on a bed. Others prefer standing on a non-slip mat. Small dogs may be more comfortable on a towel-covered table if they are relaxed and safely supervised. Do not let a dog stand on a slippery surface or near an edge.
If your dog is wiggly, ask another adult to help by gently holding, petting, and offering treats. The helper’s job is not to wrestle the dog like a tiny rodeo competitor. The goal is calm support.
Step 2: Choose the Injection Site
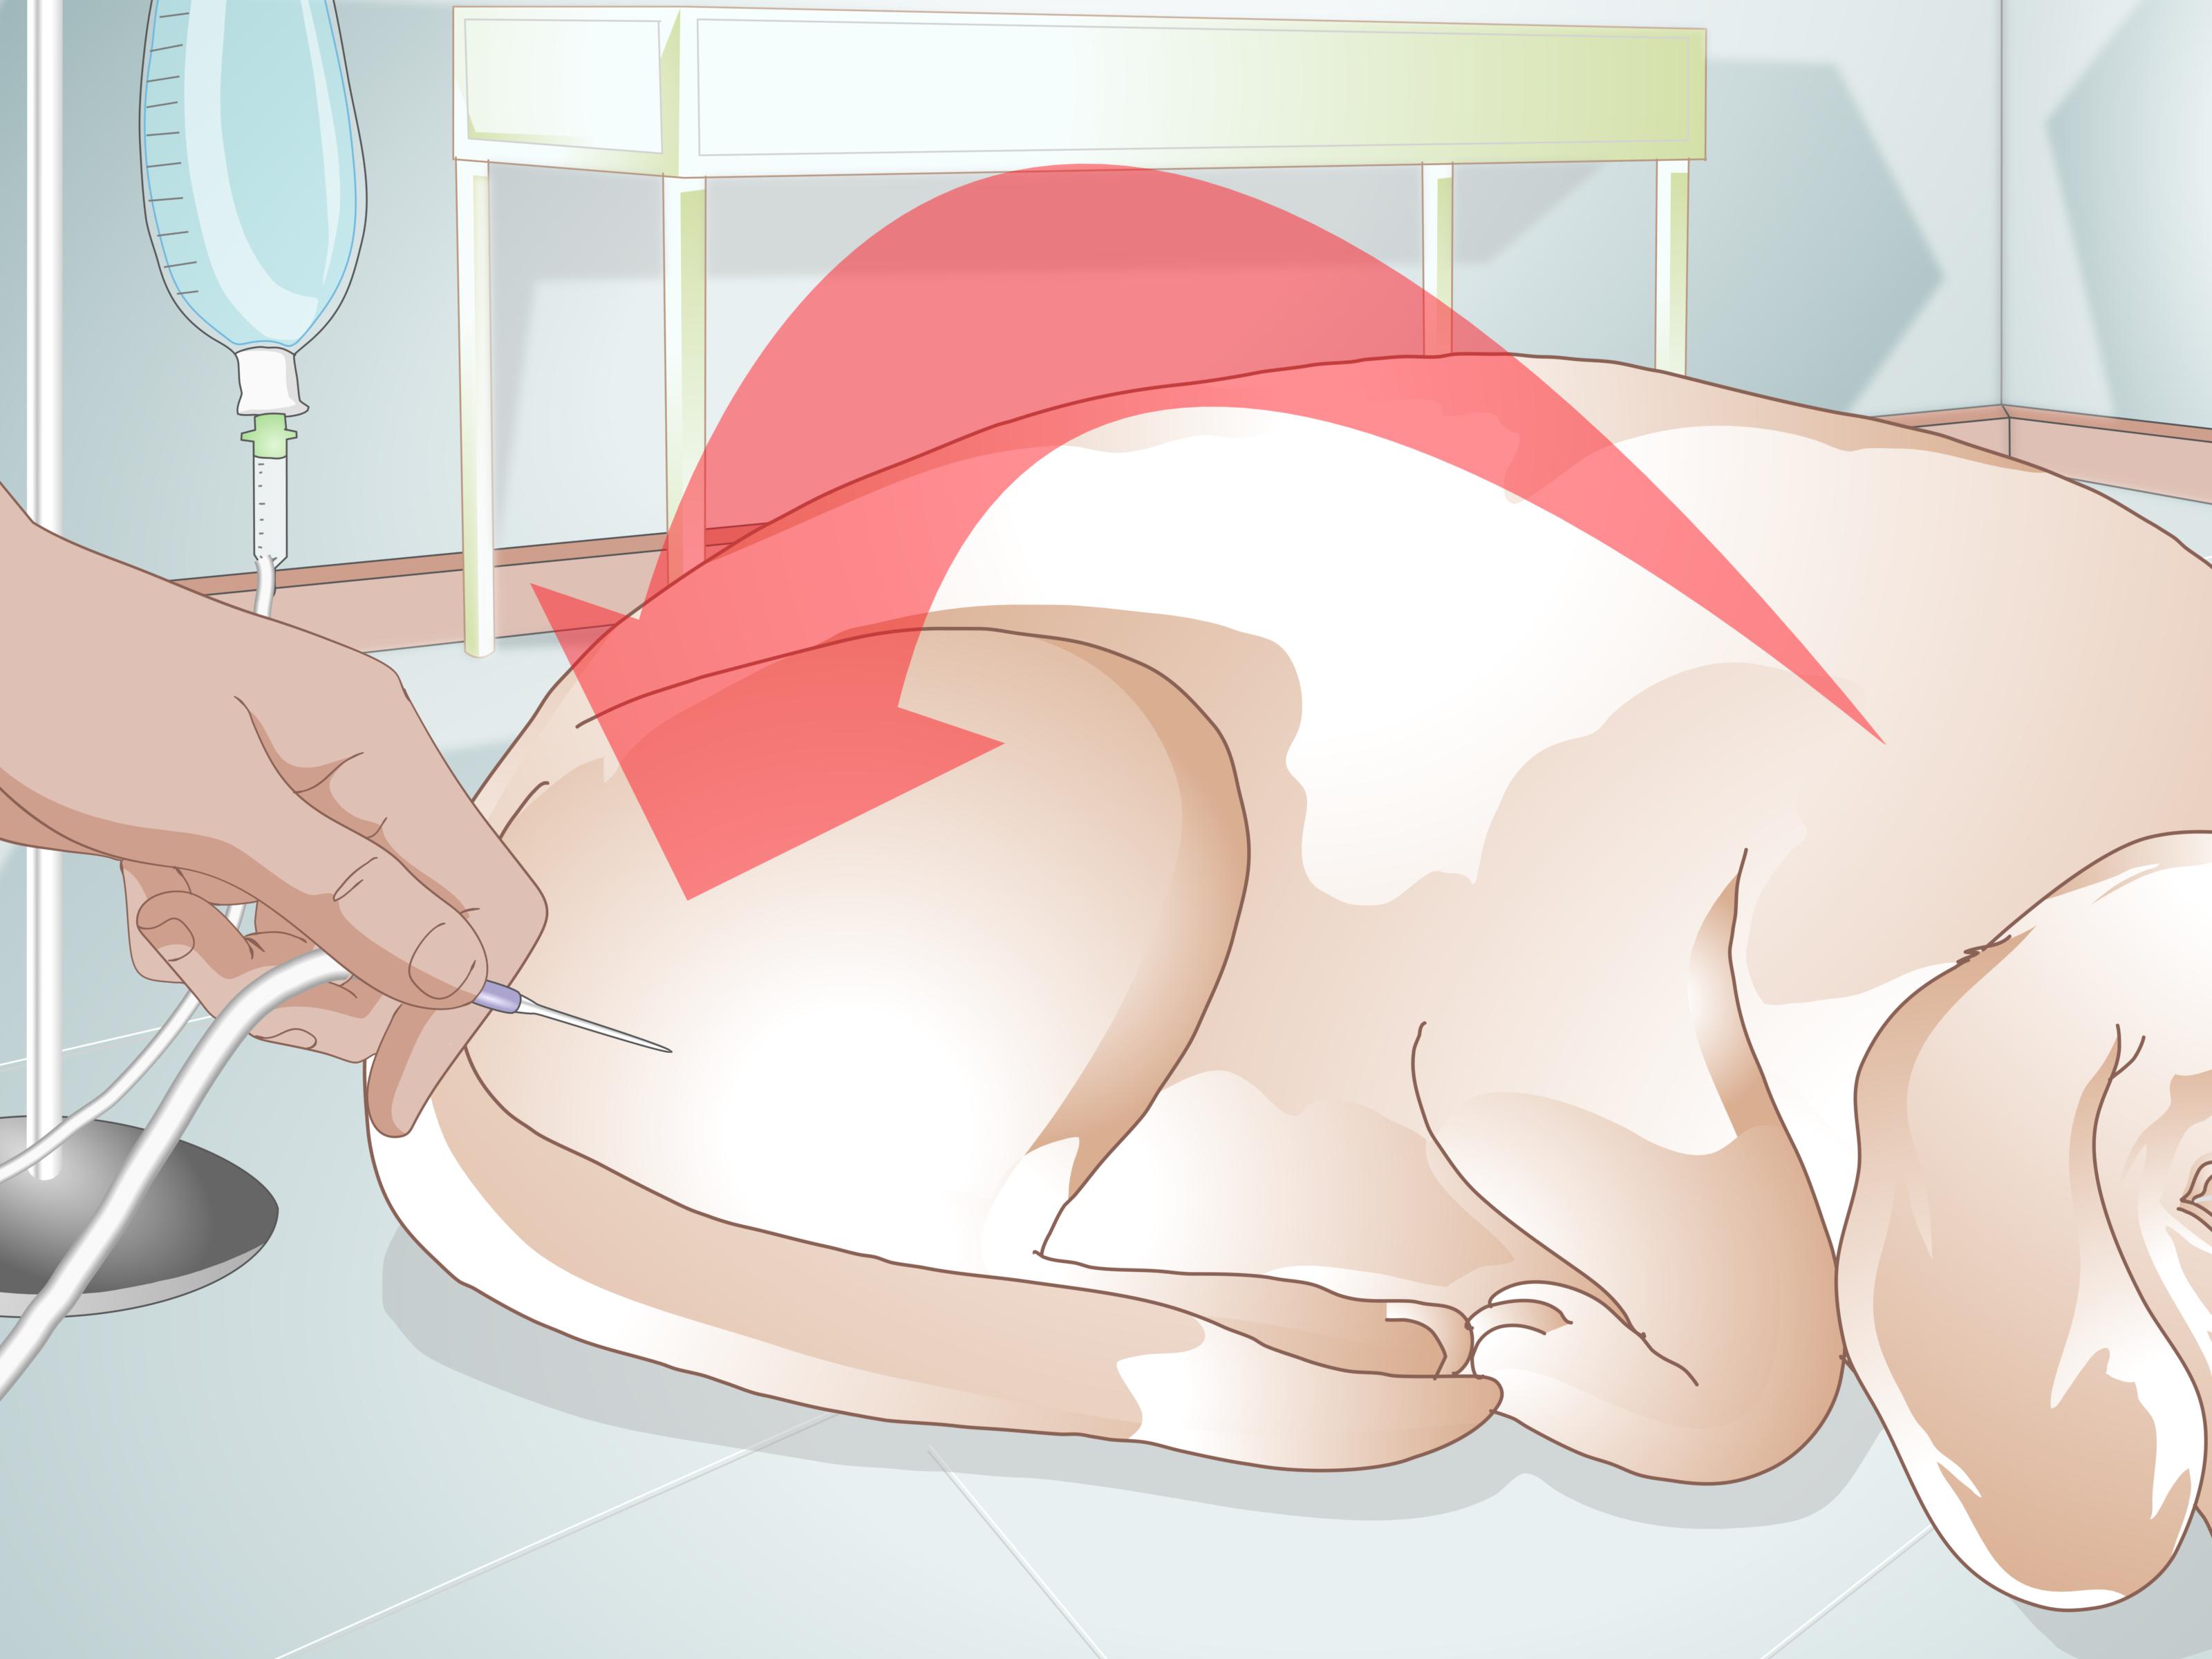
The usual area is the loose skin over the shoulders or along the upper back. Rotate sites as your veterinarian recommends so the same area does not become sore. Avoid irritated, infected, bruised, or painful skin.
Step 3: Make a “Tent” of Skin
Gently lift a fold of loose skin between your fingers to form a tent. The space under that tent is where the fluid will go. Keep your grip steady but gentle. Your dog is not a suitcase, even if the handle-like skin fold is surprisingly convenient.
Step 4: Insert the Needle
Remove the needle cap without touching the needle. Insert the needle into the base of the skin tent as your veterinarian demonstrated. The needle should go under the skin, not into muscle and not through the other side of the skin fold.
If your dog yelps sharply, jumps, or you see fluid leaking immediately from the insertion site, stop, close the clamp, and reassess. You may need to reposition with a new sterile needle. When in doubt, call your veterinary team.
Step 5: Open the Clamp and Let Fluids Flow
Open the roller clamp. Fluid should begin to flow through the drip chamber and tubing. The speed depends on the needle, tubing, bag height, and your dog’s position. If the flow is slow, make sure the clamp is fully open, the tubing is not kinked, the bag is high enough, and the needle tip is not pressed against tissue.
Step 6: Watch the Amount Carefully
Your veterinarian will tell you exactly how much fluid to give. Use the markings on the bag to track the amount. Do not guess. Do not round up because your dog “looks extra dry.” Fluids are medicine, and medicine should not be measured with vibes.
Step 7: Close the Clamp Before Removing the Needle
When the prescribed amount has been given, close the clamp first. Then remove the needle smoothly. You may gently pinch or massage the area for a moment if your veterinarian recommends it. A small amount of fluid may leak from the site; this can happen. If leaking is heavy or frequent, ask your vet to review your technique.
Step 8: Dispose of the Needle Safely
Place the used needle immediately into an approved sharps container. Do not recap it unless your veterinary team specifically taught you a safe method. Do not throw loose needles in the trash, recycling, or toilet. Keep sharps containers away from children and pets.
What Is Normal After Giving Subcutaneous Fluids?
After a session, you may notice a soft lump or pouch under your dog’s skin. This is the fluid pocket. It may slide downward with gravity, sometimes moving toward the chest or leg area before it absorbs. That can look odd the first time, but it is often normal.
Most fluid pockets absorb over several hours. Absorption time can vary based on the dog’s size, hydration status, circulation, and the amount prescribed. Your dog should generally seem comfortable after treatment.
Call Your Veterinarian If You Notice These Problems
- The fluid pocket is still large when the next dose is due
- Your dog develops coughing or breathing changes
- Your dog becomes weak, restless, bloated, or unusually tired
- The injection site becomes red, hot, swollen, painful, or draining
- You see repeated bleeding or significant leakage
- Your dog refuses food, vomits repeatedly, or seems worse
Subcutaneous fluids are meant to support your dog, not replace medical monitoring. Dogs receiving ongoing home fluid therapy usually need rechecks, lab work, and dosage adjustments. Health conditions do not read calendars politely; they change, and treatment plans must change with them.
Tips to Make the Process Easier
Create a Calm Routine
Dogs love routines. They also love snacks. Combine both. Use the same quiet place, the same mat or blanket, and the same reward pattern each time. A predictable routine can turn fluid time from “suspicious medical event” into “weird snack ceremony.”
Use High-Value Treats
Offer small pieces of chicken, a lick mat, peanut butter without xylitol, canned food, or another veterinarian-approved reward. Some dogs are so focused on the snack that they barely notice the fluids. Others notice everything but forgive you because cheese exists.
Stay Relaxed
Your dog can sense tension. Before you begin, set up everything, review the steps, and take a slow breath. Move with confidence, not speed. Rushing increases mistakes. Calm efficiency is the sweet spot.
Replace Needles as Directed
Needles become dull after use and should not be reused. A fresh sterile needle is usually more comfortable and safer. Your veterinarian will explain how often to change needles during setup and administration.
Keep a Treatment Log
Write down the date, time, amount given, injection site, appetite, energy level, water intake, urination, vomiting, diarrhea, and any concerns. This information helps your veterinarian adjust the plan. It also prevents the classic household debate: “Did we give fluids today, or was that yesterday?”
Common Mistakes to Avoid
Giving Fluids Without a Diagnosis
Dehydration is a sign, not a full diagnosis. A dog may be dehydrated because of kidney disease, gastrointestinal illness, heat injury, diabetes complications, infection, or another serious problem. Giving fluids without understanding the cause can delay needed treatment.
Using the Wrong Amount
Fluid volume depends on body weight, hydration status, lab results, disease stage, and ongoing losses. Too little may not help; too much may overload the body. Follow your veterinarian’s written plan exactly.
Ignoring Changes in Breathing
Breathing changes after fluids are a red flag. Coughing, rapid breathing, labored breathing, or unusual restlessness may indicate fluid overload or another urgent issue. Contact your veterinarian or an emergency clinic immediately.
Letting Supplies Become Contaminated
Do not touch sterile needle tips, tubing ends, or ports. Keep caps on until needed. Store supplies as instructed. Clean technique lowers the risk of infection and keeps the process safe.
Subcutaneous Fluids and Kidney Disease in Dogs
One of the most common reasons owners learn how to administer subcutaneous fluids to a dog is chronic kidney disease. When the kidneys are not filtering and balancing fluids well, some dogs benefit from extra hydration support. At-home fluids may help maintain hydration, support comfort, and assist the body in managing waste products.
However, sub-Q fluids are only one part of kidney disease management. A complete plan may include a therapeutic diet, blood pressure monitoring, nausea control, phosphate management, appetite support, urine testing, and regular bloodwork. Think of fluids as one instrument in the orchestra, not the entire concert.
When Your Dog Hates Fluid Time
Some dogs accept subcutaneous fluids with the dignity of a retired judge. Others act as if the fluid bag is a haunted jellyfish. If your dog struggles, do not force repeated stressful sessions without help. Ask your veterinarian for a technique review.
Possible solutions may include changing the location, adjusting the setup, using a smaller needle if appropriate, warming fluids correctly, splitting sessions only if your veterinarian approves, using better rewards, or having a trained person assist. For anxious dogs, your vet may recommend behavior strategies or medication support.
Real-Life Experience: What It Feels Like to Give a Dog Subcutaneous Fluids at Home
The first time many owners give subcutaneous fluids at home, they feel clumsy. That is normal. The tubing tangles. The dog turns around at the exact wrong second. The fluid bag refuses to hang from anything sensible. Someone says, “Is it flowing?” three times. The dog, meanwhile, wonders why everyone has suddenly become very interested in the skin between his shoulders.
One helpful mindset is to treat the first few sessions as practice in calmness, not perfection. Before bringing your dog over, lay out the supplies in the order you will use them. Hang the bag. Prime the line. Place treats within reach. Open the sharps container. Read the prescribed amount one more time. When everything is ready, invite your dog into the space instead of dragging them there like a reluctant celebrity entering a press conference.
Many owners find that dogs respond better when fluid time is paired with something special. For example, a dog who only gets a lick mat during fluids may begin to associate the process with a favorite reward. Another dog may prefer gentle brushing, quiet praise, or sitting beside a trusted person. The magic is not in one specific trick; it is in making the routine predictable and low-drama.
It also helps to learn your dog’s personal comfort style. Some dogs want to see what is happening. Some prefer to face away. Some relax when held gently against a person’s side. Others do better with minimal restraint and lots of treats. A nervous dog may tense up if everyone crowds around, so fewer people and quieter voices can make a big difference.
Owners often worry about the fluid lump afterward. The first time you see it, it may look like your dog is storing a small water balloon under the skin for later. In most cases, that pocket gradually absorbs. The important part is knowing what is normal for your dog. If the pocket absorbs slower than usual, your dog seems uncomfortable, or the next dose is due before the previous fluids are gone, call your veterinarian.
Another real-world tip: keep a simple log. It does not need to be fancy. A notebook on the counter works. Write down the amount, time, site used, and how your dog acted. Over time, patterns appear. Maybe your dog does better after dinner. Maybe the left shoulder area leaks more than the right. Maybe Sunday evening is a terrible idea because the house is loud and everyone is tired. These details help you adjust the routine and give your veterinarian better information.
Emotionally, giving fluids can be surprisingly tender. It is medical care, yes, but it is also an act of trust. Your dog is allowing you to help in a way they do not fully understand. You are learning a skill because their body needs support. That can feel heavy, especially with senior dogs or chronic illness. Be kind to yourself. Feeling nervous does not mean you are bad at it. It means you care.
With practice, many owners go from shaky hands to smooth routines. The process becomes less mysterious. The dog becomes less suspicious. The fluid bag becomes just another odd household object, like the vacuum cleaner’s less noisy cousin. The goal is not to become a veterinarian. The goal is to follow your veterinarian’s plan safely, notice changes early, and make your dog as comfortable as possible.
Final Thoughts
Knowing how to administer subcutaneous fluids to a dog can be a valuable home-care skill when a veterinarian prescribes it. The process involves sterile fluids, a drip set, a needle, careful measurement, calm handling, and close attention to your dog’s response. It is often manageable with training, patience, and a snack strategy worthy of a five-star canine restaurant.
Still, subcutaneous fluid therapy is medical care. Always follow your veterinarian’s instructions for the type of fluid, amount, schedule, storage, needle use, and monitoring. Contact your vet if your dog seems worse, has breathing changes, develops swelling or pain, or if you are unsure whether to continue. Done correctly, sub-Q fluids can help support hydration and comfort for dogs who need themand can give pet parents one more practical way to care for a beloved companion.
Important note: This article is for educational purposes only and is not a substitute for veterinary diagnosis, treatment, or hands-on training. Never begin, stop, increase, decrease, or change subcutaneous fluids for your dog unless your veterinarian specifically instructs you to do so.