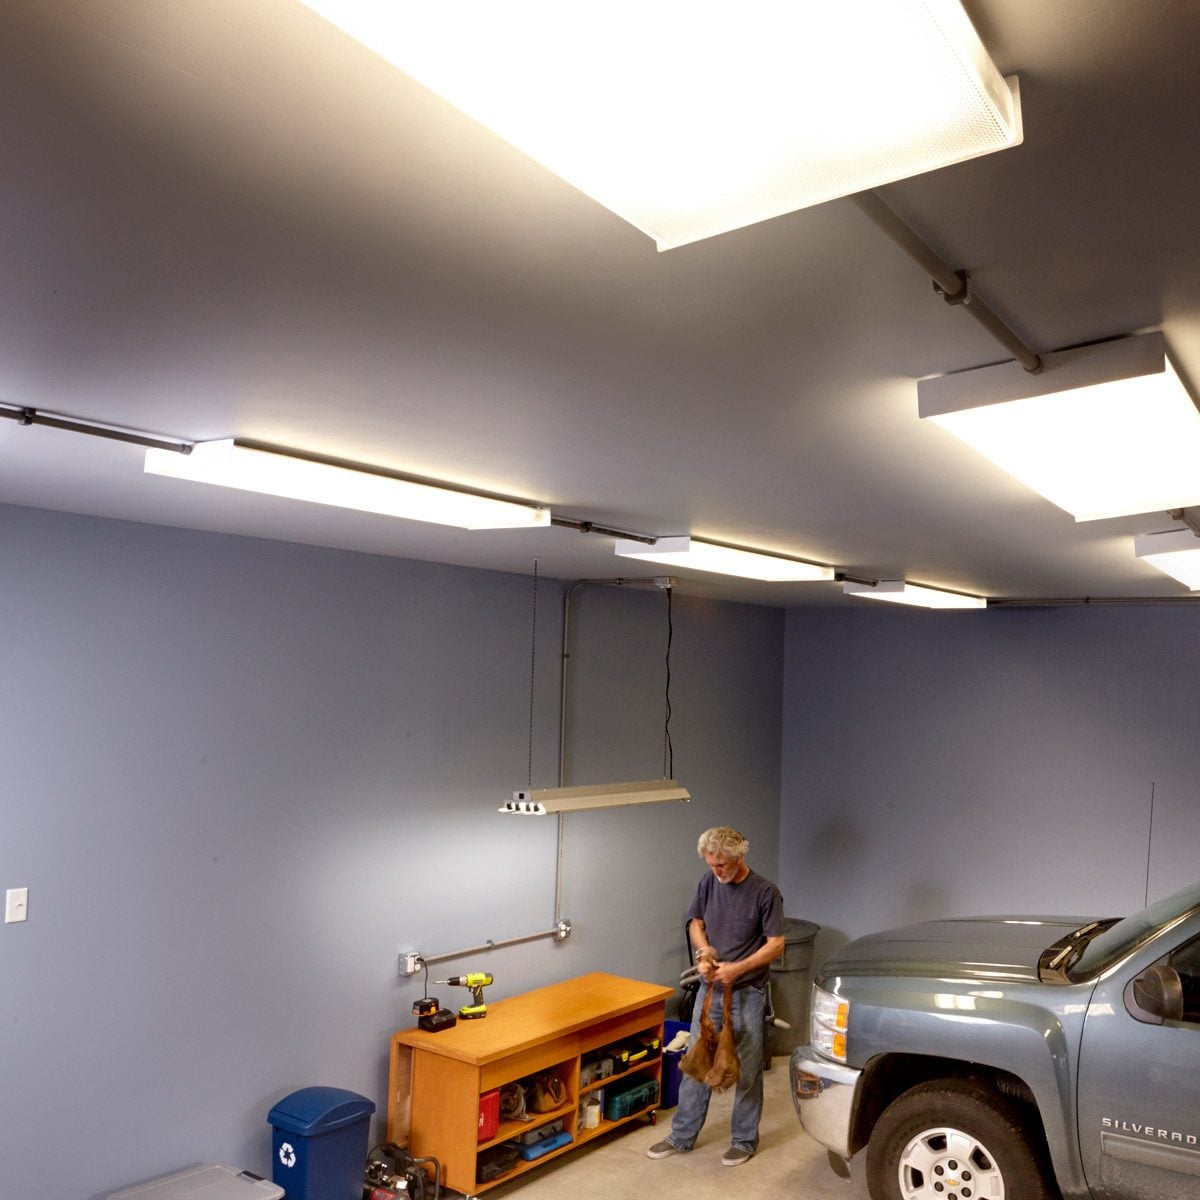
A garage without enough outlets has a special talent: it turns every project into a tripping hazard. One outlet is occupied by the refrigerator, another powers the battery charger, and suddenly you are running an extension cord across the floor like it is auditioning for an obstacle-course reality show.
Adding additional garage outlets with conduit can solve that problem without tearing open drywall, removing insulation, or performing archaeological excavation behind your walls. Surface-mounted conduit creates a protected pathway for wiring along garage walls and ceilings, making it a practical option for finished garages, concrete block walls, workshops, and spaces where hidden wiring is difficult or expensive.
However, electrical work is not the same as hanging a shelf. A shelf installed incorrectly may fall and ruin a perfectly good lawn mower. Electrical work installed incorrectly can create shock, fire, or code problems. This guide explains how to plan a safe garage outlet project using conduit, when a simple extension is reasonable, and when it is smarter to call a licensed electrician before your garage becomes a very expensive science experiment.
Why Add Garage Outlets With Conduit?
Conduit is a tube or raceway that protects electrical conductors. In a garage, it can be mounted directly on walls, ceiling joists, masonry, or exposed framing. Instead of cutting channels through drywall or drilling through a dozen studs, you create a visible but tidy route from an existing power source to a new receptacle location.
For many homeowners, conduit is the sweet spot between “I need more power over there” and “I do not want to remodel half the garage.” It is especially useful when you want outlets near a workbench, compressor, tool wall, garage door opener area, storage rack, freezer, or hobby station.
Benefits of Surface-Mounted Garage Conduit
- It avoids opening finished walls and ceilings.
- It protects wiring from accidental damage in an active workshop.
- It makes future upgrades easier because the wiring path remains accessible.
- It works well on concrete block, brick, drywall, plywood, and exposed framing.
- It can look clean and intentional when routed in straight lines.
- It helps replace permanent extension-cord use with proper fixed wiring.
Think of conduit as the organized older sibling of extension cords. It does not curl into knots, disappear under a car tire, or mysteriously become sticky after one weekend in the garage.
Start With the Electrical Plan, Not the Shopping Cart
The biggest mistake people make when adding garage outlets is buying conduit first and thinking about the circuit later. Before selecting materials, determine what the new outlets will actually power.
A phone charger and LED shop light have very different electrical demands from a table saw, air compressor, welder, portable heater, freezer, or EV charger. A garage circuit that seems “mostly unused” may already serve lighting, exterior outlets, door openers, appliances, or another part of the house.
List the Equipment You Expect To Use
Write down the tools and appliances that may run at the same time. For example, a weekend workshop might use a miter saw, shop vacuum, task lighting, battery chargers, and a radio. A garage gym may include a treadmill, fan, television, and charging station. A vehicle-focused garage may include a compressor, tire inflator, refrigerator, power tools, and eventually an EV charger.
This matters because adding outlets does not automatically add electrical capacity. Several outlets on the same circuit still share the same breaker and the same available power. You can install six beautiful receptacles and still trip the breaker every time the compressor and space heater decide to form a band.
Know When an Existing Circuit Is Not Enough
Extending an existing circuit may be reasonable for light-duty use, such as charging batteries, powering hand tools, or plugging in a work light. A dedicated circuit is often the better choice for equipment with a large or continuous electrical load.
Examples that commonly deserve dedicated planning include:
- Air compressors
- Freezers and refrigerators
- Large stationary woodworking tools
- Portable heaters
- Welders
- Garage HVAC equipment
- EV charging equipment
Do not assume a garage outlet is automatically suitable for every tool with a plug. The breaker, conductor size, receptacle type, equipment instructions, and local code requirements all matter.
Choose the Right Type of Conduit for a Garage
For indoor garage outlet projects, electrical metallic tubing, commonly called EMT, is one of the most popular choices. EMT is lightweight metal conduit that creates a durable, professional-looking surface raceway. It is commonly used in garages because it stands up well to bumps, tools, ladders, and the occasional dramatic encounter with a bicycle handlebar.
PVC electrical conduit can also work in certain garage applications, particularly where moisture, corrosion, or outdoor transitions are involved. PVC is lightweight and does not rust, but it must be installed with fittings designed for PVC conduit. It can also expand and contract more noticeably with temperature changes.
Common Conduit Options
- EMT: A practical choice for many indoor, surface-mounted garage runs. It is durable, paintable, and easy to route with the correct fittings and bender.
- PVC conduit: Useful in damp locations, exterior transitions, underground sections, and corrosion-prone environments when permitted by local code.
- Flexible metal conduit: Helpful for short final connections where vibration or movement is possible, but it is not usually the best choice for an entire exposed garage run.
- Surface raceway systems: A compact alternative for light-duty additions where traditional conduit may be more than you need.
For a typical garage workbench outlet project, EMT with metal surface boxes is often a clean, rugged combination. For a damp or exterior-adjacent area, an electrician may recommend a different conduit material, weather-rated box, gasketed cover, or corrosion-resistant hardware.
Map the Best Route Before Installing Anything
A good conduit run looks boring in the best possible way: straight, secure, level, and easy to understand. A bad conduit run looks like someone tried to draw a lightning bolt while riding a lawn mower.
Begin at the power source and identify the shortest practical route to the new outlet location. In many garages, the cleanest path travels upward from an existing outlet or junction point, across a wall or ceiling line, then downward to a new surface-mounted box near the work area.
Good Locations for Additional Garage Outlets
- Above or beside a workbench
- Near a garage refrigerator or freezer
- At both sides of the garage door area for tools and seasonal equipment
- Near a charging station for cordless tools
- Close to a utility sink, only with proper GFCI protection and code-compliant placement
- Near a ceiling-mounted garage door opener or shop lighting control area
- Along an organized tool wall, away from areas likely to be struck by vehicles
Keep receptacle locations practical. A new outlet behind a heavy storage cabinet may technically exist, but it will be about as useful as a parachute packed in the basement.
Plan for Clearance and Protection
Garage walls are busy places. Cars, bicycles, trash bins, ladders, sports equipment, and ambitious children all compete for space. Route conduit where it is less likely to be bumped, crushed, or used as an accidental coat hook.
Mount boxes and conduit where plugs can be inserted without cords crossing walking paths. Avoid locations directly behind parked vehicles, near flammable liquid storage, or where water may collect. If the route crosses masonry, use anchors and fasteners designed for masonry rather than hoping a drywall screw will discover inner strength.
Garage Outlet Safety: GFCI Protection Is Not Optional Guesswork
Garages are commonly treated as locations where ground-fault circuit interrupter protection is required. GFCI devices are designed to shut off power quickly when they detect a difference between electricity flowing out and electricity returning through the circuit, which can indicate a ground fault.
This matters in garages because moisture, concrete floors, metal tools, vehicles, outdoor transitions, and heavy-duty equipment all increase the chance that electrical mistakes become more dangerous. A GFCI is not magic armor, and it does not replace proper grounding, correct wiring, or common sense. It is an additional layer of protection.
GFCI Receptacle vs. GFCI Breaker
A GFCI receptacle protects the outlet where it is installed and may protect downstream outlets when installed correctly. A GFCI breaker protects the entire branch circuit from the electrical panel. Either approach may be appropriate depending on the circuit layout, panel compatibility, local code, and future expansion plans.
If you are adding several outlets to one garage circuit, a GFCI breaker may offer a clean whole-circuit solution. If you are extending one outlet from another, a properly installed GFCI receptacle may be part of the design. The key word is properly. Incorrect line-and-load connections, missing grounds, overloaded boxes, or mixed-up conductors can defeat the purpose of the safety device.
Materials You May Need for a Conduit Outlet Extension
Your exact materials depend on the route, conduit type, box style, circuit design, and local code. Still, a typical surface-mounted garage outlet project may include the following:
- Electrical metallic tubing or approved PVC conduit
- Matching conduit connectors, couplings, elbows, and straps
- Surface-mounted electrical boxes rated for the installation
- Grounding screws, grounding pigtails, and listed bonding hardware when required
- GFCI receptacles or a compatible GFCI breaker
- Appropriate conductors rated for use in conduit
- Outlet covers and faceplates
- Wire connectors listed for the conductor type and size
- Conduit bender, fish tape, drill, screws, anchors, level, and electrical tester
- Permanent circuit labels for the panel and new receptacles
Do not mix random fittings because they happen to fit “pretty well.” Conduit fittings, boxes, conductors, and devices should be compatible and listed for their intended use. Electrical projects are not the right place for the phrase, “Close enough.”
Step-by-Step: How To Add Outlets to a Garage Using Conduit
1. Confirm the Circuit and Shut Off Power
Identify the circuit that will supply the new outlet. Turn off the breaker, then verify at the source box with an appropriate tester that the power is actually off. Never rely only on handwritten panel labels, especially in an older home where “garage outlet” may secretly control a hallway light, bathroom fan, and a mystery outlet behind the washing machine.
Use a lockout or clear warning label when possible so nobody turns the breaker back on while work is in progress.
2. Inspect the Existing Box and Circuit Capacity
Before extending an existing outlet, inspect whether the box is large enough for added conductors and connections. Overcrowded boxes create heat and make future servicing difficult. Check the condition of the existing receptacle, grounding path, conductors, and box.
If you find damaged insulation, aluminum branch-circuit conductors, missing grounding, scorch marks, loose connections, or a confusing tangle of wires, stop and bring in an electrician. That is not a “push through it” moment. That is a “close the box gently and make a phone call” moment.
3. Mount the Surface Boxes
Install the starting box and new outlet box securely on a solid surface. For wood framing, fasten to framing whenever practical. For masonry, use proper anchors. Keep boxes level and positioned where plugs, faceplates, and conduit connections can be accessed later.
Every splice must remain inside an approved, accessible electrical box. Do not bury a connection behind drywall, inside a wall cavity, or behind permanently installed cabinetry.
4. Measure, Cut, and Dry-Fit the Conduit
Measure each straight section carefully, then cut conduit cleanly. Remove sharp edges and burrs so they do not damage conductor insulation. Dry-fit couplings, connectors, bends, and boxes before permanently fastening everything.
A conduit run should be supported with appropriate straps and installed according to the requirements for the conduit type and local code. Keep bends smooth and avoid making the route overly complicated. Every unnecessary bend makes pulling conductors harder and future changes more annoying.
5. Pull Approved Conductors Through the Raceway
Use conductors approved for installation in conduit and sized correctly for the circuit. The conductor type, number of conductors, conduit size, bend count, and circuit load all affect the design. This is one of the reasons a project that looks simple on a Saturday morning can become code-sensitive by lunchtime.
Pull wires carefully to avoid scraping insulation. Leave enough conductor length in each box for safe, serviceable connections. Do not overcrowd conduit or force conductors through tight bends.
6. Make Grounding and Device Connections Correctly
Metal boxes and metal conduit systems may require bonding and grounding connections so that a fault has a safe path back to the source. Receptacles must be properly grounded, and metal boxes generally require grounding as well.
Because the correct connection method depends on the circuit and wiring method, this is where many homeowners choose to have an electrician perform the final connections and testing. There is no shame in doing the planning, mounting, and conduit routing yourself while leaving energized-system connections to a professional.
7. Install GFCI Protection and Test the Circuit
Install the required GFCI protection as part of the circuit design. After all covers are installed and the work area is clear, restore power and test the new outlets using a receptacle tester and the GFCI test and reset functions.
Verify that all outlets are correctly wired, grounded where required, and protected as intended. Label the circuit at the panel and consider adding a small label near the first GFCI device so future homeowners know where to reset it.
Common Mistakes When Adding Garage Outlets
Using Extension Cords as Permanent Wiring
Extension cords are useful temporary tools, not permanent infrastructure. They can be crushed, overloaded, damaged by vehicles, covered by rugs, pinched in doors, or used far beyond their intended purpose. If you always need an extension cord in the same garage location, that is usually your garage politely asking for a real outlet.
Ignoring Circuit Load
More outlets do not mean more available amperage. A circuit can support several receptacles while still being limited by the breaker and conductor design. Plan for simultaneous use, not just individual tool labels.
Forgetting GFCI Protection
Garage environments are not friendly to electrical shortcuts. Water, concrete floors, metal equipment, and outdoor connections make GFCI protection especially important.
Using the Wrong Wire or Fittings
Not every cable or conductor is suitable for conduit. Not every connector fits every box. Not every box can be used in damp locations. Use listed, compatible products and follow the manufacturer instructions.
Making Hidden Splices
Electrical splices must remain accessible in approved junction boxes. A hidden splice may seem convenient until it fails, overheats, or turns a future repair into a game of hide-and-seek with electricity.
When To Call a Licensed Electrician
DIY-friendly conduit work has limits. Call a licensed electrician when the project requires a new breaker, panel modification, subpanel, 240-volt receptacle, EV charger circuit, detached garage feeder, underground wiring, service upgrade, load calculation, or troubleshooting of unknown wiring.
You should also call a professional if your garage has older wiring, no equipment grounding conductor, frequent breaker trips, a Federal Pacific or Zinsco panel, visible heat damage, unusual voltage readings, or a circuit that you cannot positively identify.
A professional can also help design the garage for future needs. Installing one well-planned conduit route today may make it much easier to add a dedicated tool circuit, extra lighting, security equipment, solar-related wiring, or EV charging equipment tomorrow.
Make Your Garage Outlet Layout Future-Ready
The best garage electrical upgrade is not just about fixing today’s shortage. It is about preventing tomorrow’s extension-cord jungle. Consider adding more outlet locations than you think you need, while keeping the circuit design realistic and code-compliant.
A smart layout may include outlets above the workbench, outlets near both garage-door sides, a dedicated location for a freezer, and a separate plan for high-demand tools. Keep outlet placement consistent so cords stay short and do not cross vehicle paths.
If you are already running conduit, consider whether an oversized raceway or an additional empty conduit path would make future upgrades easier. Empty conduit is a little like a spare closet: you do not appreciate it until the day you suddenly have too much stuff.
Real-World Experiences: What Homeowners Learn After Adding Garage Outlets With Conduit
Most homeowners who add outlets to a garage using conduit start with a simple complaint: “Why is there never power where I need it?” Then the project grows. The workbench gets a charger. The charger gets company from a shop light. The shop light gets joined by a soldering station. Before long, the garage has become a workshop, gym, bike repair station, craft room, storage center, and unofficial neighborhood charging hub.
One common lesson is that outlet placement matters more than outlet quantity. A homeowner may install three new receptacles along one wall, only to realize the most useful location was actually beside the garage door, where a pressure washer, leaf blower, or tire inflator is usually used. Another person may place outlets low on the wall, then discover that a workbench blocks access to every single one. Planning with actual tools, shelves, vehicles, and storage bins in mind prevents these frustrating surprises.
Another frequent experience is learning that neat conduit work takes patience. The first section may look easy, but keeping conduit straight, level, properly supported, and aligned with surface boxes requires careful measuring. A small error at the first bend can become an obvious crooked line across an otherwise tidy garage wall. Homeowners who take time to dry-fit the entire route before tightening fittings usually end up with better-looking results.
People also discover that garages are rougher environments than bedrooms or living rooms. A conduit run that seems safely out of the way can still get bumped by a ladder, scraped by a kayak, or attacked by a rolling trash bin. Mounting conduit thoughtfully, using sturdy boxes, and avoiding low-impact zones can save a lot of repair work later.
Many homeowners are surprised by how often they use the new outlets for small tasks. They may have planned for a power drill and air compressor, but the outlets end up serving battery chargers, holiday lights, a dehumidifier, a portable fan, a vacuum, a phone charger, and a radio that plays the same classic-rock station every Saturday morning. Convenient electrical access changes how a garage functions.
A particularly valuable lesson involves power-hungry equipment. It is easy to think, “It is just one more outlet,” until a space heater, compressor, and saw start running together. Homeowners who plan circuit capacity before installation avoid repeated breaker trips and avoid the temptation to solve the problem with an oversized breaker, which is never the correct fix.
Another experience worth mentioning is the peace of mind that comes from replacing permanent extension-cord use with proper wiring. The garage floor becomes easier to clean, safer to walk through, and less likely to collect tangled cords under tires or storage boxes. The upgrade may not be as flashy as a new epoxy floor or a giant tool chest, but it makes the garage feel more functional every day.
Finally, many people find that using a licensed electrician for the final circuit connection is the best compromise. They can handle planning, layout, box mounting, conduit routing, and cleanup while leaving panel work, load calculations, GFCI protection decisions, and final testing to a professional. That approach can reduce labor costs without turning a weekend garage project into an electrical emergency.
Conclusion
Adding additional outlets to your garage using conduit is one of the most practical upgrades you can make for a safer, more useful workspace. Surface-mounted conduit avoids major wall demolition, protects conductors, and gives you flexibility for workbenches, tools, appliances, and future projects.
The key is careful planning. Determine the expected load, choose the correct conduit and boxes, protect garage receptacles appropriately, keep every splice accessible, and do not guess about circuit capacity or grounding. A clean conduit installation can turn a frustrating garage into a workshop that feels organized, capable, and ready for whatever project you decide to start at 9:30 p.m.