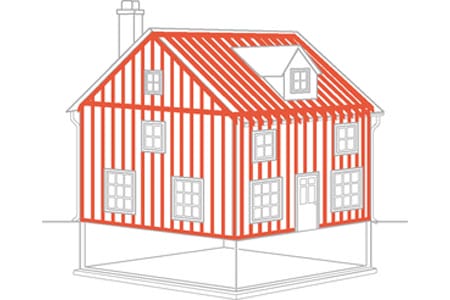
House framing is the moment when a home stops being a drawing, a dream, or a Pinterest board with suspiciously perfect lighting and starts becoming a real structure. It is the skeleton of the housethe system of floors, walls, beams, posts, sheathing, rafters, trusses, and connectors that gives the building its shape, strength, and personality. Without solid framing, the prettiest kitchen backsplash in the world is basically lipstick on a wobbly ladder.
This comprehensive guide walks through house framing from the ground up, starting with the foundation connection and moving through floor framing, wall framing, roof framing, sheathing, load paths, energy-efficient framing methods, and practical field lessons. Whether you are a homeowner trying to understand what your builder is doing, a DIY enthusiast studying residential construction, or a future contractor learning the language of studs and joists, this guide gives you a clear, realistic look at how a wood-framed house comes together.
What Is House Framing?
House framing is the structural assembly that supports and connects the major parts of a home. In most American residential construction, that means light wood framing: dimensional lumber, engineered wood products, plywood or OSB sheathing, metal connectors, nails, screws, bolts, and approved fasteners working together as one system.
The frame does several jobs at once. It carries vertical loads from the roof, upper floors, furniture, people, snow, and building materials. It resists lateral loads from wind and seismic movement. It creates openings for doors and windows. It provides cavities for insulation, plumbing, wiring, and HVAC. It also gives finish materialsdrywall, siding, trim, roofing, flooringa place to attach. In other words, framing is not just “wood standing up.” It is a carefully organized load-transfer network. Think of it as the home’s bones, joints, and handshake with gravity.
Start With the Foundation Connection
Good framing begins before the first wall is raised. The foundation must be level, properly cured, accurately laid out, and ready to receive the wood structure above it. A house frame is usually attached to the concrete or masonry foundation with a treated wood sill plate, anchor bolts, washers, and nuts. The sill plate acts as the transition between concrete and the wood framing system.
Sill Plates, Anchor Bolts, and Moisture Control
The sill plate should typically be pressure-treated lumber where it contacts concrete or masonry. A sill sealer or gasket is commonly installed beneath it to reduce air leakage and act as a capillary break. This matters because concrete can hold and transfer moisture. Wood and moisture can have a long, dramatic relationship, and not the cute kind. Keeping the framing dry from the beginning helps reduce the risk of rot, mold, and long-term movement.
Anchor bolts secure the sill plate to the foundation so the house is not merely sitting politely on top of the concrete. In areas with high winds, seismic concerns, or special local code requirements, anchor size, spacing, washers, hold-downs, and straps may be more demanding. Always follow the approved plans, local building code, and engineering details.
Floor Framing: Building the First Platform
In platform framing, which is common in modern American homes, each floor is built as a platform. The first floor system is framed on top of the foundation, then walls are raised on that platform. If the home has a second story, another floor platform is framed above the first-story walls, and the process continues upward.
Main Components of Floor Framing
A typical floor framing system may include beams, girders, joists, rim joists, blocking, bridging, subfloor panels, hangers, and support posts. Joists are horizontal members that span between supports and carry floor loads. Rim joists close off the ends of the joist bays and help tie the floor system together. Beams and girders carry heavier loads and transfer them to posts or foundation walls.
Dimensional lumber is still used in many homes, but engineered products such as I-joists, laminated veneer lumber, and rim board are common because they can provide long spans, consistency, and efficient use of material. Engineered joists must be installed according to the manufacturer’s instructions, especially around holes, notches, blocking, bearing points, and temporary bracing. A carpenter who cuts a random hole in an engineered joist without checking the guide is not “customizing.” They are flirting with structural sadness.
Subfloor Sheathing
Once joists are installed and properly braced, the subfloor is attached. Plywood or OSB panels are laid perpendicular to the joists, with staggered joints and correct fastener spacing. Adhesive is often applied to the joists before panels are nailed or screwed down to reduce squeaks. Panel spacing is important because wood products expand and contract with moisture changes. A tight subfloor may look tidy on day one but complain loudly later.
Wall Framing: Studs, Plates, Headers, and Openings
Wall framing gives the house its vertical shape. Exterior walls support roof and floor loads, resist wind pressure, and form the building envelope. Interior walls may be load-bearing or non-load-bearing, depending on the design. Either way, careful layout is the secret sauce.
Basic Wall Framing Parts
A framed wall usually includes a bottom plate, top plate, studs, king studs, jack studs, headers, cripples, blocking, and sheathing. Studs are vertical members commonly spaced 16 inches or 24 inches on center, depending on the design, lumber size, loads, wall height, sheathing, finish materials, and code requirements. Plates run horizontally at the top and bottom of the wall.
Door and window openings require special framing. A header spans across the top of the opening and transfers loads around it. King studs run full height on each side of the opening. Jack studs support the header. Cripple studs may fill the space above or below the opening. The exact size and number of these members depends on span, load, opening width, wall type, and local code.
Layout Matters More Than Beginners Think
Before cutting lumber, framers snap chalk lines and mark stud locations. Accurate layout keeps walls straight, openings correct, and loads aligned. It also makes life easier for drywall installers, electricians, plumbers, siding crews, cabinet installers, and everyone else who must work with the frame later. A framing mistake can echo through the rest of the project like a bad karaoke performance in a small room.
Common layout details include marking corners, wall intersections, door openings, window openings, intersecting partitions, and locations for beams or posts. Walls are usually assembled flat on the floor deck, squared, sheathed if appropriate, and then raised into place. Bracing keeps them plumb until the full structure is tied together.
Roof Framing: Rafters, Trusses, and the Crown of the House
Roof framing completes the main structural shell. A roof must support dead loads, live loads, snow loads where applicable, wind uplift, roofing materials, insulation, ventilation components, and sometimes mechanical equipment. It also has to shed water reliably, because roofs that do not shed water are just expensive birdbaths.
Stick-Framed Roofs
Traditional stick framing uses rafters, ridge boards, ceiling joists, collar ties, rafter ties, hip rafters, valley rafters, and blocking. This method is flexible and useful for complex roof shapes, vaulted ceilings, additions, and custom work. However, it requires careful cutting, layout, and understanding of roof geometry.
Roof Trusses
Many modern homes use manufactured roof trusses. Trusses are engineered assemblies built in a factory and delivered to the jobsite. They can be efficient, consistent, and fast to install. The important rule is simple: do not cut, drill, notch, or alter trusses unless a qualified design professional or the truss manufacturer provides an approved repair or modification. Trusses are engineered systems, not oversized wooden suggestion boxes.
Roof Sheathing
After rafters or trusses are installed and braced, roof sheathing is applied. Panels must match the required span rating and be installed with proper spacing, orientation, and fastening. In high-wind areas, nailing patterns, edge fastening, clips, and roof-to-wall connections become especially important.
The Continuous Load Path: Why Connections Matter
One of the most important ideas in house framing is the continuous load path. Loads must travel safely from the roof to the walls, from walls to floors, from floors to the foundation, and from the foundation into the ground. If the path is interrupted, loads can concentrate in weak spots.
A continuous load path depends on properly installed fasteners, straps, anchors, hangers, hold-downs, blocking, sheathing, and framing members. In ordinary weather, a weak connection may go unnoticed. During high wind or seismic movement, however, the building looks for the weakest link. Unfortunately, houses do not politely announce, “Pardon me, your roof-to-wall connection seems underwhelming.” They just fail where the connection is inadequate.
Sheathing: The Skin That Adds Strength
Wall and roof sheathing do more than provide a surface for siding and roofing. Structural sheathing helps resist racking forces, supports the building envelope, and ties framing members together. Plywood and OSB are the most common sheathing materials in residential wood framing.
Proper installation includes correct panel orientation, edge spacing, nail size, nail spacing, fastening at panel edges and field areas, and attention to shear wall requirements. Shear walls are wall segments designed to resist lateral forces. They are especially important in high-wind or seismic regions, around large openings, and in homes with complex layouts.
Advanced Framing: Using Wood More Efficiently
Advanced framing, also called optimum value engineering, is a set of techniques designed to reduce unnecessary lumber, improve insulation space, and lower thermal bridging while maintaining structural performance. Common strategies include using 2×6 studs spaced 24 inches on center, aligning framing members vertically, using two-stud corners, reducing unnecessary jack studs and cripple studs, using single top plates where allowed, and eliminating headers in non-load-bearing walls.
The benefits can include lower lumber use, improved whole-wall R-value, easier insulation installation, and reduced construction waste. However, advanced framing is not simply “use less wood and hope for the best.” It requires planning, code compliance, coordination with trades, and careful engineering where needed. The best results happen when the home is designed on a two-foot module so studs, joists, rafters, trusses, sheathing, doors, and windows work together instead of arguing behind the drywall.
Framing for Energy Efficiency
A strong frame is essential, but a comfortable and efficient house also needs smart enclosure details. Framing affects energy performance because wood conducts more heat than insulation. Every extra stud, header, and corner member can become a thermal bridge. That does not mean wood framing is bad; it means good design matters.
Air Sealing and Insulation Alignment
Framing crews should think ahead about air barriers, insulation cavities, and hard-to-reach areas. Band joists, dropped ceilings, soffits, attic transitions, garage-to-house walls, tub surrounds, fireplace chases, and stair framing can become energy leaks if no one plans the air barrier. Proper blocking and backing can make insulation and drywall installation much more effective.
Air sealing at the sill plate, rim joist, top plates, and penetrations helps reduce drafts and moisture movement. A home can have thick insulation and still perform poorly if air bypasses the insulation. That is like wearing a winter coat with the zipper open and blaming the coat.
Common House Framing Mistakes to Avoid
Ignoring Local Codes and Plans
Residential framing must follow the approved building plans and local code requirements. Snow loads in Minnesota, wind loads in coastal Florida, seismic details in California, and termite protection in parts of the South can all influence framing decisions. A detail that works in one region may be wrong in another.
Poor Lumber Selection
Twisted, bowed, crowned, cracked, or wet lumber can create problems later. Framers often crown joists and rafters consistently, reject severely warped pieces, and use straighter stock for walls where cabinets, tile, doors, or long sightlines will expose imperfections.
Incorrect Fasteners
Nails, screws, bolts, and connectors must match the intended use. Connector hardware generally requires specific fasteners. Substituting drywall screws, under-sized nails, or random leftovers from a coffee can is not a structural strategy.
Cutting Structural Members Improperly
Notches and holes in joists, studs, rafters, beams, and engineered products must follow code and manufacturer rules. Plumbing and electrical trades often need openings, but those openings must be planned. A beautiful pipe run is not a victory if it turns a joist into a breadstick.
Forgetting Temporary Bracing
Framing is vulnerable during construction. Walls, trusses, and joists may need temporary bracing until the structure is fully connected and sheathed. Many framing accidents happen before the building becomes stable as a complete system.
Inspection Points During Framing
Framing inspection is a major milestone. Inspectors commonly review foundation anchorage, wall framing, floor framing, roof framing, fire blocking, draft stopping, structural connectors, beams, posts, headers, braced wall panels, stair framing, and rough openings. They may also check that plumbing, electrical, and mechanical penetrations have not damaged structural members.
A smart builder does not treat inspection as a surprise quiz. The best approach is to check work continuously: Are walls plumb? Are openings correct? Are straps installed? Are beams bearing fully? Are joists properly supported? Are trusses braced? Are nail patterns correct? Are hold-downs where the plans show them? Finding a mistake before drywall is a correction. Finding it after drywall is a small opera with invoices.
Practical Example: Framing a Simple Rectangular House
Imagine a simple one-story rectangular home on a continuous concrete foundation. The crew begins by checking the foundation dimensions and diagonals. Then they install sill sealer, treated sill plates, washers, and nuts over the anchor bolts. Next, they frame the floor system with joists bearing on the sill and center beam, install rim joists, add blocking where required, glue and fasten the subfloor, and snap wall layout lines.
Exterior walls are built flat on the deck. Studs, plates, corners, headers, and rough openings are assembled according to the plans. The walls are squared, braced, raised, aligned, and temporarily supported. Interior bearing walls and partitions follow. Once the walls are plumb and connected, roof trusses are placed according to layout marks, braced, and fastened with approved connectors. Roof sheathing is installed, followed by wall sheathing completion, housewrap, windows, and roofing underlayment.
By the end of framing, the house has recognizable rooms, window views, roof shape, and personality. It still needs plumbing, wiring, insulation, drywall, finishes, and many cups of coffee, but the structure is there.
of Field Experience: What Real House Framing Teaches You
Experience in house framing teaches lessons that no clean diagram can fully capture. The first lesson is that layout is king. A wall that is off by half an inch may not seem dramatic while the lumber is still lying on the deck, but that small error can affect door swings, cabinet runs, stair openings, drywall seams, tile lines, and trim. Good framers measure, snap lines, check diagonals, and verify openings before the nail gun starts singing.
The second lesson is that wood has a personality. Lumber moves, bows, twists, cups, shrinks, and occasionally behaves like it has strong opinions about your schedule. Experienced crews sort material before using it. Straight studs go where walls need to be especially flat, such as kitchens, bathrooms, stairwells, and long hallways. Less perfect pieces may be cut into blocking or used in less visible areas if structurally acceptable. This simple habit can save hours of frustration later.
The third lesson is that framing is teamwork. A good frame supports every trade that follows. Electricians appreciate clear stud bays and sensible drilling paths. Plumbers appreciate stacked walls and planned chases. HVAC installers appreciate space that actually exists, not imaginary space drawn with heroic optimism. Drywall crews appreciate straight framing. Finish carpenters appreciate square openings. Homeowners appreciate doors that close without needing a motivational speech.
The fourth lesson is that water is the enemy you must respect early. Even during framing, rain can soak subfloors, collect in corners, and swell panels. Crews often sweep standing water, protect materials, cover openings when practical, and use products rated for exposure. Moisture management is not only about the finished siding and roofing; it starts when materials arrive on site.
The fifth lesson is that connectors and fasteners deserve attention. A metal hanger without the correct nails is like a seatbelt made of ribbon. It may look installed, but it is not doing the job intended. The same is true for hurricane ties, hold-downs, anchor bolts, straps, and structural screws. The detail matters because the load path depends on each connection doing its part.
The sixth lesson is that speed should never replace sequencing. Raising walls before checking the deck, loading trusses before bracing, stacking materials on unbraced joists, or sheathing over mistakes can create safety hazards and expensive rework. Efficient crews are not reckless; they are organized. They know what comes next because they have already thought three steps ahead.
The final lesson is humility. Framing looks bold and physicaland it isbut it also rewards patience, math, planning, and respect for building science. A well-framed house feels quiet before it is finished. The floors are solid, the walls are straight, the roof lines are clean, and every load has a place to go. That is the beauty of framing from the ground up: when it is done right, most people never notice it. They simply live comfortably inside it for decades.
Conclusion
From the ground up, house framing is a structured process that transforms a foundation into a durable, functional, weather-ready home. It begins with accurate layout and foundation anchorage, continues through floor and wall framing, rises into roof construction, and depends on strong connections, proper sheathing, moisture control, energy-smart details, and code-compliant workmanship.
The best framing is not just strong; it is thoughtful. It supports the loads, serves the design, respects the climate, helps the building envelope perform, and makes life easier for every trade that follows. Whether you are studying construction or preparing to talk with a builder, understanding house framing gives you a better eye for qualityand a healthy respect for the humble stud, which has been carrying more responsibility than it gets credit for.
Note: Always follow local building codes, approved plans, manufacturer instructions, and licensed professional guidance for structural work.