Note: This article is written for educational web publishing and takes a safety-first approach. A DIY USB power bank can be a fun electronics project, but lithium-ion and lithium-polymer batteries can overheat, vent, ignite, or fail if handled incorrectly. Beginners, teens, and anyone without electronics experience should use certified, prebuilt power-bank kits or buy a tested commercial unit rather than assembling raw battery packs.
What Is a DIY USB Power Bank?
A DIY USB power bank is a portable battery pack designed to charge USB-powered devices such as phones, earbuds, small lights, microcontrollers, and emergency gadgets. In simple terms, it stores energy in a rechargeable battery and delivers regulated USB output when your device needs a refill. Think of it as a tiny electrical lunchbox: it packs energy for later, preferably without smoking, swelling, or turning your backpack into a dramatic science fair exhibit.
The phrase “DIY USB power bank” can mean several things. At the safest end, it may involve placing a certified power-bank module and approved battery into a protective enclosure according to the manufacturer’s instructions. At the riskier end, it can mean building a battery pack from loose lithium cells, adding a charging circuit, wiring a boost converter, and hoping every protection feature works as expected. For most hobbyists, the safer kit-based version is the smarter route.
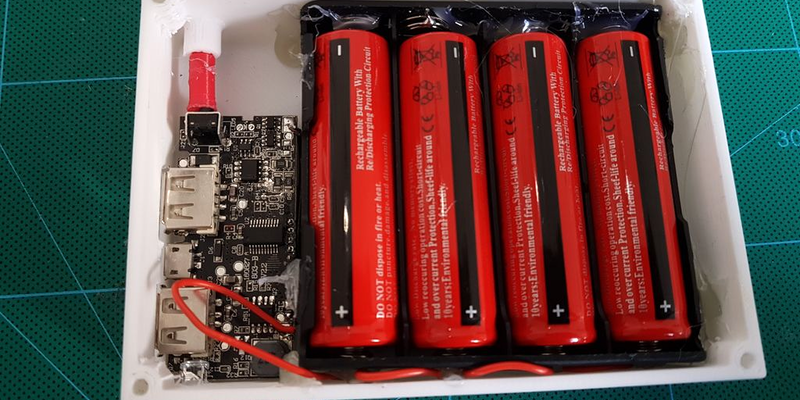
A reliable portable USB charger is more than a battery with a cable attached. A proper power bank usually includes a rechargeable cell, a battery management system, protection circuitry, a charging controller, a voltage converter, USB input and output ports, thermal safeguards, and a durable case. Each part has a job. When one part is missing or poorly chosen, the project may still “work” for a while, but it may not be safe.
How a USB Power Bank Works
Most compact power banks use lithium-ion or lithium-polymer cells because these batteries store a lot of energy for their size. A typical single lithium cell has a nominal voltage around 3.7 volts, while standard USB output is commonly 5 volts. That means a power bank needs electronics to step the battery voltage up to USB voltage. This is usually done by a boost converter.
The charging side works in the opposite direction. When you plug the power bank into a USB charger, a charge-management circuit controls how energy flows into the battery. Lithium batteries cannot be charged casually like old flashlight batteries. They require controlled charging profiles, voltage limits, current limits, and temperature awareness. A good module handles those details quietly in the background, which is exactly where those details belong.
The Core Parts Inside a Power Bank
A safe power bank design usually includes several major sections:
- Battery cell or pack: The energy storage component, commonly lithium-ion or lithium-polymer.
- Protection circuit: Helps guard against overcharge, overdischarge, short circuit, and excessive current.
- Charging controller: Manages how the battery is charged from USB input.
- Boost converter: Raises battery voltage to a stable USB output voltage.
- USB ports: Provide input and output connections for charging and powering devices.
- Enclosure: Protects the electronics from impact, metal objects, moisture, and curious fingers.
When these parts are built into a certified module, the project becomes much more beginner-friendly. When they are selected randomly from the internet and wired together without testing, the project becomes a tiny box of uncertainty. Electronics can be magical, but mystery smoke is still bad.
Safety Comes First With DIY Battery Projects
Before talking about design ideas, let’s address the big battery-shaped elephant in the room. Lithium batteries are powerful. That is why they are used in phones, laptops, cameras, power tools, e-bikes, and portable chargers. The same energy density that makes them convenient also means they must be treated with respect.
A safe DIY USB power bank project should not involve damaged cells, swollen batteries, random recycled laptop cells, mixed battery types, loose metal parts, or direct soldering to battery cells. It should not be charged unattended, left in direct sunlight, stored in a hot car, or tossed into a drawer with keys and coins. It should also never be built without a battery protection system.
Important Safety Rules
- Use only high-quality, undamaged rechargeable batteries from reputable suppliers.
- Choose a certified power-bank kit or module with built-in protection features.
- Never mix old and new cells, different capacities, or different battery chemistries.
- Do not use swollen, punctured, dented, overheated, or leaking batteries.
- Do not charge the project on a bed, sofa, paper pile, or other flammable surface.
- Use a nonconductive, ventilated enclosure that prevents accidental short circuits.
- Recycle lithium batteries through proper battery recycling or hazardous waste programs.
If the project gets unusually hot, smells strange, changes shape, makes a hissing sound, or behaves unpredictably, stop using it. Move away from flammable materials if safe to do so and follow local battery emergency guidance. A power bank should quietly charge your phone, not audition for a disaster movie.
Choosing the Right DIY Approach
There are several ways to approach a DIY USB power bank. The best option depends on your experience level, tools, budget, and risk tolerance. For most people, a prebuilt power-bank module or enclosure kit is the best balance of learning and safety.
Option 1: Use a Certified Power-Bank Kit
This is the most practical route for beginners. A kit may include a circuit board, USB ports, charging indicators, battery contacts, and an enclosure. Some kits are designed for specific protected cells, while others come with the battery already integrated. Your job is mainly assembly, inspection, and safe use.
This approach teaches the basic architecture of a power bank without asking you to design battery protection from scratch. It also reduces the chance of wiring mistakes. If your goal is to understand how portable charging works, a kit is often more educational than wrestling with raw parts and wondering why a module is getting hot enough to toast a marshmallow.
Option 2: Build a Low-Power Educational USB Supply
For classroom or hobby learning, a low-power educational project can demonstrate the idea of energy storage and voltage conversion without aiming to replace a commercial phone charger. This type of project is best done with instructor supervision and approved modules. It may power a small LED lamp, a microcontroller, or a lightweight USB gadget.
The advantage is that you can observe how input charging, battery voltage, and output regulation relate to one another. The limitation is that it may not deliver enough current for modern phones or tablets. That is fine. Not every electronics project needs to fast-charge a flagship smartphone while also making coffee.
Option 3: Buy a Certified Power Bank and Customize the Case
If your main interest is creativity rather than electrical design, buy a reputable certified power bank and customize the outside. Add a 3D-printed holder, a fabric sleeve, a label, a cable organizer, or a travel pouch. This gives you a personalized DIY result while leaving the battery engineering to professionals.
This option is especially useful for bloggers, students, campers, and makers who want a project that is practical but not risky. You still get a custom power solution, but you avoid the most hazardous parts of battery pack construction.
What Capacity Do You Need?
Power-bank capacity is usually advertised in milliamp-hours, written as mAh. Common sizes include 5,000 mAh, 10,000 mAh, and 20,000 mAh. Bigger numbers sound better, but real-world charging is affected by voltage conversion losses, cable quality, phone battery size, temperature, and the power bank’s electronics.
A 5,000 mAh power bank is compact and good for emergency top-ups. A 10,000 mAh model is a popular everyday size because it can often recharge a phone more than once, depending on the phone and efficiency. A 20,000 mAh power bank is better for travel, tablets, or multiple devices, but it is heavier and takes longer to recharge.
Understanding Real-World Capacity
Here is where many people get surprised. A power bank rated at 10,000 mAh does not deliver all of that capacity at USB output. Battery capacity is often rated at the battery’s internal voltage, while USB output is typically higher. The boost conversion process also wastes some energy as heat. That does not mean the power bank is fake; it means physics is doing physics, as usual.
For a DIY USB power bank article, it is helpful to explain this clearly to readers. A good rule is to choose more capacity than the exact number you think you need, while still keeping size and safety in mind. A giant power bank that never leaves your desk is less useful than a smaller one you actually carry.
USB-A, USB-C, and Fast Charging
Older power banks often use USB-A output and Micro-USB input. Newer designs commonly use USB-C because it is reversible, compact, and better suited for modern devices. Some USB-C power banks support USB Power Delivery, often called USB PD, which allows compatible devices to negotiate higher charging power.
For DIY projects, USB-C can be more complicated than it looks. A connector alone does not guarantee fast charging. Proper USB-C behavior requires compatible controller circuitry and safe power negotiation. This is another reason beginners should avoid improvised designs and use tested modules from reputable suppliers.
Should a DIY Power Bank Support Fast Charging?
Fast charging sounds exciting, but it increases design demands. Higher current and higher wattage create more heat and require better components, better thermal management, and more robust protection. For a beginner DIY USB power bank, simple and safe is better than fast and questionable.
If fast charging is important, a certified commercial power bank is usually the better choice. If learning is the goal, a modest 5-volt output project is easier to understand and safer to discuss in a general DIY article.
Design Features Worth Looking For
Whether you build from a kit or buy a commercial model to customize, certain features make a portable charger more useful and safer. Look for overcharge protection, overdischarge protection, short-circuit protection, temperature protection, current limiting, clear status indicators, and a strong enclosure.
LED indicators are especially helpful. They show charging status and approximate remaining capacity. Some power banks use a small display, but simple lights are often enough. A power button can help prevent accidental activation, while automatic shutoff can reduce wasted energy when no device is connected.
Enclosure Design Matters
The enclosure is not just decoration. It protects the battery and electronics from bumps, pressure, metal objects, and dust. A good enclosure should hold everything securely without crushing the battery. It should not allow loose wires, exposed terminals, or movement that could wear insulation over time.
Plastic enclosures are common because they are lightweight and nonconductive. 3D-printed cases can work for educational mockups, but they must be designed carefully so they do not trap heat or press into the battery. Metal cases can look sleek, but they require careful insulation to prevent short circuits.
Common Mistakes to Avoid
The most common DIY power bank mistakes usually come from treating batteries like ordinary components. They are not. A resistor can be annoying when it fails. A lithium battery can be much more dramatic.
Avoid using unknown salvaged cells. Avoid skipping the protection board. Avoid guessing polarity. Avoid cheap modules with no documentation. Avoid building a pack so tightly that heat cannot escape. Avoid leaving the project plugged in for days. Avoid carrying an unfinished prototype in a pocket or bag.
Another mistake is trusting capacity claims that sound unrealistic. Tiny power banks with massive advertised capacity are often suspicious. Real capacity requires physical battery volume. If a product claims it can power your phone for a month and fits on a keychain, your skepticism should wake up, stretch, and make coffee.
Testing a DIY USB Power Bank Safely
Testing should be cautious and supervised. Start by visually inspecting the enclosure, connectors, battery condition, and board alignment. Make sure nothing is loose, pinched, reversed, or exposed. Use the charger recommended by the module or kit manufacturer. Charge on a nonflammable surface in an open area where you can observe the device.
For performance testing, use low-power devices first. A USB LED light or small electronics board is less demanding than a smartphone. Watch for excessive heat, unstable output, repeated shutoff, strange smells, or swelling. If anything seems wrong, stop using the project.
Heat Is a Warning Sign
Warm is normal during charging and discharging. Hot is not. Heat shortens battery life and can signal stress, poor conversion efficiency, overloaded output, or a fault. A well-designed power bank should not become uncomfortable to touch during ordinary use.
Heat management is also why fast charging and high-capacity builds require extra care. More power means more thermal responsibility. In a DIY context, responsible design beats impressive numbers every time.
Best Uses for a DIY USB Power Bank
A safe, modest DIY USB power bank can be useful for many low-power situations. It can run a small USB desk light during an outage, power a microcontroller project, keep earbuds topped up, or serve as a backup charger for short trips. Makers may also use power-bank modules in portable sensor projects, small displays, or educational electronics demonstrations.
For emergency preparedness, a power bank belongs in the same category as a flashlight, spare cable, and basic first-aid kit. It is not glamorous, but you will suddenly think it is a genius invention when your phone hits 4 percent during a storm warning.
DIY USB Power Bank Maintenance Tips
Battery care affects both safety and lifespan. Store a power bank in a cool, dry place. Avoid extreme heat, direct sun, and freezing conditions. Do not store it fully depleted for long periods. Recharge it occasionally if it sits unused. Inspect it before travel or emergency use.
Use quality cables. A damaged cable can cause slow charging, unreliable connections, or heat. Keep ports clean and dry. Do not force connectors. If the case cracks, the battery swells, or charging becomes erratic, retire the device and recycle it properly.
Travel Tips for Power Banks
Power banks are treated as spare lithium batteries for air travel. In general, they belong in carry-on baggage, not checked luggage. Terminals and ports should be protected from short circuits, and the power bank should be easy to access. Airline and aviation rules can vary by country and capacity, so travelers should check current rules before flying.
For DIY power banks, travel is trickier. A homemade battery device may attract extra scrutiny and may not be accepted by airlines if it lacks clear labeling or safety certification. For flights, a certified commercial power bank with visible capacity labeling is the better choice. Your homemade electronics project may be charming, but airport security is not famous for appreciating charming ambiguity.
Environmental Responsibility and Recycling
Lithium batteries should not be thrown into household trash or regular recycling bins. Even depleted batteries can hold residual energy and may cause fires if crushed or shorted during waste handling. Proper recycling helps recover valuable materials and reduces safety risks.
When a power bank reaches the end of its life, take it to a battery recycling location, electronics recycler, or household hazardous waste collection program. Before recycling loose batteries, protect terminals according to local guidance. If the battery is swollen, damaged, recalled, or overheating, follow special disposal instructions from local authorities or recycling programs.
Is a DIY USB Power Bank Worth It?
A DIY USB power bank is worth it if your goal is learning, customization, or creating a safe low-power project with approved components. It is not always worth it if your only goal is saving money. Commercial power banks are inexpensive, widely available, and often include engineering and certification that would be difficult to reproduce at home.
The best DIY mindset is curiosity, not corner-cutting. Build to understand. Customize to solve a specific problem. Choose safety over capacity bragging rights. A power bank is successful when it quietly works, safely charges, and does not become the most memorable part of your day for the wrong reason.
Real-World Experience: What Building and Using DIY USB Power Banks Teaches You
Working with a DIY USB power bank project teaches a lesson that many beginners do not expect: portable power is less about one big battery and more about balance. Capacity, size, heat, output current, charging speed, safety, and durability all pull in different directions. Increase one feature, and another usually demands attention. A tiny case looks clean, but it may trap heat. A huge battery sounds useful, but it adds weight and charging time. A fast output port sounds modern, but it requires better components and more careful thermal design.
One of the most useful experiences is learning how much cable quality matters. Many people blame the battery when their phone charges slowly, but the cable may be the weak link. Thin, worn, or low-quality USB cables can create voltage drop and inconsistent charging. In daily use, a simple, sturdy, short cable often performs better than a fancy-looking cable that has survived three backpacks, two pets, and one mysterious drawer full of adapters.
Another practical lesson is that status indicators are more valuable than they seem. A few small LEDs can prevent a lot of guessing. Without clear indicators, users may not know whether the power bank is charging, full, empty, overloaded, or asleep. For a DIY project, visible feedback makes the device easier to trust. It also makes troubleshooting less frustrating. Nobody enjoys staring at a silent box and wondering whether it is charging or just quietly judging them.
Enclosure design is another area where experience changes your opinion quickly. On paper, any box that fits the parts may seem acceptable. In practice, the enclosure determines how pleasant and safe the device feels. A good case keeps the board aligned, protects the ports, prevents the battery from shifting, and avoids pressure points. It also makes the power bank easier to carry. Rounded edges, secure screws, proper spacing, and strain relief can make the difference between a polished project and a fragile desk ornament.
Testing also teaches patience. A responsible builder does not assemble a power bank and immediately plug in an expensive phone. It is better to start with visual inspection, then basic charging observation, then a low-power USB load, and only later a real device. This slower process may feel boring, but it reveals problems early. Heat, flickering indicators, loose ports, or intermittent output are all clues that something needs attention.
The biggest takeaway is humility. Batteries deserve respect. A DIY USB power bank is not just a weekend craft; it is an energy storage device. When built with certified modules, proper protection, and realistic expectations, it can be educational and genuinely useful. When rushed, overloaded, or assembled from questionable parts, it becomes a risk that is not worth the savings. The smartest makers are not the ones who build the most powerful gadget. They are the ones whose projects work safely, last reliably, and do not make the smoke alarm participate.
Conclusion
A DIY USB power bank can be a rewarding project for anyone interested in portable electronics, battery-powered gadgets, or emergency charging. The key is to approach it with realistic expectations and serious respect for lithium battery safety. A good power bank needs more than capacity; it needs protection circuitry, proper charging control, voltage regulation, heat management, and a strong enclosure.
For most readers, the best DIY path is a certified kit, a low-power educational build, or a customized commercial power bank. These options provide useful hands-on learning without unnecessary risk. If you want a dependable travel charger, buy a certified model. If you want to learn how portable power works, build carefully, test slowly, and keep safety at the center of every decision.