Holiday gift wrap has an unusually short career. It spends days looking glamorous beneath the tree, enjoys approximately four seconds of attention, and then is torn apart by someone shouting, “Is this the sweater?” That brief lifespan does not mean your wrapping should be boringor require an advanced degree in ribbon engineering.
With a few inexpensive supplies, you can turn plain paper, leftover fabric, old maps, natural decorations, and reusable containers into memorable holiday packaging. The five DIY holiday gift wrap ideas below work for Christmas, Hanukkah, winter birthdays, hostess gifts, office exchanges, and any occasion involving cookies and suspiciously cheerful music.
Each method includes practical steps, styling suggestions, and solutions for common wrapping problems. Choose one design for a coordinated look or combine several techniques to create a pile of presents that feels personal without looking chaotic.
Before You Begin: Build a Simple Gift-Wrapping Station
A small amount of preparation prevents the annual search for the missing tape dispenser. Clear a table or section of the floor and gather everything before opening a roll of paper.
Basic supplies
- Sharp scissors
- Clear or double-sided tape
- Paper tape or decorative washi tape
- Kraft paper, recycled paper, or saved wrapping paper
- Ribbon, cotton cord, yarn, or natural twine
- Cardstock or recycled holiday cards for tags
- A ruler, pencil, and hole punch
- Stamps, paint, markers, or ink pads
Place the gift inside a box whenever possible. Boxes are dramatically easier to wrap than objects shaped like guitars, stuffed animals, frying pans, or whatever your nephew requested this year. Reuse shipping boxes, but remove old labels and cover visible logos so the package does not accidentally advertise dishwasher tablets.
For crisp results, measure the paper before cutting. It should reach around the box with a modest overlap, while the paper at each end should extend slightly more than halfway up the side. Excess paper creates bulky folds; too little paper creates improvisational panic.
1. Hand-Stamped Kraft Paper Gift Wrap
Kraft paper is the little black dress of DIY gift wrapping: inexpensive, versatile, and happy to work with almost anything. Its neutral surface pairs well with traditional red and green, modern black and white, metallic accents, pastel palettes, or children wielding stamps with unreasonable enthusiasm.
What you need
- Plain kraft paper or clean brown paper bags
- Rubber stamps, foam stamps, or a pencil with an unused eraser
- Water-based craft paint or ink pads
- Scrap paper for testing
- Ribbon, twine, or yarn
How to make it
- Cut a piece of kraft paper slightly larger than the amount needed for the gift.
- Lay it flat with the outside surface facing up.
- Test your stamp and color on scrap paper. This step is less exciting than stamping immediately, but it prevents your snowflake from resembling a festive potato.
- Apply the pattern across the paper. Use evenly spaced rows for a polished design or rotate the stamp randomly for a playful, handmade look.
- Allow the paint or ink to dry completely before wrapping.
- Place the gift face down, pull the paper snugly around the box, and secure the seam on the bottom.
- Fold the ends into triangular flaps, crease the edges, and tape them flat.
A pencil eraser makes an easy polka-dot stamp. A halved potato can become a tree, star, or simple geometric block. You can also use evergreen-shaped stamps, snowflakes, tiny houses, initials, or paw prints for the family member who insists the gift is technically from the dog.
Make it look intentional
Limit each package to two or three colors. White paint with deep green ribbon creates a modern woodland style, while black stars and gold cord feel sophisticated. For children’s gifts, combine red, pink, turquoise, and lime dots with chunky yarn.
Personalize the design by stamping the recipient’s initial repeatedly across the paper. This eliminates the need for a tag and prevents the traditional holiday mystery known as “Whose present is this?”
2. Reusable Fabric Gift Wrap
Fabric wrapping is attractive, forgiving, and especially useful for gifts that refuse to behave like rectangles. Inspired by Japanese furoshiki wrapping, the method uses a square piece of cloth and a few knots rather than paper and tape.
The fabric can become part of the present. A tea towel works well for a cookbook, a scarf can hold jewelry or accessories, and a cloth napkin can wrap candles, mugs, or gourmet treats. Even a clean piece of attractive fabric from your craft drawer can enjoy a second career.
What you need
- A square scarf, tea towel, napkin, bandana, or fabric remnant
- The gift
- An optional tag or small decoration
How to wrap a rectangular box
- Spread the fabric diagonally on a flat surface so it resembles a diamond.
- Place the box in the center.
- Bring the bottom corner over the box, followed by the top corner.
- Fold or tuck excess fabric beneath the package.
- Bring the left and right corners together above the box.
- Tie a secure square knot and adjust the fabric until the folds look balanced.
For a bottle, place it upright near the center of the fabric, gather all four corners above the neck, and secure them with ribbon. Alternatively, lay the bottle diagonally, roll it in the fabric, fold the bottom upward, and tie the loose ends at the top.
Choosing the right fabric
Lightweight cotton, linen, and thin woven fabrics are easier to knot than stiff upholstery material. The cloth should be large enough for its opposite corners to meet comfortably. When in doubt, choose a larger square; dramatic fabric tails can look decorative, while a square that is too small looks like it has lost an argument.
Finish the knot with a handwritten tag, bell, wooden ornament, dried flower, or candy cane. Explain that the fabric is reusable so the recipient knows it is part of the gift rather than unusually luxurious packaging headed toward the trash.
3. Botanical Brown-Paper Packages
Natural gift wrap combines plain paper, twine, and botanical accents for a style that feels warm, seasonal, and expensiveeven when most of the materials came from your backyard or kitchen.
This look works particularly well for hostess gifts, handmade products, baked goods, and presents arranged beneath a rustic or minimalist tree.
Possible natural decorations
- Small evergreen or rosemary sprigs
- Dried orange slices
- Cinnamon sticks
- Pinecones
- Dried flowers or seed heads
- Clean leaves
- Wooden ornaments
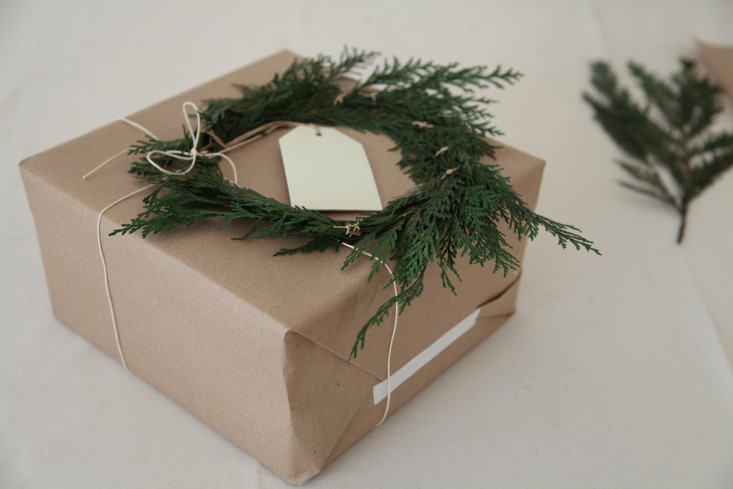
How to assemble the package
- Wrap the gift in plain kraft paper, recycled paper, or uncoated white paper.
- Wrap twine around the box horizontally two or three times.
- Rotate the box and cross the twine vertically.
- Tie a secure knot or small bow on top.
- Slide a short botanical sprig beneath the twine.
- Add a paper tag and one contrasting accent, such as a dried orange slice or cinnamon stick.
Use restraint. One rosemary sprig looks elegant; an entire shrub suggests the gift was involved in a landscaping accident. Keep the greenery small enough that it does not hide the tag or shed dramatically across the recipient’s carpet.
Dry and protect natural materials
Botanical decorations should be clean and dry before touching paper or fabric. Fresh greenery may contain moisture or sap, so add it close to the time the gift will be exchanged. Dried citrus should be fully dehydrated to reduce the chance of staining the paper.
For a more colorful variation, paint a broad stripe across white paper, let it dry, and finish the package with cotton cord and eucalyptus-style foliage. A dark blue stripe with silver cord suits Hanukkah, while burgundy paint, gold thread, and dried orange create a rich winter palette.
4. Upcycled Maps, Sheet Music, and Paper Collage
Some of the best homemade wrapping paper is already hiding in drawers, closets, and recycling piles. Old maps, newspaper comics, outdated calendars, magazine pages, sheet music, paper shopping bags, and damaged books can all become distinctive packaging.
Choose material that has no sentimental, historical, or practical value. A road atlas from an obsolete vacation route is fair game. Your grandmother’s handwritten music book is not, unless your holiday goal is to become the subject of a family meeting.
Match the paper to the recipient
- Use an old city map for a traveler.
- Wrap a record or musical accessory in copied sheet music.
- Use colorful comic pages for children.
- Choose gardening catalog pages for a plant lover.
- Use a cookbook page reproduction for a kitchen gift.
- Select magazine typography for a bold, modern collage.
Create a layered collage
- Wrap the box in plain paper as a base.
- Tear or cut interesting paper scraps into geometric shapes.
- Arrange the pieces before gluing anything.
- Attach them using a glue stick or small pieces of double-sided tape.
- Add a narrow ribbon or paper band around the center.
- Make a tag from a recycled holiday card.
A collage is useful when your saved paper scraps are too small to wrap an entire box. Combine three coordinated patterns rather than every scrap in the house. Repetition creates visual unity: use several circles, a row of triangles, or overlapping strips of similar width.
Turn old cards into tags
Cut the decorative front of a used greeting card into a rectangle, circle, arch, or simple ornament shape. Punch a hole near the top and attach it with string. Blank areas on the reverse provide space for a name and message.
When planning to recycle the wrapping afterward, avoid paper with glitter, plastic film, foil, or heavy lamination. Local recycling rules vary, so check your community’s guidance rather than trusting the highly scientific “scrunch test” alone.
5. Gift Wrap That Is Also a Gift
The most efficient holiday package does two jobs. Instead of covering the present with disposable material, place it inside something useful: a tea towel, tote bag, storage basket, cookie tin, jar, planter, or zippered pouch.
This technique is ideal for themed gift sets because the container helps organize the contents. It is also a heroic solution for people who discover at 11:47 p.m. that the wrapping paper roll contains only eleven usable inches.
Useful container-and-gift combinations
- A mixing bowl filled with baking tools and ingredients
- A reusable tote holding books, snacks, or travel accessories
- A tea towel wrapped around a cookbook or bottle
- A planter containing gardening gloves, seeds, and a hand tool
- A cookie tin filled with homemade treats
- A makeup pouch holding skincare or beauty products
- A basket containing coffee, tea, mugs, and biscotti
How to style an open container
- Place heavier items in the bottom and taller products toward the back.
- Add shredded paper, a folded towel, or clean reused tissue paper for support.
- Arrange labels so they face outward.
- Secure loose products with cotton ribbon or place the entire arrangement inside a reusable fabric bag.
- Attach a tag to the handle or tie it around the container.
Keep food gifts in clean, food-safe packaging. A decorative basket may hold sealed snacks, but unwrapped cookies should be placed in a suitable tin, jar, bag, or lined box.
Add a keepsake topper
A small ornament can replace a disposable bow. Other useful toppers include cookie cutters, luggage tags, measuring spoons, hair clips, key chains, or tiny toys. Select an item connected to the main gift so the package feels coordinated rather than as though a kitchen drawer exploded on it.
How to Make All Five Gift-Wrap Styles Look Coordinated
You do not need to use identical paper on every present. Coordination comes from repeating a few design elements across different packages.
Choose a limited color palette
Select two main colors and one accent. Examples include kraft, forest green, and cream; navy, white, and silver; or burgundy, blush, and gold. Repeat those colors in your ribbon, tags, paint, and fabric.
Use one consistent tag shape
Even when the wrapping materials vary, matching tags bring the collection together. Cut every tag into an arch, circle, tree, star, or simple rectangle.
Repeat one signature detail
Add the same cotton twine, stamped initial, dried orange slice, or tiny bell to every package. A repeating accent gives your gift pile a recognizable style without forcing you to wrap twelve boxes exactly alike.
Common Holiday Gift-Wrapping Mistakes
Using far too much paper
More paper does not create more luxury. It creates thick corners and seams that refuse to lie flat. Measure before cutting and trim excess material as you work.
Wrapping with dull scissors
Dull blades tear paper and create jagged edges. Use sharp craft scissors and reserve them for paper and ribbon rather than opening shipping boxes or trimming mystery objects in the garage.
Ignoring the drying time
Stamped or painted paper must dry before it touches the gift. Prepare custom paper in batches earlier in the dayor several days before the holidayso wet paint does not transfer onto the box, table, sleeves, cat, and everything else nearby.
Adding decorations that cannot travel
Large pinecones and delicate dried flowers may look beautiful at home but suffer during shipping. Use flat paper ornaments, stamps, fabric ribbon, or sturdy tags for mailed gifts.
Forgetting how the package will be opened
A reusable wrap should be easy to untie. Avoid excessive knots, glue, staples, or tape that turns a sustainable package into an escape-room challenge.
From the Wrapping Table: Practical Experience With the Five Methods
A realistic holiday wrapping session rarely begins with a spotless studio and a perfectly arranged cup of cocoa. It begins with a dining table covered in online shipping boxes, three partial rolls of tape, and a pair of scissors that someone used for gardening. The most useful lesson is to prepare the materials before the first present touches the table.
Kraft paper tends to be the easiest method for producing several coordinated packages. Once the stamp spacing is established, the process moves quickly. The biggest surprise is how little decoration the finished paper needs. A box covered in small white trees already has enough visual interest, so a length of green twine and a plain tag may look better than an enormous bow. The homemade irregularities are part of the charm. One slightly crooked tree looks handcrafted; fifty crooked trees look like a blizzard, which is still seasonal.
Fabric wrap is usually the fastest option for awkward gifts. Soft items, jars, bottles, and boxes with uneven edges disappear neatly beneath a square of cloth. The challenge is fabric size. A napkin that appears enormous when folded in a drawer can become surprisingly tiny when asked to cover a board game. Keeping several sizes nearby prevents last-minute wrestling. Thin cotton is easier to knot than stiff fabric, and pressing wrinkled cloth first produces a noticeably cleaner result.
Botanical gift wrap creates the strongest “How did you make this?” reaction, even though the assembly is simple. The practical trick is to add greenery last. Packages can be wrapped and tied several days early, but fresh sprigs are better attached shortly before the exchange. Small rosemary branches are convenient because they fit beneath twine and contribute a subtle seasonal scent. Large clippings look impressive for about ten minutes and then begin dropping needles with the confidence of a tree that pays rent.
Upcycled paper requires more design judgment but produces the most personal packages. A map associated with a family trip or sheet music connected to a favorite song can quietly reference a shared memory. Older paper may be brittle, so wrapping it around a base layer or using it as a decorative band often works better than forcing it around sharp corners. Magazine scraps are especially effective as tags, stripes, and geometric collage pieces.
The reusable-container method is the champion of last-minute wrapping. A basket, tin, tote, or mixing bowl can turn several small objects into one coherent gift. Arrangement matters more than ornamentation: tall items belong in back, labels should face forward, and filler keeps everything upright. Once the contents are stable, a ribbon and tag are usually enough.
The final lesson is that a coordinated collection does not require perfection. Repeating one ribbon, tag shape, or color creates consistency even when the methods differ. Handmade gift wrap feels special because someone spent time making choices for the recipient. Crisp corners are lovely, but thoughtfulness is doing the real work.