A dishwasher air gap is one of those kitchen parts most people ignore until it suddenly impersonates a tiny countertop fountain. Water bubbles from theion that your dishwasher has developed opinions about indoor plumbing.
The good news is that a leaking dishwasher air gap is usually not a sign that the dishwasher itself is ruined. In most cases, the air gap is doing exactly what it was designed to do: sending backed-up water into the sink area instead of allowing dirty drain water to flow backward into the dishwasher. The usual culprit is a clog in the air gap, the outlet hose, the garbage disposal connection, or the kitchen sink drain.
This guide explains how the system works, how to identify the blockage, how to clear it safely, and when to stop playing plumber and call a professional.
What Is a Dishwasher Air Gap?
A dishwasher air gap is a small cylindrical fitting mounted on the sink deck or countertop, usually beside the faucet. Beneath its decorative cap are two plumbing connections. The smaller inlet receives wastewater pumped from the dishwasher. The larger outlet carries that water to a garbage disposal or sink drain connection.
Inside the fitting, the drain stream passes through an open-air break. That physical separation helps prevent contaminated sink or disposal water from siphoning backward into the dishwasher. Plumbing codes in many U.S. jurisdictions require an approved air-gap arrangement, although exact installation rules vary by location. rmal operation, you may hear water moving through the fitting, but you should not see water pouring from its vent openings. When water escapes from the cap, the drain path after the air gap is usually restricted.
Why Is My Dishwasher Air Gap Leaking?
1. Debris Is Blocking the Air Gap
Food fragments, grease, soap residue, paper labels, seeds, and other kitchen confetti can collect inside the air-gap chamber. A partial clog may cause occasional dribbling. A complete blockage can send a noticeable stream of water across the sink whenever the dishwasher drains.
2. The Outlet Hose Is Clogged or Kinked
The larger hose running from the air gap to the garbage disposal or sink drain handles the full discharge flow. Greasy sludge can coat its corrugated interior, while a sharp bend can pinch the hose and restrict drainage.
Because this section is downstream from the air gap, a blockage here commonly forces water out through the countertop vent. Manufacturer troubleshooting guidance repeatedly identifies the downstream hose and sink plumbing as primary suspects when water spills from an air gap. arbage Disposal Is Clogged
Many dishwashers drain into a port on the side of the garbage disposal. If the disposal chamber is packed with food or the sink drains slowly, dishwasher wastewater has nowhere convenient to go. It chooses the air gap instead because water, like a hurried commuter, takes the first available exit.
4. The Disposal Knockout Plug Was Never Removed
This problem often appears after a new dishwasher or garbage disposal installation. New disposals usually have a solid knockout plug inside the dishwasher inlet. The installer must remove that plug before attaching the drain hose.
If the plug remains in place, the dishwasher cannot discharge through the disposal. Water may remain in the tub, back up through the drain system, or spill from the air gap during the first cycle after installation.
5. A Hose Connection Is Loose, Split, or Incorrectly Sized
If water appears below the sink rather than from the air-gap cap, inspect the hose connections. A loose clamp, cracked rubber hose, poorly fitted adapter, or damaged air-gap body can leak during the drain cycle. This is different from a vent overflow, although both problems can occur simultaneously.
6. The Sink Drain Is Partially Blocked
A slow kitchen sink is an important clue. The dishwasher, garbage disposal, and sink often share part of the same drainage system. If the branch drain or trap is restricted, cleaning only the visible air gap may provide temporary relief without solving the underlying problem.
Signs That the Air Gap or Drain Path Is Clogged
- Water sprays or dribbles from the air-gap cap during the dishwasher drain cycle.
- Dirty water remains in the bottom of the dishwasher after a cycle.
- The kitchen sink or garbage disposal drains slowly.
- The air gap makes unusually loud gurgling sounds.
- The dishwasher develops a sour or sewage-like odor.
- Drain-related warning lights or error codes appear.
- Water leaks inside the sink cabinet near the drain hoses.
A small amount of clean water in the dishwasher’s filter or sump area can be normal on some models. A deep pool covering the tub floor is not. Check the owner’s manual for model-specific guidance before assuming every teaspoon is an emergency.
Tools and Supplies You May Need
- Rubber gloves
- Old towels or absorbent rags
- A bucket or shallow pan
- A flashlight
- A long bottle brush or narrow cleaning brush
- Needle-nose pliers
- A screwdriver or nut driver for hose clamps
- A flexible drain-cleaning brush
- Replacement hose clamps, if the originals are corroded
Avoid blindly pouring caustic drain cleaner into the air gap. It may remain trapped in a hose, damage certain materials, splash during disassembly, or create a hazardous surprise for whoever opens the plumbing later.
How to Repair a Dishwasher Air Gap Clog
Step 1: Stop the Dishwasher and Make the Area Safe
Cancel the cycle and allow the dishwasher to stop. Turn off power at the circuit breaker before disconnecting hoses or reaching near electrical components. If water is actively spreading, shut off the dishwasher’s water supply valve as an extra precaution.
Place towels around the air gap and inside the sink cabinet. Keep a bucket beneath the hose connections because even a properly stopped dishwasher may leave water inside its drain line.
Step 2: Remove the Decorative Cap
Most air-gap covers lift straight off, although some may need a gentle twist. Beneath the metal or plastic shell is usually a smaller plastic cap. Remove it carefully.
Do not attack the cap with heavy pliers unless absolutely necessary. Cracked plastic converts a simple clog repair into an unplanned shopping trip.
Step 3: Inspect and Clean the Air-Gap Chamber
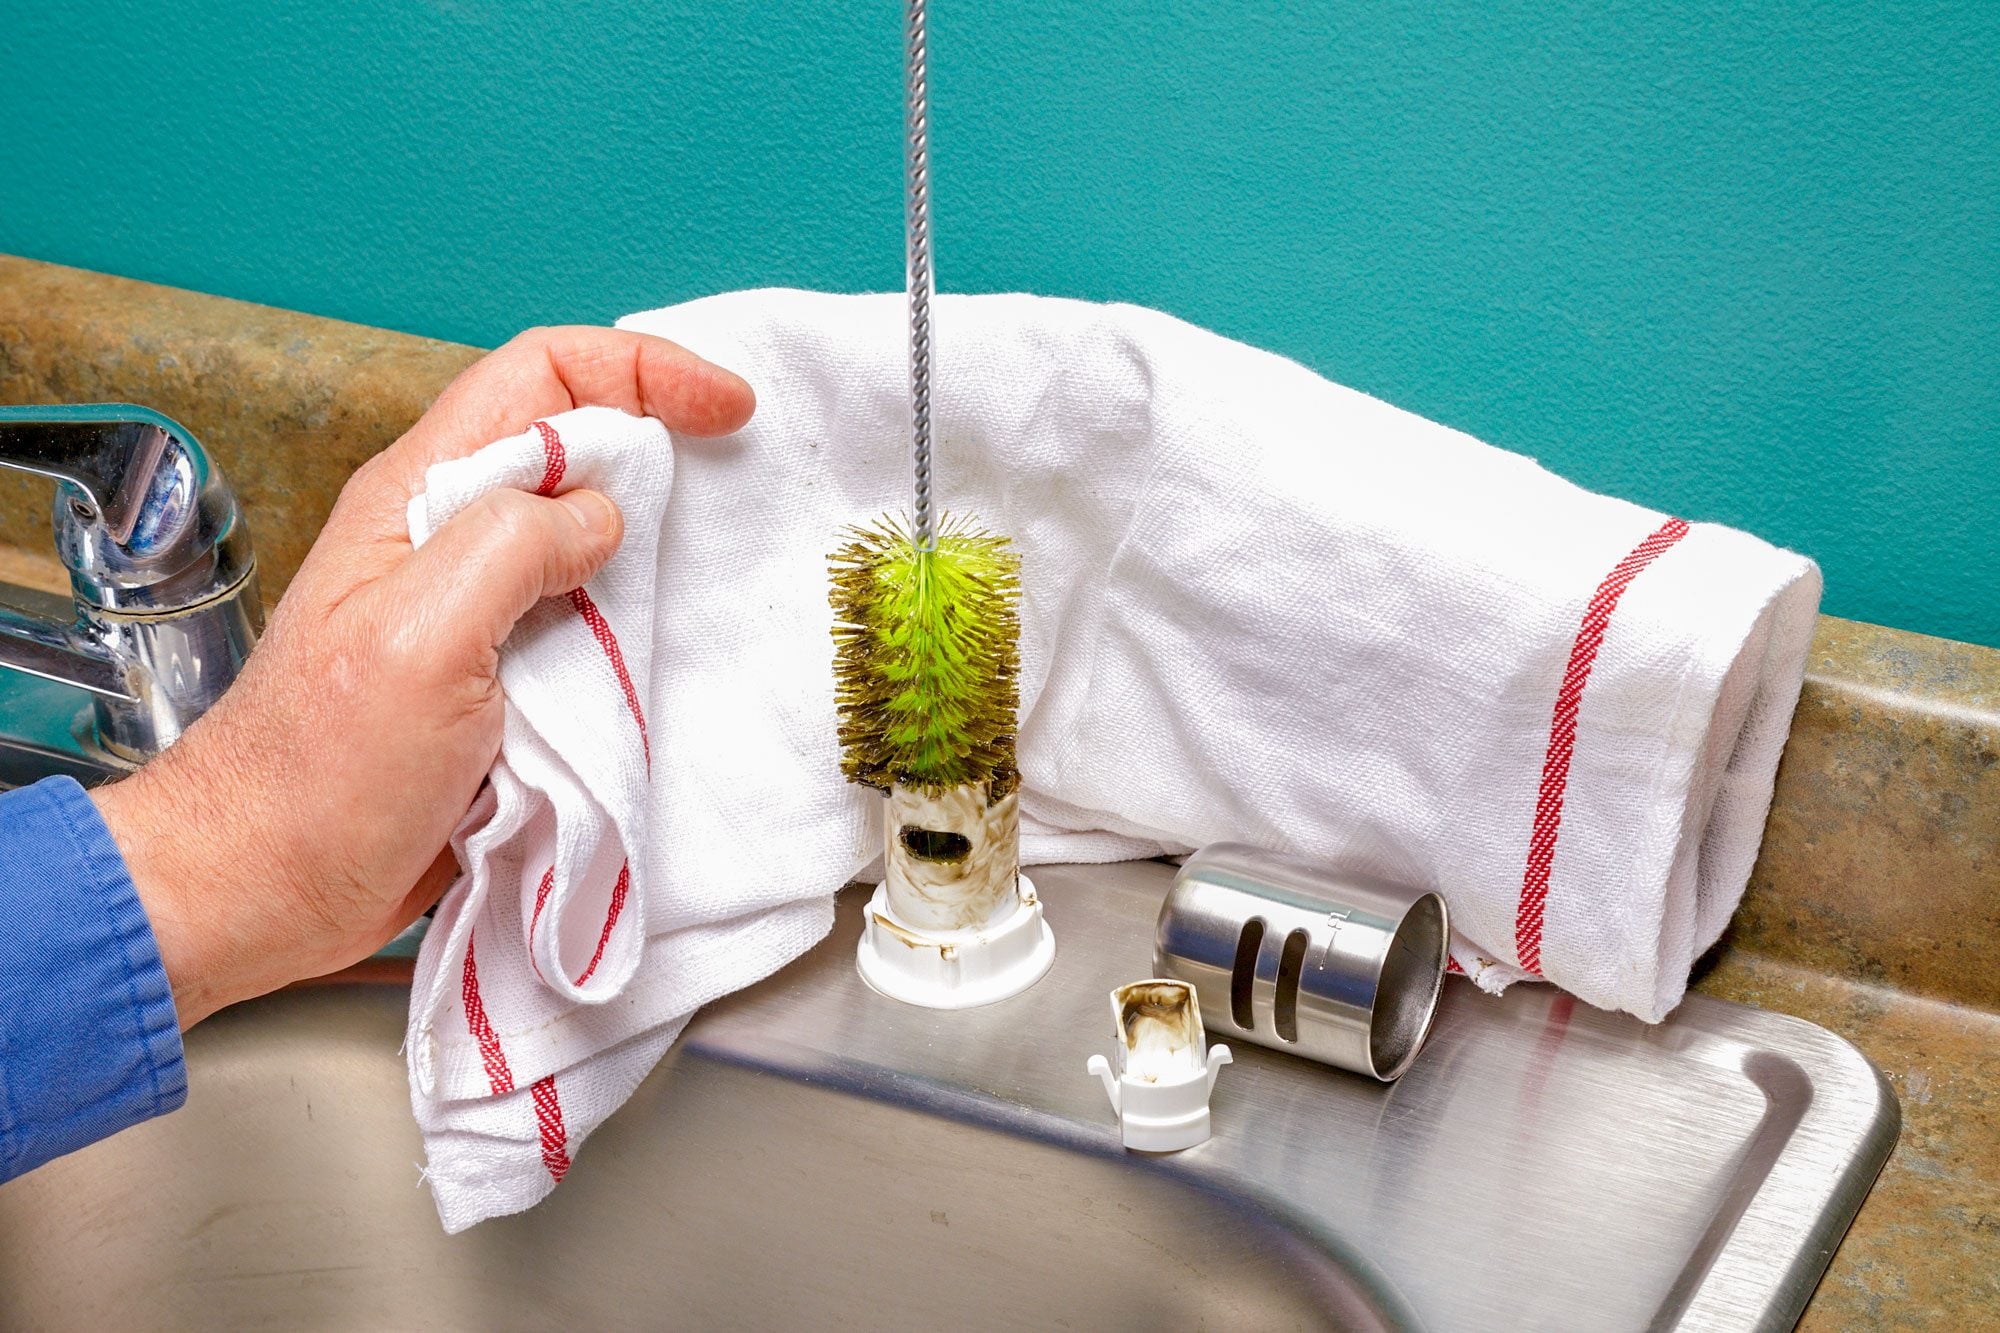
Look inside the fitting with a flashlight. Remove visible debris with gloved fingers or needle-nose pliers. Use a long bottle brush to scrub the interior passage and loosen food residue, grease, and detergent buildup.
Appliance manufacturers commonly recommend removing the cap and clearing accumulated debris from this chamber when a dishwasher is not draining correctly. sh a rigid metal object deep into the fitting. You could puncture a hose, damage the plastic body, or force the obstruction farther down the drain path.
Step 4: Flush the Air Gap Carefully
Once loose debris is removed, flush the chamber with hot tap water. A turkey baster can provide controlled pressure without flooding the counter. Direct the flow into the opening and observe whether the water drains freely toward the garbage disposal or sink connection.
LG support guidance specifically suggests using hot water delivered with a turkey baster when cleaning an air gap. ter immediately rises or spills from the vent, the restriction is probably in the larger downstream hose, disposal inlet, or sink drain.
Step 5: Run and Clear the Garbage Disposal
Restore power only as needed for this separate test, keep hands and tools out of the disposal, and run cold water. Operate the disposal briefly to clear ordinary food buildup. Turn the power off again before touching any hose or disposal connection.
If the disposal is new and the dishwasher has never drained correctly, check whether the dishwasher inlet knockout plug was removed. Disconnect power to the disposal before removing the plug. Retrieve the knocked-out piece from inside the disposal before operating it.
Step 6: Inspect the Larger Outlet Hose
Under the sink, locate the larger hose running from the air gap to the disposal or drain tailpiece. Check for crushing, tight bends, sagging sections, greasy deposits, or a loose clamp.
Photograph the setup before disconnecting anything. That image will be useful if reassembly begins to resemble an archaeological reconstruction.
Place a bucket underneath the connection. Loosen the clamp and remove the hose from the disposal or drain fitting. Be prepared for stale water. Clean the hose with a flexible brush, or flush it in a utility sink or outdoors.
Replace the hose if it is brittle, split, badly coated with hardened grease, or permanently kinked. A cleaned hose should allow water to pass freely without backing up.
Step 7: Check the Disposal Inlet or Drain Tailpiece
Inspect the nipple where the hose attaches. Grease and food can form a solid plug directly inside this narrow opening. Remove buildup carefully with a small brush or another suitable tool.
If the dishwasher connects to a branch tailpiece instead of a disposal, inspect that fitting and the nearby sink trap for restrictions. A clogged trap may need to be removed and cleaned or cleared with appropriate drain equipment.
Step 8: Reassemble the Connections
Push each hose fully onto its fitting and position the clamp behind the raised ridge. Tighten the clamp securely without crushing the plastic connector. Make sure the outlet hose follows a smooth path with no sharp kinks.
Reinstall the inner cap and decorative air-gap cover. Orient the cover’s vent openings toward the sink basin when the design allows it. That way, an unexpected overflow lands in the sink instead of watering your countertop appliances.
Step 9: Test the Dishwasher
Restore power and run a short rinse or drain cycle. Watch the air gap from above and inspect every connection below the sink with a flashlight.
A dry paper towel held beneath each joint can reveal a small leak faster than your fingertips. Check the towel after the dishwasher begins pumping water out.
If the air gap no longer overflows and the dishwasher empties normally, the clog is cleared. If water still erupts from the cap, the sink drain may be blocked farther downstream, the hose may remain restricted, or the dishwasher’s drain pump may not be moving water correctly.
What Not to Do
Do Not Seal the Air-Gap Vent
Covering the vent with tape, caulk, or an unvented decorative cap defeats its safety function and does nothing to remove the clog. It merely forces the backed-up water to search for a more expensive escape route.
Do Not Assume the Dishwasher Is Defective
Air-gap overflows are often external plumbing issues. GE notes that the air gap is a plumbing device rather than a dishwasher component, and unresolved overflow may require a plumber rather than appliance warranty service. eep Running Full Cycles
Repeatedly operating the dishwasher while the air gap is overflowing can soak countertop seams, cabinets, flooring, and nearby electrical devices. Diagnose the drain path before the next mountain of plates enters the machine.
Do Not Use Hand Dish Soap
Automatic dishwasher detergent is formulated to produce limited suds. Hand dish soap can create a foam festival inside the appliance, interfere with draining, and cause leaks around the door or other openings.
How to Prevent Another Dishwasher Air Gap Clog
- Scrape bones, fruit pits, paper labels, and large food scraps into the trash or compost.
- Clean the dishwasher filter according to the manufacturer’s schedule.
- Run the garbage disposal before starting the dishwasher when both share a drain.
- Do not pour cooking grease into the sink.
- Check the air gap periodically for visible buildup.
- Keep drain hoses free of sharp bends and stored items that could crush them.
- Use only automatic dishwasher detergent.
- Investigate a slow-draining sink before it becomes completely blocked.
Routine filter and drain-path maintenance reduces food buildup, odors, standing water, and repeat clogs. It is not glamorous work, but neither is mopping fermented casserole water from a cabinet at midnight.
When to Call a Plumber or Appliance Technician
Call a licensed plumber when the sink drains slowly, the branch drain repeatedly clogs, the air gap continues to overflow after the hoses are cleared, or the installation may not comply with local plumbing code.
A plumber is also the right choice when the countertop fitting must be replaced, the drain configuration needs modification, the clog is located inside a wall, or you are uncomfortable disconnecting the garbage disposal.
Call an appliance technician when the household drain path is open but the dishwasher still leaves substantial standing water, displays recurring drain errors, makes abnormal pump noises, or fails to send a strong stream through its drain hose. The drain pump, check valve, control system, or internal sump may need professional diagnosis.
Real-World Troubleshooting Experiences and Lessons
The “Clean Cap, Same Leak” Scenario
A common homeowner experience begins with an obvious wad of food under the air-gap cap. The debris is removed, the fitting looks spotless, and everyone celebrates for approximately nine minutes. During the next drain cycle, water spills out again.
The missed detail is usually the larger outlet hose. The visible chamber may contain debris, but it is often only the lobby of the clog hotel. Grease and fibrous food collect deeper in the corrugated hose, especially near the garbage disposal connection.
The practical lesson is to test the flow after cleaning the top. If hot water does not pass freely from the air gap to the disposal, continue downstream rather than repeatedly polishing the cap.
The New Disposal Mystery
Another classic case appears after a kitchen upgrade. The new garbage disposal works perfectly, the sink drains, and the dishwasher suddenly refuses to empty. Because everything is new, the owner assumes an electronic failure. In reality, the disposal’s dishwasher knockout plug is still intact.
This issue can cause an immediate backup during the first cycle after installation. The clue is timing: the dishwasher drained normally before the disposal replacement and failed immediately afterward. Checking the disposal inlet can prevent an unnecessary appliance-service visit.
The Holiday Dinner Overflow
Air-gap leaks often choose busy evenings because heavy cooking sends more grease and food debris through the shared drain. The dishwasher is packed, the disposal is full, the sink is draining slowly, and then the little chrome cylinder joins the festivities by spraying gravy-scented water.
The effective response is not to run the dishwasher again and hope plumbing morale improves. Stop the cycle, clear the sink and disposal, clean the air gap, and inspect the outlet hose. Large holiday loads also demonstrate why scraping dishes and running the disposal before the dishwasher can prevent trouble.
The Leak That Was Under the Sink
Sometimes the air gap is blamed because the cabinet becomes wet only during dishwasher drainage. Yet the countertop vent remains dry. The real problem may be a loose hose clamp or a split outlet hose. Water follows the hose, drips from a low point, and makes the source difficult to identify.
A useful technique is to dry the cabinet, place paper towels beneath each connection, and run a brief drain test while watching with a flashlight. The first wet towel identifies the problem area without requiring detective music.
The Recurring Clog That Was Really a Sink Problem
Some air gaps are cleaned every few weeks because the overflow keeps returning. That repeated pattern suggests the air gap is the messenger, not the villain. A partially blocked trap or branch drain may accept normal sink flow but struggle with the dishwasher’s rapid discharge.
In these cases, cleaning the small fitting provides only temporary improvement. The lasting repair is clearing the shared drain line and correcting poor hose routing. Paying attention to a slow sink, gurgling drain, or disposal backup helps identify the larger plumbing problem.
The Best General Lesson
Successful troubleshooting follows the direction of water flow: dishwasher filter and pump, smaller inlet hose, air-gap chamber, larger outlet hose, garbage disposal or branch tailpiece, and finally the sink drain.
Start with the accessible components and move downstream. That sequence prevents random part replacement and makes the repair easier to understand.
Conclusion
A dishwasher air gap leaking onto the sink is annoying, but it is also a useful warning. The fitting is revealing that wastewater cannot move freely through the intended drain path. In many homes, the repair is straightforward: remove the cap, clear the chamber, flush it, inspect the outlet hose, clean the disposal connection, and test the system.
If the overflow continues, look beyond the visible fitting. A clogged sink drain, forgotten disposal knockout plug, damaged hose, or dishwasher drain-pump problem may be responsible. Work safely, disconnect power before handling hoses or the disposal, and call a professional when the blockage is deep, recurrent, or difficult to access.
Note: Dishwasher plumbing layouts and code requirements vary. Follow the appliance and air-gap manufacturers’ instructions and all applicable local plumbing rules for your installation.