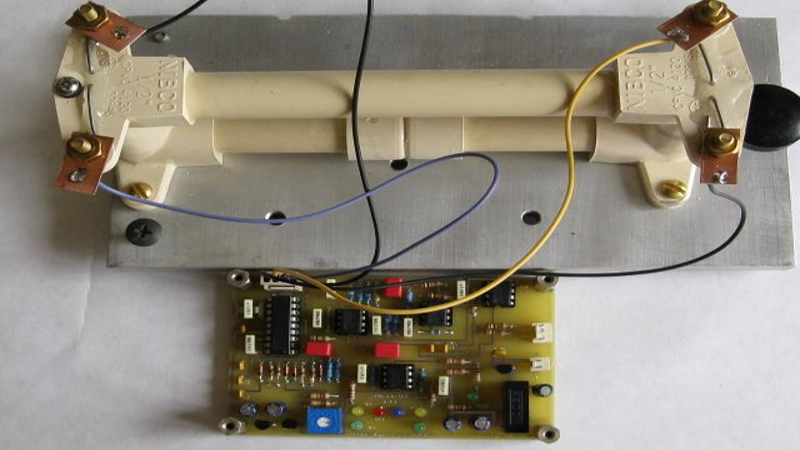
Some DIY projects begin with a dramatic question, like “Can I measure earthquakes from my garage?” Others begin with a less glamorous one: “Why do I own three PVC elbows, a bottle of epoxy, and an unreasonable amount of curiosity?” The good news is that both questions lead to the same place. With ordinary plumbing parts, basic electronics, patience, and a healthy respect for leaks, you can build a homemade seismometer capable of detecting tiny ground movements.
A seismometer is the sensing part of a seismograph system. It reacts to ground motion; the recorder turns that motion into readable data. Professional seismic stations use highly sensitive instruments installed in carefully chosen locations, often underground, where temperature changes, wind, and household noise are reduced. Your homemade version will not replace a national seismic network, but it can teach the same core principle: when the ground moves, something inside the instrument resists that movement, and the difference can be measured.
The fun twist here is that a seismometer does not have to look like a polished laboratory instrument. A clever design can use PVC pipe, end caps, couplings, liquid, electrodes, and a data logger to create a fluid-based motion sensor. It is part science project, part hardware-store treasure hunt, and part reminder that plumbing parts are secretly auditioning for jobs in geophysics.
What Is a Plumbing-Part Seismometer?
A plumbing-part seismometer is a DIY seismic sensor built around a sturdy pipe body, usually PVC, that holds a suspended mass, liquid, electrodes, or another motion-sensitive element. In one popular concept, the instrument works as a fluid mass electrolytic seismometer. Instead of relying only on a metal spring and magnet, it uses a conductive liquid as part of the sensing system. When the ground shifts, the liquid’s motion changes the electrical relationship between electrodes. That tiny change can be amplified, recorded, and viewed as a waveform.
The core idea is simple: earthquakes and other vibrations move the instrument’s frame. The internal mass or liquid does not move in exactly the same way at the same instant because inertia makes it lag behind. That relative motion is the useful signal. Whether the sensor uses a hanging weight, a coil and magnet, a spring, or electrolyte fluid, the big lesson remains the same: motion becomes measurable when one part of the system moves differently from another.
Why Use Plumbing Parts?
Plumbing parts are cheap, available, strong, and designed to seal. That makes them surprisingly useful for experimental instruments. PVC pipe is easy to cut, easy to drill, and rigid enough for a small seismometer body. End caps create a sealed chamber. Threaded fittings make maintenance easier. Rubber washers and grommets help isolate parts and reduce noise. If you have ever stood in a hardware aisle wondering whether a pipe fitting could become scientific equipment, congratulationsyou are thinking like a maker.
Another advantage is modularity. You can build a compact vertical sensor, a horizontal pendulum-style sensor, or a fluid-based chamber. You can change the length of the body, adjust the internal mass, test different liquids, or improve the electronics later. Plumbing parts invite experimentation without requiring a machine shop or a research grant large enough to make your wallet faint.
How a Homemade Seismometer Works
The Inertia Principle
Seismometers rely on inertia. Imagine holding a cup of water and suddenly moving your hand. The cup moves first, but the water sloshes because it resists the sudden motion. A seismometer uses that delay. The frame follows the ground, while the internal mass, spring, magnet, or liquid responds more slowly. Measuring the difference gives you a record of vibration.
The Fluid Sensor Concept
In a fluid mass electrolytic design, a sealed PVC chamber contains conductive liquid and electrodes. When vibration occurs, the fluid shifts slightly. The electrode readings change as the liquid moves, producing a small electrical signal. Because the signal is tiny, it usually needs amplification and filtering before a computer or microcontroller can display it clearly.
From Wiggle to Data
The sensor is only half the story. To make useful seismic data, you need a way to record the signal over time. A basic setup may use an Arduino-compatible board, an analog-to-digital converter, simple signal-conditioning electronics, and logging software. More advanced builders may use a Raspberry Pi, a low-noise amplifier, or open-source seismic visualization tools. The goal is to create a clean time-series graph: small wiggles for background noise, bigger spikes for footsteps or doors, and perhaps a long, rolling signal from a distant earthquake if your setup is sensitive and quiet enough.
Basic Parts You May Need
The exact parts depend on the design, but a plumbing-part seismometer usually includes the following categories:
- PVC pipe body: The main chamber or frame of the seismometer.
- PVC end caps and couplings: Used to seal the chamber and support internal components.
- Rubber washers or grommets: Helpful for sealing wire exits and reducing vibration noise.
- Electrodes: Stainless steel, graphite, or other corrosion-resistant conductors for fluid sensing.
- Conductive liquid: A mild electrolyte solution, handled carefully and sealed securely.
- Wire and connectors: For carrying the tiny sensor signal to the electronics.
- Amplifier circuit: Needed because seismic signals are usually very small.
- Microcontroller or data logger: Records the signal and sends it to a computer.
- Stable base: A heavy tile, concrete block, or rigid platform helps reduce false readings.
- Sealant: Epoxy or silicone can prevent leaks, but it must be used with ventilation and care.
For safety, keep the project low voltage, avoid harsh chemicals, and use adult supervision when cutting, drilling, soldering, or sealing parts. A seismometer should measure shaking, not create a family legend about “the time the science project leaked under the workbench.”
Build Overview: From Pipe to Earthquake Listener
1. Design the Sensor Body
Start with a section of PVC pipe long enough to create a stable chamber. The body should be rigid, sealed, and easy to mount. Shorter bodies are easier to handle, while longer bodies may give the internal fluid or mass more room to respond. Keep the design simple for your first version. A complicated first build has a special talent for becoming a decorative object.
2. Install Electrodes or the Motion-Sensing Element
For a fluid-based version, electrodes should be positioned carefully so small liquid movements can change the reading. They must not touch each other directly, and they should be secured so vibration does not loosen them. In a pendulum or spring-mass version, the moving element must swing freely without scraping the frame.
3. Seal the Chamber
Leak prevention matters. Use properly fitted end caps, rubber grommets, and sealant where wires exit the body. Test the chamber with plain water before adding any conductive solution. If it leaks with water, it will leak with scienceand science is much harder to explain to a carpet.
4. Connect the Electronics
The electrical signal from a homemade sensor is usually weak, noisy, or both. A simple amplifier can boost the signal, while filtering can reduce unwanted high-frequency noise. A microcontroller can read the voltage changes and send values to a computer. For cleaner results, keep wires short, use shielded cable if possible, and place the electronics away from power supplies, motors, and appliances.
5. Mount It Somewhere Quiet
Location is everything. A concrete floor on the lowest level of a building is better than a wobbly desk. Avoid washing machines, refrigerators, busy hallways, and windows that catch wind. Your seismometer is sensitive; it may consider a passing truck, a dropped backpack, or a dramatic cat landing to be breaking news.
6. Record Baseline Data
Before celebrating every spike as an earthquake, record normal background noise. Watch what the signal looks like during quiet hours, busy hours, rain, traffic, and household activity. Baseline data helps you separate real ground motion from ordinary local vibration.
Testing and Calibration
Testing a homemade seismometer is where the project becomes addictive. Begin with controlled movements. Tap the floor gently at a fixed distance. Walk past the instrument. Drop a small object nearby on a padded surface. Record how the signal changes. Do not use unsafe impacts, heavy drops, or anything that could damage the floor, the instrument, or your toes.
Calibration is more challenging because professional seismic measurement requires known reference signals. For a DIY instrument, your goal is not perfect magnitude measurement. Your goal is repeatability. If the same small tap produces a similar waveform each time, your sensor is behaving consistently. If the signal drifts wildly while nothing is happening, look for leaks, loose wires, temperature changes, or electronic noise.
You can also compare your recordings with public earthquake reports. When a large regional or distant earthquake occurs, check the time of the event and see whether your seismometer captured a long-period signal shortly afterward. A distant earthquake may appear as slow rolling waves rather than a sudden sharp spike. This is one of the best “aha” moments in amateur seismology: realizing your homemade pipe gadget may have noticed the planet ringing.
Common Problems and How to Fix Them
Too Much Noise
If the graph looks like a nervous porcupine, reduce local vibration. Move the instrument to a concrete floor, add mass to the base, shorten cables, and keep electronics away from motors and chargers. Noise can also come from poor grounding or loose connectors.
Signal Drift
Slow changes in the baseline may come from temperature shifts, liquid movement, electrode polarization, or unstable electronics. Let the instrument settle before recording serious data. A sealed, thermally stable location helps.
No Signal at All
Check the obvious first: power, wiring, electrode contact, data-logging settings, and whether the input range is correct. Many DIY electronics problems are not mysterious; they are simply one wire pretending to be connected.
Leaks
Leaks are the villain of fluid-based builds. Test the chamber before installing electronics. Use proper fittings, avoid over-tightening PVC, and let sealants cure fully. If the design cannot stay sealed, rebuild the chamber rather than trusting hope as a waterproofing strategy.
What Can a DIY Seismometer Detect?
A well-built homemade seismometer may detect footsteps, doors closing, nearby traffic, washing machines, construction, storms, and sometimes earthquakes. Detecting local noise is easy. Detecting distant seismic waves requires better isolation, a quiet site, stable electronics, and patience. The instrument’s sensitivity depends on its mechanical design, damping, electronics, installation, and environmental conditions.
Professional seismic stations are installed with great care because the Earth is not the only thing that shakes. Wind shakes buildings. Temperature changes move materials. Cars shake roads. People shake floors. Pets conduct unauthorized vibration experiments. Your DIY sensor lives in that noisy world, so interpretation matters as much as construction.
Why This Project Is Worth Building
Building a seismometer out of plumbing parts teaches physics in a way a textbook cannot. You learn about inertia, damping, signal amplification, noise, calibration, and data analysis. You also learn that Earth is constantly moving in ways humans rarely notice. Even when no earthquake is nearby, the ground carries vibrations from weather, machines, vehicles, and human activity.
The project also makes science feel accessible. A seismometer can sound like an exotic instrument locked behind university doors, but the basic principles can be explored with hardware-store parts. That does not make professional seismology simple; it makes the entry point approachable. A PVC pipe sensor will not compete with a broadband seismic station, but it can open the door to understanding how those stations work.
Practical Tips for Better Results
- Build rigidly: Flexible frames add unwanted motion.
- Seal carefully: Fluid sensors need dependable containment.
- Reduce electrical noise: Use short wires and stable power.
- Choose a quiet location: A basement slab is better than a desk.
- Record continuously: Long recordings reveal patterns short tests miss.
- Label events: Note footsteps, doors, storms, and appliance cycles.
- Compare with real earthquake times: Public seismic reports help validate unusual signals.
Experience Notes: Lessons From Building a Plumbing-Part Seismometer
The first experience most builders have with a plumbing-part seismometer is not a majestic earthquake recording. It is usually a leak test. This is humbling but useful. A DIY instrument that cannot hold liquid will not hold data quality either. The best approach is to assemble the PVC body dry first, check alignment, mark the electrode positions, and then test the chamber with plain water before bringing electronics anywhere near it. This small act of patience can save hours of cleanup and several dramatic sighs.
Another lesson is that stability matters more than appearance. A neat-looking seismometer sitting on a lightweight table will often produce worse results than an ugly one mounted on a heavy concrete paver. The sensor needs a firm connection to the ground. If the base rocks, flexes, or slides, the data becomes a biography of your furniture rather than a record of ground motion. A heavy base, rubber feet used thoughtfully, and a low center of gravity can improve the signal dramatically.
Electronics also teach patience. The first graph may look chaotic, and that does not mean the build failed. It means the instrument is hearing everything. Footsteps look huge. A door closing can create a sharp pulse. A washing machine may produce repeating patterns. Even a phone vibrating nearby can show up if the sensor is sensitive enough. Instead of being disappointed, treat these signals as practice. They help you learn the personality of your instrument.
Temperature is another sneaky character. A fluid-based sensor can drift as the room warms or cools. The PVC body, liquid, and electrodes may all respond slightly to temperature changes. For better recordings, place the instrument where sunlight, air-conditioning vents, and heaters will not constantly disturb it. Let it settle before judging its performance. A quiet night recording is often cleaner than a daytime test in a busy room.
Documentation is the difference between tinkering and learning. Keep a small log of changes: liquid concentration, electrode spacing, amplifier settings, mounting location, and major household events. When a strange signal appears, your notes will help you decide whether you captured a distant earthquake or simply discovered that someone slammed the garage door at 9:14 p.m. The log does not need to be fancy. A spreadsheet or notebook is enough.
The most satisfying moment is when the seismometer becomes less of a gadget and more of a listener. You begin to notice daily rhythms: morning footsteps, afternoon traffic, evening appliance cycles, quieter hours after midnight. Then, when a larger regional earthquake occurs, you have enough baseline knowledge to recognize that the waveform is different. That is when the project becomes magical. A few plumbing parts, some wires, and a sealed chamber suddenly feel connected to the moving Earth beneath your feet.
Finally, expect revisions. The first version is rarely the final version. You may rebuild the chamber, improve the seal, change the electrode material, add better filtering, or move the instrument three times before finding a good location. That is normal. Homemade seismology rewards small improvements. Each adjustment teaches you something about physics, electronics, materials, and the wonderfully inconvenient fact that the world is always vibrating.
Conclusion
Building a seismometer out of plumbing parts is one of those rare DIY projects that turns ordinary materials into a window on planetary motion. PVC pipe becomes a sensor body. Conductive liquid becomes part of a measuring system. Tiny voltage changes become waveforms. And a quiet corner of your home becomes a miniature seismic station, complete with mystery spikes, background noise, and the occasional reminder that Earth is not as still as it looks.
This project is not about replacing professional instruments. It is about understanding the principles behind them. A homemade seismometer teaches inertia, damping, signal processing, calibration, and environmental noise in a hands-on way. It also gives makers, students, and curious adults a reason to look at plumbing parts with suspicious scientific optimism. Build carefully, test patiently, record consistently, and you may discover that the ground has been telling stories all along.
Note: This article is intended for educational DIY use. Use low-voltage electronics, avoid harsh chemicals, ventilate when using sealants, and get adult supervision for cutting, drilling, soldering, or testing sealed fluid chambers.