Note: This article is written as original web-ready content and synthesized from real DIY, upcycling, holiday decorating, sustainability, and home-safety guidance.
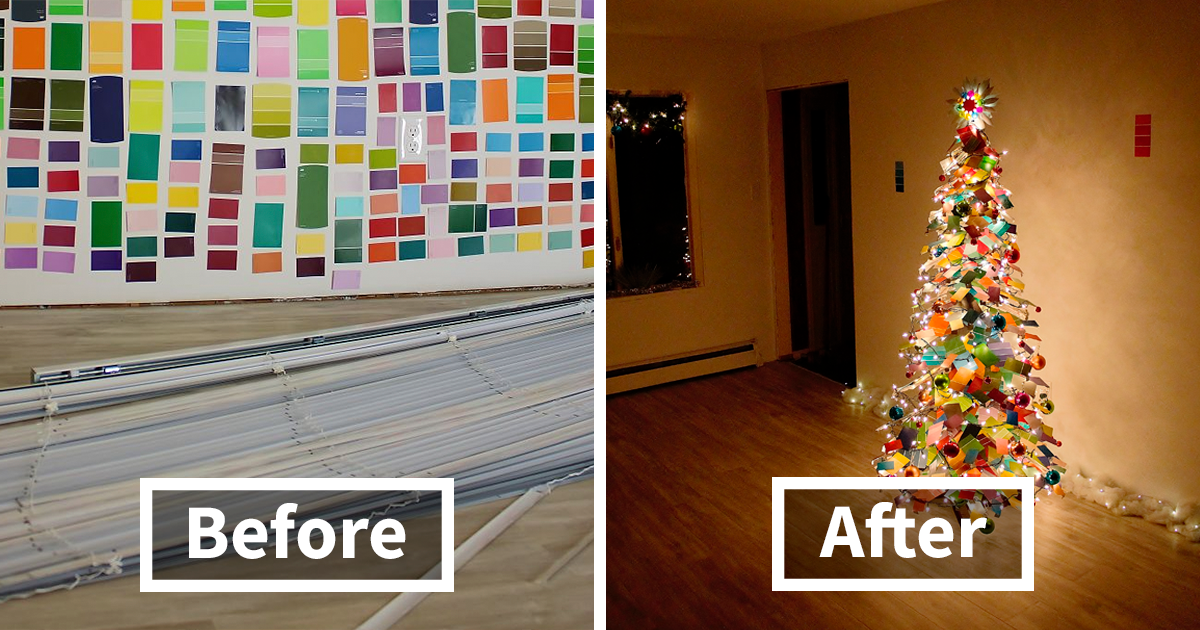
Some Christmas trees arrive in a box. Some arrive tied to the roof of a car, shedding needles like a nervous porcupine. Ours arrived in the form of a stack of paint samples, a pile of old blinds, and one dangerous sentence: “How hard could it be?”
That sentence, as every DIY enthusiast knows, is the official ribbon-cutting ceremony for chaos. But this time, the chaos had a surprisingly stylish ending. We made an unconventional Christmas tree from paint samples and old window blinds, and it turned out to be colorful, lightweight, budget-friendly, renter-friendly, and just strange enough to make guests stop mid-sentence and say, “Wait… is that made from blinds?”
Yes. Yes, it is. And we are weirdly proud of it.
This project is part holiday craft, part upcycling experiment, part interior design therapy. It works beautifully for small apartments, dorm rooms, offices, craft rooms, kids’ spaces, and anyone who wants festive decor without wrestling a seven-foot evergreen through a doorway. It is also a clever way to reuse materials that would otherwise sit in a garage until the year 2047.
Why Make an Unconventional Christmas Tree?
A traditional Christmas tree is wonderful, but it is not always practical. Real trees require space, water, cleanup, and the emotional strength to vacuum pine needles from places pine needles have no business being. Artificial trees are reusable, but they can be bulky, expensive, and awkward to store. An alternative Christmas tree gives you the holiday feeling without demanding half your living room as tribute.
That is where a DIY Christmas tree made from repurposed materials shines. Paint samples bring instant color. Old blinds provide structure. Together, they create a wall-mounted or freestanding holiday decoration that looks playful, modern, and surprisingly intentional. The best part is that the materials are flat, easy to cut, and forgiving. If you make a crooked cut, congratulationsyou have created “handmade charm.”
The Design Idea: A Colorful Tree With a Secondhand Soul
The concept is simple: use old blind slats as horizontal branches and layer paint samples over them like colorful pine needles, ornaments, or scales. Arrange the slats from longest at the bottom to shortest at the top, creating a classic triangle silhouette. Then attach paint chips in a gradient, rainbow, monochrome palette, or traditional Christmas mix of greens, reds, creams, and metallic accents.
Think of it as a Christmas tree that got a design degree and then moved into a studio apartment.
We chose an ombré look, starting with deep forest greens at the bottom, moving into sage, mint, icy blue, blush, and warm white near the top. The result felt festive but not overly traditional. It had the spirit of a tree without pretending to be one. No needles. No trunk. No squirrel hiding in the branches. A win on all fronts.
Materials You Will Need
You do not need a professional workshop to make this unconventional Christmas tree. You need patience, a clear surface, and the willingness to admit that hot glue is both a tool and a lifestyle.
Basic Supplies
- Old vinyl, faux wood, or lightweight blind slats
- Paint samples or paint chips in your chosen color palette
- Scissors or a craft knife
- Hot glue gun or strong craft glue
- Ruler or measuring tape
- Pencil
- Twine, ribbon, fishing line, or removable wall hooks
- Cardboard, foam board, or thin wood backing if making a mounted version
- Optional: LED fairy lights, paper star, mini ornaments, ribbon, beads, or bells
A Quick Word About Paint Samples
Paint samples are excellent for crafts because they already come in coordinated shades. However, use them thoughtfully. If you already have leftover paint chips from a past project, this is the perfect way to keep them out of the junk drawer. If you collect new ones, take only what you need. The goal is creative reuse, not raiding the paint aisle like a raccoon in a hardware-store hoodie.
Step 1: Clean and Prep the Old Blinds
Old blinds are useful, but they can also be dusty enough to qualify as archaeological artifacts. Before crafting, wipe each slat with a damp microfiber cloth. For vinyl or faux wood blinds, mild soap and water usually work well. Let everything dry fully before gluing anything. Glue and damp dust are not friends; they are coworkers who avoid each other in the break room.
Inspect the slats for cracks, bends, or sharp edges. Discard broken pieces or trim them down. If the blinds have cords, remove them carefully and keep them away from children and pets. The slats should be clean, dry, flat, and easy to handle.
Step 2: Decide on the Tree Size
Before cutting, decide where the tree will live. A wall-mounted tree above a console table can be tall and dramatic. A tabletop version should be smaller and lighter. A door decoration needs to be slim enough not to smack visitors in the face, which is generally considered poor holiday hospitality.
For a medium wall tree, start with a bottom slat around 28 to 36 inches wide. Reduce each slat by two to four inches as you move upward. You might use eight to twelve slats total, depending on how full you want the tree to look.
Example Measurements
- Bottom row: 34 inches
- Second row: 30 inches
- Third row: 26 inches
- Fourth row: 22 inches
- Fifth row: 18 inches
- Sixth row: 14 inches
- Seventh row: 10 inches
- Top row: 6 inches
These measurements are flexible. The tree does not have to be mathematically perfect. In fact, a slightly imperfect shape often looks more handmade and charming.
Step 3: Choose a Color Palette
The paint samples are the personality of this project, so choose your palette before you glue. A traditional palette might include evergreen, cranberry, ivory, gold, and chocolate brown. A modern palette might use dusty rose, clay, cream, sage, and champagne. A playful family version might be full rainbow, because sometimes December needs more drama than red and green can provide.
For a polished look, sort your paint samples from darkest to lightest. Ombré designs are especially effective because the natural gradient helps the eye read the shape as a tree. Darker colors at the bottom create weight, while lighter colors at the top make the tree feel airy.
Color Palette Ideas
- Classic Christmas: pine green, holly red, cream, gold, walnut
- Winter Frost: icy blue, soft gray, white, silver, navy
- Retro Holiday: avocado, coral, mustard, teal, warm pink
- Minimalist: white, beige, mushroom, taupe, charcoal
- Candy Shop: mint, pink, cherry red, vanilla, cocoa
Step 4: Cut the Paint Samples
Now comes the strangely satisfying part. Cut the paint samples into small rectangles, triangles, half-circles, feather shapes, or fringe strips. We cut ours into narrow tapered pieces so they looked like abstract pine needles. Some were long, some were short, and some looked like they had been cut during an earthquake. Once layered together, they all behaved.
If you want a clean modern tree, use uniform shapes. If you want a handmade, whimsical tree, vary the sizes. For kids, rounded pieces are easier and safer than sharp points. For a more dimensional look, gently curl the ends of the paint pieces with a pencil before gluing.
Step 5: Attach the Paint Samples to the Blind Slats
Lay one blind slat flat and begin attaching paint sample pieces along the front edge. Overlap them slightly, like shingles on a roof. This creates fullness and hides the blind underneath. Work from one end to the other, keeping the colors consistent with your plan.
A hot glue gun works quickly, but craft glue gives you more adjustment time. If children are helping, use glue dots or school glue and accept that the drying process will become part of your holiday journey. Not every craft needs to be fast. Some crafts build character. Others build fingerprints in glue.
Repeat the process for each slat. When all the slats are covered, lay them out in tree formation and adjust the spacing. This is the moment when the pile of scraps starts looking like an actual Christmas tree instead of evidence from a very festive crime scene.
Step 6: Build the Tree Shape
There are two main ways to assemble the tree: wall-mounted or backed.
Option 1: Wall-Mounted Tree
For a wall-mounted tree, attach each slat directly to the wall using removable hooks, adhesive strips, or small nails if your wall allows it. Start with the longest slat at the bottom and work upward. Use a ruler or painter’s tape guideline to keep the center aligned.
This version is ideal for renters or small spaces. It takes up almost no floor space and can be installed above a table, desk, mantel, or even in a hallway. Add lightweight LED fairy lights around the outline for extra sparkle.
Option 2: Backed Tree
For a portable version, glue or tape the slats onto foam board, cardboard, or thin plywood. This makes the tree easier to move and store. Cut the backing into a triangle or leave it rectangular for a framed-art look. If the backing shows, paint it white, black, or a coordinating color.
The backed version is sturdier and better for homes with kids, pets, or enthusiastic relatives who gesture wildly while telling stories.
Step 7: Add Lights and Decorations
Because paint samples and blinds are lightweight materials, keep decorations simple. Battery-operated LED fairy lights are a smart choice because they stay cool, use less energy than traditional incandescent lights, and are easy to control. Avoid heavy ornaments, open flames, or anything that could pull the slats loose.
We added a paper star at the top, a few tiny bells, and a thin ribbon garland made from leftover gift wrap ribbon. The goal was sparkle, not a craft avalanche. The finished tree looked cheerful, graphic, and modernlike a Christmas card decided to become furniture.
Safety Tips for a DIY Christmas Tree
Even unconventional Christmas decor needs common sense. Keep the tree away from candles, heaters, fireplaces, and stovetops. Use only indoor-rated lights indoors, inspect light strings before using them, and turn lights off before leaving the house or going to bed. If your DIY tree is made from paper, paint chips, cardboard, or plastic blinds, treat it as decorative, not structural.
Do not overload outlets. Do not staple through wires. Do not use damaged cords. And please, do not attach real candles to your paint sample tree unless your holiday theme is “insurance claim chic.”
Why This Project Works So Well
The reason this DIY paint sample Christmas tree works is balance. The blind slats create structure, while the paint samples bring color and texture. The familiar triangular shape gives the eye an instant holiday signal, even though the materials are unexpected. It is just recognizable enough to be festive and just weird enough to be memorable.
It also fits several popular decorating ideas at once: low-waste crafting, small-space holiday decor, personalized color palettes, handmade ornaments, and budget-friendly Christmas decorating. Instead of buying a new decoration, you create something that reflects your home, your colors, and your sense of humor.
Budget Breakdown
If you already have old blinds and leftover paint samples, this project can cost almost nothing. The main expenses are glue, removable hooks, and optional lights. Even if you buy a foam board backing and a fresh pack of glue sticks, the total cost is usually far less than a traditional tree or store-bought wall decoration.
It is also easy to customize based on what you have. No paint samples? Use scrapbook paper, old holiday cards, magazine pages, wallpaper scraps, or fabric remnants. No blinds? Use cardboard strips, yardsticks, dowels, rulers, or thin scrap wood. The idea is flexible: build a tree shape from horizontal supports and layer colorful pieces over the top.
Kid-Friendly and Family-Friendly Variations
This project can be adapted for kids by pre-cutting the blind slats and letting children arrange the paint chips. They can sort colors, create patterns, add stickers, draw tiny ornaments, or write holiday wishes on the back of each piece. The finished tree becomes part decoration, part family memory board.
For classrooms, use paper strips instead of actual blind slats. For offices, ask everyone to contribute one paint sample with a written wish for the new year. For a party, set up a “decorate a branch” station and let guests create sections of the tree. The final result may not be elegant, but it will have personality. Sometimes personality beats symmetry, especially after cookies.
Where to Display Your Unconventional Christmas Tree
A paint sample and blind slat Christmas tree works best where people can see the colors up close. Hang it above an entry table, beside a bookshelf, in a breakfast nook, over a craft desk, or on a blank wall that needs seasonal cheer. It also makes a fun background for holiday photos, especially if you choose bold colors.
For a minimalist home, use neutral paint chips and clean spacing. For a maximalist home, layer colors, lights, tassels, and tiny ornaments until the tree looks like it has strong opinions. For a rental, use removable hooks and keep the whole thing lightweight. When the season ends, detach the slats, stack them flat, and store them in an envelope or shallow box.
Common Mistakes to Avoid
The first mistake is making the tree too heavy. Blind slats are lightweight, but too much glue, thick backing, and heavy ornaments can turn a wall tree into a slow-motion holiday landslide. Keep it light.
The second mistake is skipping the layout stage. Always arrange the slats and paint samples before gluing everything permanently. A five-minute preview can save you from a tree that accidentally leans like it heard bad news.
The third mistake is using too many unrelated colors. Eclectic is good. Random can be rough. If you want a rainbow tree, organize the rainbow intentionally. If you want a cozy tree, stay within warm tones. If you want a winter tree, use cool shades and metallic accents. The more unusual the material, the more helpful a clear palette becomes.
Extra Experience: What We Learned While Making This Paint Sample and Old Blinds Christmas Tree
Making this unconventional Christmas tree taught us that DIY projects have two timelines: the timeline you imagine and the timeline that actually happens after you spend twenty minutes looking for the scissors you were holding five minutes ago. We thought the project would be quick. It was not difficult, but it did ask for patience, especially during the color-sorting stage.
The first big lesson was that old blinds are more useful than they look. At first, the slats seemed flimsy and uninspiring. Once cut into graduated lengths, however, they became the perfect skeleton for the tree. They were flexible enough to handle easily but rigid enough to hold a straight line. The slight curve in each slat even added dimension, making the finished tree look less flat.
The second lesson was that paint samples are tiny mood-makers. A single paint chip does not look like much. A hundred paint chips arranged in a thoughtful gradient can completely change the feeling of a room. We started with traditional greens, then added pale blue and blush because the tree needed a little mischief. That choice made the whole piece feel more modern and personal.
The third lesson was that perfection is overrated. Some pieces were cut unevenly. Some glue dots were visible. One slat had a tiny bend in it, probably from its previous life of blocking afternoon sun. But once everything came together, those imperfections gave the tree character. Store-bought decor can be beautiful, but handmade decor has a story. This tree’s story was, “We used what we had, made a mess, and somehow created something charming.”
We also learned that lightweight decorations are essential. At one point, we tried adding miniature ornaments. They looked cute for about three seconds, then pulled one slat forward like it was trying to escape. We switched to paper circles, ribbon scraps, and LED fairy lights. Much better. The tree looked festive without needing structural engineering.
Another pleasant surprise was how easy it was to store. A regular artificial tree needs a box, a closet, and a brief wrestling match. This DIY tree came apart in flat sections. We stacked the slats, wrapped the lights, tucked the paper star into an envelope, and slid everything behind a shelf. It was the least dramatic post-Christmas cleanup we have ever experienced.
Guests loved it too. People asked questions, touched the slats, guessed the materials, and immediately started suggesting other versions. One person wanted a monochrome white version. Another wanted a rainbow tree for a classroom. Someone else suggested using old holiday cards instead of paint samples, which is genuinely brilliant and mildly annoying because we wish we had thought of it first.
The biggest experience-based tip is to make the tree reflect your actual home. Do not copy a color palette just because it is trendy. If your home is full of warm woods and cozy neutrals, make a soft beige, green, and gold version. If your home is colorful, go bold. If your holiday style is nostalgic, add handwritten labels, old cards, and family photos. The beauty of this project is that it does not have one “correct” look.
Would we make it again? Absolutely. Next time, we might create a larger version with wider spacing and a wooden frame. Or we might make three small trees in different palettes and hang them as a set. That is the problem with successful DIY projects: they do not end. They multiply quietly in your brain until you are saving cereal boxes “just in case.”
In the end, our unconventional Christmas tree became more than a decoration. It became a reminder that holiday magic does not have to come from expensive materials. Sometimes it comes from leftovers, experiments, and the willingness to look at old blinds and say, “You, my dusty friend, are about to become festive.”
Conclusion
Making an unconventional Christmas tree from paint samples and old blinds is a creative, budget-friendly, and space-saving way to decorate for the holidays. It transforms ordinary leftover materials into something colorful and personal, while giving your home a festive focal point that guests will actually remember.
This project is easy to customize, simple to store, and perfect for anyone who enjoys upcycled Christmas decor with a sense of humor. Whether you choose a classic green palette, a frosty winter ombré, or a full rainbow masterpiece, the result proves that Christmas style does not have to come from a store shelf. Sometimes it comes from the junk drawer, the garage, and one brave afternoon with a glue gun.