Lighted wedding tulle is one of those decorations that looks wildly expensive but can be surprisingly friendly to a DIY budget. With a few yards of airy fabric, a strand of warm fairy lights, and the correct clips, a plain folding table can suddenly look like it belongs in a romantic garden reception instead of the church basement storage closet.
The trick is not just wrapping lights in tulle and hoping for the best. Wedding tables are touched, bumped, photographed, moved around, leaned on by guests hunting for cake, and occasionally attacked by toddlers with frosting fingers. So the goal is to connect lighted wedding tulle to tables in a way that looks soft and magical but stays secure, safe, and neat from the first toast to the last slice of dessert.
This guide walks you through the best ways to attach tulle with lights to reception tables, sweetheart tables, head tables, cake tables, gift tables, buffet tables, and entry displays. You will learn what supplies to use, how to hide cords and battery packs, how to create elegant swags, and how to avoid the classic DIY wedding décor disaster: one sad corner drooping like it just heard the final catering bill.
What Is Lighted Wedding Tulle?
Lighted wedding tulle is a decorative combination of sheer tulle fabric and small LED lights, usually fairy lights, mini string lights, or curtain-style lights. Tulle is a lightweight net-like fabric often used for veils, skirts, chair bows, backdrops, pew décor, and table accents. When paired with warm white lights, it creates a soft glowing effect that feels romantic without being too flashy.
For wedding tables, lighted tulle is usually used in three main ways: as a front table swag, as a full table skirt, or as a glowing runner layered over a tablecloth. The most popular look is a gathered or draped tulle swag attached along the front edge of the table, with lights tucked inside the folds. It is especially pretty on sweetheart tables and cake tables because those areas are heavily photographed.
Best Tables for Lighted Wedding Tulle
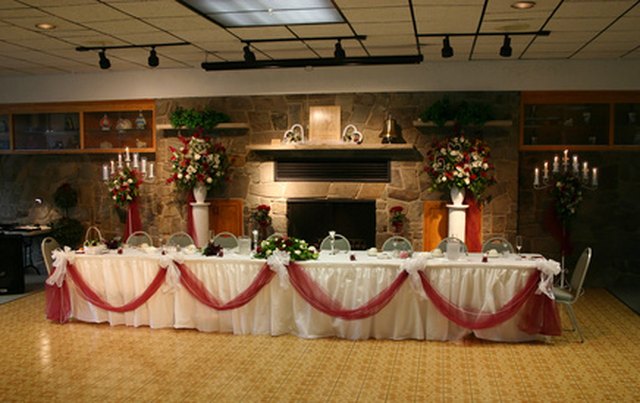
You can use lighted wedding tulle on almost any table, but some tables benefit more than others. The sweetheart table is the star of the show, so a glowing tulle skirt gives it a romantic focal point. A head table can use longer tulle swags to frame the wedding party. A cake table looks beautiful with soft lighting underneath the table edge, especially if the reception lighting is dim.
Gift tables, memory tables, guest book tables, escort card tables, dessert stations, and buffet tables can also be dressed with tulle. For buffet tables, keep the tulle attached to the front and sides only, away from food warmers, serving utensils, and traffic paths. Nobody wants the mashed potatoes wearing a veil.
Supplies You Need
Basic Materials
Before you start, gather everything in one place. Wedding setup time moves quickly, and searching for one missing clip while the florist, DJ, and aunt-with-opinions circle the room is not the peaceful bridal fantasy anyone ordered.
- Tulle rolls or pre-made tulle table skirts
- Battery-operated LED fairy lights or low-heat string lights
- Clear table skirt clips or hook-and-loop table clips
- Removable adhesive hooks or clear mini clips
- Safety pins, floral wire, or zip ties for hidden securing
- Scissors
- Measuring tape
- Extra batteries
- Clear tape or painter’s tape for battery packs
- Extension cords only if using plug-in lights
Best Lights to Use
Battery-operated LED fairy lights are usually the easiest choice for lighted wedding tulle on tables. They do not require a nearby outlet, they are simple to hide, and they reduce the cord jungle that can appear under a reception table. Warm white lights are the safest design choice because they flatter flowers, linens, food, and human faces. Cool white lights can look crisp and icy, while colored lights work best for themed weddings or after-party areas.
Choose LED lights because they stay cooler than older incandescent mini lights and are more energy efficient. For a professional-looking table, use lights with thin copper or silver wire rather than bulky green holiday cords. Green cords have a way of announcing, “I escaped from a Christmas tree,” which may not be the message your blush-and-ivory wedding palette was going for.
Measure Before You Attach Anything
Measure the width of the table front, the sides you plan to cover, and the drop from tabletop to floor. Standard banquet tables are often 6 or 8 feet long, but wedding venues may use different sizes. Do not guess. Tulle is forgiving, but math is less emotional than a bride realizing the table skirt stops halfway across the cake table.
For a simple front swag, plan for at least two to three times the table width in tulle. This gives you enough fabric for soft gathers instead of a stretched, flat look. For example, an 8-foot table needs about 16 to 24 feet of tulle for an attractive gathered front. If you want dramatic swoops, add extra length.
For lights, one 6- to 10-foot fairy light strand may work for a small cake table. A long head table may require several strands. Always test the lights before installation, and bring spare batteries. Wedding lights enjoy waiting until the exact moment of setup to reveal their personal problems.
Method 1: Attach Lighted Tulle with Table Skirt Clips
Table skirt clips are the cleanest and most reliable way to connect lighted wedding tulle to tables. They slide over the edge of the table and provide a place to attach fabric. Many clips include hook-and-loop strips, which work well with pre-made table skirts or fabric that has matching fastener tape sewn or attached to it.
Step-by-Step Instructions
- Cover the table with a base tablecloth first. Let it hang evenly on all sides.
- Place clear table skirt clips along the front edge of the table, spacing them about 10 to 12 inches apart.
- Attach your tulle to the clips, gathering the fabric as you go.
- Weave battery-operated fairy lights loosely through the folds of tulle.
- Secure the light wire to the back side of the tulle with small safety pins, floral wire, or clear clips.
- Hide the battery pack behind the tablecloth, under the tabletop, or behind a floral arrangement.
- Fluff the tulle until the lights are softly diffused.
This method is excellent for sweetheart tables, cake tables, DJ tables, and vendor tables because it gives the decoration a finished edge. The clips keep the fabric from sliding down, while the tablecloth hides the mechanics. It is basically wedding décor with a tiny backstage crew.
Method 2: Use Adhesive Hooks for a Draped Swag
If you do not have table skirt clips, removable adhesive hooks can create beautiful tulle swags. This works best on tables with smooth edges or when the tablecloth is already secured. Use small clear hooks and attach them just under the tabletop edge, where they will not be visible from guest eye level.
How to Make Tulle Swags
Start by placing hooks at the two outside corners and one or more points across the center front of the table. Gather the tulle at the first hook, let it dip gracefully, then gather it again at the next hook. Repeat until the front of the table has soft scalloped swags. Add lights by weaving them through the top folds, then let some lights settle into the lower curves of the tulle.
The secret is balance. If one swag hangs dramatically lower than the others, it may look less “romantic ballroom” and more “laundry trying to escape.” Step back often and adjust the folds before securing everything tightly.
Method 3: Pin the Tulle to a Tablecloth
For a quick and budget-friendly option, you can attach lighted tulle directly to a fabric tablecloth with safety pins. This is best for indoor receptions, low-traffic display tables, and lightweight tulle designs.
Use small safety pins on the back side of the tablecloth so they do not show. Pin through a gathered section of tulle and then through the tablecloth. Avoid pinning through light wires. The lights should be supported by the tulle folds or attached separately with twist ties or floral wire. Pins and wires are not best friends; keep them separated like relatives with different seating chart opinions.
This method is fast, but it is not as strong as table skirt clips. If guests will be sitting at the table, leaning near it, or moving around it often, clips are a better choice.
Method 4: Wrap Tulle Around a Table Runner
For a softer tabletop look, place a fabric runner down the center of the table and layer tulle and fairy lights over it. This method is ideal for guest tables, long banquet tables, or romantic dinner-style receptions. Use battery-operated lights and hide the battery pack under greenery, inside a lantern, behind a centerpiece, or under the table edge.
Keep the lights low and gentle. The goal is a warm glow, not an airport runway guiding guests toward the salad fork. Avoid placing lights where plates, glasses, or serving dishes will sit. Leave enough clear space for dining comfort.
How to Hide Battery Packs and Cords
Battery packs are the tiny villains of lighted wedding décor. They are necessary, but they do not exactly scream elegance. Fortunately, they are easy to disguise with a little planning.
For table skirts and swags, tape the battery pack to the underside of the table near the edge, making sure the on/off switch remains accessible. You can also tuck it behind the tablecloth, inside a small fabric pouch, behind flowers, or inside a decorative box. On cake tables or guest book tables, hide the pack behind a framed sign, lantern, vase, or basket.
If you use plug-in lights, route cords down the back or side of the table, never across walkways. Secure cords with cord covers or tape approved for floors if they must run near traffic areas. Do not hide extension cords under rugs or heavy fabric where heat can build up or guests can trip. Pretty is important; not launching Grandma into the dessert bar is more important.
Safety Tips for Lighted Wedding Tulle
Wedding tulle is fabric, and lights are electrical products, so safety matters. Use lights that are listed by a recognized safety testing organization such as UL, ETL, or CSA. Inspect every strand before the wedding for frayed wires, cracked sockets, exposed wire, loose connections, or broken bulbs. If a strand looks damaged, do not use it.
LED lights are preferred because they produce less heat than traditional bulbs. Avoid placing tulle near candles, open flames, sparklers, heaters, chafing dishes, or food warmers. If you want candles on the same table, choose flameless LED candles. They still look romantic, and they do not try to turn your centerpiece into a campfire.
Do not attach lights with staples, nails, or anything sharp that can puncture wire insulation. Use clips, soft twist ties, floral wire wrapped gently, or hook-and-loop fasteners. If using outdoor tables, choose lights and extension cords rated for outdoor use and protect connections from moisture.
Design Ideas for Different Wedding Tables
Sweetheart Table
For a sweetheart table, use full, layered tulle in ivory, white, champagne, blush, or a color that matches the wedding palette. Attach the tulle with table skirt clips across the front and sides. Add warm fairy lights inside the top layer, then finish the corners with flowers, greenery, bows, or small arrangements. This creates a glowing frame around the couple without distracting from their faces in photos.
Cake Table
A cake table should feel special but not cluttered. Attach lighted tulle around the front only, leaving the tabletop clean for the cake stand, serving set, flowers, and signage. Use soft lights rather than bright bulbs so the cake remains the star. If the cake has metallic details, pearls, sugar flowers, or textured frosting, warm lighting can make those details sparkle beautifully.
Head Table
For a long head table, repeat tulle swags in equal sections. Place clips at consistent intervals and use matching light strands in each swag. To avoid uneven brightness, use the same brand and color temperature of lights across the entire table. Mixing warm white, cool white, and mystery-white from the bottom of a craft bin can look chaotic in photos.
Guest Book or Welcome Table
A welcome table needs to be beautiful and practical. Use a short tulle swag with a single light strand, then hide the battery pack behind a guest book sign, card box, or floral arrangement. Keep the writing surface clear so guests can sign comfortably. A glowing table is charming; making guests sign the book on top of a lumpy battery pack is less charming.
Buffet or Dessert Table
For buffet tables, attach tulle only to the front and possibly the short sides. Keep all fabric and lights away from hot food equipment, serving flames, and high-touch areas. Use clips instead of pins because buffet tables get bumped often. If the caterer needs access to under-table storage, ask before covering the entire front with elaborate tulle.
Color and Style Combinations That Work
White tulle with warm white lights is classic and works with nearly every wedding style. Ivory tulle feels softer and warmer, especially in rustic barns, garden venues, and candlelit receptions. Blush tulle adds romance without overpowering the table. Champagne or gold-toned tulle pairs beautifully with metallic accents and evening weddings.
For a winter wedding, layer white tulle with cool white lights and silver accents. For a boho wedding, combine ivory tulle with greenery and warm micro lights. For a glam wedding, use fuller layers of tulle, pearl accents, crystal clips, and a dense line of fairy lights. For a beach wedding, use airy white tulle with subtle lights and avoid heavy swags that might fight the breeze.
Common Mistakes to Avoid
The first common mistake is using too little tulle. Thin, stretched tulle does not diffuse lights well and can look unfinished. Use enough fabric to create fullness. The second mistake is placing lights too close together in one area, which creates bright clumps instead of an even glow. Spread the lights loosely through the fabric folds.
Another mistake is forgetting access to the battery switch. Always test where the battery pack will sit and make sure someone can reach it before the reception begins. Also avoid attaching décor in a way that prevents venue staff from moving tables, changing linens, or serving food.
Finally, do not wait until the wedding day to test your design. Create a sample at home using a folding table, a tablecloth, tulle, clips, and lights. Take a photo in daylight and in dim lighting. The camera will reveal uneven spots your eyes may miss. Cameras are rude that way, but useful.
Quick Setup Timeline
One month before the wedding, choose your tulle color, light style, and attachment method. Two weeks before, measure all tables and buy extra clips, batteries, and tulle. One week before, test every light strand and label each one for its table. The day before or morning of the wedding, install tablecloths first, then clips, then tulle, then lights. Turn lights on only after everything is attached and the room lighting is set.
If someone else is decorating for you, prepare each table’s materials in a labeled bag. Include a simple photo or sketch of the desired look. This saves time and prevents your helpers from inventing a bold new design called “confused glowing spaghetti.”
Extra Experience-Based Tips for Connecting Lighted Wedding Tulle to Tables
After working with wedding-style table décor, one lesson becomes obvious very quickly: the best lighted tulle designs are the ones that look effortless but are secretly very organized. The finished table should look like a soft cloud of romance, not like someone wrestled a craft store and the craft store won.
Start with the tablecloth. A clean, well-fitted base linen makes everything easier. If the tablecloth is crooked, wrinkled, or too short, the tulle will not magically fix it. Tulle is pretty, but it is not a licensed structural engineer. Steam or press the tablecloth if needed, then secure it before adding any decorative layers.
When creating swags, use odd numbers of dips when possible. Three or five swags often look more natural than two or four, especially on a sweetheart table or cake table. The center swag can hang slightly lower than the side swags for a graceful focal point. For a long head table, keep the swags uniform so the table looks polished in wide-angle photos.
Layering is another helpful trick. One layer of tulle can look too transparent, especially over dark tablecloths or metal table legs. Two or three layers create a softer glow and hide clips, wires, and table hardware. If you are using a darker wedding color, layer colored tulle over white or ivory tulle to keep the lights visible. Lights can disappear inside very dark fabric unless they are placed near the front layer.
Do not pull the light strand tight. A tight wire creates straight lines, and straight lines can fight the soft shape of tulle. Let the lights meander gently through the folds. Think “fireflies in a garden,” not “electrical diagram.” If the strand is too long, double it back loosely rather than wrapping it into a bright knot.
Battery life deserves more attention than most people give it. Many fairy lights last several hours, but battery quality, light mode, and strand length all matter. Use fresh batteries for the actual event, not the same ones from your living room test run. If the lights have multiple settings, choose steady-on or slow glow instead of fast flashing. A wedding table should not look like it is trying to signal aircraft.
Assign one person to turn on the lights before guests enter the reception space. This can be a planner, venue coordinator, bridesmaid, groomsman, sibling, or trusted friend. Give that person a list of tables and show them where the switches are hidden. Hidden battery packs are great for photos, but not great if nobody can find them until dessert.
For outdoor weddings, wind is the sneaky enemy. Even a light breeze can lift tulle, twist swags, and expose wires. Use more clips than you think you need, especially at corners. Clear clips, discreet zip ties, and small weights hidden behind the tablecloth can help. Avoid long loose tails of tulle near walkways because they can catch on shoes, chair legs, or passing servers.
Another experience-based tip: photograph the decorated table from guest height, not just standing height. Sit in a chair and look at the table from the angle guests will actually see. This helps you spot visible battery packs, dangling wires, uneven clips, and awkward gaps. It also helps you decide whether the glow is strong enough once the room lights are dimmed.
If the venue has strict rules, ask about them early. Some venues prohibit tape on tables, open flames, extension cords across floors, or décor attached to certain surfaces. Knowing the rules ahead of time keeps setup smooth and prevents last-minute panic. Nothing ruins a dreamy decorating plan like a venue manager saying, “Absolutely not,” while holding a clipboard.
Finally, keep the design comfortable. Guests need legroom. Servers need access. The couple needs to sit, stand, hug relatives, and move around without dragging a glowing tulle train behind them. Beautiful wedding décor should support the celebration, not trap people in a decorative net. When in doubt, secure the tulle higher, keep cords hidden, and leave more open space than you think you need.
Conclusion
Connecting lighted wedding tulle to tables is a simple DIY project that can make a reception feel warm, romantic, and thoughtfully styled. The best method is to use table skirt clips or hook-and-loop clips over a base tablecloth, then layer gathered tulle and LED fairy lights for a soft glow. Adhesive hooks, safety pins, and runner-style arrangements can also work when used carefully.
The key is planning: measure your tables, choose low-heat LED lights, test every strand, hide battery packs, and secure the fabric so it stays beautiful all night. Whether you are decorating a sweetheart table, cake table, head table, or welcome display, lighted tulle adds instant atmosphere without requiring a luxury floral budget. It is elegant, flexible, affordable, and just dramatic enough to make guests say, “Wow,” without realizing you assembled it with clips, batteries, and determination.