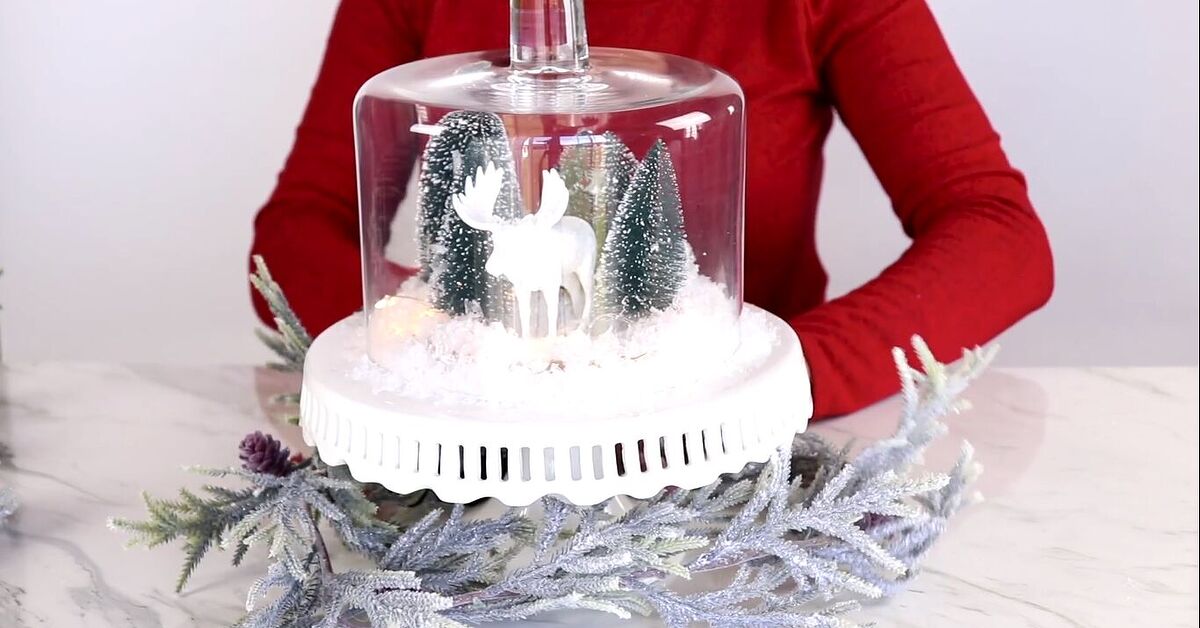
There are two kinds of holiday decorators in this world: the people who own a carefully labeled storage system with twelve matching bins, and the rest of us, who look at a random glass dish and whisper, “You could become something festive.” If you fall into category two, welcome home. This DIY Christmas cloche project turns a humble trifle dish into a charming holiday display that looks boutique-worthy, but still feels delightfully budget-friendly.
A Christmas cloche has that magical snow-globe-meets-storybook quality. It frames tiny treasures, makes even a five-dollar bottle brush tree look fancy, and instantly adds height and sparkle to a mantel, dining table, console, or kitchen counter. The best part? You do not need specialty glassware to make one. A clear trifle dish, flipped upside down, becomes the perfect dome for a cozy Christmas vignette.
In this step-by-step guide, you’ll learn how to make a cute DIY Christmas cloche using a trifle dish, what supplies work best, how to style it so it looks intentionally festive instead of accidentally cluttered, and how to avoid a few common craft mishaps. Because holiday crafting should feel merry and bright, not like a one-woman hostage negotiation with hot glue strings.
Why a Trifle Dish Makes a Surprisingly Great Christmas Cloche
A trifle dish is practically begging for a second career in holiday decor. Its clear glass lets light pass through beautifully, the pedestal shape adds a little elegance, and when inverted, it creates a ready-made dome with a built-in top handle. In other words, it is a cloche hiding in plain sight.
Using a trifle dish also makes this project wonderfully accessible. You may already have one in a cabinet, or you can often find one at thrift stores, discount home shops, or big-box stores during the holiday season. Unlike some delicate decorative domes, a trifle dish usually has enough width and height to hold bottle brush trees, miniature houses, faux snow, ornaments, pinecones, or even a tiny winter village scene.
Another bonus is flexibility. You can create a rustic farmhouse version, a vintage-inspired display, a neutral winter wonderland, or a colorful retro Christmas look. The dome stays the same. The personality inside is where the fun begins.
What You Need
Basic Supplies
- 1 clear glass trifle dish
- 1 sturdy base such as a wood round, cake stand, charger, plate, or thick coaster
- Glass cleaner or rubbing alcohol and a lint-free cloth
- Faux snow, batting, white felt, or paper filler for the ground layer
- Mini bottle brush trees, tiny houses, deer figurines, ornaments, bells, or pinecones
- Faux greenery, small ribbon, or mini wreath accents
- Battery-operated micro lights or a flameless tea light
- Hot glue gun or clear-drying craft adhesive for optional securing
Optional Extras for Extra Cuteness
- Mini gift boxes
- Wood beads or jingle bells
- Mini sled, skates, or vintage-style car figurine
- Tiny wreath or bow for the top handle
- Glittered pinecones or faux berries
- Mini village houses painted in pastel or classic Christmas colors
Before You Start: A Few Smart Prep Tips
First, clean your trifle dish well. Glass shows everything: dust, fingerprints, smudges, and the kind of streaks that somehow appear two seconds after cleaning. Wipe it thoroughly and let it dry before styling. If you plan to glue any elements to a base, make sure the surface is clean and dry so your adhesive has a better shot at holding.
Second, choose a base that is slightly wider than the opening of the inverted trifle dish. This helps the cloche sit securely and gives your arrangement enough breathing room. A wooden round adds warmth, a white plate feels classic, and a gold charger makes things instantly more glamorous. Holiday decorating is funny that way. Add one metallic element and suddenly everyone thinks you have a vision board.
Third, skip real flames inside the cloche, especially if you are using faux greenery, ribbon, paper houses, cotton batting, or dried natural materials. A tiny battery light gives you the same cozy glow without turning your centerpiece into a cautionary tale.
How to Make a Cute DIY Christmas Cloche Using a Trifle Dish
Step 1: Pick Your Theme
Before you start gluing or layering, decide on the look you want. A clear theme makes styling easier and keeps your finished cloche from feeling crowded. Here are a few winning options:
- Classic Christmas: green bottle brush trees, faux snow, red ribbon, tiny deer
- Vintage Holiday: pastel trees, miniature houses, mercury-look ornaments, lace ribbon
- Rustic Woodland: pinecones, moss, neutral trees, burlap bow, wood base
- Winter Wonderland: white houses, silver accents, snowy trees, soft fairy lights
- Whimsical Retro: pink, mint, and aqua ornaments with playful figurines
Step 2: Build the Base Layer
Set your chosen base on a flat surface. Add your “ground” material first. Faux snow is the obvious pick, but white felt, batting, or even a circle of textured paper can work beautifully. The goal is to give your decorative items something soft and snowy to sit on.
Keep the layer thin enough that your items do not wobble. Too much fluff can make a tiny tree lean like it survived a blizzard. Cute in theory. Annoying in practice.
Step 3: Arrange the Biggest Pieces First
Start with your tallest item, usually a bottle brush tree or miniature house, and place it slightly off-center. Then add the second-largest piece nearby to create balance. A good rule is to work in odd numbers when possible. Three trees in staggered heights often look more natural than two matching ones standing there like awkward cousins in a family photo.
If you are creating a tiny village, keep one focal point near the center and cluster supporting elements around it. If your design is simpler, one tree, one deer, and a little faux snow can be all you need.
Step 4: Add Small Details
Once the main pieces are in place, tuck in mini pinecones, berries, bells, tiny wrapped gifts, or small ornaments. This is where the display starts to feel layered and charming. Avoid filling every inch. A little negative space helps the cloche feel polished and lets each item be seen clearly through the glass.
Think of it like decorating a tiny stage set. Every element should have a reason to be there. If one glitter mushroom somehow wandered into your rustic woodland scene, maybe let it rest until next year.
Step 5: Add Light
Thread a short strand of battery micro lights around the base of the trees or behind the main focal point. Hide the battery pack behind a house or under the edge of faux snow if possible. You can also place a flameless tea light beneath the trifle dish if your scene is simple and elevated enough.
Soft lighting makes the whole cloche look magical at night and helps glass decor sparkle without much extra effort. It is the decorating equivalent of very flattering restaurant lighting.
Step 6: Test the Dome
Carefully invert the trifle dish over the arrangement. Check that the tallest pieces do not touch the glass and that nothing shifts when the dome is lowered. If pieces wobble, remove the dome and secure the problem items with a tiny dot of hot glue or clear-drying adhesive.
Do not over-glue unless you want this cloche to become a permanent holiday heirloom. A light hand gives you the freedom to refresh the display next season.
Step 7: Decorate the Outside
You can stop once the dome is in place, but a few small touches on the outside make it even sweeter. Tie velvet ribbon, baker’s twine, or thin plaid ribbon around the base or the pedestal top. Add a tiny bow, a sprig of faux cedar, or a small hanging bell. Just keep the outside embellishments proportional. This is a cloche, not a parade float.
Best Styling Ideas for a Christmas Cloche
1. Mini Forest Scene
Use three bottle brush trees in varying heights, faux snow, and one small deer. This is the easiest version and still looks high-end. Try neutral trees for a modern winter feel or traditional green for classic Christmas charm.
2. Tiny Holiday Village
Add one or two miniature houses, a few tiny trees, and warm micro lights. This works especially well on entry tables, mantels, and sideboards where the cloche can be admired up close.
3. Vintage Ornament Display
Place a small stack of vintage-style ornaments, a ribbon bow, and some glittered faux snow under the dome. This look feels nostalgic and elegant, especially if you use mercury-glass-inspired tones like silver, blush, and pale gold.
4. Natural Woodland Look
Layer moss, pinecones, neutral trees, and faux cedar. Use a wood slice base and finish with twine or velvet ribbon. This version works beautifully if your Christmas decor leans cozy, earthy, and slightly cabin-ish.
5. Candy-Colored Retro Christmas
Think pink bottle brush trees, pastel mini houses, and tiny shiny ornaments. It is playful, cheerful, and perfect if your holiday decor says, “Yes, I do enjoy whimsy, and no, I will not apologize.”
Mistakes to Avoid
Using a Base That Is Too Small
If the base is narrower than the dome opening, the whole arrangement can feel unstable. Always check fit before you style.
Overstuffing the Cloche
More is not always merrier. Too many items make the display look cluttered and block the beauty of the glass.
Choosing Tall Pieces Without Measuring
Nothing humbles a crafter faster than a tree that will not fit under the dome. Do a dry fit before final placement.
Using Real Candles
Skip them. Flameless lighting is safer, easier, and kinder to faux greenery, ribbon, and paper decor.
Ignoring the Surrounding Decor
Your cloche will look best when it connects with the rest of your holiday styling. Echo nearby colors, textures, or materials so it feels like part of the room rather than a random festive UFO landing on the buffet.
Where to Display Your DIY Christmas Cloche
This project is versatile enough to work all over the house. Try it:
- As a dining table centerpiece
- On a mantel layered with garland and stockings
- On an entry console with candles and greenery
- On a kitchen counter for instant holiday cheer
- On a bookshelf or side table as part of a winter vignette
- In a guest room for a subtle seasonal touch
If you make more than one, vary the height and theme slightly so the group feels collected rather than copied and pasted. Holiday magic loves a little variety.
How to Store It After the Holidays
If your arrangement is lightly secured, you can often lift the trifle dish, remove delicate pieces, and wrap everything separately for storage. Store the glass in padded wrapping, keep small accessories in labeled bags, and protect flocked trees from getting crushed. Future You will be deeply grateful when December rolls around again and you are not untangling ribbon from a mystery ornament with the energy of a sleep-deprived raccoon.
Final Thoughts
Learning how to make a cute DIY Christmas cloche using a trifle dish is one of those wonderfully satisfying holiday projects that looks expensive, feels personal, and comes together with basic materials. It is festive without being fussy, creative without being complicated, and charming enough to become part of your annual Christmas decorating tradition.
Whether you style yours with a snowy mini village, a cluster of bottle brush trees, or a vintage-inspired ornament scene, the beauty of this craft is that it can reflect your own holiday style. One glass dish, a little imagination, and a few carefully chosen details are all it takes to create a centerpiece that feels warm, nostalgic, and just plain adorable.
So next time you see a trifle dish, do not just think dessert. Think tiny winter wonderland with main-character energy.
Experience and Lessons Learned From Making a Christmas Cloche With a Trifle Dish
The first time I made a DIY Christmas cloche using a trifle dish, I honestly thought it would be one of those “simple” crafts that secretly requires the patience of a saint and the hand strength of a professional jeweler. Happily, it turned out to be the opposite. It was easy enough to finish in an afternoon, but detailed enough to feel creative. That balance is probably why I keep coming back to this project every holiday season.
One thing I learned right away is that the trifle dish itself does a lot of the heavy lifting. Because the glass has height and shape, almost anything inside it automatically looks more special. A plain bottle brush tree sitting on a shelf is cute. The same bottle brush tree under glass with a little faux snow? Suddenly it looks like it belongs in a holiday catalog next to a cashmere throw and a mug of artisanal cocoa. The cloche creates focus. It tells your eye, “Yes, this tiny tree is important now.”
I also learned that restraint matters. On my first try, I kept adding things because each one looked charming on its own. A tree. A deer. A house. A present. A bell. A pinecone. A second tree. A third tree. At one point the scene looked less like a peaceful Christmas village and more like the toy aisle had exploded inside a fishbowl. Once I removed a few items, the arrangement instantly looked better. Now I always start with one focal point and build slowly.
Another helpful discovery was that texture matters just as much as color. The prettiest cloches I have made were not always the most colorful ones. Sometimes the best version used soft white batting, a matte bottle brush tree, a tiny wooden house, and a bit of velvet ribbon. The contrast between smooth glass, fluffy snow, rough wood, and soft fabric made the whole display feel richer. It reminded me that good holiday decor is not just about adding sparkle. It is also about mixing textures so the piece feels warm and layered.
Lighting made the biggest difference of all. I resisted using micro lights at first because I assumed they would be too much trouble. I was wrong. A short battery-powered string tucked behind a tiny house made the cloche glow in the evening and completely changed the mood. During the day, it looked sweet. At night, it looked magical. That tiny bit of light turned a craft into decor.
I have also found that this project works especially well when you use pieces that mean something to you. One year I tucked in a miniature sled because it reminded me of childhood winters. Another year I used pastel bottle brush trees to match vintage ornaments from my grandmother’s collection. Those small personal details made the cloches feel less generic and more like part of the family’s holiday story.
If I could offer one practical tip from experience, it would be this: always test the dome early. More than once, I built a scene I loved, only to discover the tallest tree pressed awkwardly against the glass. It is much easier to measure as you go than to redesign the whole thing at the end while muttering festive words that are not, strictly speaking, festive.
Overall, making a Christmas cloche with a trifle dish has become one of my favorite seasonal decorating projects because it feels both nostalgic and flexible. It can be elegant, whimsical, rustic, vintage, or modern depending on the pieces you choose. It is affordable, easy to customize, and satisfying in that deeply holiday way where a few simple objects somehow become a tiny world. And really, that may be the best part of Christmas crafting: taking ordinary things and giving them a little extra wonder.