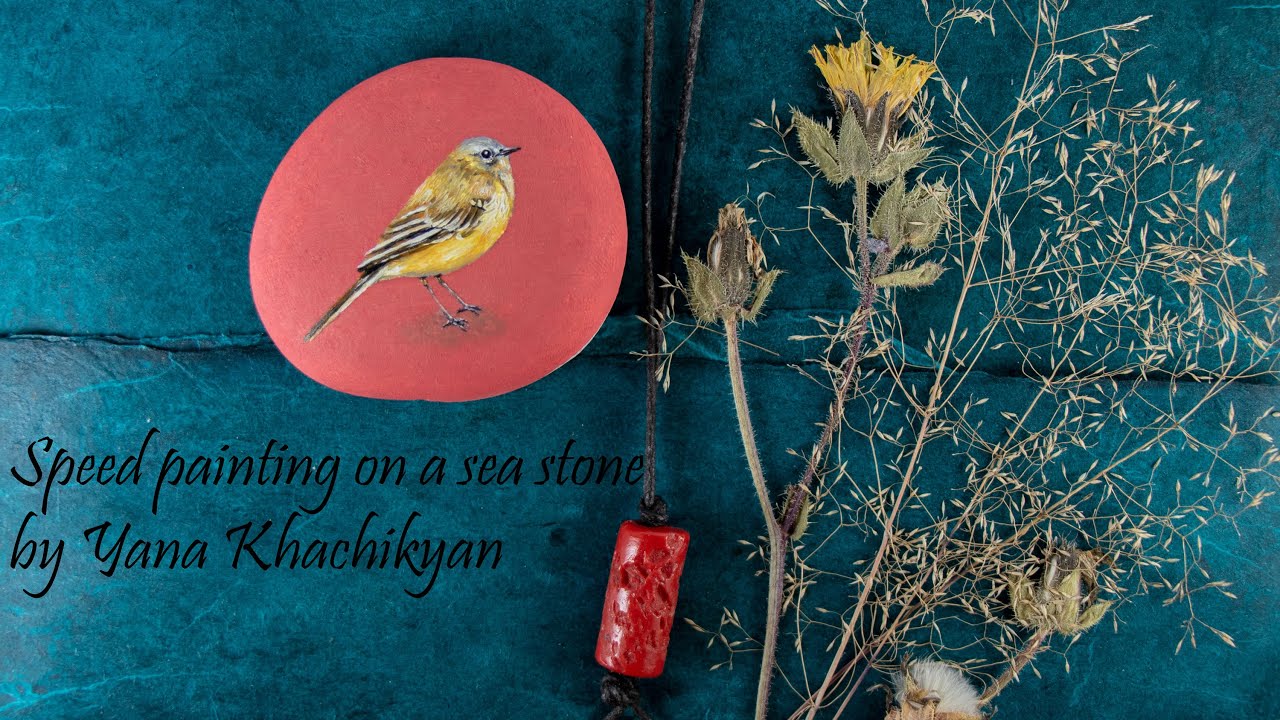
Sea stones are nature’s tiny blank canvasessmooth, moody, oddly shaped, and already dressed in the kind of coastal texture painters spend years trying to fake. One afternoon, while sorting through a handful of responsibly collected beach stones, I had a ridiculous little thought: what if each one became a miniature world?
Not a slow, fussy, “cancel all weekend plans” kind of world. I wanted speed painting: quick decisions, tiny brushes, bold colors, and just enough detail to make each stone feel alive. The result became a series of miniature paintings on sea stonessmall landscapes, little houses, boats, moons, birds, flowers, and quiet seaside scenes that looked as if someone had trapped a vacation inside a pebble.
This project sits somewhere between rock painting, miniature art, coastal decor, and creative therapy. It is also a fantastic reminder that art does not always need a stretched canvas, a dramatic studio window, or a beret worn at an emotionally complicated angle. Sometimes, all you need is a clean stone, acrylic paint, a fine brush, and the courage to paint a lighthouse smaller than your thumbnail.
Why Sea Stones Make Beautiful Miniature Canvases
Sea stones are naturally polished by water, sand, and time. Their surfaces often feel soft under the fingers, but they still carry subtle bumps, curves, and mineral patterns. That combination makes them perfect for miniature painting because every stone already has personality before the first brushstroke lands.
A flat oval stone might become a moonlit bay. A long gray pebble might turn into a row of tiny cottages. A dark round stone could become a night sky with one glowing window. Unlike paper or canvas, sea stones do not ask you to control every inch. They quietly suggest ideas. Half the fun is listening.
The Charm Of Imperfect Shapes
Miniature painting on sea stones works best when you stop fighting the shape. If a stone has a chipped edge, that might become a cliff. If it has a pale streak, it could become a wave, a road, or a cloud. The stone is not a mistake; it is a co-author with better patience than most humans.
That is what makes this art form so approachable. You are not starting with a terrifying white rectangle. You are starting with a tiny object that already looks interesting. Your job is to add a story.
What Is Speed Painting On Sea Stones?
Speed painting is a method of creating finished-looking artwork quickly by simplifying the process. Instead of building endless layers and polishing every detail, you focus on strong shapes, smart contrast, limited colors, and a clear focal point.
For my miniature sea stone series, I treated each stone like a tiny scene that needed to be completed in one short session. Some pieces took 15 minutes. Others took 30 or 40, especially when I got overconfident and decided to paint windows smaller than a sesame seed. That was my villain origin story.
The goal was not perfection. The goal was energy. Speed painting keeps the brush moving and prevents the artist from overworking the surface. On a stone, that matters because too many thick layers can bury the natural texture and make the final piece feel heavy.
Speed Painting Versus Detailed Miniature Painting
Traditional miniature painting often celebrates extreme precision. It can involve delicate layering, careful blending, magnification tools, and hours of patient work. Speed painting borrows the spirit of miniatures but uses shortcuts. Instead of painting every leaf on a tiny tree, you paint a dark shape, add a few bright touches, and let the viewer’s imagination do the landscaping.
That is the secret: miniature art does not need to show everything. It only needs to suggest enough for the eye to believe.
The Materials I Used For My Sea Stone Miniatures
This project does not require a luxurious art supply collection, although art stores are very good at convincing us we need twelve versions of blue. For a clean and durable result, I used a simple set of supplies:
- Smooth sea stones or responsibly sourced craft stones
- Acrylic paint in a small but flexible palette
- Fine detail brushes, including liner brushes
- Acrylic paint pens for sharp dots and tiny highlights
- White or black gesso for priming selected stones
- A cup of water and a soft cloth for cleaning brushes
- A clear acrylic sealer or varnish for protection
Acrylic paint is especially practical for rock painting because it dries quickly, adheres well to prepared surfaces, and offers strong color coverage. Paint pens can help with dots, stars, tiny flowers, and window frames, but brushes give the paintings more life and variation.
Choosing The Right Stones
The best stones for miniature painting are smooth, clean, and comfortable to hold. Flat stones are easier for landscapes and houses, while rounded stones are wonderful for moons, animals, abstract patterns, and ocean scenes. Very porous rocks can drink paint like they have been wandering the desert, so those usually need primer.
It is also important to source stones responsibly. Some beaches, parks, and protected areas do not allow visitors to remove natural objects. When in doubt, buy smooth craft stones, use stones from your own yard, or collect only where it is clearly permitted. A beautiful art project should not begin with accidentally annoying a park ranger.
How I Prepared The Stones Before Painting
Preparation is not glamorous, but it saves the painting from looking like it survived a sandstorm. I washed each stone with mild soap and water, scrubbed away grit, and let everything dry completely. Any moisture trapped under paint can affect adhesion and make sealing less reliable.
For darker stones, I sometimes painted directly onto the natural surface to keep the moody coastal look. For scenes needing brighter colors, I added a thin coat of white gesso. For night scenes, black gesso worked beautifully because it instantly created depth and drama.
The key is to keep primer thin. A thick primer coat can flatten the natural character of the stone. I wanted the surface to remain stone-like, not turn into a tiny frosted cookie.
My Speed Painting Process Step By Step
Every miniature in the series followed a loose process. The subject changed, but the rhythm stayed the same: choose the stone, plan the scene, block in colors, add contrast, sharpen the focal point, and seal the finished piece.
Step 1: Match The Scene To The Stone
Before painting, I turned each stone in my hand and looked for clues. A wide oval stone suggested a beach horizon. A narrow stone looked like a street. One triangular stone practically begged to become a mountain, and honestly, who was I to argue with geology?
This step made the work faster because I was not forcing ideas onto the wrong surface. The stone’s shape helped design the composition.
Step 2: Use A Limited Color Palette
Speed painting becomes easier when the color choices are limited. I often used three main colors: a dark tone, a middle tone, and a highlight. For example, a night-sea stone might use deep navy, muted teal, and warm ivory. A cottage scene might use gray-blue shadows, clay red roofs, and creamy white walls.
A limited palette also helps the series feel connected. Even though each stone shows a different subject, the colors create a family resemblance. Think of it as a tiny pebble neighborhood with good interior design.
Step 3: Block In Big Shapes First
Miniature painting becomes chaotic when you start with details. I learned to block in the biggest shapes first: sky, sea, land, house, moon, tree, or boat. These shapes do not need to be perfect. They only need to establish the scene.
On such a small surface, strong silhouettes are more important than complicated detail. A simple dark boat against a pale sunset can say more than ten nervous little lines.
Step 4: Add Contrast Quickly
Contrast is what makes miniature art readable. Without it, the image turns into a polite blur. I used dark shadows under roofs, bright highlights along waves, pale dots for stars, and warm color in windows. These quick touches made the stones feel finished even when the brushwork stayed loose.
The smallest bright mark can become the star of the entire painting. A single yellow window on a blue-gray house can make a stone feel cozy, mysterious, and slightly like it knows a secret.
Step 5: Save Details For The Final Minutes
Details are the dessert, not the dinner. I added them last: birds in the sky, foam on water, flower dots, tiny doors, roof lines, moonlight, and little paths. The trick is knowing when to stop. With miniatures, one extra detail can be charming; twelve extra details can make the stone look like it lost a fight with a confetti cannon.
Subjects That Worked Best In The Series
Some subjects naturally fit the format of sea stone miniatures. Coastal themes were the obvious choice, but I also experimented with landscapes, plants, and small architectural scenes.
Mini Seascapes
Seascapes felt perfect because the stones already came from the mood of the shore. I painted tiny horizons, soft waves, cloudy skies, sailboats, and moonlit water. The best results came from keeping the horizon simple and using a few bright strokes to suggest movement.
Tiny Houses And Cottages
Small houses were some of my favorite subjects. A cottage on a stone has instant storybook energy. I used simple rectangles, triangle roofs, and glowing window dots. Even when the perspective was slightly wonky, the charm survived. In fact, a little wonkiness made the houses feel handmade and alive.
Flowers, Leaves, And Garden Scenes
Floral miniatures were fast and satisfying. I painted dark stems first, then added small dots and strokes for petals. On gray stones, warm flower colors looked especially cheerful. These pieces worked well as pocket gifts or small desk decorations.
Night Skies And Moons
Night scenes may be the easiest way to make a dramatic sea stone painting. A dark background, a pale moon, a few stars, and a line of water can create instant atmosphere. The contrast does most of the heavy lifting, which is excellent news for anyone whose coffee has not started working yet.
Common Mistakes I Made While Painting Sea Stones
The series taught me plenty, mostly because I made nearly every beginner mistake at least once. First, I learned not to paint on dusty stones. Even a little grit can drag through wet paint and leave scratchy marks.
Second, I learned not to overload the brush. Too much paint creates blobs, and blobs are not ideal when your entire house is smaller than a fingernail. Thin layers gave me more control and cleaner edges.
Third, I learned to let layers dry. Acrylic paint dries fast, but “fast” does not mean “immediately because I am impatient.” Painting wet details over wet backgrounds can create muddy colors. Sometimes the best technique is putting the stone down and pretending to be a calm person.
How I Sealed And Displayed The Finished Stones
After the paintings dried completely, I sealed them with a clear acrylic coating. Sealing helps protect the artwork from dust, handling, and minor moisture. For stones that stay indoors, a light varnish is usually enough. For outdoor display, stronger weather-resistant protection may be needed, though painted stones should still be placed thoughtfully and legally.
I preferred a satin or gloss finish depending on the subject. Gloss made sea scenes look wet and luminous, while satin kept cottages and floral designs softer. I applied light coats rather than one heavy coat to avoid pooling around the edges.
For display, I arranged the stones in a shallow wooden tray, along a windowsill, and in small groups on a desk. They also worked beautifully as handmade gifts. There is something delightful about handing someone a tiny painted stone and watching them hold it like a treasure map.
Why This Project Is So Addictive
Speed painting miniatures on sea stones is addictive because the finish line is always close. Unlike a large painting that can glare at you unfinished for three months, a stone can become a complete piece in under an hour. That small success creates momentum.
The series also encourages experimentation. If one idea fails, it is just one little stone. There is no dramatic tragedy, no expensive canvas wasted, no need to stare into the distance like a misunderstood Renaissance apprentice. You simply learn, adjust, and paint the next one.
This low-pressure format makes it ideal for beginners, busy artists, hobby painters, and anyone who wants a creative ritual that fits into real life. It is art you can do at a kitchen table without rearranging your entire identity.
Creative Ideas For Your Own Sea Stone Miniature Series
If you want to create your own series, choose a theme before you begin. A theme helps the collection feel intentional and makes decision-making faster. Here are a few ideas that work especially well:
- Mini coastal villages
- Moon phases on dark stones
- Tiny wildflower studies
- Seascapes at different times of day
- Little boats and harbors
- Birds, shells, and beach plants
- Abstract color studies inspired by the ocean
You can also number the stones on the back to turn them into a formal series. Add initials, dates, or short titles. A painted stone called “Blue House After Rain” immediately feels more poetic than “Pebble Number Four,” although both are valid if you are feeling efficient.
Experiences From Creating My Series Of Speed Painted Miniatures On Sea Stones
The most surprising part of creating this series was how personal the stones became. At first, I treated them like practice surfaces. They were small, affordable, and not intimidating. But after a few sessions, each stone started to feel like a tiny chapter. One had a red-roof cottage under a cloudy sky. Another had a white sailboat drifting through dark blue water. A round gray stone became a full moon scene with three black birds crossing the sky. They were simple, but they carried atmosphere.
I discovered that speed painting does not mean careless painting. It means making confident choices. When I gave myself a limited time window, I stopped fussing over every line and focused on what the viewer needed to understand. A roof needed a shadow. A wave needed one highlight. A tree needed a silhouette. That was enough. The paintings became stronger when I stopped trying to explain everything with the brush.
One of my favorite experiences was painting several stones in a single color family. I used deep blues, foggy grays, soft whites, and tiny touches of warm yellow. Together, the stones looked like fragments of one coastal evening. Separately, each had its own mood. That taught me the value of consistency in a series. The stones did not need identical subjects; they needed a shared visual language.
I also learned that holding the stone changes the relationship with the artwork. A canvas hangs on a wall, but a painted stone sits in the palm. You can turn it, feel its weight, notice the edge, and see how the image curves around the surface. That physical quality makes the piece feel intimate. It is less like viewing art and more like discovering a tiny object with a secret.
Of course, not every stone became a masterpiece. Some looked muddy. Some had houses with suspiciously athletic roof angles. One boat looked less like a boat and more like a confused potato wearing a sail. But even the awkward pieces were useful. They showed me which brushes worked, which colors covered well, and how much detail a small surface could realistically hold before everything became visual soup.
The biggest lesson was to respect the stone. Instead of covering every natural mark, I began leaving parts exposed. A gray streak became mist. A brown patch became land. A pale vein became moonlight. Once I allowed the natural surface to participate, the paintings felt more organic and less forced.
By the end of the series, I had a small collection that felt joyful, coastal, handmade, and a little magical. More importantly, I had built a habit of creating without waiting for perfect conditions. That may be the real gift of painting miniatures on sea stones: they remind you that art can begin small, move quickly, and still leave a lasting impression.
Conclusion
Creating a series of speed paintings on sea stones turned out to be more than a craft project. It became a playful study in observation, restraint, texture, and storytelling. Each stone offered a different challenge, and every miniature scene taught me how much emotion can fit into a very small space.
Whether you are a beginner looking for an easy rock painting idea or an experienced artist searching for a fresh miniature format, sea stones are wonderfully inviting. They are humble, tactile, and full of character. With acrylic paint, a few brushes, a simple palette, and a willingness to embrace imperfection, you can transform ordinary stones into tiny worlds worth holding onto.
And if your first attempt looks strange? Congratulations. You have created character. The next stone is already waiting.