A Barbie party without a life-size Barbie box is like a birthday cake without frosting: technically possible, but emotionally suspicious. Whether you are planning a pink-themed birthday, a movie-night party, a bachelorette bash, a classroom event, or a fabulous “come dressed like your childhood dream job” celebration, a DIY life-size Barbie box instantly turns the room into a photo booth, party centerpiece, and conversation starter.
The best part? You do not need to be a professional prop builder, carpenter, or person who owns twelve mysterious power tools in the garage. With large cardboard, foam board, strong tape, bright pink covering, a little measuring, and a healthy respect for straight lines, you can create a sturdy, camera-ready Barbie-inspired display box that guests can step inside for photos.
This guide walks you through the full process: planning the size, choosing materials, building the structure, cutting the front window, decorating the box, adding party details, and avoiding the classic DIY disasterslike realizing your box is too short after Aunt Linda has already put on heels.
What Is a DIY Life-Size Barbie Box?
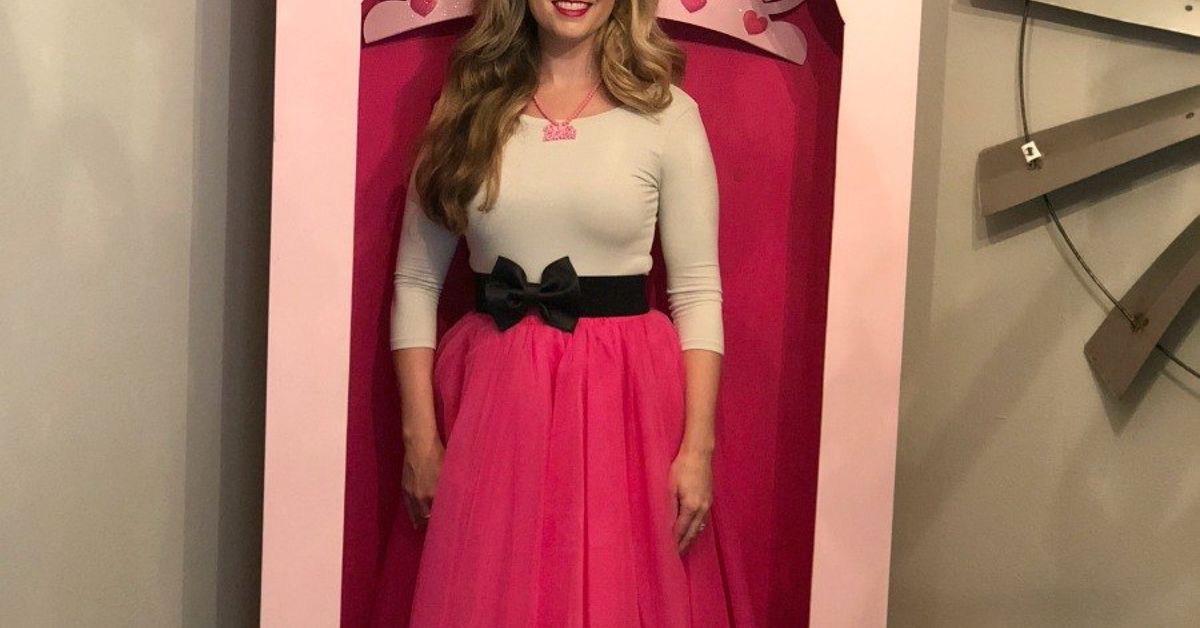
A DIY life-size Barbie box is a large, upright party prop designed to look like a toy doll package. Guests stand inside or behind it, pose through the open front, and take photos that look playful, glamorous, and slightly “limited edition.” Most versions are made from a refrigerator box, wardrobe box, large appliance box, foam board panels, or lightweight cardboard sheets.
For a Barbie party, the design usually includes a hot pink exterior, a large open display window, white or pink lettering, decorative stars, birthday text, and optional accessories such as balloons, faux price tags, glitter trim, or a personalized “Birthday Doll” label. You can keep it simple and affordable, or you can go full Dreamhouse energy with LED lights, vinyl lettering, and a matching balloon garland.
Before You Build: Plan the Size
The most important step is deciding who will use the box. A child-size Barbie box can be shorter and lighter, while an adult party photo booth needs more height, width, and stability. A good general size for adults is about 6 to 6.5 feet tall, 3 to 4 feet wide, and 18 to 24 inches deep. For children, 4.5 to 5.5 feet tall may be enough.
If you are using a refrigerator box or appliance box, you already have most of the structure. If you are building from flat cardboard panels, plan for one back panel, two side panels, a top panel, a bottom panel, and a front frame. The front should have a large cutout window so guests can be seen clearly in photos.
Recommended Dimensions
- Adult-size box: 72–78 inches tall, 36–44 inches wide, 18–24 inches deep.
- Teen or child-size box: 54–66 inches tall, 28–36 inches wide, 14–20 inches deep.
- Front window: Leave a top border of 8–12 inches, side borders of 5–8 inches, and a bottom border of 14–22 inches.
- Photo space: Make sure the opening frames the face, outfit, and shoes if possible.
Here is the golden rule: measure your tallest guest, then add a little extra room. People love a photo booth until they have to crouch like a flamingo in a windstorm.
Supplies You Will Need
You can build a DIY life-size Barbie box on a budget, especially if you can find a clean appliance box from a furniture store, appliance store, moving supply shop, or local recycling group. Choose cardboard that is thick enough to stand upright but light enough to move.
Basic Materials
- One large appliance box, refrigerator box, wardrobe box, or several large cardboard sheets
- Foam board or extra cardboard for reinforcement
- Heavy-duty packing tape or water-activated packing tape
- Hot glue gun or craft glue
- Pink bulletin board paper, wrapping paper, vinyl, poster paper, or peel-and-stick wallpaper
- White cardstock, vinyl letters, or printed lettering
- Ruler, yardstick, or measuring tape
- Pencil or marker
- Scissors
- Craft knife or box cutter, used carefully with adult supervision
- Cutting mat or scrap cardboard for safe cutting
- Optional: glitter tape, LED strip lights, balloons, stickers, ribbon, and faux product labels
For the cleanest look, choose materials that will not wrinkle easily. Fabric-like bulletin board paper, vinyl covering, and peel-and-stick wallpaper tend to look smoother than thin gift wrap. However, gift wrap can still work beautifully if you apply it slowly and avoid stretching it.
Step 1: Prepare the Cardboard Box
Start with the largest, cleanest box you can find. Remove labels, loose tape, staples, and damaged flaps. Stand the box upright and decide which side will become the front. If the box has printing on it, do not panic. You are covering it anyway. Cardboard is forgiving; it has seen worse things than your marker lines.
If the box is too deep, trim the back or side panels so the finished prop is easier to place against a wall. If the cardboard is weak, reinforce the corners from the inside using strips of foam board or doubled cardboard. Tape along the inside seams first, then tape the outside seams for extra strength.
Step 2: Mark and Cut the Front Window
The front window is the star of the whole project. Use a measuring tape and pencil to mark the opening. Keep the top, sides, and bottom borders wide enough to support the box. A thin frame may look sleek, but it can bend, wobble, or tear once guests start posing enthusiastically.
A popular layout is a tall rectangular opening with a diagonal lower edge, similar to retail doll packaging. You can also keep the window perfectly rectangular for easier cutting. For a beginner-friendly version, mark straight lines and use a yardstick as your guide.
Cut slowly and carefully. Do not try to slice through thick cardboard in one dramatic superhero move. Make several gentle passes along the line. If younger helpers are involved, let them decorate, tape, or place stickers while an adult handles sharp tools.
Step 3: Reinforce the Frame
After cutting the window, the box may feel less sturdy. That is normal. Reinforce the inside edges of the front frame using strips of cardboard or foam board. Tape or glue these strips along the top, sides, and bottom border. This creates a stronger frame and helps prevent the front from sagging.
If your party will be outdoors or in a busy space, add support braces at the back. You can create simple triangular cardboard braces and tape them behind the box. Another option is to attach the box to a lightweight PVC frame or place it against a wall. The goal is simple: the box should stand still while your guests serve their best doll-box pose.
Step 4: Cover the Box in Pink
Now the transformation begins. Cover the outside of the box with hot pink paper, vinyl, poster paper, or peel-and-stick wallpaper. Start with the sides, then cover the front frame, top, and bottom. Smooth the material as you go, working from the center outward to reduce bubbles and wrinkles.
If you use wrapping paper, apply double-sided tape or glue in small sections. If you use bulletin board paper or vinyl, cut larger pieces and wrap them around the edges for a cleaner finish. Overlap seams slightly and place them on the sides or back where they are less visible.
For the inside of the box, you can use a lighter pink, white, blue, or patterned paper. A contrasting interior makes the person inside stand out better in photos. If the birthday guest has a themecowgirl, beach, glam, disco, princess, retro, or Malibu pool partymatch the interior color to that style.
Step 5: Add the Barbie-Inspired Design Details
This is where your DIY life-size Barbie box becomes party magic. Add large lettering across the lower front panel, a round badge in the top corner, and playful product-style text such as “Birthday Edition,” “Party Doll,” “Dream Guest,” “Limited Edition,” or “Ages: Fabulous and Up.”
For personal party use, many people create Barbie-inspired designs. If you plan to sell the prop, use it for a commercial event, or publish printable files, avoid copying official brand logos or protected artwork without permission. A custom pink doll-box theme can still feel instantly recognizable without duplicating official packaging.
Fun Text Ideas for the Box
- “Birthday Girl Edition”
- “Malibu Party Doll”
- “Dreamhouse Guest”
- “Includes: Confidence, Sparkle, and Cake”
- “Warning: May Cause Excessive Posing”
- “Limited Edition: One Night Only”
- “Accessories Sold Separately: Sunglasses, Sass, and Snacks”
If you have a Cricut, Silhouette, or similar cutting machine, vinyl lettering gives the box a polished finish. If not, print large letters at home, cut them out, and mount them on cardstock. You can also use foam letters from a craft store.
Step 6: Decorate for the Party Theme
A Barbie party can go in many directions, so use the box to support the overall theme. For a classic pink birthday, add glitter stars, white trim, balloons, and a giant bow. For a beachy party, add palm leaves, sunglasses, seashell stickers, and a “Malibu Edition” label. For a disco version, add silver fringe, mirror-ball accents, and hot pink metallic paper.
Balloons are one of the easiest ways to make the box look bigger and more festive. Attach a small balloon garland to one side or across the top, but do not overload the cardboard. Lightweight decorations are your friend. Heavy decorations are the friend who says, “Trust me,” right before the whole thing tips forward.
Step 7: Make It Photo-Ready
Place the finished box where it gets good light. Natural light near a window is great during the day. For evening parties, use soft lamps, ring lights, or LED strips around the front frame. Avoid harsh overhead lighting because it can create shadows on faces.
Leave enough room in front of the box for the photographer or phone tripod. Add a small basket of props nearby: sunglasses, feather boas, tiaras, microphones, toy phones, handbags, and speech-bubble signs. Guests are more likely to use the photo booth when the props are visible and easy to grab.
Photo Booth Styling Tips
- Place the box against a plain wall or matching backdrop.
- Use a balloon garland to frame one side, not both, so photos do not look crowded.
- Add a small sign that says “Step inside and strike a pose.”
- Keep the floor clear so guests do not trip while entering or exiting.
- Test photos before the party starts and adjust lighting if needed.
Budget-Friendly Tips
You do not need a luxury craft budget to build a great Barbie party prop. The biggest cost is usually the covering material. Cardboard can often be found for free, while tape, paper, and decorations can be purchased affordably from craft stores, dollar stores, moving supply stores, or online retailers.
If your budget is tight, use paint instead of vinyl or peel-and-stick wallpaper. Paint takes longer to dry but can look bold and smooth with two coats. If you use paint, place cardboard on the floor, work in a ventilated area, and allow enough drying time before decorating.
You can also reuse party supplies. Leftover balloons, ribbon, wrapping paper, and poster board can become trim, labels, and accents. A DIY project like this rewards creativity more than perfection. In fact, tiny imperfections often disappear in photos, especially once people start posing with sunglasses and cupcake energy.
Common Mistakes to Avoid
The first mistake is making the box too narrow. Guests need room to stand comfortably, especially if they are wearing costumes, dresses, or heels. The second mistake is cutting the front window too large. A giant opening may look dramatic, but it can weaken the structure. Keep enough border around the window to support the box.
Another common issue is using thin paper without smoothing it properly. Wrinkles can show up in photos, especially under bright light. Work slowly and use wider sheets when possible. Finally, do not forget stability. If the box wobbles before guests arrive, it will wobble even more when everyone gets excited.
Safety Notes for a DIY Party Prop
This project is simple, but it still involves cutting, taping, and standing a large object upright. Use sharp tools carefully, cut away from your body, and place cardboard on a safe cutting surface. Younger helpers can decorate, measure, or hand over supplies, but an adult should handle utility knives and hot glue.
Make sure the finished box does not block exits, stairs, or walkways. If the party is outdoors, avoid placing the box where wind can catch it. Cardboard is lightweight, and a sudden breeze can turn your glamorous photo booth into a pink sailboat.
of Real-World Experience: What Actually Makes the Barbie Box Work
The biggest lesson from building a DIY life-size Barbie box is that the structure matters more than the decoration. Everyone gets excited about the hot pink paper, glitter letters, and cute labels, but the real hero is the boring reinforcement hidden inside. If the corners are strong and the front frame is supported, the box will survive the party. If not, it may start leaning before the first group photo, which is not the kind of dramatic entrance anyone requested.
Another experience-based tip: build the box where you plan to use it, or at least check that it fits through doors. A six-foot cardboard box may seem light, but it can become awkward when you try to rotate it through a hallway. If you are transporting it, make the design collapsible by taping panels from the inside and leaving one side seam flexible. You can also build the box in two sections: the main frame and a removable bottom sign panel.
The photo area matters too. A beautiful box placed in a dark corner will not get used as much as a simpler box placed in good lighting. Before the party, stand inside the box and take a test picture. Check whether the lettering is visible, whether your face is shadowed, and whether the opening frames the body nicely. This five-minute test can save the entire photo booth experience.
Guests also need permission to play. A lot of people will admire the box but hesitate to step inside unless there is a sign or someone starts the trend. Add a small sign nearby that says, “Get in the box!” or “Pose like a limited edition doll.” Once one person does it, everyone else follows. Suddenly your carefully built cardboard prop becomes the busiest celebrity at the party.
Personalization is what makes the project memorable. Instead of only writing “Barbie,” add the birthday person’s name, age, favorite color, hobbies, or theme. A box that says “Emma: Birthday Edition” or “Sophia Dreamhouse Collection” feels custom and special. You can even add funny accessory labels such as “Includes: iced coffee, confidence, and emergency lip gloss.”
Finally, do not chase perfection too aggressively. Cardboard bends. Tape shows. Paper wrinkles. A corner may look slightly homemade. That is fine. The photos will be full of people smiling, laughing, and pretending to be a collectible doll, which is already delightfully ridiculous. The goal is not to build a museum-grade retail display. The goal is to create a joyful, pink, unforgettable party moment that guests will post, share, and talk about long after the cake has vanished.
Conclusion
Building a DIY life-size Barbie box for a Barbie party is one of the most rewarding party projects because it delivers a huge visual impact without requiring professional skills. Start with strong cardboard, plan the size carefully, reinforce the frame, cover it in bold pink, and personalize it with playful lettering. Add good lighting, a few props, and a safe location, and you have a photo booth that feels fun, nostalgic, and totally party-ready.
The best version is not necessarily the most expensive one. It is the one that fits your space, matches your theme, and makes guests laugh the moment they see it. In other words, if people line up to step inside and pose like they come with accessories, congratulationsyou built the box correctly.