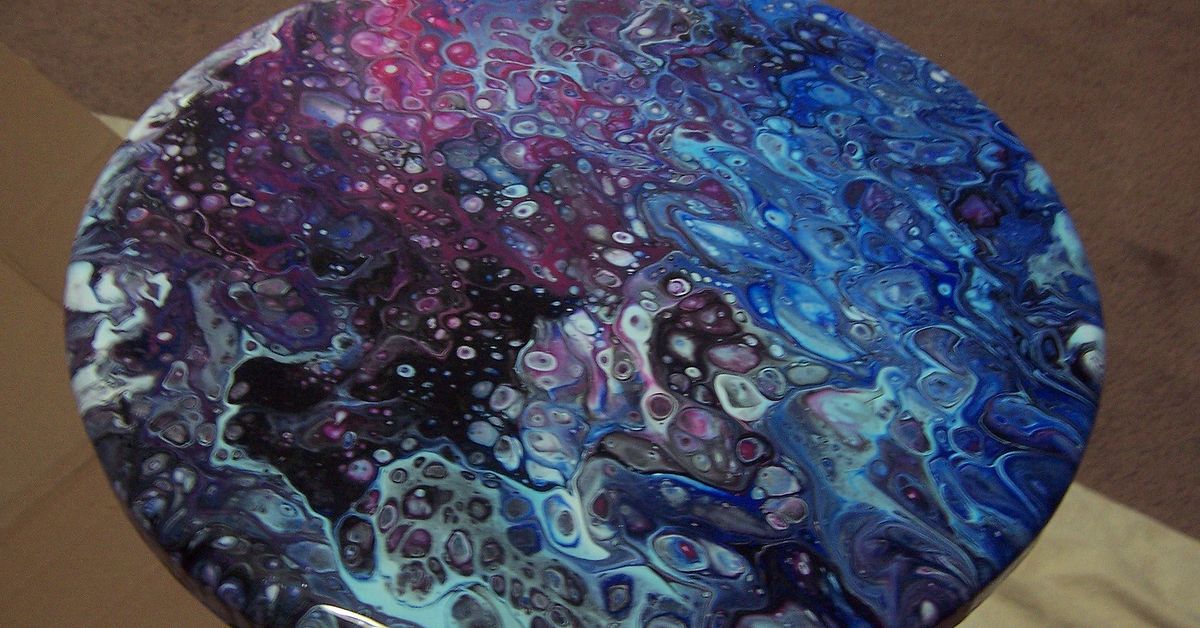
Painting a dirty pour table top is the kind of DIY project that looks wildly expensive but secretly begins with a thrifted table, a few cups of acrylic paint, and the courage to make a controlled mess. If you have ever looked at a plain coffee table and thought, “This could use more drama,” acrylic pouring is ready to answer with swirls, marble effects, ocean-like waves, galaxy colors, and enough personality to make your furniture feel like it has a favorite playlist.
A dirty pour is an acrylic pouring technique where multiple paint colors are mixed separately, layered together in one cup, and poured onto a surface. Instead of brushing paint in neat little lines like a responsible adult, you tilt and guide the flowing paint until it creates organic patterns. The result is unpredictable in the best way. No two dirty pour table tops will ever look exactly the same, which is great news if you like custom decor and bad news if you enjoy total control.
This guide explains how to paint a dirty pour table top DIY from start to finish, including surface prep, paint mixing, pouring, sealing, troubleshooting, and care. Whether you are refreshing a side table, coffee table, nightstand, plant stand, or small dining table, the steps below will help you create a durable, glossy, conversation-starting finish.
What Is a Dirty Pour Table Top?
A dirty pour table top is a painted furniture surface made with fluid acrylic paint. The “dirty” part does not mean muddy, sloppy, or suspiciously found in a garage. It simply means the colors are layered into the same cup before pouring. When the paint hits the tabletop, the colors interact, stretch, overlap, and form natural movement.
For a table, the dirty pour technique works especially well because a flat horizontal surface gives the paint room to move. Unlike a small canvas, a tabletop becomes functional art. With the right prep and sealer, it can handle everyday use while still looking like a boutique furniture piece.
Best Tables for a Dirty Pour Project
Not every table is a perfect candidate, but many can be transformed with good preparation. Solid wood tables are excellent because they sand well and hold primer nicely. MDF and laminate tables can also work, but they need extra attention because slick surfaces do not love paint unless you give them something to grip.
Good table choices include:
- Small coffee tables
- End tables and side tables
- Nightstands
- Console tables
- Round accent tables
- Old dining tables used for light-duty purposes
If this is your first dirty pour furniture project, start small. A huge dining table may sound glamorous, but it also requires more paint, more space, more drying time, and more emotional support.
Supplies You Will Need
Gather everything before you pour. Once the paint starts flowing, you do not want to run across the room looking for gloves while your masterpiece drips onto the floor like a colorful crime scene.
Materials
- Table or tabletop surface
- Acrylic paints in 3 to 6 colors
- Acrylic pouring medium
- Primer suitable for wood, laminate, or MDF
- Fine-grit sandpaper, such as 120-grit and 220-grit
- Tack cloth or microfiber cloth
- Mild cleaner or degreaser
- Painter’s tape
- Plastic drop cloth or disposable table covering
- Disposable cups
- Stir sticks
- Gloves
- Clear protective topcoat, such as water-based polyurethane, polycrylic, acrylic varnish, or epoxy resin
Optional tools
- Small level
- Painter’s pyramids or plastic cups to raise the table
- Heat gun or small torch for bubbles, used carefully
- Palette knife for guiding edges
- Foam brush or quality synthetic brush for sealer
Step 1: Choose a Color Palette That Fits Your Room
A dirty pour table top can be elegant, coastal, boho, modern, retro, or delightfully chaotic. The secret is choosing colors with intention. For a marble look, use white, gray, black, and a metallic accent. For a beach-inspired table, try navy, turquoise, white, sand, and a little pearl. For a galaxy effect, use black, deep blue, purple, magenta, and silver. For a warm earthy table, choose terracotta, cream, olive, bronze, and espresso.
A good beginner formula is three main colors, one light color, and one accent color. Too many colors can turn into mud, especially if you combine opposites like orange and blue or purple and yellow without enough separation. Beautiful chaos is the goal; soup is not.
Step 2: Clean the Table Thoroughly
Before sanding or painting, clean the tabletop. Furniture collects dust, oil, hand lotion, food residue, wax, and mysterious sticky spots that nobody in the house will admit to causing. Use a mild cleaner or degreaser and wipe the entire surface. Pay close attention to edges, corners, and any decorative grooves.
After cleaning, let the table dry completely. Paint and trapped moisture are not friends. They will smile in public, then betray you later with peeling, bubbling, or poor adhesion.
Step 3: Sand for Better Adhesion
Sanding is not glamorous, but it is one of the most important parts of painting a dirty pour table top DIY. Sanding dulls the old finish and gives primer a better surface to hold onto. For glossy wood or laminate, start with 120-grit sandpaper to scuff the finish. Then smooth the surface with 220-grit sandpaper.
You do not usually need to sand down to bare wood unless the old finish is peeling, damaged, or uneven. The goal is to remove shine and create tooth. Once you finish sanding, remove dust with a vacuum, tack cloth, or slightly damp microfiber cloth. Dust left on the tabletop can create bumps under the pour, and nobody wants a lumpy galaxy.
Step 4: Prime the Tabletop
Primer helps paint stick and creates an even base color. For wood, a quality bonding primer or stain-blocking primer works well. For laminate or slick furniture, use a bonding primer designed for hard-to-paint surfaces. Apply a thin, even coat and let it dry according to the product directions.
After the primer dries, lightly sand with 220-grit sandpaper and wipe clean. If the surface still looks uneven or the original color is showing through, apply a second coat of primer. A white primer makes bright colors pop, while a black primer can create depth for galaxy, jewel-tone, or dramatic marble pours.
Step 5: Level and Protect Your Workspace
Acrylic pouring depends on gravity, and gravity has no respect for your flooring. Cover your work area with a drop cloth or plastic sheeting. Raise the table on cups, blocks, or painter’s pyramids so paint can drip freely over the edges. Make sure the table is level before pouring. If one side is lower, your paint will migrate there like it just remembered an appointment.
Use painter’s tape to protect table legs, undersides, drawers, hardware, or any areas you do not want painted. If the tabletop is removable, take it off and work on it separately. This makes pouring and sealing easier.
Step 6: Mix the Acrylic Paint and Pouring Medium
Pouring medium changes the flow of acrylic paint, helping it move smoothly without thinning it into weak, watery color. Many craft pouring mediums recommend starting around equal parts acrylic paint and pouring medium, then adjusting as needed. The ideal consistency is often compared to warm honey or melted ice cream: fluid enough to pour, but not so thin that it runs away screaming.
Mix each color in a separate cup. Stir slowly to reduce bubbles. If the paint is too thick, add a small amount of pouring medium. If it is too thin, add more paint. Avoid adding too much water, especially for a tabletop, because excess water can weaken the paint film and affect durability.
Step 7: Layer the Dirty Pour Cup
Now comes the fun part. Choose a larger cup and begin layering your mixed colors. Pour a little of one color, then another, then another. Repeat the layers until the cup contains enough paint for your tabletop. Do not stir the dirty pour cup. The layering is what creates ribbons, cells, and movement.
For a balanced design, alternate light and dark colors. Add metallic paint sparingly because it can dominate the composition. White helps separate colors and create contrast. Black creates drama but can overpower softer shades if used heavily.
Step 8: Pour the Paint onto the Tabletop
There are two popular ways to pour. For a classic dirty pour, slowly pour the layered cup across the tabletop in a winding motion. For a flip cup, place the tabletop over the cup or flip the cup upside down onto the surface, then lift it and let the paint spread. The flip cup method can create bold, dramatic blooms of color.
Once the paint is on the table, tilt the surface gently to move it toward the edges. Work slowly. If you tilt too aggressively, the best parts of the design may slide right off the table, which is both tragic and very on-brand for impatient DIY.
Step 9: Cover the Edges
Use gloved fingers, a palette knife, or a stir stick to guide paint over the edges. Tabletop edges are easy to forget, but they make the difference between a finished furniture piece and a craft project that looks like it got tired halfway through.
Check all sides for missed spots. You can dab extra paint onto bare areas or use drips from the drop cloth if they are still clean and wet. If the table has a thick edge, let the paint flow naturally and then smooth any heavy drips before drying.
Step 10: Remove Bubbles Carefully
Small air bubbles may appear after pouring. You can pop them by gently passing a heat gun or small torch over the surface, keeping it moving and never holding heat in one place. Too much heat can scorch paint, damage the table, or create strange textures. Use caution, especially near plastic, laminate, or taped areas.
If you do not have a heat tool, you can also blow gently through a straw or use a toothpick to pop stubborn bubbles. The goal is subtle correction, not a dramatic dragon performance.
Step 11: Let the Pour Dry Without Disturbing It
Drying time depends on paint thickness, humidity, temperature, and the products used. Thin pours may feel dry within a day, while thicker pours can take several days or longer. Keep the table flat, dust-free, and protected while it dries. A large cardboard box or clean plastic storage bin placed over the project can help keep dust, pet hair, and curious fingerprints away.
Do not seal too soon. Acrylic paint can feel dry on the surface while remaining soft underneath. If you trap moisture under a topcoat, the finish may cloud, bubble, or cure poorly. Patience is part of the project. Consider it the table’s spa retreat.
Step 12: Seal the Dirty Pour Table Top
A dirty pour table top needs a protective finish because tables are touched, bumped, wiped, and occasionally used as landing zones for coffee mugs, keys, laptops, and snacks. For light-use tables, acrylic varnish or polycrylic can work beautifully. For a harder furniture finish, water-based polyurethane is a popular option because it dries clear and resists scratches better than many decorative sealers. Oil-based polyurethane is durable, but it can add a warm amber tone, which may change whites and cool colors.
Apply thin coats instead of one thick coat. Let each coat dry as directed, then lightly sand between coats if the product recommends it. For high-use surfaces, consider three or more coats. Epoxy resin can create a glass-like finish, but it requires careful measuring, mixing, bubble control, ventilation, and curing. It is stunning when done well and deeply unforgiving when rushed.
How Much Paint Do You Need?
The amount of paint depends on the size of your table and how much paint you allow to flow over the edges. A small side table may need 8 to 12 ounces of mixed paint. A medium coffee table may need 16 to 24 ounces or more. It is better to mix slightly too much than to run out halfway through the pour. A dry corner during a dirty pour is the DIY equivalent of a cliffhanger ending.
If you are unsure, measure the tabletop and prepare extra paint in your main colors. Leftover mixed paint can be poured onto coasters, trays, small canvases, or drawer fronts for matching decor.
Common Dirty Pour Table Top Mistakes
Skipping surface prep
Paint needs a clean, sanded, primed surface. If you pour directly onto glossy furniture, the design may peel later. Prep is the boring foundation that makes the exciting part last.
Using paint that is too thin
If the mixture is watery, colors may blend into a dull mess. Use pouring medium to improve flow without weakening the paint too much.
Over-tilting the table
Tilt gently and stop when the design looks good. Many pours are ruined by the sentence, “Just one more tilt.” That sentence has destroyed more swirls than gravity itself.
Sealing before the paint cures
Give the pour enough time to dry fully. The thicker the paint, the longer the wait. A rushed topcoat can cause cloudiness or tackiness.
Choosing the wrong topcoat
Use a sealer appropriate for furniture. Decorative craft sealers may look nice, but a tabletop usually needs something more protective.
Dirty Pour Color Ideas for Table Tops
For a modern marble look, combine white, charcoal, silver, and a small amount of black. For a coastal style, use teal, aqua, navy, pearl white, and sand beige. For a luxury geode effect, try emerald, black, white, gold, and clear glitter accents. For a sunset table, use coral, peach, magenta, cream, and bronze. For a minimalist look, choose two neutrals and one metallic accent.
Always test colors together on cardboard before pouring the table. Paint behaves differently when layered, and a test pour can save you from discovering too late that your elegant palette has become “expired smoothie.”
How to Care for a Painted Dirty Pour Table
After sealing, give the finish time to cure before heavy use. Dry and cured are not the same thing. A surface may be dry to the touch but still soft underneath. Avoid placing hot mugs, heavy objects, or wet items on the table during the curing period.
Clean the finished table with a soft damp cloth. Avoid harsh chemicals, abrasive scrubbers, and standing water. Use coasters for drinks and felt pads under decorative objects. If the table gets scratched over time, lightly sand the affected area and apply another thin coat of compatible clear finish.
Experience Notes: What I Learned Painting a Dirty Pour Table Top DIY
The biggest lesson from painting a dirty pour table top DIY is that the project rewards preparation more than bravery. The pour looks like the star of the show, but the sanding, cleaning, priming, and leveling are the quiet backstage crew making sure nobody falls into the orchestra pit. On my first practice pour, I spent far too much time picking colors and far too little time checking whether the surface was level. The design looked beautiful for about three minutes. Then it slowly drifted to one corner like it had packed a suitcase. Since then, I always use a small level before opening a single paint bottle.
Another experience worth sharing is to mix more paint than you think you need. Running out of paint during the pour creates panic, and panic is not a recommended artistic technique. I like to keep an emergency cup with my main base color ready. If a corner looks thin or an edge needs help, that extra paint saves the design without forcing me to remix colors while wearing gloves covered in acrylic confetti.
Color choice also matters more than beginners expect. The prettiest bottles on the shelf do not always become the prettiest pour. High-contrast colors make movement easier to see, while too many similar mid-tones can blend into a cloudy finish. White is useful because it separates colors and adds brightness. Metallics are gorgeous, but they should be treated like hot sauce: exciting in the right amount, overwhelming if you pour with too much enthusiasm.
I also learned that edges deserve respect. A tabletop may look amazing from above, but furniture is seen from the side too. Letting paint drip over the edges gives the piece a finished, intentional look. I use a gloved finger to smooth the sides and check underneath for heavy drips after about 15 minutes. This small step keeps the table from drying with hard paint icicles underneath.
The final lesson is to be patient with sealing. A dirty pour can feel dry long before it is ready for a protective topcoat. Waiting a few extra days can prevent cloudy finishes, dents, and tacky spots. Once sealed properly, the table becomes both art and furniture, which is the whole point. The best dirty pour table tops look spontaneous, but they survive daily life because the maker slowed down where it mattered. In other words, let the paint be wild, but let the process be sensible.
Conclusion
Learning how to paint a dirty pour table top DIY is a creative way to turn ordinary furniture into a one-of-a-kind statement piece. The process is beginner-friendly, but the best results come from careful prep, smart color choices, proper paint consistency, slow tilting, full drying time, and a durable clear topcoat. Whether you want a marble coffee table, a coastal side table, or a galaxy-inspired nightstand, the dirty pour technique gives you freedom to experiment while still creating a functional surface. Start small, protect your workspace, embrace the mess, and remember: the table is supposed to look artistic, not perfect.