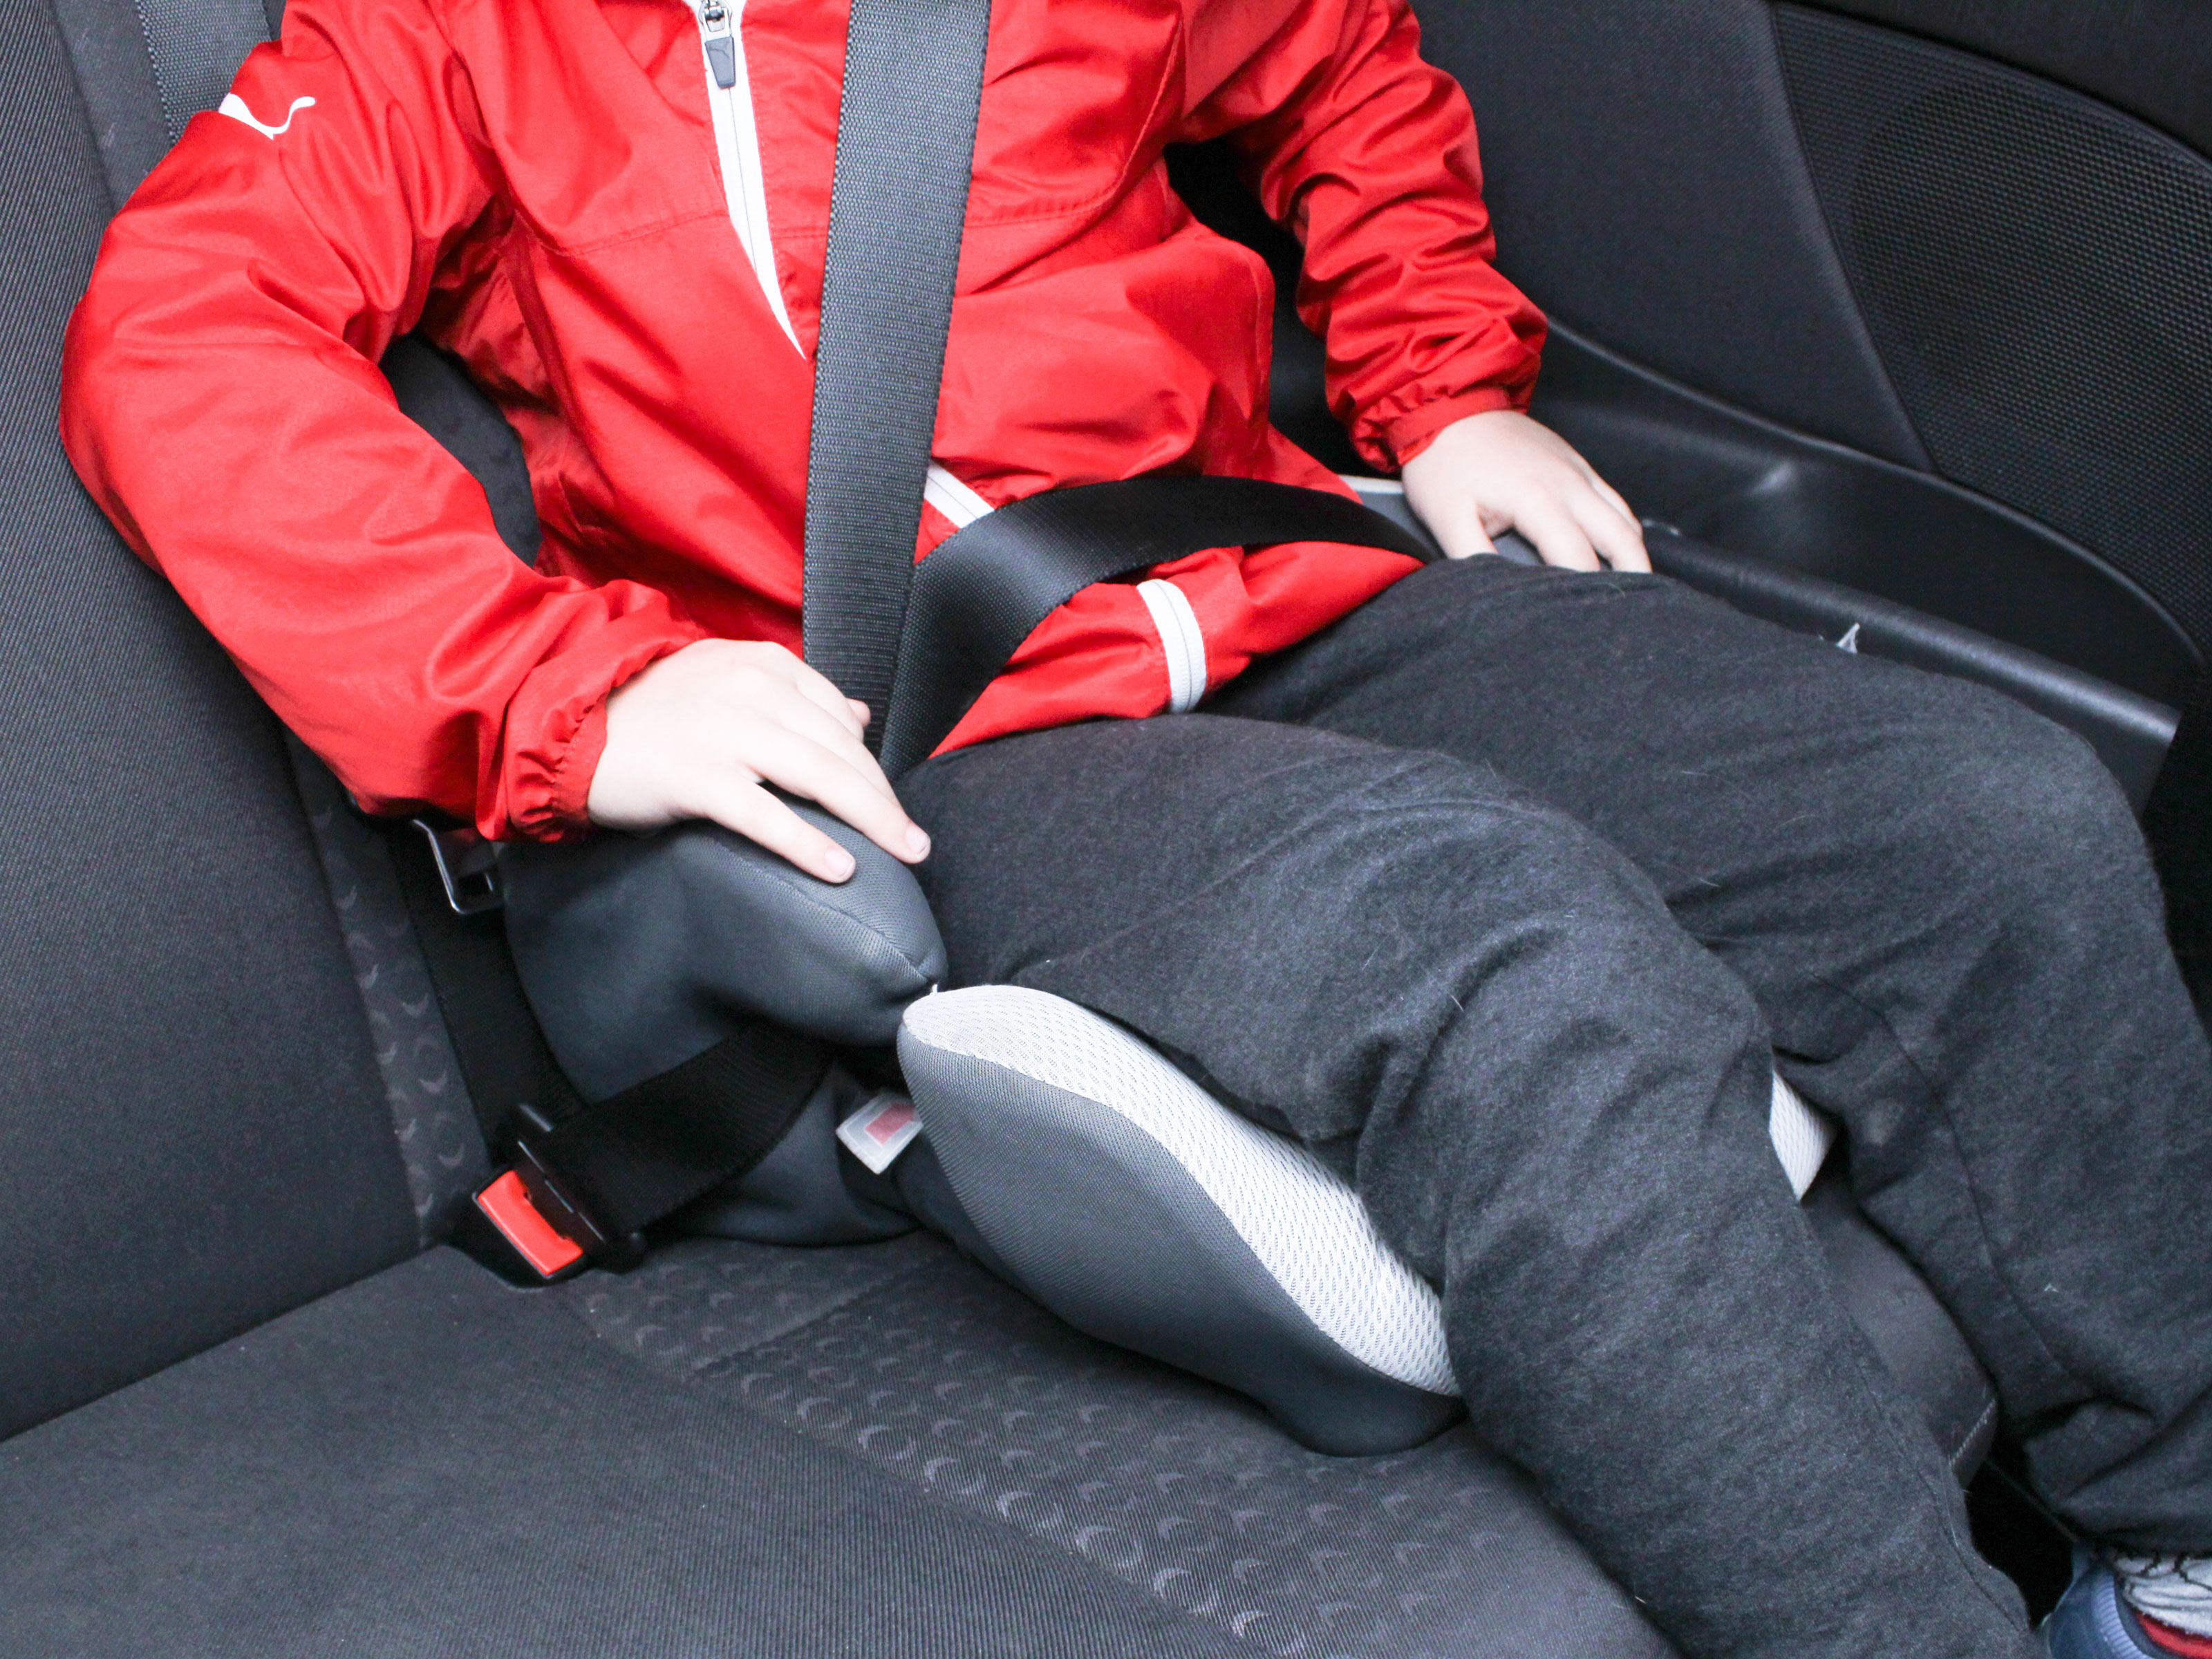
Note: This guide is based on current U.S. child passenger safety guidance from major safety and health organizations. Always follow your booster seat manual, your vehicle owner’s manual, and your state’s child passenger safety law. When in doubt, ask a certified Child Passenger Safety Technician to check the setup. Key safety points include using a booster until the vehicle seat belt fits correctly, keeping children under 13 in the back seat, and making sure the lap belt sits low on the upper thighs while the shoulder belt crosses the center of the chest and shoulder.
Introduction: The Booster Seat Is Small, but the Job Is Big
Learning how to install a booster seat may feel like one of those parenting tasks that should take thirty seconds and zero brain cells. Place seat, buckle child, drive away, right? Not quite. A booster seat looks simple because it does not usually have a built-in harness like a forward-facing car seat. But its job is incredibly important: it helps position the vehicle’s adult seat belt so it fits a child’s smaller body correctly.
A booster seat does not restrain the child by itself. Instead, it lifts the child so the vehicle’s lap-and-shoulder belt can do the restraining work safely. That means “installation” is really about choosing the right seat, placing it in the right vehicle position, routing the belt correctly, and checking the fit every single ride. In other words, the booster is the helpful stage manager; the seat belt is the star of the show.
This guide walks you through how to install a booster seat in 11 steps, using practical language, real-world examples, and enough detail to keep you from staring at the back seat like it just handed you a physics exam. Whether you are using a high-back booster seat, a backless booster seat, or a combination seat converted to booster mode, the same goal applies: the child sits upright, the belt lies flat, the lap belt stays low, and the shoulder belt crosses the chest properly.
Before You Start: Know What a Booster Seat Is For
A booster seat is designed for children who have outgrown their forward-facing car seat with a harness but are still too small for the vehicle seat belt alone. Many children need a booster until they are about 4 feet 9 inches tall and often between 8 and 12 years old, though fit matters more than birthdays. A child is ready for the adult seat belt only when the belt fits correctly without help from a booster.
High-Back Booster vs. Backless Booster
A high-back booster seat has a backrest and often provides better shoulder belt positioning, especially in vehicles with low seat backs or no adjustable head restraints. A backless booster seat is lighter, easier to move, and works well when the vehicle seat has proper head support and the shoulder belt fits correctly. Consumer Reports has long recommended high-back boosters for everyday use because they often help position the shoulder belt better, while IIHS emphasizes that the key purpose of any booster is to raise the child and guide the belt into a safer position.
The Golden Rule: Use a Lap-and-Shoulder Belt
A booster seat should be used with a lap-and-shoulder seat belt, not a lap-only belt. The lap belt and shoulder belt work together to spread crash forces across stronger parts of the body. Safety organizations warn that a shoulder belt should never be placed behind the child’s back or under the arm because that can leave the upper body poorly protected.
How to Install a Booster Seat: 11 Steps
Step 1: Read the Booster Seat Manual First
Yes, the manual. The tiny booklet that often hides under the seat pad like it owes you money. Read it anyway. Booster seats may look similar, but belt guides, height adjustments, LATCH rules, cup holder placement, recline limits, and weight requirements can vary by model. Some boosters allow LATCH to hold the booster in place when it is unoccupied; others do not. Some high-back boosters require the shoulder belt to pass through a guide at shoulder level. Your manual tells you exactly how that specific seat is meant to be used.
Also check the labels on the booster seat itself. Look for height and weight limits, expiration dates, model numbers, and manufacturer instructions. A booster that is expired, recalled, missing parts, or damaged should not be used. If the booster has been in a moderate or severe crash, check the manufacturer’s crash replacement policy and NHTSA guidance before using it again.
Step 2: Read Your Vehicle Owner’s Manual
Your vehicle manual explains which seating positions are suitable for child restraints and how the seat belts, head restraints, and LATCH anchors work. This matters because a booster seat depends heavily on the vehicle seat belt geometry. A booster may fit beautifully in one back seat position and awkwardly in another, like jeans after Thanksgiving dinner.
Look for information about rear seating positions, adjustable shoulder belt anchors, inflatable seat belts, removable head restraints, and any restrictions on using boosters with certain vehicle features. If your vehicle has unusual seat belt designs, built-in booster seats, or very sculpted rear seats, the manual becomes even more important.
Step 3: Choose the Back Seat
The back seat is the safest place for children. U.S. safety guidance consistently recommends that children younger than 13 ride properly restrained in the rear seat. This is especially important because front airbags are designed for adults and can be dangerous for children in the front passenger seat.
Pick a rear seating position with a lap-and-shoulder belt. If possible, choose a spot where the booster sits flat and stable, the child has head support, and the shoulder belt can cross the child’s chest correctly. The center rear seat can be a great location if it has a lap-and-shoulder belt and the booster fits well. If the center position has only a lap belt, use an outboard rear seat with a lap-and-shoulder belt instead.
Step 4: Place the Booster Seat Flat on the Vehicle Seat
Set the booster seat on the vehicle seat so it rests flat against the seat cushion. The base should not hang dramatically over the edge unless the booster manual specifically allows a small amount of overhang. Push it back until it touches the vehicle seat back. For a high-back booster, make sure the back of the booster sits flush against the vehicle seat back unless the manual says otherwise.
Check that the booster is not tilted, wedged, or sitting on top of buckles, toys, blankets, or yesterday’s mysterious snack crumbs. A thin layer of crumbs will not ruin your day, but bulky items under the booster can affect positioning. Avoid adding aftermarket mats, padding, or accessories unless both the booster manufacturer and vehicle manufacturer allow them.
Step 5: Adjust the Booster Height
If you are using a high-back booster, adjust the headrest or shoulder belt guide so the shoulder belt can cross the child’s shoulder correctly. The belt should not rub the neck, slide off the shoulder, or float away from the body. Most high-back boosters have a handle, squeeze lever, or adjustment track that lets you raise the back as your child grows.
The shoulder belt guide should generally sit at or slightly above the child’s shoulder, but always follow the booster manual. If the child’s ears are above the top of the booster or vehicle head restraint, check whether the seat is still appropriate. Proper head support matters, especially in backless booster use.
Step 6: Use LATCH Only If the Booster Allows It
Some booster seats come with lower anchors, often called LATCH connectors. In booster mode, LATCH usually does not restrain the child during a crash; the vehicle seat belt does that job. Instead, LATCH may hold the booster in place so it does not slide around or become a projectile when empty. But not every booster uses LATCH, and not every vehicle seating position has lower anchors.
If your booster seat allows LATCH, connect the lower anchor straps to the vehicle’s lower anchors and snug them according to the manual. Do not use LATCH if the booster manual says not to. Do not improvise with cargo hooks, seat frame bars, or anything that looks “anchor-ish.” Car seats are not a craft project.
Step 7: Seat the Child Properly
Have your child sit all the way back in the booster with their back against the booster or vehicle seat back. Their bottom should be flat, not scooted forward. Their knees should bend comfortably at the edge of the booster or vehicle seat when possible. A child who slouches forward can move the lap belt up onto the belly, which is exactly where you do not want it.
This step is also about maturity. A booster seat is appropriate only if the child can sit correctly for the whole ride. That means no leaning sideways, no tucking the shoulder belt behind the back, no sliding under the lap belt, and no dramatic “I’m a noodle now” performances during the drive.
Step 8: Pull the Lap-and-Shoulder Belt Across the Child
Pull the vehicle seat belt across the child and booster. Buckle it into the correct buckle for that seating position. Listen for the click, then give the buckle a quick check to make sure it latched. Route the belt through any required booster belt guides. On many high-back boosters, the shoulder belt passes through a guide near the child’s shoulder. On many backless boosters, the lap belt may pass under armrests or belt guides.
Follow your booster’s instructions exactly. Belt guides are not decorative trim. They exist to help the belt sit where it belongs. If the belt is routed incorrectly, the booster may not position the belt properly.
Step 9: Check the Lap Belt Position
The lap belt should lie snugly across the child’s upper thighs or low across the hips, not across the stomach. This is one of the most important booster seat checks. NHTSA, CDC, Safe Kids, IIHS, CHOP, and other safety organizations repeat this point because it matters: the abdomen is not where crash forces should be concentrated.
If the lap belt rides up onto the belly, try adjusting the booster position, belt routing, or seating position. If the belt still does not fit correctly, that booster may not be a good match for that vehicle or child. Booster fit is a relationship, and sometimes the chemistry is just not there.
Step 10: Check the Shoulder Belt Position
The shoulder belt should cross the center of the child’s shoulder and chest. It should not press into the neck, cut across the face, hang off the shoulder, or sit behind the back. A shoulder belt that annoys the neck often tempts children to move it under the arm or behind the back, which is unsafe. Safe Kids specifically warns against placing the shoulder belt under the arm or behind the back.
If the shoulder belt is too close to the neck, adjust the high-back booster’s belt guide or try a different rear seating position. If you are using a backless booster, the seat may include a shoulder belt positioning clip. Use it only as instructed by the manufacturer. Never use aftermarket clips or gadgets that did not come with the booster unless they are specifically approved by the booster maker.
Step 11: Recheck the Fit Every Ride
Children grow. Jackets get bulky. Friends climb in. Seat belts twist. Buckles hide. Life happens. That is why booster seat safety is not a one-time installation ceremony with imaginary trumpets. It is a quick habit you repeat before every drive.
Before moving the car, check four things: the child is sitting upright, the lap belt is low on the thighs or hips, the shoulder belt crosses the chest and shoulder, and the belt is flat and snug. NHTSA recommends checking belt fit often, and CDC guidance says children no longer need a booster only when the seat belt fits properly without it.
The 5-Second Booster Seat Fit Test
Once the booster is in place, use this quick fit test before each ride:
- The child’s back is against the seat back.
- The lap belt lies low across the upper thighs or hips.
- The shoulder belt crosses the center of the shoulder and chest.
- The child can keep the belt in position without slouching or playing with it.
- The child stays in the back seat, especially if younger than 13.
If one of these points fails, adjust the setup. If it keeps failing, try a different booster or seating position. The best booster seat is not always the fanciest one. It is the one that fits your child, fits your vehicle, and gets used correctly every time.
Common Booster Seat Mistakes to Avoid
Mistake 1: Moving Out of a Harness Too Soon
A child should generally stay in a forward-facing car seat with a harness until they outgrow the harness seat’s height or weight limit. A booster requires the child to sit properly using the vehicle belt for the entire ride. If your child is still wiggly, sleepy, or likely to lean out of position, a harnessed seat may still be the safer stage.
Mistake 2: Using a Lap Belt Only
A booster seat needs a lap-and-shoulder belt. A lap-only belt cannot protect the upper body properly in booster use. If the center rear seat has only a lap belt, do not use a booster there. Choose another rear seating position with a lap-and-shoulder belt.
Mistake 3: Letting the Belt Ride on the Belly
The lap belt belongs low, not across the stomach. If the booster does not position the lap belt correctly, it may not be the right booster for your child or car. Try another seating location or another booster model.
Mistake 4: Putting the Shoulder Belt Behind the Back
This is common when a child complains that the shoulder belt feels uncomfortable. But behind-the-back belt placement removes upper body protection. Fix the belt fit instead of hiding the belt.
Mistake 5: Forgetting to Buckle an Empty Booster
If your booster is not attached with LATCH, buckle it when empty. An unsecured booster can move around during sudden stops. This is one of those tiny habits that takes two seconds and makes the back seat less chaotic.
Mistake 6: Using Bulky Coats Under the Seat Belt
Thick winter coats can create space between the child and the belt. Instead, buckle the child with the belt snug against regular clothing, then place a coat or blanket over the child for warmth. The seat belt should lie flat and close to the body.
When Can a Child Stop Using a Booster Seat?
A child can stop using a booster only when the adult seat belt fits correctly without it. Many safety experts use a simple seat belt fit check: the child sits all the way back, knees bend at the edge of the seat, the lap belt stays low on the thighs or hips, the shoulder belt crosses the chest and shoulder, and the child can remain seated that way for the entire trip. Safe Kids describes similar signs, including knees bending at the seat edge and the belt sitting on the shoulder and hips rather than the neck or belly.
Do not rush this step. Graduating from a booster too early is not a badge of honor. It is like switching from training wheels to a unicycle during rush hour. The child may technically be older, but the belt still has to fit their body correctly.
Extra Experience-Based Tips for Installing and Using a Booster Seat
After helping families think through booster seat setup, one lesson becomes clear: the “best” installation is the one that still works on a rushed Tuesday morning. A booster seat may pass the living-room test, the driveway test, and the “look how responsible we are” test, but the real exam happens when everyone is late, someone forgot a backpack, and the child is holding a waffle like it is official travel equipment.
First, practice the full booster routine when you are not in a hurry. Let your child climb in, sit back, pull the belt across, buckle it, and check the belt path. Teach them what “good belt fit” looks like: lap belt low, shoulder belt across the chest, body upright. Kids are often more cooperative when they understand the reason behind a rule. You do not need to deliver a crash dynamics lecture worthy of a university podium. A simple explanation works: “The belt has to touch the strong parts of your body.”
Second, choose convenience without sacrificing fit. If your child rides in multiple vehicles, check the booster in every car. A booster that fits perfectly in a minivan may fit poorly in a compact sedan. Grandparents’ cars, carpool vehicles, and rideshare situations can all change the belt angle. Keep a lightweight backless booster for travel only if it still provides correct belt fit and the child has proper head support.
Third, create a “no buckle, no roll” family rule. The car does not move until everyone is buckled correctly. This rule works best when adults follow it too. Children have world-class hypocrisy detectors. If adults skip seat belts, kids notice immediately and store that information for future courtroom-level arguments.
Fourth, watch for comfort problems. If the shoulder belt bothers your child’s neck, do not let them tuck it under the arm. Instead, adjust the booster, use the built-in guide, raise or lower the vehicle shoulder belt anchor if allowed, or try a high-back booster. Comfort and safety should work together. A setup that annoys the child every ride is more likely to be misused.
Fifth, keep the booster clean enough to function. Sticky belt guides, twisted straps, buried buckles, and mystery goo can make buckling harder. Follow the manufacturer’s cleaning instructions. Do not soak parts that should not be soaked, and do not use harsh cleaners unless allowed. A clean booster is not just nicer; it is easier to use correctly.
Sixth, check growth every few months. Children do not grow evenly. One month the booster fits like a dream; the next month the shoulder guide needs adjusting. Measure height, check weight limits, and confirm that the ears, shoulders, and belt still line up according to the manual. The booster stage can last for years, so tiny adjustments matter.
Seventh, be careful with hand-me-down boosters. A used booster can be acceptable only if you know its full history. Confirm it has not expired, has not been in a crash that requires replacement, has all parts, has readable labels, and has the manual available. If you do not know the history, skip it. Saving money is great; gambling with safety is not the coupon you want.
Eighth, involve your child in ownership. Let them choose between safe, approved options when possible. Maybe they pick the cup holder side, the seat color, or the “car snack rule.” A child who feels included may be less likely to fight the booster. Just remember: the child may choose the color, but the adult chooses the safety standard.
Ninth, schedule a professional check if you are unsure. Certified Child Passenger Safety Technicians can help identify issues that are easy to miss, such as poor shoulder belt geometry, incorrect belt routing, or a booster that is not ideal for your vehicle. Even confident parents can benefit from a second set of trained eyes.
Finally, make booster safety boring. That is the dream. The best booster routine is not dramatic, confusing, or negotiable. It is ordinary. Child gets in, sits back, belt lies low, shoulder belt crosses the chest, buckle clicks, adult checks, car goes. No speeches. No wrestling match. No Olympic-level bargaining. Just a safe habit repeated until the adult seat belt truly fits on its own.
Conclusion: A Correct Booster Seat Setup Is Worth the Minute
Installing a booster seat is less about tightening straps and more about achieving proper seat belt fit. The booster lifts the child so the vehicle’s lap-and-shoulder belt can protect the body correctly. That means the lap belt must stay low across the upper thighs or hips, the shoulder belt must cross the center of the chest and shoulder, and the child must sit upright for the whole ride.
The 11 steps are simple, but they matter: read the manuals, choose the back seat, place the booster flat, adjust the height, use LATCH only when allowed, seat the child properly, route the belt correctly, check lap belt fit, check shoulder belt fit, and repeat the fit check often. Once this becomes routine, booster safety stops feeling complicated and starts feeling like second nature.
And yes, the cup holders may still collect crackers, crayons, and one fossilized French fry from 2022. That part is apparently unavoidable. But a properly installed and used booster seat gives your child a safer ride, and that is the part worth getting right every single time.