Note: This guide is written for beginner and intermediate anglers who want a practical, real-world explanation of downrigger fishing. Always check local fishing regulations, boating safety rules, and equipment manuals before heading out.
Introduction: Why Downriggers Make Trolling Less Like Guessing
If you have ever trolled across a lake and wondered whether your lure was actually where the fish wereor just taking a scenic vacation somewhere behind the boata downrigger setup may become your new favorite fishing tool. A downrigger is designed to put your bait or lure at a controlled depth while trolling. Instead of hoping your spoon, plug, flasher, or bait is running deep enough, you use a weighted ball, cable, boom, reel, and release clip to send your presentation right into the strike zone.
That is the magic of downrigger fishing: precision. Fish such as salmon, lake trout, kokanee, walleye, striped bass, and other open-water predators often suspend at very specific depths. They may be 35 feet down over 90 feet of water, 80 feet down near the thermocline, or cruising just below a bait school. Without a controlled-depth trolling system, you are left estimating lure depth based on line length, lure design, speed, current, and a little bit of fisherman optimismwhich, as every angler knows, can be wildly inaccurate after two cups of gas-station coffee.
This article breaks down how to use a downrigger setup in 5 steps, from mounting the gear to fighting the fish after the release pops. We will also cover common mistakes, useful tips, and hands-on experience that can save you from tangled lines, dragging bottom, or accidentally turning your trolling spread into underwater spaghetti.
What Is a Downrigger Setup?
A downrigger setup is a trolling system that uses a heavy weightoften called a cannonballto carry your fishing line and lure down to a chosen depth. Your fishing line is not tied directly to the weight. Instead, it is clipped into a downrigger release clip. When a fish strikes, the fishing line pops free from the clip, allowing you to fight the fish directly on your rod and reel.
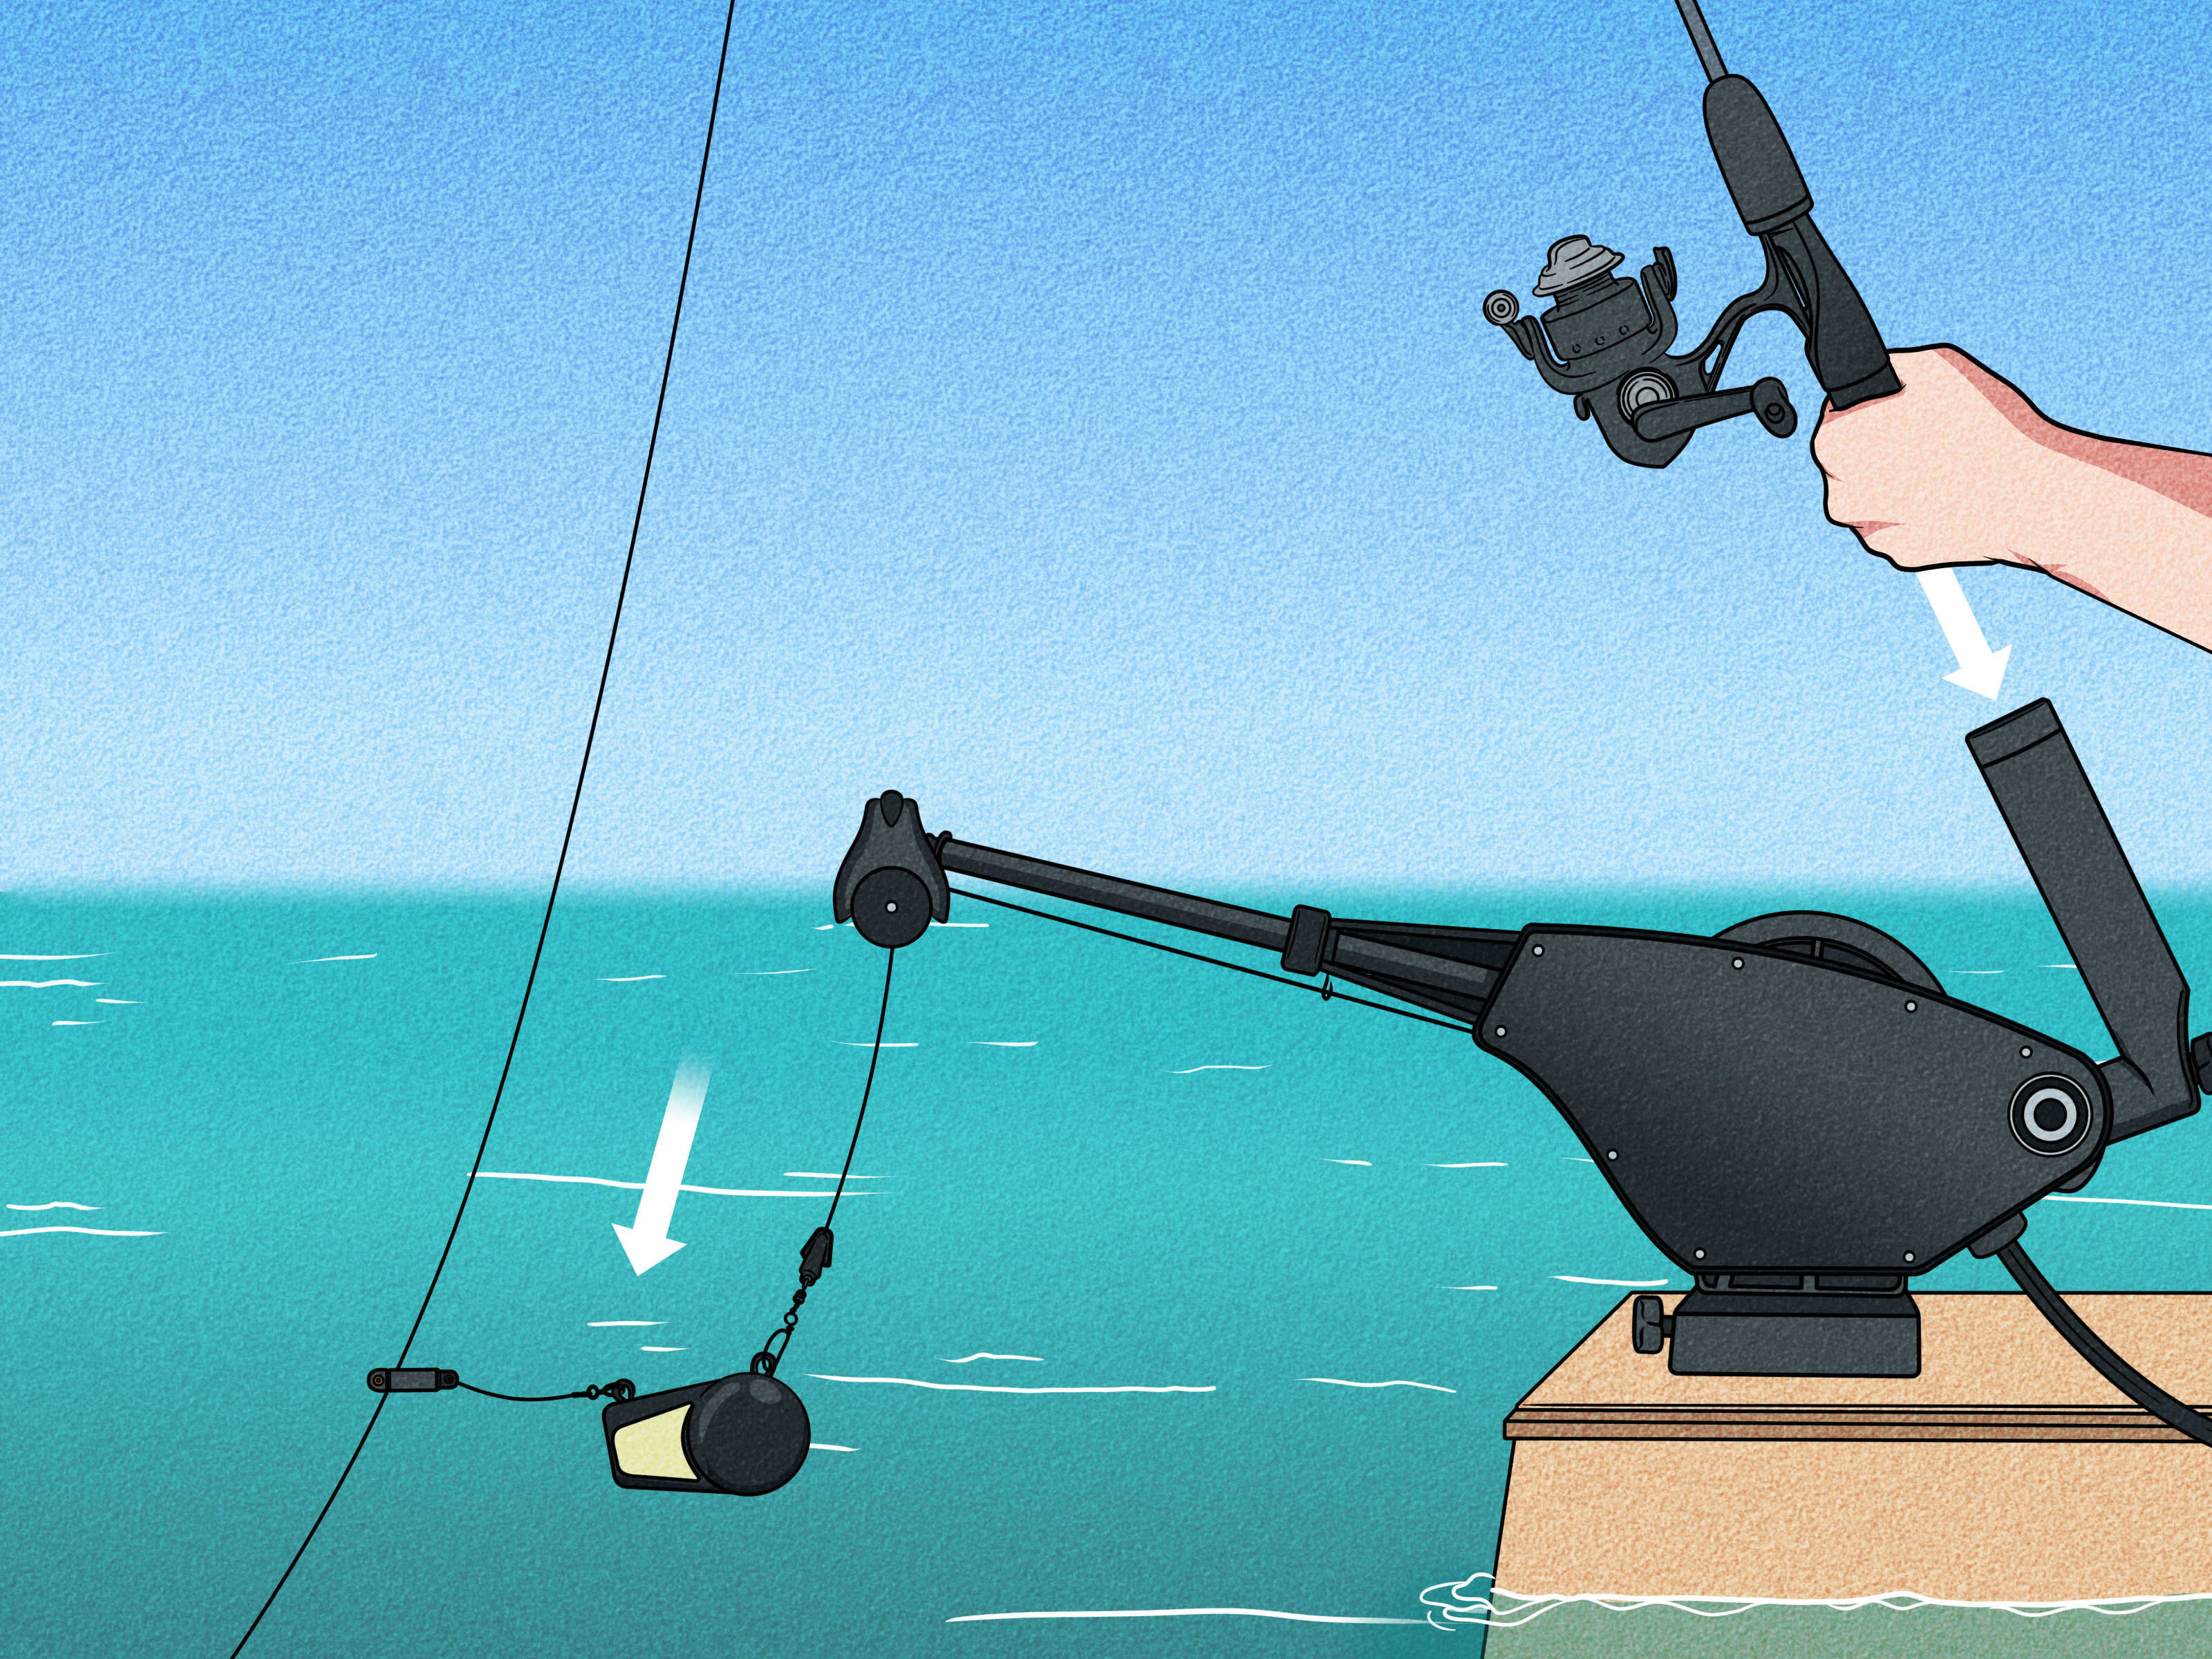
The basic components include a downrigger unit, a mounting base, a boom, a spool of cable or braided downrigger line, a depth counter, a downrigger weight, a release clip, a rod holder, and your normal trolling rod and reel. Manual downriggers are operated by hand crank. Electric downriggers raise and lower the weight with a motor, which is especially helpful when fishing deep or running multiple lines.
Why Anglers Use Downriggers
Downriggers help anglers solve one of trolling’s biggest problems: depth control. Fish are not always near the surface, and many species spend much of the day suspended in deeper water. A downrigger lets you place your lure near fish seen on sonar, near bait schools, along temperature breaks, or just above bottom structure.
They are especially popular for salmon fishing, lake trout trolling, kokanee fishing, deep-water walleye tactics, Great Lakes fishing, and coastal trolling. Downriggers also allow anglers to use lighter lures that would never dive deeply on their own. A small spoon, soft bait, plug, or spinner can be placed 50, 80, or even 100 feet down without adding bulky weights directly to the fishing line.
How to Use a Downrigger Setup: 5 Steps
Using a downrigger may look intimidating at first. There is a boom, a cable, a ball, a clip, a rod, a reel, and at least one person on board saying, “I saw this once on YouTube.” But once you understand the order of operations, the process is straightforward.
Step 1: Mount the Downrigger Securely
Start by mounting the downrigger on a strong, stable part of the boat. Most anglers install downriggers on the stern corners, gunwales, or a dedicated trolling board. The mount must be strong enough to handle the pull of the downrigger weight, water resistance, boat movement, and the occasional “oops” moment when the ball bumps bottom or weeds.
If you are using a clamp-on or portable downrigger for a small boat, kayak, or rental boat, double-check that the clamp is tight and positioned so the boom clears the side of the boat. If you are installing a permanent base, follow the manufacturer’s instructions and use backing plates when needed. A downrigger weight bouncing at trolling speed puts real force on the mount, so this is not the place for creative engineering involving duct tape and wishful thinking.
Position the boom so the cable drops cleanly into the water and does not rub against the hull, motor, transducer, swim platform, or other gear. The rod holder should angle the rod slightly upward and away from the cable. This helps the rod load properly when the line is clipped in and reduces tangles when a fish strikes.
Step 2: Attach the Weight and Release Clip
Next, connect the downrigger weight to the terminal end of the cable or braided downrigger line. Most downrigger weights range from about 6 to 15 pounds, though heavier weights are used for deep trolling, fast speeds, or heavy current. Round cannonballs are common, but finned weights, fish-shaped weights, and pancake-style weights can track better in certain conditions.
The release clip is the small but mighty part of the system. It grips your fishing line while the downrigger lowers the lure to depth. When a fish hits, the tension pulls the line free. Some clips attach directly to the weight, while others are attached by a short leader, cable, or stacker setup.
Adjust the release tension based on your target species, lure drag, trolling speed, and line strength. A light tension setting may work for kokanee or small trout, while salmon and lake trout often need firmer tension. If the clip is too loose, the line will pop free constantly. If it is too tight, small fish may drag along unnoticed, creating the least exciting game of “Is that a fish or a wet sock?” ever played.
Step 3: Let Out Your Lure Behind the Boat
Before clipping your fishing line to the downrigger release, let your lure run behind the boat. This distance is called the setback. A common setback range is 10 to 100 feet, depending on water clarity, fish mood, boat traffic, species, and lure type.
Short setbacks keep your lure closer to the downrigger weight and make depth control more precise. They often work well in deep water, stained water, or when fish are aggressive. Longer setbacks can help in clear water or when spooky fish shy away from boat noise and the downrigger ball. For salmon and trout, many anglers experiment with setbacks between 20 and 60 feet until fish tell them what they prefer.
After letting out the lure, place the fishing line into the release clip. With many pinch-pad releases, you can control tension by placing the line deeper into the jaws for a stronger hold or closer to the edge for a lighter release. Make sure the rod reel is in gear and the drag is set correctly. A drag that is too tight can break line on a hard strike. A drag that is too loose may create slack and missed fish.
Step 4: Lower the Downrigger to the Target Depth
Now lower the downrigger weight to your desired depth. Use the depth counter as your guide. If your fish finder shows bait or fish at 45 feet, try setting the downrigger at 42 to 45 feet, or slightly above the fish. Predatory fish often look upward to feed, so running your lure just above marks on sonar can be more effective than running it below them.
Lower the weight smoothly. Avoid dropping it too fast, especially when multiple rods are out. A fast drop can tangle the lure, wrap the cable, or cause the release to trip. Once the weight reaches depth, place the rod in the holder and reel up slack until the rod tip bends. This loaded bend is important. It shows that the line is properly tensioned in the release clip.
Watch the cable angle while trolling. At slower speeds and shallow depths, the cable may hang nearly vertical. At faster speeds or deeper depths, water resistance pushes the weight backward, creating an angle called blowback. Blowback means the weight is not as deep as the counter says. Heavier weights, slower speeds, thinner cable, or streamlined weights can reduce this effect.
Step 5: Troll, Watch the Rod, and Fight the Fish
Once the lure is running at depth, troll at the speed that matches your lure and target species. Trout and salmon trolling often happens around 1.5 to 3 mph, but the best speed depends on lure action, water temperature, current, and fish behavior. Watch the lure beside the boat before sending it down. If the spoon wobbles nicely, the plug tracks straight, or the flasher rotates properly, you are in the neighborhood. If it spins like a washing machine full of fireworks, adjust speed or rigging.
When a fish strikes, the fishing line should pop free from the release. The rod tip will spring upward, then load again as the fish pulls. Pick up the rod, keep steady pressure, and start reeling. Another person should raise the downrigger weight if possible, especially when fighting a strong fish. This keeps the fish from wrapping around the cable or weight.
If you are fishing alone, fight the fish first unless the weight is creating an obvious problem. Many solo anglers briefly crank or power the downrigger up after the fish is under control. Stay calm. A fish hitting a downrigger rod can turn the boat into a small theater production, but panic is how rods get dropped, nets get stepped on, and sandwiches become casualties.
Choosing the Right Gear for a Downrigger Setup
A good downrigger setup does not need to be fancy, but it should be balanced. Match the downrigger, rod, reel, line, release, and weight to your fishing depth and target species.
Manual vs. Electric Downriggers
Manual downriggers are affordable, simple, and excellent for smaller boats or occasional trolling. They require hand cranking, which is fine at 30 feet but becomes less charming when you are retrieving a 12-pound ball from 110 feet for the fifth time.
Electric downriggers cost more but save effort, especially for deep-water salmon and lake trout trolling. Many electric models offer auto-up features, depth counters, programmable depths, or integration with trolling systems. If you fish often, fish deep, or run several rods, an electric downrigger can feel like hiring a quiet deckhand who never eats your snacks.
Rod, Reel, and Line
Downrigger rods usually have moderate action, enough backbone to fight fish, and enough flex to load nicely in the holder. Common lengths range from 7 to 9 feet. A line-counter reel is not required when using a downrigger, but it helps repeat productive setbacks. Many anglers use monofilament because it stretches, grips release clips well, and forgives sudden strikes. Braided line can work, but it may slip in some clips unless adjusted properly or wrapped with a rubber band or special release.
Weights and Releases
For shallow trolling, lighter balls may be enough. For deep trolling, faster speeds, or strong current, heavier weights reduce blowback and keep the lure closer to the intended depth. Release clips should be matched to line type and fish size. Adjustable releases are useful because they let you fine-tune tension throughout the day.
Common Downrigger Mistakes to Avoid
Downriggers are simple once you learn them, but a few mistakes can quickly turn a peaceful morning into a knot-removal seminar.
Dropping the Weight Too Fast
Lowering the ball too quickly can trip the release, tangle the lure, or send your setup into chaos. Lower it smoothly and keep an eye on rod tension.
Fishing Too Deep
Many beginners run lures below fish because they try to match the sonar mark exactly. Since many predator fish feed upward, start slightly above the fish and adjust from there.
Ignoring Blowback
Your depth counter tells you how much cable is out, not always the exact running depth. If your cable is sweeping far back, your lure is riding higher than expected. Adjust by slowing down, using a heavier weight, or letting out more cable carefully.
Using the Wrong Release Tension
If your release is too loose, waves and lure drag will pop it free. If it is too tight, fish may not release properly. Test and adjust until the rod stays loaded but releases cleanly on a firm pull.
Forgetting to Raise the Ball
When a fish is hooked, the downrigger ball remains down there like an underwater bowling ball with a cable attached. Raise it when safe to avoid tangles during the fight.
Best Fishing Situations for Downriggers
Downriggers shine whenever fish are suspended or holding at a predictable depth. They are especially useful in deep lakes, reservoirs, Great Lakes waters, and coastal trolling zones. If your sonar shows fish at 60 feet over 150 feet of water, a downrigger allows you to put your lure right where the action is.
Lake trout often suspend near cold-water zones or structure. Salmon may follow baitfish at specific temperatures. Kokanee can be extremely depth-sensitive. Walleye may suspend over open basins. In each case, a downrigger gives you repeatability. When you catch a fish at 47 feet with a 35-foot setback at 2.2 mph, you can duplicate that setup instead of simply saying, “Well, something worked somewhere back there.”
Practical Experience: Lessons From Using a Downrigger Setup
Experience teaches downrigger lessons faster than any manual. The first big lesson is that small adjustments matter. Moving a lure from 55 feet to 49 feet can change the entire day. Fish may ignore a bait below them but crush it when it runs just above their heads. If you are marking fish and not getting bites, change depth before changing every lure in the box.
The second lesson is to watch your rod tips like they are telling a story. A properly loaded downrigger rod has a steady bend. If the rod slowly pulses, your lure may be working well. If the tip shakes wildly, the lure may be spinning, fouled with weeds, or dragging a small fish. If the rod suddenly straightens, the release may have popped. Many beginners miss fish because they assume a small change in rod behavior is nothing. Sometimes it is nothing. Sometimes it is a trout politely stealing your lure’s dignity.
The third lesson is that trolling speed is not just a number on a screen. Speed at the surface may differ from lure speed below the boat because of current, wind, and boat direction. If you troll with the wind and catch fish, then turn around and stop getting bites, your lure action may have changed. Watch the rod, watch the GPS, and occasionally check lure action beside the boat. A spoon that looks perfect at 2.1 mph may look ridiculous at 2.8 mph.
The fourth lesson is to keep your setup organized. Before dropping the ball, make sure the lure is swimming cleanly, the line is in the release, the reel is engaged, and the rod is in the holder. Do not rush. Most tangles happen during deployment, not while everything is trolling smoothly. When fishing multiple downriggers, set one side at a time and use different depths or setbacks to reduce crossing lines during turns.
The fifth lesson is to make wide, gentle turns. A sharp turn causes inside lines to slow and sink while outside lines speed up and rise. This can trigger bites, but it can also create tangles if you turn too aggressively. Smart anglers use turns as a fish-finding tool. If the outside rod gets hit, the fish may want a faster lure. If the inside rod gets hit, they may prefer slower action. Your boat is not just transportation; it is part of the presentation.
Another important experience-based tip is to avoid constantly changing everything at once. If you swap lure color, depth, speed, and setback all together, you will not know what fixed the problem. Change one variable at a time. For example, keep the same spoon and speed but raise the downrigger 10 feet. If that fails, change the setback. Then change lure color. Fishing rewards curiosity, but it punishes chaos.
Finally, downrigger fishing becomes much easier when you keep notes. Record the date, water temperature, depth, lure, speed, setback, weather, and where fish were caught. Over time, patterns appear. Maybe your local lake trout prefer silver spoons 20 feet behind the ball in July. Maybe salmon hit flashers best at dawn and smaller spoons after sunrise. Maybe kokanee only cooperate when you promise not to brag too early. A simple fishing log turns random success into repeatable success.
Conclusion: Downrigger Fishing Is Precision With a Splash of Patience
Learning how to use a downrigger setup is one of the best ways to become a more precise trolling angler. The system may seem complicated at first, but the process is simple: mount the downrigger, attach the weight and release, set your lure behind the boat, lower it to the target depth, and troll while watching the rod.
The real skill comes from adjusting depth, speed, setback, lure action, and release tension until the fish respond. Downriggers are not magic machines, though some days they feel close. They are tools that help you fish smarter, cover productive water, and repeat what works.
Start simple. Use one rod. Learn how the release feels. Watch your sonar. Make small changes. Keep the boat under control. And when the rod pops free and starts bouncing, try not to yell “Fish on!” so loudly that nearby anglers spill their coffee. Actually, go ahead. They would do the same.