At first, it looks like a regular dollar store run: a few inexpensive picture frames, maybe a pack of glue sticks, and that brave little voice in your head saying, “I can totally make something beautiful with this.” Then suddenly, those plain frames become a stylish lantern, a mini greenhouse, a jewelry display, a spice organizer, or wall decor that looks suspiciously more expensive than it has any right to look.
That is the magic of a good Dollar Store frames DIY. Picture frames are one of the most underrated supplies in the craft aisle because they already come with structure, glass, borders, and decorative edges. In other words, half the work is already done. You are not building from scratch; you are simply convincing a budget frame to live its best life.
In this guide, we will focus on one of the most popular ideas: turning dollar store picture frames into a beautiful decorative lantern. But we will also explore other clever frame projects, practical tips, design variations, and real-life lessons from trying this type of craft at home. Spoiler alert: hot glue is helpful, patience is powerful, and measuring twice still beats muttering “close enough” while holding a crooked frame.
Why Dollar Store Picture Frames Are a DIY Goldmine
Dollar store picture frames are affordable, lightweight, and available in many common sizes such as 4×6, 5×7, and small tabletop styles. That makes them ideal for beginner-friendly home decor projects. Instead of buying specialty wood, glass panels, or custom trim, you can use frames as ready-made building blocks.
The real appeal is flexibility. A simple black frame can become modern farmhouse decor. A gold frame can lean glam. A white frame can look coastal, clean, or cottage-inspired. Add paint, fabric, stain, ribbon, beads, moss, battery candles, or faux greenery, and suddenly that humble frame has main-character energy.
The Big Reveal: Turning Dollar Store Frames into a Decorative Lantern
The most famous version of this project uses four picture frames joined together to create a box-shaped lantern. Remove the backing and inserts, keep the glass or clear plastic panes if they are safe and secure, then glue the frames together at the sides. Add a small wood base, a lid if desired, and decorative filler inside. The final look resembles a high-end lantern you might see in a home decor store, except your wallet does not need to sit down afterward.
Basic Supplies You Will Need
- Four matching dollar store picture frames
- Hot glue, craft adhesive, or a stronger multipurpose adhesive
- Low-temperature glue gun for safer crafting
- Small wood plaque, scrap wood, or sturdy cardboard for the base
- Spray paint, chalk paint, or acrylic paint
- Battery-operated candle or fairy lights
- Faux moss, greenery, pine cones, shells, ornaments, or seasonal filler
- Optional: ribbon, knob, small handle, beads, twine, or decorative trim
Step-by-Step: How to Make a Dollar Store Picture Frame Lantern
Step 1: Choose the Right Frames
Pick four frames that are the same size and shape. Flat-sided frames are easier to glue together than rounded or heavily carved frames. For a beginner project, 4×6 or 5×7 frames work beautifully because they create a lantern large enough to decorate but small enough to stay sturdy.
Check each frame before buying. Make sure the corners are not cracked, the glass or plastic is not scratched, and the frame edges line up evenly. Dollar store crafting is wonderfully affordable, but you still want supplies that behave themselves.
Step 2: Remove the Backing
Take out the cardboard backing, paper inserts, and easel stands. Keep the glass or plastic panes if you want a windowed lantern. If you prefer an open-sided lantern, remove the panes too. For homes with kids or pets, plastic panes may be a safer option than glass.
Step 3: Paint Before Assembly
Painting the frames before gluing them together is much easier than trying to wiggle a brush into corners later. Lightly sand glossy frames so the paint grips better. Apply thin coats rather than one heavy coat. Metallic gold creates a vintage glam look, matte black feels modern, white looks coastal, and weathered brown gives rustic farmhouse charm.
Spray paint should be used outdoors or in a well-ventilated area. Let every coat dry fully before handling. Yes, watching paint dry is not thrilling, but fingerprints in tacky paint are even less thrilling.
Step 4: Glue the Frames into a Box Shape
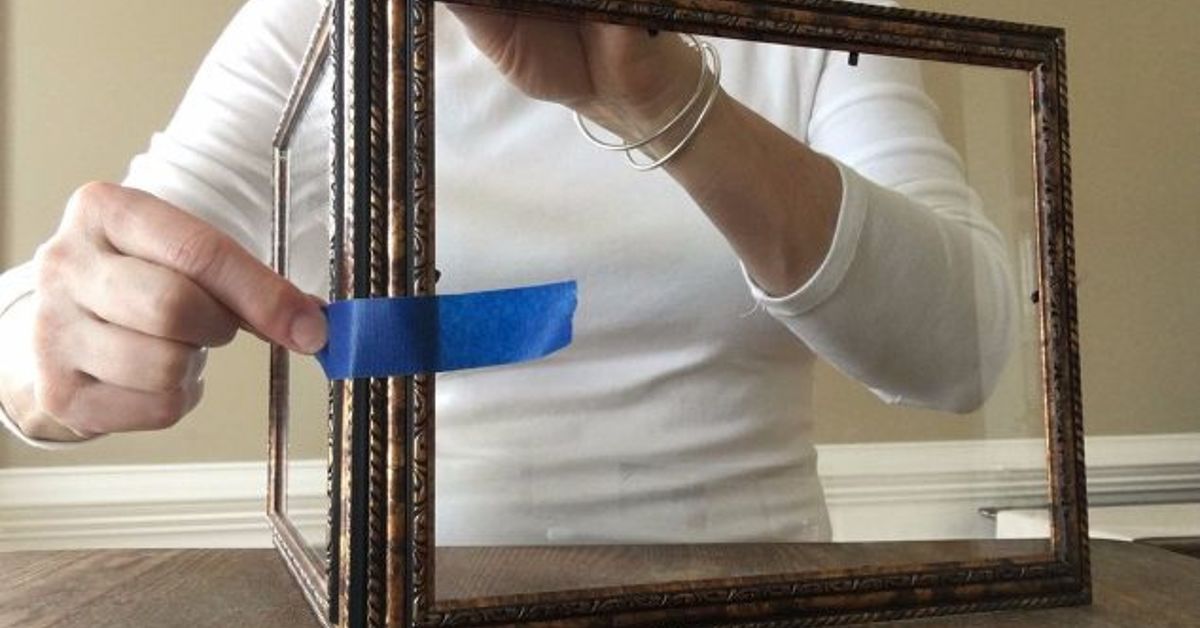
Stand two frames upright at a 90-degree angle and glue along the edge where they meet. Hold them in place until the adhesive begins to set. Add the third and fourth frames the same way until you have a square or rectangular open box.
Hot glue works quickly, but stronger craft adhesive usually gives a more durable hold. Many DIYers use hot glue to tack pieces in place, then reinforce the seams with a stronger adhesive. If your lantern will be moved often, do not rely on a tiny dab of glue and optimism.
Step 5: Add a Base
Attach the frame box to a wood plaque, scrap wood square, foam board, or sturdy cardboard covered with decorative paper. A base gives the lantern stability and provides a surface for your candle or filler. Paint or stain the base to match the frames.
Step 6: Decorate the Inside
Use a battery-operated candle, fairy lights, or a small LED puck light. Add moss, faux succulents, seashells, mini pumpkins, pine cones, ornaments, or flower petals depending on the season. The goal is cozy, not cluttered. Leave enough breathing room so the lantern feels styled instead of stuffed like a craft drawer after a holiday sale.
Step 7: Add Finishing Touches
A small knob glued to the top can mimic a lantern handle. Twine adds farmhouse texture. Ribbon makes it gift-ready. Gold wax or dry-brushed paint can highlight raised details. You can even frost the glass with glass spray or add vinyl decals for a custom look.
Important Safety Tips for This DIY Frame Lantern
Use battery-operated candles instead of real candles. A frame lantern made from glue, paint, plastic, paper backing, ribbon, faux greenery, and other decorative materials should not be treated like a fire-safe candle holder. Flameless candles give the same warm glow without the open flame risk.
When working with a glue gun, choose a low-temperature model when possible, keep fingers away from hot glue, and place the glue gun on a heat-safe surface. If children are helping, adults should handle the cutting, hot glue, and spray paint. Kids can choose colors, arrange decorations, and proudly announce that they are the creative director.
Design Ideas for Every Style
Farmhouse Lantern
Paint the frames matte black or distressed white. Add jute twine around the top and fill the base with moss, mini pine cones, and a warm LED candle. This version works well on a mantel, coffee table, entryway console, or dining room centerpiece.
Coastal Lantern
Use white or light blue paint, then fill the lantern with sand, shells, sea glass, and a flameless candle. This is perfect for a bathroom shelf, beach house, summer table setting, or anyone who wants vacation energy without actually checking airfare.
Glam Gold Lantern
Spray the frames metallic gold and keep the inside simple with fairy lights or a white LED candle. Add pearl beads, crystal-style garland, or mirrored accents. This version looks great for weddings, bridal showers, holiday tables, or dressing up a bedroom vanity.
Seasonal Lantern
For fall, use mini pumpkins, acorns, orange leaves, and warm lights. For Christmas, use ornaments, faux snow, red ribbon, and tiny bottle brush trees. For spring, try pastel flowers, faux grass, and butterfly accents. For Halloween, add spooky silhouettes to the panes and place purple or orange lights inside.
More Clever Things to Do with Dollar Store Frames
The lantern is only the beginning. Dollar store picture frames can be turned into organizers, trays, wall accents, and display pieces. Once you start seeing frames as building materials, the ideas multiply quickly.
1. Picture Frame Jewelry Organizer
Remove the glass and backing, then add mesh, fabric, cork, or small hooks inside the frame. Use it to hang earrings, necklaces, bracelets, or keys. A painted frame with decorative mesh can look boutique-worthy while solving the eternal mystery of where your other earring went.
2. Framed Light Switch Cover
A small frame can be placed around a light switch plate to make it look decorative. This quick upgrade is especially useful in hallways, powder rooms, or older homes where plain switch plates feel unfinished. Choose a frame that fits around the plate without interfering with the switch.
3. In-Drawer Spice Organizer
Flat acrylic or plastic frames can be placed inside a drawer to create slanted rows for spice jars. The angle makes labels easier to read and keeps bottles from rolling around. It is a small kitchen upgrade that feels oddly satisfying, like folding fitted sheets correctly except actually achievable.
4. Mini Greenhouse or Terrarium
Several frames can be assembled into a small greenhouse-style display for faux plants, succulents, or seasonal decor. If you use real plants, make sure the structure can handle moisture and has airflow. For the easiest version, use faux greenery and skip the plant-parent guilt.
5. Dry-Erase Message Board
Place patterned paper, scrapbook paper, or fabric behind the glass and use the surface as a dry-erase board. It is great for grocery lists, meal planning, love notes, reminders, or writing “Buy more glue sticks” because somehow there are never enough.
Why This Project Looks More Expensive Than It Is
The secret is repetition. Four matching frames create symmetry, and symmetry tends to look intentional. Add a unified paint color and a simple filler, and the finished piece feels coordinated rather than thrown together. That is why a few low-cost materials can mimic the shape and mood of store-bought lanterns.
Another trick is restraint. Beginners often want to add every ribbon, flower, jewel, sticker, and charm they own. But high-end decor usually has breathing room. Choose one main finish, one texture, and one focal element. For example: black paint, moss, and a candle. Or gold paint, clear beads, and fairy lights. Simple choices make the project feel polished.
Common Mistakes to Avoid
Using Mismatched Frames Without Planning
Mismatched frames can look charming on a gallery wall, but for a lantern, they can create uneven corners and wobbly sides. If you want a clean lantern shape, matching frames are your best friend.
Skipping Dry Time
Paint and glue need time to cure. If you rush assembly, the frames may slide, the paint may smudge, or the whole lantern may lean like it heard bad news. Let each stage dry before moving on.
Using a Real Candle
Do not place a lit candle inside a decorative frame lantern unless the entire project is made from fire-safe materials and designed for open flame use. Most dollar store frame crafts are not. Battery candles are inexpensive, reusable, and far safer.
Overloading the Inside
Too much filler can make the lantern look messy and unstable. Keep the bottom layer shallow and let the light remain visible. The glow is the star, not the entire contents of the craft bin.
Where to Use Your Finished Frame Lantern
A Dollar Store frame lantern works almost anywhere you need a little atmosphere. Place it on a mantel with garland, use it as a dining table centerpiece, set it on a bathroom shelf, style it on a covered porch, or group three lanterns in different heights for a dramatic display.
It also makes a thoughtful handmade gift. Customize it with the recipient’s favorite colors, seasonal decor, family photos printed on vellum, or small meaningful objects. For weddings and parties, several frame lanterns can create affordable table decor that feels warm and personal.
Experience Section: What This DIY Really Feels Like in Real Life
Here is the honest truth about making a Dollar Store frame craft: it starts with confidence, takes a brief detour through chaos, and ends with you holding up the finished project like you just invented electricity. The first time you try it, you may underestimate how important straight edges are. You may also discover that hot glue strings behave like tiny craft spiders. This is normal. This is the process.
One of the best experiences with this project is the shopping stage. Walking into the dollar store with a plan feels practical, but walking out with frames, moss, fairy lights, ribbon, mini pumpkins, and a decorative bird you absolutely did not need feels like destiny. The frames are usually the anchor purchase, but the accessories help define the personality of the piece. That is where the fun begins.
When assembling the lantern, the biggest lesson is to dry-fit everything first. Stand the frames together without glue and see how the corners meet. Some frames have tiny raised edges or decorative lips that prevent perfect contact. If you notice that before gluing, you can adjust the layout, sand a rough edge, or choose which sides face outward. If you notice it after gluing, congratulations, you have entered the advanced level of “creative problem solving.”
Another experience worth mentioning is how paint changes everything. Cheap plastic frames may look plain or shiny straight from the store, but a coat of matte black or antique gold can completely transform them. The first coat may look unimpressive. Do not panic. The second coat usually brings the magic. A light dry-brush technique can make raised details look carved, while a clear sealer can help protect the finish.
Decorating the inside is where personal taste shines. For a fall lantern, faux leaves and a small LED candle make the piece feel cozy. For Christmas, mini ornaments and fairy lights look festive without much effort. For spring, faux tulips or moss create a fresh look. The same lantern can be redecorated all year, which makes the project more useful than a one-season craft.
The most satisfying part is seeing where the lantern lands in your home. A handmade piece has a different feeling than something bought fully finished. It carries a little story: the frames from aisle five, the glue on your thumb, the moment you realized the ribbon was upside down, and the final proud placement on the mantel. It is decor with a memory attached.
This project is also a great reminder that creativity does not require expensive supplies. Some of the best DIY ideas come from looking at ordinary items differently. A picture frame does not have to stay flat on a wall. It can become a lantern wall, a display case, a message board, or a tiny greenhouse. Once you make one project, you will probably start side-eyeing every frame in the store and wondering, “What else could you become?”
If you are crafting with friends or family, this project becomes even better. Everyone can make the same basic lantern but choose different colors and fillers. One person may create rustic farmhouse decor, another may go full glitter glam, and someone else may build a Halloween version with tiny bats. Same frames, totally different personalities. That is the beauty of budget DIY: it gives everyone room to play.
And yes, mistakes will happen. A seam may need extra glue. A frame may sit slightly uneven. A paint drip may appear out of nowhere like it pays rent. But most mistakes are fixable with trim, ribbon, sanding, or strategic greenery. In fact, many “oops” moments become design features. That uneven corner? Add twine. That glue blob? Cover it with a bow. That scratched pane? Frost it or replace it with decorative paper.
In the end, the experience is less about perfection and more about transformation. You picked up simple frames from the Dollar Store, gave them a little imagination, and turned them into something beautiful, useful, and completely custom. That is the kind of DIY win that makes you look around your home and think, “What else can I upgrade for less than the price of lunch?”
Conclusion
Dollar store frames may look ordinary on the shelf, but they are secretly one of the most versatile supplies in budget home decor. With four matching frames, a little paint, safe adhesive, and a battery-operated candle, you can create a decorative lantern that looks stylish, seasonal, and far more expensive than it is.
This project works because it combines structure, creativity, and affordability. You do not need advanced tools or professional design skills. You only need a clear plan, a steady hand, and the willingness to see a simple picture frame as something bigger. Whether you make a farmhouse lantern, coastal centerpiece, glam gold accent, or holiday display, this Dollar Store frames DIY proves that great style does not have to come with a dramatic receipt.