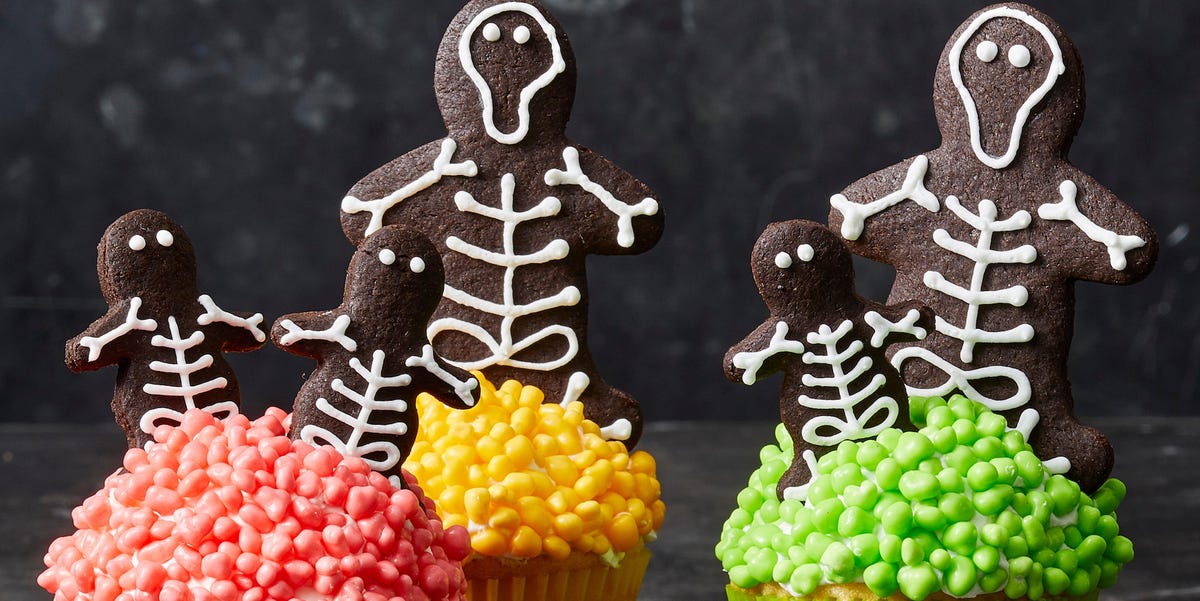
Some Halloween desserts are all costume and no personality: a little orange frosting, a plastic spider, and suddenly everyone is expected to clap. These chocolate skeleton cookie cupcakes are not that dessert. They are deeply chocolatey cupcakes topped with rich cocoa buttercream and a crisp chocolate skeleton cookie that looks delightfully spooky without requiring a degree in pastry engineering.
Think of them as the friendliest creatures in the graveyard: a moist chocolate cupcake wearing a fancy frosting hat and carrying a tiny skeleton cookie on top. They are ideal for Halloween parties, school events, haunted-house movie nights, office potlucks, or any October gathering where regular cupcakes feel a little too alive.
This recipe makes 12 standard cupcakes with matching chocolate cookie toppers. The process has a few parts, but every step is manageable. Make the cookies ahead, bake the cupcakes, whip up frosting, then assemble your edible skeleton crew. The final result looks impressively detailed, even though the decorating method is mostly dots, lines, and a willingness to let your skeletons have a little personality.
Why These Chocolate Skeleton Cookie Cupcakes Work
The best Halloween cupcakes need two things: flavor that earns a second bite and decoration that earns a second look. These cupcakes deliver both. The cake is made with cocoa powder, buttermilk, neutral oil, and hot coffee or hot water. The coffee does not make the cupcakes taste like a latte; it simply helps the chocolate flavor taste deeper and more dramatic. In other words, it gives the cocoa a tiny black cape.
The chocolate cookies are firm enough to hold their shape yet tender enough to eat without feeling like a haunted paving stone. A simple white royal icing turns each cookie into a skeleton. Because skeletons are naturally bony-looking, you do not need perfect piping skills. Uneven ribs? Artistic. Crooked legs? Very realistic, frankly.
What Makes Them Party-Friendly
- Each cupcake is individually portioned and easy to serve.
- The cookie toppers can be made a day or two before the party.
- Chocolate cake and chocolate cookies share several pantry ingredients.
- The decoration looks elaborate, but it uses a simple squeeze-and-pipe technique.
- You can make every skeleton slightly different, which saves you from chasing impossible perfection.
Ingredients for Chocolate Skeleton Cookie Cupcakes
For the Chocolate Cupcakes
- 1 cup all-purpose flour
- 1/2 cup natural unsweetened cocoa powder
- 3/4 cup granulated sugar
- 1 teaspoon baking powder
- 1/2 teaspoon baking soda
- 1/2 teaspoon kosher salt
- 1 large egg, at room temperature
- 1/2 cup buttermilk, at room temperature
- 1/4 cup neutral vegetable oil
- 1 teaspoon vanilla extract
- 1/2 cup hot coffee or hot water
For the Chocolate Buttercream
- 3/4 cup unsalted butter, softened
- 2 1/2 cups confectioners’ sugar
- 1/3 cup unsweetened cocoa powder
- 1/4 teaspoon kosher salt
- 1 1/2 teaspoons vanilla extract
- 2 to 4 tablespoons heavy cream or whole milk
For the Chocolate Skeleton Cookies
- 1 1/4 cups all-purpose flour, plus more for rolling
- 1/3 cup unsweetened cocoa powder
- 1/4 teaspoon baking powder
- 1/4 teaspoon kosher salt
- 1/2 cup unsalted butter, softened
- 1/2 cup granulated sugar
- 1 large egg yolk
- 1 teaspoon vanilla extract
- 1 tablespoon milk, only if needed
For the White Skeleton Icing
- 1 cup confectioners’ sugar
- 1 1/2 teaspoons meringue powder
- 2 to 3 teaspoons water
- 1/4 teaspoon vanilla extract, optional
Helpful Equipment
- Standard 12-cup muffin pan and cupcake liners
- Wire cooling rack
- Electric hand mixer or stand mixer
- 3-inch gingerbread-person cookie cutter
- Rolling pin
- Piping bag or small resealable plastic bag
- Small round piping tip, optional
How to Make the Chocolate Skeleton Cookies
Start with the cookies because they need time to cool and dry after decorating. In a medium bowl, whisk together the flour, cocoa powder, baking powder, and salt. Set the dry ingredients aside.
In a larger bowl, beat the softened butter and sugar until the mixture looks lighter and fluffy, about two minutes. Add the egg yolk and vanilla, then beat again until smooth. Add the dry ingredients in two additions, mixing on low speed just until a soft dough forms. If the dough feels too crumbly to hold together when pressed, add the milk one teaspoon at a time.
Shape the dough into a flat disk, wrap it, and chill for 30 to 45 minutes. Chilling helps the cookie dough roll more neatly and keeps the little skeleton limbs from spreading into mysterious blobs in the oven.
Heat the oven to 350°F. Line a baking sheet with parchment paper. Roll the chilled dough on a lightly floured surface until it is about 1/4 inch thick. Cut out 12 gingerbread-person shapes and transfer them carefully to the baking sheet. Gather and reroll scraps as needed.
Bake for 8 to 10 minutes, until the cookies look dry around the edges and no longer appear shiny in the center. Let them cool on the pan for five minutes, then move them to a wire rack. Cool completely before decorating.
Decorating the Chocolate Skeleton Cookies
Whisk the confectioners’ sugar, meringue powder, two teaspoons water, and vanilla until smooth. The icing should be thick enough to hold a line but soft enough to squeeze through a small opening. Add a few drops of water only if it feels stubbornly thick.
Transfer the icing to a piping bag fitted with a small round tip, or use a small resealable bag with one tiny corner snipped off. Pipe a skull near the head, a line down the center for the spine, short lines for ribs, and skinny lines for arms and legs. Add tiny dots at the joints for an extra playful look.
Let the royal icing dry until firm, at least 45 minutes. For the cleanest finish, let the cookies dry for several hours or overnight. This is an excellent task for the evening before a party, preferably while listening to something spooky enough to make you question the noises in your kitchen.
How to Make Moist Chocolate Cupcakes
Heat the oven to 350°F. Line a 12-cup muffin pan with paper liners. In a large bowl, whisk together the flour, cocoa powder, sugar, baking powder, baking soda, and salt. Break up any obvious cocoa lumps now; this is much easier than trying to negotiate with a lump of dry cocoa later.
In a separate bowl, whisk the egg, buttermilk, oil, and vanilla until fully combined. Pour the wet ingredients into the dry ingredients and stir just until no large streaks of flour remain. Slowly pour in the hot coffee or hot water and whisk until the batter is smooth. The batter will be thin. That is normal. Do not panic, call a neighbor, or add more flour.
Divide the batter among the cupcake liners, filling each about two-thirds full. Bake for 17 to 20 minutes. The cupcakes are ready when the tops spring back lightly when touched and a toothpick inserted in the center comes out with a few moist crumbs rather than wet batter.
Cool the cupcakes in the pan for five minutes, then transfer them to a wire rack. Let them cool completely before frosting. Warm cupcakes and buttercream do not form a partnership; they form a small chocolate landslide.
How to Make Chocolate Buttercream Frosting
Beat the softened butter on medium speed until creamy. Add the confectioners’ sugar, cocoa powder, and salt in two additions, mixing on low speed at first so your kitchen does not become a powdered-sugar weather system.
Add the vanilla and two tablespoons of cream. Beat on medium-high speed for two to three minutes, until the frosting is fluffy and smooth. Add more cream, one teaspoon at a time, only if the frosting is too stiff to spread or pipe. If it becomes too soft, mix in a little more confectioners’ sugar.
For a dramatic bakery-style swirl, use a large star tip and pipe from the outer edge inward, finishing with a small peak in the center. For a simpler look, spread the frosting with an offset spatula. The skeleton cookie will be the star of the show, so the frosting does not need to audition for a reality baking competition.
How to Assemble Skeleton Cookie Cupcakes
- Place the cooled cupcakes on a serving tray or cake stand.
- Pipe or spread a generous layer of chocolate buttercream over each cupcake.
- Press one decorated chocolate skeleton cookie gently into the frosting.
- Angle the cookie slightly backward for a more dimensional, standing-up effect.
- Add black sanding sugar, chocolate cookie crumbs, or crushed chocolate sandwich cookies around the base if you want a “graveyard dirt” finish.
For a kid-friendly decorating station, let everyone draw their own skeleton bones. Some cookies may look like they were assembled by a distracted archaeologist, but that is part of the charm. Skeletons have been underground for a while. A few missing ribs are understandable.
Best Tips for Perfect Halloween Cupcakes
Use Natural Cocoa for a Balanced Chocolate Cupcake
Natural cocoa works especially well in this recipe because it pairs nicely with the buttermilk and baking soda. Choose a cocoa powder that smells richly chocolatey when you open the container. Old cocoa is not dangerous merely because it has lost enthusiasm, but fresh cocoa creates a more vivid flavor.
Do Not Overmix the Batter
Whisk the batter only until smooth after the hot coffee is added. Overmixing can make cupcakes tougher, and nobody wants a dessert with the emotional texture of a shoe.
Cool Completely Before Frosting
Give the cupcakes enough time to cool all the way through. The tops may feel cool before the centers are truly ready. If you are in a hurry, place the cooling rack in a breezy spot, but avoid putting steaming cupcakes directly in the refrigerator because trapped moisture can make the liners peel away.
Pipe the Icing in Sections
When decorating the cookies, pipe the skull first, then the spine, ribs, arms, and legs. Trying to create one continuous skeleton outline usually ends with a strange white squiggle that looks more like a haunted noodle than a human skeleton.
Make the Toppers Ahead
The chocolate skeleton cookies can be baked and decorated up to two days ahead. Store them in a single layer in an airtight container once the icing is fully dry. Keep the cookies separate from the cupcakes until close to serving time so they stay crisp.
Store Leftovers Properly
Because the buttercream includes dairy, store leftover cupcakes in an airtight container in the refrigerator. Let them sit at room temperature for about 20 to 30 minutes before serving so the cake and frosting soften slightly. For the prettiest presentation, remove the cookie toppers before refrigerating and place them back on the cupcakes just before serving.
Easy Variations for Chocolate Skeleton Cookie Cupcakes
Cookies-and-Cream Graveyard Cupcakes
Use vanilla buttercream instead of chocolate frosting, then scatter crushed chocolate sandwich cookies over the top. The dark crumbs resemble graveyard soil, and the white skeleton cookie bones become even more visible.
Mocha Skeleton Cupcakes
Use strong brewed coffee instead of hot water in the cupcake batter and add 1 teaspoon of espresso powder to the buttercream. This variation tastes more grown-up without turning your Halloween dessert into a midnight espresso emergency.
Orange-Spiced Chocolate Cupcakes
Add 1 teaspoon finely grated orange zest and a pinch of cinnamon to the cupcake batter. Chocolate and orange are a classic pair, and the flavor gives the cupcakes a subtle autumn twist without making them taste like a candle aisle.
Mini Skeleton Cupcakes
Make mini cupcakes for a dessert buffet, then use smaller cookie cutters or break full skeleton cookies in half for the toppers. Mini versions are especially useful when the party menu includes lots of other sweets and you want guests to enjoy a spooky treat without needing a wheelbarrow afterward.
What the Chocolate Skeleton Cookie Cupcake Experience Feels Like
Making chocolate skeleton cookie cupcakes is less like completing a strict baking assignment and more like hosting a tiny edible art project. The first stage is calm and cozy: cocoa powder on the counter, butter softening in a bowl, and that familiar chocolate smell beginning to take over the kitchen. Then the cookie cutters come out, and the mood changes. Suddenly, you are not simply baking. You are building a miniature skeleton population.
The cookie-decorating stage is usually where people become unexpectedly invested. A simple white line for a spine becomes ribs, then a little skull, then tiny joint dots, and before long each cookie develops a personality. One might look cheerful. Another may appear to be dancing. A third may have one leg slightly longer than the other and seem to be escaping from a low-budget horror movie. The good news is that none of this hurts the final dessert. In fact, the imperfect cookies often become the favorites.
There is also a satisfying contrast between the serious-looking chocolate cake and the silly skeletons. The cupcakes are rich, dark, and bakery-style, while the cookies are playful and cartoonish. Adults tend to appreciate that the dessert actually tastes like chocolate instead of being all frosting and food coloring. Children usually focus on the skeleton toppers, which is fair. Tiny cookies with bones are difficult to compete with.
At a Halloween gathering, these cupcakes often create a moment before anyone takes a bite. People look at the tray, choose a favorite skeleton, compare the funniest faces, and ask whether the toppers are edible. That small pause is part of the experience. A good themed dessert should invite conversation, not just disappear into a napkin within thirty seconds.
They are also surprisingly flexible for different kinds of events. For a children’s party, set out extra icing and let guests decorate cookies before placing them on cupcakes. For an office event, make the skeletons neat and minimalist, then serve the cupcakes on a dark platter with cookie crumbs around the base. For a movie night, go wild with candy bones, black sprinkles, and extra frosting. There is no wrong level of spooky.
The final moment is the best one: lifting a cupcake, seeing the little skeleton cookie leaning out of the chocolate buttercream, and realizing that the whole thing held together beautifully. The cake is soft, the frosting is creamy, the cookie is crisp, and the decoration gets a laugh before it gets eaten. That is the magic of these Halloween cupcakes. They look like a complicated dessert project, but they feel like fun from the first whisk to the final crumb.
Conclusion
These chocolate skeleton cookie cupcakes are a spooky, crowd-pleasing dessert that delivers far more than a cute Halloween photo. Moist cocoa cupcakes, smooth chocolate buttercream, and crisp hand-decorated skeleton cookies create a dessert with flavor, texture, and serious party-table appeal. Bake the cookies ahead, take your time with the icing, and remember that a slightly crooked skeleton is not a mistake. It is simply having a very good time.
Note: Let the royal icing on the cookies dry completely before assembling the cupcakes. For the crispest cookie toppers, add them shortly before serving and keep a few extras on hand in case a skeleton loses a limb during transport.