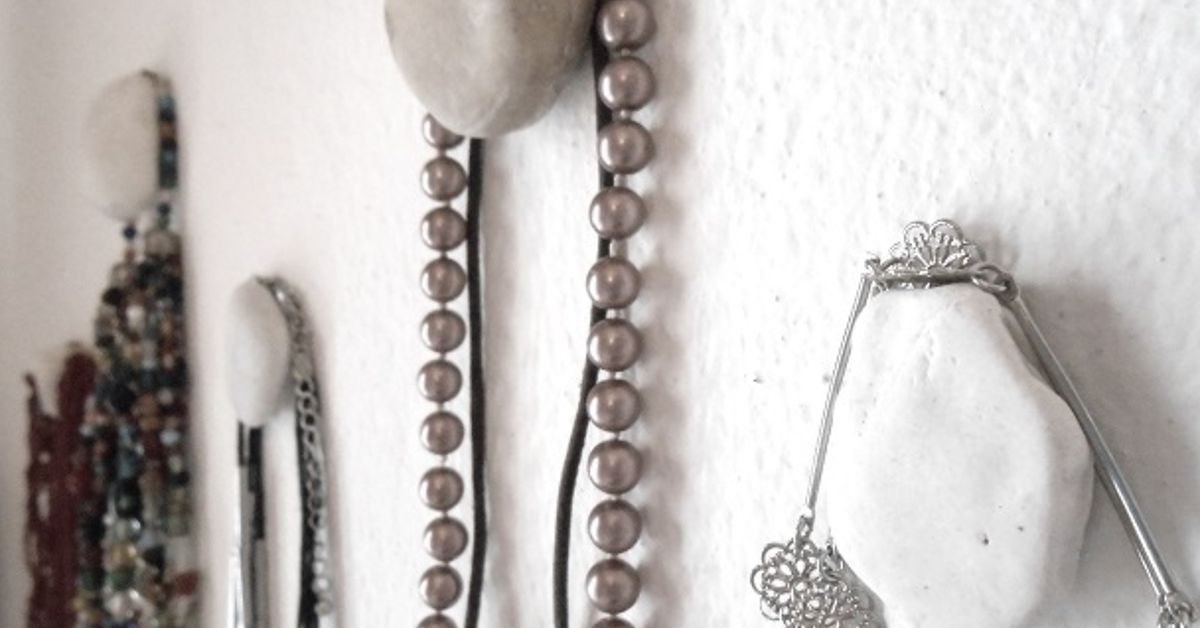
Some home projects require a workshop, a heroic collection of power tools, and the emotional resilience to read a 47-page instruction manual. DIY pebble hangers for jewelry require none of those things. At their simplest, they are smooth stones mounted on a wall or wooden board so necklaces and bracelets can hang neatly instead of forming a tiny metallic bird’s nest inside a drawer.
This nature-inspired jewelry organizer is inexpensive, customizable, and surprisingly decorative. A row of sea-worn pebbles can bring coastal character to a bedroom, while dark river rocks create a more modern, earthy look. Better still, wall-mounted jewelry storage keeps frequently worn pieces visible, separates necklace chains, and uses vertical space that might otherwise sit around doing absolutely nothing.
Why Make Pebble Hangers for Jewelry?
Jewelry boxes are useful, but they are not always friendly to long chains. Necklaces slide together, clasps catch on neighboring pieces, and the pendant you planned to wear disappears beneath six bracelets and an earring that has been single since 2019. Hanging necklaces individually helps reduce tangling and makes the entire collection easier to see.
Design and organization publications frequently recommend hooks, wall-mounted displays, and open-view storage for necklaces and everyday accessories. Visible storage can also encourage people to wear more of what they already own instead of repeatedly reaching for the same two pieces.
A Small Project With Plenty of Personality
No two pebbles are identical, which gives the finished organizer an organic, handmade quality. You can arrange pale stones in a clean horizontal row, mix colors for a playful display, or create an irregular constellation of pebbles across a narrow section of wall. The finished project works especially well in coastal, rustic, Scandinavian, bohemian, and nature-inspired rooms.
Choose the Right Construction Method
There are two practical ways to make DIY pebble jewelry hangers. The correct choice depends on your wall, the weight of your jewelry, and whether you want a removable or permanent installation.
Method 1: No-Drill Pebbles Mounted Directly on the Wall
For the quickest version, attach flat-backed pebbles to a smooth wall with removable mounting strips or double-sided mounting tape rated for both the surface and the expected load. The stone itself acts as a small knob, allowing a necklace or lightweight bracelet to rest around it.
This method is best for costume jewelry, light chains, and inexpensive accessories. Adhesive-product instructions commonly require a clean, dry, smooth surface, firm pressure during installation, and a waiting period before adding weight. Some removable-hook manufacturers also warn against using their products for valuable items, on wallpaper, over beds, or on weak and textured surfaces. Follow the instructions for the exact product rather than treating all sticky rectangles as interchangeable magic.
Method 2: Pebble Knobs Mounted on a Wooden Board
A board-mounted organizer is the stronger and more versatile option. Each pebble can be bonded to a flat-front cabinet knob, wooden spacer, or metal hook base. The hardware is then mechanically attached to a painted or stained board, and the entire board is secured to the wall.
This design gives the pebbles more projection, which helps necklaces stay in place. It also allows you to remove the organizer as a single piece when repainting or moving. For medium-weight statement necklaces, this is usually the better choice.
Materials and Tools
Adjust the supply list according to your chosen mounting method.
- Five to nine smooth pebbles with reasonably flat backs
- Mild soap, water, and a clean cloth
- Isopropyl alcohol, if permitted by the adhesive manufacturer
- Fine-grit sandpaper
- Ruler, pencil, and painter’s tape
- Removable mounting strips or strong double-sided mounting tape for the no-drill version
- Two-part epoxy rated for stone and the material of the hook base
- Flat-front cabinet knobs, short spacers, or low-profile metal hook bases
- A wooden board approximately 18 to 24 inches long
- Paint, stain, or clear wood finish
- Picture-hanging hardware, screws, and wall anchors appropriate for the wall
- Disposable gloves and safety glasses
How to Choose Good Pebbles
Look for stones approximately 1.5 to 2.5 inches wide. Very small pebbles provide too little bonding area, while oversized rocks add unnecessary weight. Smooth oval stones generally work better than jagged pieces because chains can slide on and off without catching.
Check the back of every pebble against a flat table. A slight curve is manageable, but a deeply rounded back creates a narrow contact point and a weaker bond. For direct wall mounting, choose thick stones that project far enough from the wall to hold a chain. Thin, flat stones may look pretty but behave more like decorative coasters than useful hooks.
How to Make No-Drill DIY Pebble Hangers
Step 1: Clean and Dry the Stones
Wash the pebbles with mild soap and water to remove soil, salt, oil, and mysterious beach substances best left unidentified. Rinse thoroughly and allow them to dry completely. Moisture trapped beneath adhesive can interfere with bonding.
Step 2: Plan the Layout
Cut paper templates roughly matching the size of your pebbles and temporarily tape them to the wall. Space small necklace hangers about four inches apart. Allow six inches or more for chunky pendants and statement pieces.
A straight row creates a tidy, modern appearance. A staggered arrangement feels more natural and accommodates necklaces of different lengths. Position longer pieces near the outer edges or lower row so they do not overlap shorter chains.
Step 3: Prepare the Wall
Confirm that the mounting product is suitable for your wall finish. Clean the area according to its directions. Many removable mounting products recommend rubbing alcohol rather than household sprays, since some cleaners leave residue. Fresh paint must also cure fully before adhesive is applied.
Step 4: Attach the Mounting Material
Cover as much of the pebble’s flat back as possible without allowing the tape to show around the edges. Press the adhesive firmly onto the stone, then mount the pebble according to the product instructions. Do not immediately test the bond by hanging your heaviest necklace and staring at it with suspense. Allow the specified bonding or waiting time first.
Step 5: Add Jewelry Gradually
Begin with one light necklace per pebble. Watch for movement during the first few days. If a stone shifts, remove it before it falls and switch to a larger adhesive pad, a flatter stone, or the board-mounted method.
How to Make a Stronger Board-Mounted Organizer
Step 1: Prepare the Board
Sand the board until the edges and face feel smooth. Remove all dust before applying paint or stain. Surface preparation matters because dirt, grease, loose fibers, and sanding residue can interfere with a clean finish. When staining, apply the product with the grain and remove excess according to the manufacturer’s directions.
Step 2: Arrange the Pebble Knobs
Place the pebbles across the board before gluing anything. Mix sizes and colors until the arrangement feels balanced. Leave enough room for fingers to reach behind necklaces when lifting them off.
For an 18-inch board, five pebble knobs usually create a comfortable layout. Seven smaller knobs can work on a 24-inch board. More than that may turn your organizer into rush-hour traffic for necklaces.
Step 3: Create the Knob Bases
Use flat-front cabinet knobs or short wooden spacers that can be screwed into the board. Lightly roughen smooth metal bonding surfaces with fine sandpaper, then remove dust and oil. This creates a more adhesive-friendly surface.
Step 4: Bond the Pebbles
Mix a two-part epoxy precisely as directed. Apply a controlled amount to the knob face and press the pebble into position. Too much epoxy creates visible squeeze-out; too little leaves gaps.
Hold each assembly steady with painter’s tape, a padded clamp, or a simple support jig. Epoxy manufacturers commonly recommend preparing smooth metal surfaces by light sanding, cleaning away contaminants, working within the stated application time, and leaving the bond undisturbed during setup. Full cure time can be considerably longer than the initial set time, so check the label before installing the knobs.
Step 5: Attach the Knobs to the Board
Mark and drill the hardware holes only after the adhesive has fully cured. Screw the knobs into the board from the back, using washers when necessary to distribute pressure. Avoid overtightening, which can crack a wooden spacer or stress the adhesive bond.
Step 6: Mount the Board Securely
Whenever possible, attach the organizer to wall studs. When studs are unavailable, select anchors that match the wall material and exceed the total loaded weight of the organizer. Drywall, brick, concrete, plaster, and hollow doors require different fasteners. Anchor manufacturers specify compatible wall types, drill-bit sizes, screws, and weight limits, so verify those details before installation.
Styling Ideas for Pebble Jewelry Hangers
Coastal Minimalism
Use pale gray, cream, and sand-colored stones on a whitewashed board. Add a thin jute hanging cord for decoration, but use proper hidden hardware to support the actual weight.
Modern Black-and-White Display
Choose charcoal pebbles and mount them on a light maple or matte white board. Keep the spacing perfectly even for a clean architectural look.
Color-Grouped Jewelry Station
Assign each pebble a category: gold-tone chains, silver-tone chains, colorful beads, bracelets, and everyday favorites. The arrangement becomes easier to use when its organization reflects your morning routine.
Natural Gallery Wall
Combine the pebble hanger with a small mirror, framed botanical print, and shallow dish for rings. Wall storage is especially useful in compact bedrooms because hooks and narrow displays add organization without occupying dresser space.
Protecting the Jewelry and the Wall
Pebble hangers are ideal for frequently worn costume jewelry, beaded necklaces, lightweight bracelets, and chains with durable clasps. Store delicate heirlooms, valuable gemstones, soft metals, and easily scratched pieces in lined compartments designed for fine jewelry.
Inspect every pebble for sharp grains or rough edges. A small transparent felt dot can be added to the top contact area if a stone feels abrasive. Do not overcrowd each hanger; separate chains are much less likely to knot than a stack of six necklaces sharing one increasingly nervous pebble.
Install the display in a dry dressing area rather than directly beside a shower or sink. Also keep small loose stones, hardware, and curing adhesive away from children and pets.
Common Problems and Easy Fixes
The Pebble Slides Down the Wall
The stone may be too heavy, the back may be too rounded, or the wall may have residue or texture. Remove the pebble, clean the area correctly, and replace it with a lighter, flatter stone. For recurring problems, use the wooden-board method.
The Necklace Keeps Slipping Off
Choose a thicker pebble or mount it on a short spacer. A stone that sits almost flush against the wall offers very little ledge for the chain.
The Epoxy Remains Soft
Incorrect mixing proportions, inadequate mixing, low temperature, or an incompatible product may prevent proper curing. Do not install the component. Remove the uncured material according to the adhesive manufacturer’s safety instructions and start again with a fresh batch.
The Board Tilts Forward
The hanging hardware may be too close to the center or unsuitable for the loaded weight. Use two widely spaced attachment points and confirm that the anchors are appropriate for the wall.
Experience Notes: What Makers Usually Learn From the First Attempt
The first version of a pebble jewelry hanger often begins with an irresistible thought: “It is only a rock and a piece of tape. How complicated could this be?” The answer is not very complicatedbut just complicated enough to punish impatience.
A common first attempt uses the prettiest pebbles rather than the most practical ones. Those smooth, perfectly round stones look wonderful in a bowl, yet their curved backs leave almost no surface for adhesive. They may stay on the wall long enough to create confidence, wait until everyone is asleep, and then make a dramatic midnight escape.
The most successful stones are not necessarily the glamorous ones. They have broad, flat backs, moderate weight, and enough thickness to act like real knobs. Before committing to a layout, it helps to place each pebble on a table and press lightly around its edges. A stone that rocks like a tiny seesaw will probably be difficult to mount directly.
Another lesson concerns spacing. Pebbles arranged closely together look charming while the wall is empty. Once necklaces are added, however, pendants collide and chains overlap. A paper-template test prevents this problem. Hanging temporary lengths of string from the templates makes the preview even more accurate, particularly when the jewelry collection includes both chokers and long pendants.
Adhesive preparation is where many projects quietly succeed or fail. A wall can appear clean while still holding dust, skin oil, polish, or cleaner residue. Likewise, a river pebble may feel dry but retain moisture in small surface pores. Washing the stones early and leaving them overnight removes a surprising amount of uncertainty.
The no-drill version is satisfying because the transformation happens quickly. Within minutes, an unused wall becomes an organic jewelry display. It is also easy to rearrange before the final placement. The limitation becomes clear when heavier accessories enter the scene. Chunky necklaces place more leverage on the pebble than their weight alone suggests, especially when pulled upward at an angle.
That is why the board-mounted version tends to become the favorite after experimentation. Screwed-in knob bases provide predictable spacing and stronger mechanical support, while the board protects the wall from a collection of separate attachment points. It also looks more deliberate, like a finished home accessory rather than a group of rocks that climbed the wall during the night.
The epoxy stage rewards restraint. An oversized blob does not necessarily create a better bond; it often produces a shiny ring around the pebble. Applying a small, even amount and supporting the stone while it cures creates a cleaner result. Numbering the pebbles and their planned positions on painter’s tape is helpful because once epoxy is mixed, leisurely artistic debate becomes less enjoyable.
Finishing the board can change the entire personality of the project. Raw pine and gray stones feel casual and coastal. Walnut stain and black pebbles look sophisticated. A muted green board with cream stones creates a softer botanical style. Testing the finish on the back prevents the familiar DIY experience of discovering that “warm honey” stain actually means “surprisingly orange.”
The final and perhaps most useful lesson is to design around real habits. A beautiful organizer will not remain organized if removing or replacing jewelry is awkward. Mount it close to the mirror or dressing area, keep everyday necklaces at an easy height, and leave enough clearance for both hands. When each piece can be returned in one effortless motion, the organizer becomes part of the routine instead of another decorative object waiting to collect clutter.
Safety Notes
Wear gloves when handling adhesives and work in a ventilated area according to the product label. Use safety glasses whenever drilling, sanding, or operating a rotary tool. Secure workpieces rather than holding them in your hand, and avoid loose clothing, long loose hair, and dangling jewelry around rotating equipment.
Drilling directly through natural stone is unnecessary for this project. Anyone choosing an advanced drilled-stone design should use accessories specifically intended for stone, follow the tool manufacturer’s instructions, and control dust and flying debris appropriately.
Conclusion
DIY pebble hangers for jewelry turn simple natural materials into useful wall decor. The no-drill version is quick and renter-friendly when used with lightweight, nonvaluable accessories on suitable surfaces. The board-mounted version requires more preparation but delivers better projection, stronger support, and a polished furniture-quality appearance.
Whichever method you choose, the important details are wonderfully unglamorous: select flat stones, clean every surface, follow adhesive instructions, leave enough space between hangers, and use mounting hardware that matches the wall. Do that, and your necklaces can finally hang peacefully instead of practicing complicated knots in the dark.