Wind is invisible, sneaky, and occasionally dramatic enough to relocate your patio umbrella into the neighbor’s yard. But with a simple DIY anemometer, you can stop guessing and start measuring. An anemometer is a wind tester that measures wind speed, and the classic cup-style version is one of the easiest weather instruments to build at home, in a classroom, or in a garage that already has too many “future project” boxes.
This guide shows you how to build a practical homemade anemometer using basic materials like paper cups, straws, a pencil, a pushpin, tape, and a marker. You will also learn how it works, how to test it, how to calculate a rough wind speed, and how to improve accuracy without turning your kitchen table into a NASA laboratory. The goal is not to build a professional-grade weather station. The goal is to create a fun, useful wind speed meter that helps you understand moving air, backyard weather, fan experiments, kite-flying conditions, and the science behind real meteorological tools.
What Is an Anemometer?
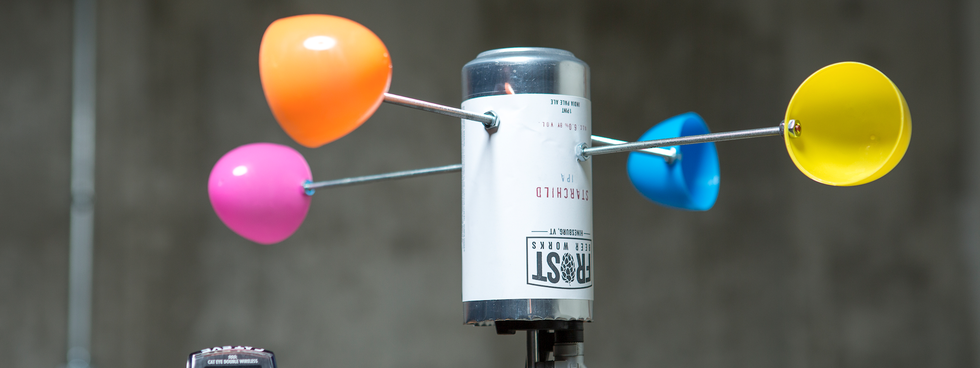
An anemometer is a device used to measure wind speed. Professional weather stations often use cup anemometers, propeller anemometers, sonic anemometers, or sensors built into larger automated weather systems. A cup anemometer is especially friendly for a DIY project because it has a simple design: several cups catch the wind and rotate around a central axis. The faster the wind blows, the faster the cups spin.
Think of it as a tiny merry-go-round powered by air. Instead of children shouting “again!” it gives you rotations you can count. Those rotations can be used to estimate wind speed or compare wind strength from one location to another.
Why Build a DIY Wind Tester?
A homemade wind tester is more than a rainy-day science craft. It helps you see how wind behaves around your home, garden, schoolyard, balcony, or workshop. Wind speed affects weather, gardening, drone flying, sailing, outdoor events, wildfire risk, air quality studies, and wind energy planning. Even if your DIY anemometer is not as accurate as a calibrated commercial instrument, it can still teach valuable lessons about measurement, design, friction, balance, and real-world data collection.
Good Uses for a Homemade Anemometer
You can use your DIY anemometer to compare wind speed in an open yard versus near a fence, measure how fan settings change airflow, track breezy days for a school project, test kite-flying conditions, or observe how trees, buildings, and walls block or funnel wind. If you garden, it can help you understand why one corner of the yard dries out faster than another. If you love weather, it gives you a hands-on way to collect your own observations instead of just staring at an app and pretending to be a meteorologist.
Materials You Need
This basic cup anemometer uses household and classroom supplies. Lightweight materials work best because they reduce friction and help the wind tester spin in gentle breezes.
- 4 small paper cups or lightweight plastic cups
- 2 straight drinking straws or lightweight wooden skewers
- 1 pencil with a fresh eraser
- 1 pushpin or straight pin
- Tape or a stapler
- Scissors
- Hole punch or sharp pencil for making holes
- Marker, preferably a bright color
- Ruler or measuring tape
- Stopwatch or phone timer
- Modeling clay, a cup of sand, or a small base to hold the pencil upright
For a sturdier version, replace straws with thin dowels, use a small bead as a spacer, and mount the pencil in a wooden block. For a classroom version, keep it simple. The cups-and-straws design is easy to build, easy to repair, and easy to laugh at when it spins like it just drank espresso.
Safety First: Tiny Tools, Real Fingers
The only mildly tricky part of this project is using a pushpin and scissors. If children are building the anemometer, an adult should help with punching holes and placing the pin into the eraser. Keep the pin straight, avoid forcing it through thick plastic, and do not hold the center joint directly behind the pin while pushing. Wind science is fun; surprise finger acupuncture is not.
How To Build a DIY Anemometer
Step 1: Mark One Cup
Choose one cup and draw a large, bright X on the outside. This marked cup will help you count rotations. Every time the marked cup comes back to the starting position, that equals one full rotation. Without the mark, counting rotations becomes a dizzy guessing game, especially in stronger wind.
Step 2: Punch Holes in the Cups
Take each of the four cups and make one hole near the rim. The hole should be large enough for a straw to slide through, but not so large that the cup wobbles wildly. Try to place the holes at the same height on each cup. Consistency helps the anemometer stay balanced.
Step 3: Make the Cross Arm
Place the two straws across each other at right angles to form a plus sign. Tape them together firmly at the center. The four straw ends should be as equal in length as possible. If one arm is much longer than the others, your wind tester may spin unevenly, like a shopping cart with one suspicious wheel.
Step 4: Attach the Cups
Slide one cup onto each straw end. All cups must face the same direction around the circle. This is important. The wind needs to push into the open side of one cup while the rounded side of the opposite cup moves with less resistance. If one cup faces the wrong way, the anemometer will fight itself and spin poorly.
Use tape or staples to secure the cups to the straw ends. Check that the cups are evenly spaced and that the open sides form a circular pattern. When you blow gently on the cups, the whole cross should rotate in one direction.
Step 5: Add the Center Pivot
Push the pin through the exact center of the straw cross and into the pencil eraser. Do not push it in too tightly. The straw cross needs to rotate freely around the pin. If it feels stiff, pull the pin back slightly or add a small bead or washer between the straw cross and eraser to reduce friction.
Step 6: Mount the Pencil
Stick the pencil point-down into modeling clay, a cup filled with sand, or a small block with a drilled hole. The pencil should stand as straight as possible. If the support leans, the spinning cups may rub against the pencil or wobble. Your anemometer does not need to look like a museum exhibit, but it should rotate freely.
Step 7: Test the Spin
Blow gently into the cups or place the anemometer in front of a fan on low speed. Watch the marked cup. If it circles smoothly, congratulations: you have built a working DIY wind tester. If it jerks, stalls, or spins backward, check cup direction, center alignment, tape weight, and pin tightness.
How a Cup Anemometer Works
A cup anemometer works because moving air applies more force to the open side of a cup than to the rounded back side. That uneven force creates torque, which turns the arms. As wind speed increases, the cups rotate faster. Real anemometers use calibrated sensors to convert rotation into wind speed. Your DIY version uses observation and simple math.
The most basic measurement is rotations per minute, or RPM. Count how many times the marked cup passes the starting point in 30 seconds, then multiply by two. For example, if the marked cup makes 24 rotations in 30 seconds, the anemometer is spinning at about 48 RPM.
How To Estimate Wind Speed
For a simple classroom estimate, measure the distance from the center pin to the center of one cup. This is the radius of the cup’s circular path. Then use the circle distance formula:
Circumference = 2 × 3.14 × radius
If the radius is 6 inches, the cup travels about 37.7 inches in one rotation. If it spins 60 times per minute, the cup travels about 2,262 inches per minute, or about 188.5 feet per minute. From there, you can convert to miles per hour. However, remember this important detail: the cup’s travel speed is not perfectly equal to the true wind speed. Cup shape, friction, arm length, and turbulence all affect the reading.
The best way to make your DIY anemometer more useful is to calibrate it. Compare its RPM readings with a reliable local weather station, a handheld wind meter, or a fan with a known airflow setting. Create a simple chart: RPM on one side and estimated wind speed on the other. Once you have that chart, your homemade wind tester becomes much more practical.
Simple Calibration Method
Place your anemometer outside in an open area and check a nearby trusted weather source at the same time. Record your RPM and the reported wind speed. Repeat this on several days with different wind conditions. Your table might look like this:
| Observed RPM | Nearby Reported Wind Speed | Notes |
|---|---|---|
| 20 RPM | 4 mph | Light breeze, leaves moving |
| 45 RPM | 8 mph | Steady breeze |
| 80 RPM | 14 mph | Small branches moving |
This approach will not produce certified weather data, but it gives you a personalized conversion chart for your exact build. That is better than using a random formula from the internet and pretending your paper cups are precision aerospace equipment.
Where To Place Your Wind Tester
Placement matters. Wind near buildings, fences, trees, parked cars, and walls can be blocked, accelerated, or swirled into turbulence. For the most consistent readings, place your DIY anemometer in an open area away from large obstacles. A school field, open yard, or clear driveway usually works better than a porch corner.
Professional wind measurements often use standardized heights and carefully chosen exposure conditions. Your backyard project does not need that level of control, but you should keep testing conditions consistent. If you measure on Monday at waist height beside a shed and Tuesday on a picnic table in the open yard, your data will be hard to compare.
Common Problems and Easy Fixes
The Cups Will Not Spin
The pin may be too tight, the cups may be too heavy, or one cup may face the wrong direction. Loosen the pivot, use lighter cups, and check that all cup openings point the same way around the circle.
The Anemometer Wobbles
Uneven straw lengths, heavy tape, off-center pin placement, or crooked mounting can cause wobble. Re-center the pin and trim the arms so they are equal. Balance is the secret sauce.
The Readings Change Too Much
Wind naturally gusts and shifts, so some variation is normal. Take several readings and average them. For example, count rotations for 30 seconds, rest for 30 seconds, and repeat five times. Average the results for a smoother number.
It Breaks in Strong Wind
Paper cups and drinking straws are not built for storm chasing. Bring the anemometer indoors during heavy wind, rain, or thunderstorms. For outdoor durability, use plastic cups, wooden dowels, waterproof tape, and a stronger base.
How To Upgrade Your DIY Anemometer
Once the basic design works, you can improve it. Add a low-friction bead at the pivot. Use a small bearing for smoother rotation. Replace paper cups with lightweight plastic measuring cups. Attach a magnet and reed switch to count rotations electronically. Connect the sensor to an Arduino or Raspberry Pi for automatic data logging. Add a wind vane beside it to measure wind direction. Suddenly, your simple wind tester becomes the beginning of a homemade weather station.
If you enjoy coding, you can record rotations per second and display estimated wind speed on a small screen. You can also log wind data over several days and compare it with local forecasts. This turns a weekend craft into a real STEM project involving engineering, math, weather science, and data analysis.
Understanding Wind Speed Readings
Wind speed is often reported in miles per hour, meters per second, kilometers per hour, or knots. In the United States, everyday forecasts commonly use miles per hour. Scientific and engineering work often uses meters per second. Marine and aviation weather frequently uses knots. For quick context, a 5 mph wind feels like a light breeze, 15 mph can move small branches, and 25 mph can make outdoor chores feel like a comedy sketch with flying napkins.
The Beaufort wind scale is another useful reference because it links wind speed to visible effects. If smoke rises straight up, the air is calm. If leaves rustle, there is a light breeze. If dust and loose paper start moving, the breeze is stronger. Pairing your anemometer readings with what you see around you helps you understand wind in a practical way.
DIY Anemometer Accuracy: What To Expect
A homemade anemometer is excellent for learning and comparison, but it is not a certified weather instrument. Friction at the pin, cup size, arm length, turbulence, and counting errors can all affect accuracy. Very light winds may not move the cups at all because the starting friction is too high. Strong gusts may spin the cups faster than you can count. Rain can add weight and slow the cups down.
Still, accuracy improves when you keep the design balanced, reduce friction, use consistent placement, average multiple readings, and calibrate against a reliable source. The key is to treat your DIY wind tester as a measurement tool with limits, not a magic truth machine. Even professional instruments require calibration, maintenance, and proper siting.
Real-World Connections: Why Wind Measurement Matters
Wind speed data is important in far more places than weather forecasts. Engineers use wind data when designing bridges, buildings, towers, and wind turbines. Farmers and gardeners care about wind because it affects evaporation, pollination, pesticide drift, and plant stress. Fire weather teams monitor wind because it can push flames and smoke quickly across dry landscapes. Airports rely on wind information for takeoffs and landings. Renewable energy planners study wind speed before deciding whether a site is suitable for wind power.
That is what makes a DIY anemometer such a satisfying project. You are not just taping cups to straws. You are building a small version of an instrument that connects to weather safety, engineering decisions, clean energy, and everyday outdoor life.
Experience Notes: What I Learned Building and Testing a DIY Anemometer
The first thing you learn when building a DIY anemometer is that “simple” does not always mean “effortless.” On paper, the project sounds almost too easy: attach cups to straws, pin them to a pencil, and let the wind do the rest. In real life, the wind immediately becomes a picky supervisor. If one cup is taped slightly lower than the others, the whole thing wobbles. If the pin is pushed too deeply into the eraser, the arms refuse to spin. If the tape is bulky on one side, your beautiful weather instrument starts rotating like it has a personal grudge against balance.
The biggest improvement came from paying attention to friction. A tiny gap between the straw cross and the pencil eraser made a huge difference. When the pin was too tight, the anemometer needed a strong gust to move. When the pivot was loose but stable, even a gentle breeze could start the cups turning. Adding a small bead as a spacer helped the arms spin more freely. It was a small change, but it made the wind tester feel much more responsive.
Another lesson was that location can completely change the reading. Testing beside a wall gave inconsistent results because the wind curled and bounced around the surface. Moving the anemometer into a more open part of the yard produced steadier rotation. Testing near shrubs also showed how plants slow wind down. The cups spun quickly in the open driveway, then slowed noticeably behind a hedge. That single comparison made the project feel less like a craft and more like real environmental observation.
Counting rotations was fun at first and hilarious after about 20 seconds. In stronger wind, the marked cup moved quickly enough that it was easy to lose count. A bright marker helped. So did recording a short phone video and counting the rotations afterward. For school projects, that trick is golden. Instead of arguing whether the cup passed 41 or 42 times, you can replay the video and settle the debate like civilized scientists.
Calibration was the moment the project became genuinely useful. Raw RPM numbers are interesting, but they do not mean much until you compare them with known wind speeds. By checking local weather readings and writing down my anemometer’s RPM at the same time, I built a rough conversion chart. It was not perfect, but it made patterns clear. Low RPM matched light breezes. Higher RPM matched days when small branches moved. The DIY wind tester became a backyard wind diary.
The best experience, though, was seeing how quickly small design changes affected performance. Shorter arms spun differently from longer arms. Lightweight cups worked better than heavier ones. A crooked base made the cups scrape. A stronger base improved stability outdoors. This is the real value of the project: it turns invisible air into visible motion and turns trial-and-error into learning. You do not need expensive equipment to understand wind. Sometimes four cups, two straws, one pencil, and a little patience are enough to make the weather feel wonderfully hands-on.
Conclusion
Building a DIY anemometer is one of the easiest ways to turn everyday weather into a hands-on science experiment. With simple materials, you can create a working wind tester, count rotations, estimate wind speed, compare locations, and learn why professional weather instruments must be carefully designed and calibrated. The project is affordable, fun, and surprisingly useful, whether you are teaching kids, building a homemade weather station, planning a STEM activity, or simply trying to understand why your backyard feels like a tiny wind tunnel.
The best part is that your first version does not need to be perfect. In fact, improving the design is half the fun. Reduce friction, balance the cups, test different locations, record your data, and calibrate your readings. Before long, you will have more than a paper-cup spinner. You will have a homemade tool that makes wind visible, measurable, and a lot more interesting.