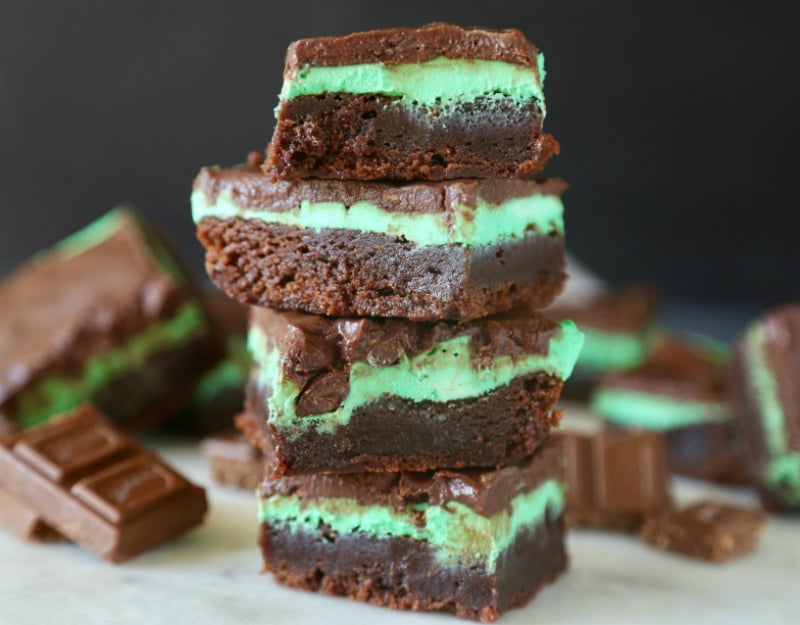
There are desserts that politely sit on a plate, and then there are mint chocolate brownies: rich, fudgy, cool, dramatic little squares that arrive wearing a glossy chocolate coat and absolutely no apologies. They combine deep cocoa flavor with a refreshing peppermint layer, creating the kind of contrast that makes “just one bite” a highly suspicious promise.
Whether you are baking for a holiday tray, a St. Patrick’s Day gathering, a birthday, or a Wednesday that has been behaving rudely, mint chocolate brownies are a dependable crowd-pleaser. The secret is not piling on enough mint to make everyone feel like they brushed their teeth with dessert. It is creating balance: dark, chewy brownies on the bottom, a creamy mint filling in the middle, and a smooth chocolate topping that brings the whole operation together.
Why Mint Chocolate Brownies Work So Well
Chocolate and mint are one of those flavor pairings that somehow manage to feel cozy and refreshing at the same time. Chocolate brings richness, bitterness, sweetness, and that unmistakable “I deserve this” energy. Mint cuts through the richness with a cool finish, so every bite feels less heavy than a plain frosted brownie.
The texture matters just as much as the flavor. A good mint brownie should have a dense, fudgy center, slightly chewy edges, a creamy filling, and a topping that snaps gently when cold but melts smoothly once it reaches your mouth. It is basically a dessert with a full personality arc.
For a deep chocolate flavor, many successful brownie methods use both cocoa powder and melted chocolate. Cocoa provides bold chocolate intensity, while melted chocolate contributes richness and a softer, fudgier bite.
The Classic Layered Mint Brownie Formula
Layer One: Fudgy Chocolate Brownies
The brownie layer should be sturdy enough to support the mint filling but tender enough that it does not feel like chocolate drywall. A combination of butter, semisweet chocolate, cocoa powder, eggs, sugar, and a modest amount of flour creates that ideal chewy-fudgy middle ground.
A glossy top is not just brownie vanity. It is a clue that the sugar, fat, and eggs were mixed well enough to create that delicate, crackly finish people mysteriously fight over at potlucks. Heating butter and sugar or whisking eggs and sugar thoroughly can help encourage that familiar shiny crust.
Layer Two: Cool Mint Filling
The middle layer is a simple mint buttercream made with softened butter, powdered sugar, milk or cream, peppermint extract, and a tiny pinch of salt. It should be smooth and spreadable, not stiff enough to patch a hole in your kitchen wall.
Green food coloring is optional. A pale mint color looks festive, but bright green is not required unless your dessert table has been recruited for a cartoon leprechaun convention. The flavor matters more than the color.
Layer Three: Chocolate Topping
The final chocolate layer gives mint brownies their bakery-style look. A blend of chocolate and a little butter creates a topping that slices cleanly once chilled. You can use semisweet chocolate for a classic flavor, dark chocolate for a less sweet finish, or milk chocolate if your household believes dessert should have the emotional energy of a warm blanket.
Mint Chocolate Brownies Recipe
This recipe makes 16 rich squares in an 8-by-8-inch pan. They are generous, layered, and not pretending to be a light snack. Respectfully, neither are we.
Ingredients for the Brownie Base
- 10 tablespoons unsalted butter
- 4 ounces semisweet chocolate, chopped
- 1 cup granulated sugar
- 1/2 cup packed light brown sugar
- 2 large eggs
- 1 large egg yolk
- 1 teaspoon vanilla extract
- 3/4 cup all-purpose flour
- 1/2 cup unsweetened cocoa powder
- 1/2 teaspoon fine salt
- 1/2 teaspoon espresso powder, optional
- 3/4 cup semisweet chocolate chips or chopped chocolate
Ingredients for the Mint Filling
- 4 tablespoons unsalted butter, softened
- 1 1/2 cups powdered sugar
- 1 tablespoon whole milk or heavy cream
- 1/2 teaspoon peppermint extract
- Pinch of salt
- 1 or 2 drops green food coloring, optional
Ingredients for the Chocolate Topping
- 4 ounces semisweet or dark chocolate, chopped
- 1 tablespoon unsalted butter
Step 1: Prepare the Pan
Heat the oven to 325°F. Line an 8-by-8-inch baking pan with parchment paper, leaving enough paper overhang on two sides to lift the finished brownies out later. This step prevents the ancient tragedy of beautifully baked brownies refusing to leave the pan.
Step 2: Melt the Butter and Chocolate
In a medium saucepan over low heat, melt the butter and chopped semisweet chocolate together. Stir until smooth, then remove from the heat. Let the mixture cool for about five minutes so it is warm but not hot enough to turn your eggs into an awkward chocolate scramble.
Step 3: Build the Brownie Batter
In a large bowl, whisk the granulated sugar, brown sugar, eggs, egg yolk, and vanilla for about one minute. The mixture should look glossy and slightly thicker. Slowly whisk in the warm chocolate mixture.
In another bowl, stir together the flour, cocoa powder, salt, and espresso powder if using. Fold the dry ingredients into the wet ingredients just until no dry streaks remain. Fold in the chocolate chips. Do not overmix. Brownie batter is not a cardio workout.
Step 4: Bake Until Fudgy, Not Raw
Spread the batter evenly in the prepared pan. Bake for 28 to 34 minutes, or until the edges are set and the center looks mostly firm with a slightly shiny top. A toothpick should come out with moist crumbs, not wet batter. For fudgy brownies, visual cues matter more than waiting for a perfectly clean toothpick.
Cool the brownies completely in the pan. This is the moment when patience enters the chat. Frosting warm brownies can turn your clean mint layer into a pastel landslide.
Step 5: Make the Mint Filling
Beat the softened butter until creamy. Add powdered sugar, milk or cream, peppermint extract, salt, and optional food coloring. Beat until smooth and fluffy. Taste a tiny amount and adjust carefully. The filling should taste cool and fresh, not like a snowstorm moved into your mouth.
Spread the mint filling evenly over the cooled brownie layer. Chill the pan for 20 to 30 minutes so the filling firms up before the chocolate topping goes on.
Step 6: Add the Chocolate Topping
Melt the chopped chocolate and butter together in a microwave-safe bowl in short intervals, stirring between each interval, or melt them gently over a double boiler. Spread the chocolate over the chilled mint layer with an offset spatula or the back of a spoon.
Return the pan to the refrigerator for 30 to 45 minutes, until the chocolate layer is set.
Step 7: Slice Like You Mean It
Lift the chilled brownie slab out of the pan using the parchment paper. Use a sharp knife warmed under hot water, wipe it dry, and clean the blade between cuts. It is a small effort that makes the layers look polished instead of like they were cut during an earthquake.
How to Make Mint Chocolate Brownies Even Better
Use Good Chocolate
Brownies are not the place to use chocolate that tastes vaguely like sweetened candle wax. Choose a chocolate you would happily eat on its own. A semisweet chocolate in the 55% to 70% cacao range usually gives a balanced result: rich enough for serious chocolate flavor, but not so bitter that the mint filling has to work overtime.
Do Not Overbake
Overbaked brownies are not a crime, but they do become more cake-like and less gloriously fudgy. Start checking early. The edges should look done, the center should not jiggle like pudding, and the top should appear set. Brownies continue to firm as they cool, so pulling them when they still look slightly soft is often the right move.
Let Every Layer Cool
Layered brownies reward patience. The base should be fully cool before the mint filling goes on. The mint filling should be chilled before the chocolate topping arrives. The chocolate topping should be set before slicing. Yes, this requires time. No, eating the warm brownie scraps from the edge does not count as waiting politely.
Keep the Mint in Its Lane
Peppermint extract is powerful. A little creates a clean, cool flavor; too much can make the brownies taste like they are preparing for dental surgery. Use a measured amount, taste the filling, and remember that chilled desserts can taste slightly less sweet and less intense than room-temperature frosting.
Easy Variations for Mint Brownie Fans
Peppermint Bark Brownies
Sprinkle crushed candy canes or peppermint candy pieces over the chocolate topping before it sets. This adds crunch, color, and holiday personality. Keep the candy pieces small so the brownies are easy to slice and do not require protective eyewear.
Thin Mint-Inspired Brownies
Fold crushed chocolate-mint cookies into the brownie batter or sprinkle cookie crumbs over the topping. The result tastes like a brownie and a beloved chocolate-mint cookie decided to form a very successful band.
Mint Oreo Brownies
Add chopped mint sandwich cookies to the brownie batter, then use a white chocolate drizzle over the dark chocolate topping. The mint filling stays creamy, while the cookies add a pleasant crunch.
Dark Chocolate Mint Brownies
Use dark chocolate in the topping and reduce the powdered sugar in the filling slightly for a less sweet, more grown-up dessert. This version pairs especially well with coffee after dinner.
Gluten-Free Mint Chocolate Brownies
Use a reliable one-to-one gluten-free flour blend in place of all-purpose flour. Because brownies rely less on gluten development than cakes or bread, they adapt well when the flour blend is designed for baking.
Serving and Storage Tips
Mint chocolate brownies are excellent straight from the refrigerator, where the layers stay neat and the chocolate topping has a satisfying snap. They are also delicious after sitting at room temperature for 15 to 20 minutes, when the brownie base becomes softer and the mint filling feels extra creamy.
Serve them on their own, with a scoop of vanilla ice cream, or with hot coffee for a dessert that feels like it showed up wearing a tiny tuxedo. For a party platter, cut the brownies into small squares because they are rich enough that a little goes a long way. Of course, people may still return for seconds. That is between them and their conscience.
Store mint chocolate brownies in an airtight container in the refrigerator for up to five days. Separate layers with parchment paper if stacking them. For longer storage, freeze individual squares tightly wrapped for up to two months. Thaw in the refrigerator overnight or leave at room temperature for about 30 minutes before serving.
Experiences With Mint Chocolate Brownies: Why They Become a Tradition
Mint chocolate brownies have a funny way of becoming more than dessert. They often begin as a simple baking project for a holiday, a school event, a family dinner, or a weekend when the weather has made everyone a little dramatic. Then someone asks for the recipe. Someone else takes two home “for later.” A relative who claims not to like mint suddenly develops very strong opinions about whether the frosting layer should be thicker. Before long, the brownies have become part of the occasion.
The experience starts with the smell. Chocolate brownies in the oven create that familiar, warm kitchen aroma that makes people wander in pretending they were only looking for water. Then the peppermint filling changes the mood completely. It smells bright and cool against the deep cocoa base, almost like winter and comfort shook hands over a mixing bowl. Even before the final chocolate layer goes on, the pan already looks like it is planning something special.
There is also a small satisfaction in building the layers. Brownies are usually the low-maintenance members of the dessert family: mix, bake, slice, disappear. Mint chocolate brownies ask for a little more attention. You wait for the base to cool. You spread the green or pale mint filling carefully. You smooth on the glossy chocolate top. The process feels calm and almost ceremonial, especially if you are making them while music plays in the background and nobody is asking where the clean towels are.
At gatherings, these brownies tend to attract people who did not even know they wanted dessert. The dark chocolate top catches the light, the mint layer hints at something unexpected, and the neat little squares look like they came from a bakery case. They are especially popular during winter holidays and St. Patrick’s Day, but their appeal is not limited to themed celebrations. Chocolate and mint do not need a calendar invitation.
The best part is watching how different people approach them. Some eat the brownie layer first, saving the mint topping for the end. Some take tiny bites and inspect every layer like dessert critics on a very important assignment. Others eat one square quickly, then return five minutes later with the expression of someone who has made peace with their choices. Mint chocolate brownies have that rare ability to feel nostalgic and new at once.
They are also forgiving enough to become your own tradition. Maybe your version includes crushed peppermint candy. Maybe it has a darker chocolate topping, cookie crumbs, or extra espresso powder in the brownie batter. Maybe you skip food coloring entirely because the mint flavor is the point, not a fluorescent paint sample. The recipe can change over time, but the experience stays the same: a cool, creamy layer tucked between chocolate, a plate that empties faster than expected, and the small joy of knowing you made something people genuinely remember.
Conclusion
Mint chocolate brownies are proof that a familiar dessert can become memorable with one smart flavor twist. A fudgy brownie base gives you rich cocoa depth, a smooth peppermint filling adds brightness, and a thin chocolate topping creates the perfect finish. Take your time with the cooling stages, use peppermint extract with a light hand, and slice the brownies once fully chilled for the cleanest layers.
Whether you make them for a festive dessert table or an ordinary evening that deserves a little extra chocolate, these brownies deliver a bakery-style treat without requiring pastry-school credentials, a stand mixer the size of a washing machine, or a personal assistant named Ganache.