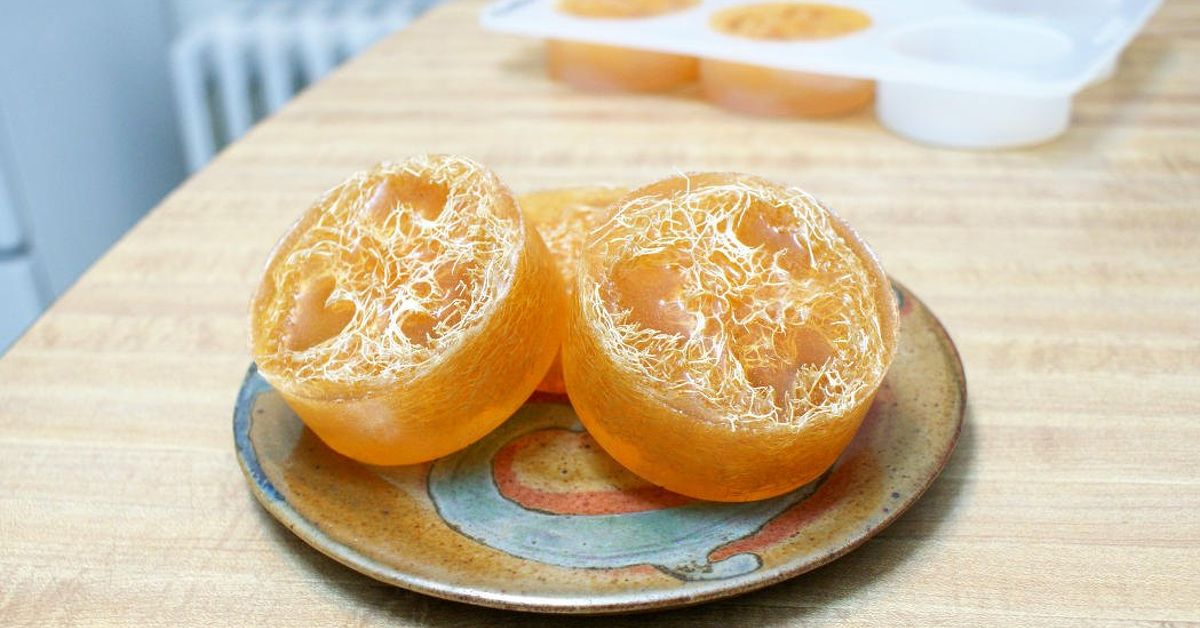
DIY loofah soaps are the cheerful little overachievers of the homemade bath world. They cleanse, exfoliate, look adorable in a gift basket, and make you feel like the kind of person who owns matching glass jars for everything. The best part? You do not need a chemistry degree, a soapmaking shed, or a dramatic pioneer bonnet to make them. With a melt-and-pour soap base, natural loofah, a mold, and a few skin-friendly add-ins, you can create polished-looking exfoliating soap bars in an afternoon.
These handmade loofah soap bars combine a gentle cleanser with the scrubby texture of dried luffa sponge. That means they are especially useful for rougher body areas like elbows, knees, heels, and hands. They are not, however, a “scrub everything aggressively until you glow like a marble countertop” situation. Good exfoliation is gentle, occasional, and matched to your skin type. Your skin is an organ, not a casserole dish.
In this guide, you will learn how to make DIY loofah soaps safely, how to choose the right soap base, what ingredients work best, how to avoid common mistakes, and how to customize your bars for gifts, guest bathrooms, craft fairs, or your own shower shelf.
What Are DIY Loofah Soaps?
DIY loofah soaps are bars of soap with pieces of natural loofah embedded inside. Loofah, also spelled luffa, does not come from the sea, despite its sponge-like appearance. It is the dried fibrous interior of a mature gourd from the cucumber and squash family. When young, the plant can be eaten like a vegetable in some cuisines. When fully mature and dried, the inside becomes a natural sponge that can be sliced, trimmed, and used for exfoliation.
When placed inside soap, loofah adds texture and mild scrubbing power. As the soap wears down, more of the loofah becomes exposed, creating a bar that is part cleanser, part body buffing tool. It is practical, pretty, and just rustic enough to make your bathroom look like it belongs in a lifestyle magazine with a suspiciously calm person holding herbal tea.
Why Make Loofah Soap at Home?
There are plenty of reasons to make homemade loofah soap. First, it is beginner-friendly when you use melt-and-pour soap base. Unlike cold process soap, melt-and-pour soap has already gone through saponification, the chemical reaction that turns oils and lye into soap. You simply cut, melt, scent, color, pour, and wait. It is the soapmaking equivalent of taking the scenic route without needing to build the road.
Second, DIY loofah soaps are highly customizable. You can choose a clear base for a spa-like look, a goat milk or shea butter base for a creamy appearance, or an aloe base for a fresh green tint. You can add fragrance oils, essential oils, mica colorants, cosmetic clays, dried botanicals, or layered colors. You can make round bars, loaf slices, individual discs, or mini guest soaps.
Third, handmade loofah bars make excellent gifts. They are useful, beautiful, and easy to package with a kraft paper label, cotton ribbon, or a small note. Unlike some DIY gifts, they do not require the recipient to pretend they know what to do with a decorative pinecone mobile.
DIY Loofah Soap Ingredients
1. Melt-and-Pour Soap Base
For beginners, melt-and-pour soap base is the easiest and safest choice. Popular options include clear glycerin, white glycerin, shea butter, goat milk, aloe, oatmeal, honey, and olive oil bases. Clear soap base shows off the loofah beautifully, while opaque bases create a softer, creamier look.
Use about 1 pound of soap base for a small batch of 4 to 6 bars, depending on your mold size and the amount of loofah used. Cut the base into small, even cubes so it melts smoothly and does not scorch.
2. Natural Loofah
You can buy whole loofah sponges, pre-sliced loofah rounds, shredded loofah, or loofah powder. Whole loofahs are ideal for round tube molds or large soap discs. Sliced loofah rounds fit nicely into silicone muffin molds. Shredded loofah is better if you want a gentler exfoliating bar with texture throughout.
3. Fragrance or Essential Oil
Fragrance makes the soap feel special, but more is not always better. Follow the usage rate recommended by your fragrance supplier. As a general starting point for melt-and-pour soap, many makers use a low percentage of fragrance by weight, but every oil is different. Too much fragrance can make soap soft, sweaty, irritating, or simply overwhelming. Nobody wants a shower that smells like a candle store exploded.
Popular scent ideas include lavender, eucalyptus, grapefruit, peppermint, cucumber melon, coconut, rosemary mint, lemongrass, vanilla sandalwood, and orange blossom. For sensitive skin, consider leaving the bars unscented or using a very low amount of a skin-safe fragrance.
4. Colorants
Use cosmetic-grade mica, liquid soap colorant, clay, or natural powders designed for soap. Avoid food coloring because it may bleed, fade, or stain. A little color goes a long way. Soft green, ocean blue, honey gold, creamy white, blush pink, and pale lavender all pair beautifully with loofah.
5. Rubbing Alcohol in a Spray Bottle
A fine mist of high-proof isopropyl alcohol helps pop bubbles on the surface of melt-and-pour soap and can help layers adhere. It is one of those tiny soapmaking details that makes the finished bar look much more professional.
Tools You Will Need
- Microwave-safe glass measuring cup or double boiler
- Kitchen scale
- Sharp knife and cutting board
- Silicone soap mold, muffin mold, or PVC tube mold
- Small spatula or spoon
- Spray bottle filled with isopropyl alcohol
- Infrared thermometer, optional but helpful
- Disposable gloves for handling colorants and fragrance
- Plastic wrap or shrink wrap for finished bars
Easy DIY Loofah Soap Recipe
Ingredients
- 1 pound melt-and-pour soap base
- 4 to 6 loofah slices or enough loofah to fit your mold
- Skin-safe fragrance oil or essential oil, used according to supplier guidelines
- Cosmetic-grade colorant, optional
- Isopropyl alcohol in a spray bottle
Step 1: Prepare the Loofah
Slice your loofah into rounds about 1/2 inch to 1 inch thick, depending on the mold. If the loofah feels very stiff, soak it briefly in warm water, squeeze it out thoroughly, and pat it dry. This helps it fit into molds more easily. Place one loofah piece in each mold cavity.
Step 2: Cut and Melt the Soap Base
Cut the melt-and-pour soap base into small cubes. Place the cubes in a microwave-safe measuring cup and heat in short bursts, stirring between each round. Do not boil the soap. Overheating can create rubbery texture, excess bubbles, or a less attractive finish. If using a double boiler, melt slowly over gentle heat.
Step 3: Add Color and Scent
Once the soap base is fully melted, let it cool slightly. Stir in your colorant slowly until you like the shade. Add fragrance or essential oil according to the safe usage rate for your specific product. Stir gently to avoid whipping bubbles into the soap.
Step 4: Pour Over the Loofah
Spritz the loofah pieces lightly with alcohol, then pour the melted soap over them. Pour slowly so the soap can move through the loofah fibers. If the loofah floats, press it down gently with a spoon or pour in stages. Tap the mold lightly on the counter to release trapped air.
Step 5: Spray the Surface
Spray the top of each bar with isopropyl alcohol to pop bubbles. This small step can turn “homemade in a hurry” into “boutique spa shop, please and thank you.”
Step 6: Let the Soap Harden
Allow the bars to sit undisturbed until firm. Most melt-and-pour soaps harden within a few hours, though larger bars may need longer. Avoid moving the mold too soon or you may wrinkle the surface.
Step 7: Unmold and Wrap
Once the bars are completely solid, gently remove them from the mold. Melt-and-pour soap contains glycerin, which attracts moisture from the air. To help prevent “sweating,” wrap the bars tightly in plastic wrap or shrink wrap after unmolding.
Best Soap Bases for Loofah Soap
Clear Glycerin Base
Clear glycerin soap is the classic choice for DIY loofah soaps because it makes the loofah visible. It gives the bar a clean, modern, spa-like look. It is especially pretty with pale blue, green, amber, or completely transparent soap.
Shea Butter Base
Shea butter melt-and-pour base creates a creamy, opaque bar. It pairs well with warm fragrances like vanilla, honey, sandalwood, or oatmeal. The loofah will be less visible, but the bar feels cozy and giftable.
Aloe Vera Base
Aloe melt-and-pour soap often has a light green tint and a fresh feel. It works well with cucumber, mint, eucalyptus, or citrus scents. This is a great option for summer-themed shower bars.
Goat Milk Base
Goat milk soap base gives a soft, creamy appearance and works beautifully with gentle, comforting scents. Pair it with lavender, chamomile, vanilla, or honey for a farmhouse-style bar.
Design Ideas for Handmade Loofah Soap Bars
Citrus Sunshine Loofah Soap
Use clear soap base, orange or yellow mica, and a grapefruit or sweet orange fragrance. Add a loofah round to each mold and pour the golden soap over the top. These bars look bright, cheerful, and energizing.
Lavender Spa Loofah Soap
Use a white or clear base with a tiny amount of purple mica. Add lavender fragrance or lavender essential oil at a safe usage rate. For a decorative touch, sprinkle a few lavender buds on the top, but keep botanicals minimal because they can discolor or feel scratchy.
Ocean Breeze Loofah Soap
Use clear soap base with blue and teal layers. Pour one thin layer, let it firm slightly, spray with alcohol, then pour another layer. The loofah inside gives the bar a beachy, natural texture.
Coffee Scrub Loofah Soap
Use an opaque base with a small amount of finely ground coffee and a warm coffee or vanilla fragrance. Because loofah is already exfoliating, go easy on extra scrub ingredients. Too much texture can turn your soap into a tiny household weapon.
Skin Safety: How to Use Loofah Soap Wisely
Loofah soap is best for the body, not the face. Facial skin is more delicate, and a loofah can be too rough for many people. Use loofah bars on areas that can handle mild physical exfoliation, such as arms, legs, feet, elbows, and knees.
Do not use loofah soap on sunburned skin, open cuts, irritated patches, eczema flares, freshly shaved skin, or areas with active acne. If your skin is dry, sensitive, acne-prone, or easily irritated, use the bar lightly and only occasionally. If redness, stinging, itching, or burning occurs, stop using it.
Gentle pressure is enough. Let the soap glide over wet skin in small motions, then rinse thoroughly. You are aiming for smooth skin, not a dramatic before-and-after scene in a home renovation show.
Loofah Hygiene and Storage Tips
Because loofah is a natural fibrous material, it can trap moisture if it stays wet. After each use, rinse the bar well and store it on a draining soap dish where air can circulate. Do not leave it sitting in a puddle on the edge of the tub. That is where good soap bars go to become sad.
For best results, make smaller bars that can be used up within a reasonable time. If the loofah develops an off smell, discoloration, sliminess, or visible mold, discard it. In humid bathrooms, extra airflow matters. A slatted bamboo soap dish, wire rack, or raised ceramic dish can help the bar dry faster.
Can You Make Loofah Soap with Cold Process Soap?
Yes, experienced soapmakers can make cold process loofah soap, but beginners should understand the safety requirements first. Cold process soapmaking involves sodium hydroxide, commonly called lye. Lye can cause serious burns if it contacts skin or eyes, and it must be handled with goggles, gloves, long sleeves, ventilation, accurate measuring, and proper equipment.
For most beginners, melt-and-pour soap is the better starting point. You still get beautiful handmade loofah bars without handling raw lye. If you want to explore cold process soap later, follow a tested recipe from a reliable soapmaking source, use a lye calculator, and never improvise with measurements.
Common DIY Loofah Soap Mistakes
Using Too Much Fragrance
Too much fragrance can make soap soft, oily, irritating, or overpowering. Always follow supplier guidelines. More scent does not make the soap more luxurious; sometimes it just makes your bathroom smell like a perfume counter having a nervous breakdown.
Overheating the Soap Base
Melt-and-pour soap should be heated gently. If it boils, it may become cloudy, bubbly, or rubbery. Use short microwave bursts and stir often.
Skipping Alcohol Spray
Alcohol spray helps reduce bubbles and can help layers stick together. It is not glamorous, but it works. Many good-looking soap bars owe their smooth tops to this tiny backstage hero.
Using Too Much Scrub Material
Loofah is already exfoliating. If you add coffee grounds, pumice, salt, seeds, or heavy clay, use a light hand. A bar can go from “pleasantly scrubby” to “why is my soap angry?” very quickly.
Leaving Bars Unwrapped
Melt-and-pour soap can attract moisture from the air because of its glycerin content. Wrap finished bars tightly after they harden, especially if you live in a humid climate.
Packaging Ideas for DIY Loofah Soaps
For gifts, wrap each bar in clear shrink wrap or plastic wrap first to protect it from moisture. Then add a decorative outer layer such as kraft paper, a cigar-band label, tissue paper, cotton twine, or a small muslin bag. Add a label with the soap name, scent, ingredients, and a simple use note such as “Use on body only. Let dry between uses.”
If you plan to sell handmade soap, be careful with claims. A simple cleansing soap is different from a product that claims to treat acne, eczema, inflammation, infection, pain, or other medical conditions. Avoid drug-like claims unless you fully understand the regulatory requirements. “Exfoliating body soap” is safer wording than “cures keratosis pilaris,” “heals eczema,” or “detoxifies skin.” Your label should be honest, clear, and not written like it is auditioning for a miracle cure commercial.
of Real-Life Experience: What Making DIY Loofah Soaps Teaches You
The first thing you learn when making DIY loofah soaps is that loofah has a personality. It looks innocent sitting there on the craft table, all beige and wholesome, but the second you pour melted soap around it, it may float, tilt, trap bubbles, or try to escape its mold like a tiny spa-themed submarine. The trick is patience. Pour slowly, let the soap soak into the fibers, and keep a spoon nearby to nudge the loofah back into place. After one batch, you stop expecting perfection and start working with the material instead of against it.
The second lesson is that temperature matters more than beginners expect. When the soap is too hot, it can create lots of bubbles, melt delicate embeds, or make the finished bar look less smooth. When it is too cool, it thickens before fully moving through the loofah. The sweet spot is warm enough to pour easily but not so hot that it behaves like lava with a hobby. A thermometer helps, but even without one, you can learn by watching the texture. Smooth, fluid soap is your friend. Steamy, boiling soap is not invited.
Another practical discovery is that simple designs often look the best. It is tempting to add three colors, two fragrances, flower petals, glitter, clay, coffee, oats, and possibly your hopes for the new year. Resist. Loofah already gives the bar visual interest. A clear base with one soft color can look elegant. A creamy white bar with a neat loofah center can look expensive. Too many add-ins may make the soap muddy, scratchy, or hard to use.
DIY loofah soaps also teach you how different people prefer different levels of exfoliation. Some love a full loofah slice because it feels satisfyingly scrubby on heels and elbows. Others prefer shredded loofah because it is gentler and easier to use all over the body. If you are making bars as gifts, it is smart to create a mixed batch: a few strong scrub bars for feet and a few milder bars for hands and arms. Label them clearly so nobody accidentally treats their shoulder like a cast-iron skillet.
Storage is another lesson that arrives quickly. A loofah soap left in standing water turns mushy faster than one stored on a draining dish. The prettiest soap in the world still needs airflow. In real bathrooms, especially humid ones, a good soap dish is not optional; it is the difference between a long-lasting bar and a slippery blob with ambition.
Finally, making loofah soap is satisfying because it gives fast results. Many crafts require drying time, curing time, sewing skills, sanding skills, or emotional resilience. Melt-and-pour loofah soap gives you a finished product the same day. You can make a batch in the afternoon, wrap it by evening, and feel wildly productive with very little chaos. It is creative, useful, affordable, and forgiving. Even the imperfect bars work. In fact, those slightly lopsided first attempts often become the ones you keep for yourself, because they remind you that handmade does not mean flawless. It means made with attention, curiosity, and maybe one or two soap flakes stuck to your sleeve.
Conclusion
DIY loofah soaps are one of the easiest ways to step into homemade bath products without getting overwhelmed. They are attractive, customizable, practical, and beginner-friendly when made with melt-and-pour soap base. With natural loofah, a good soap base, skin-safe fragrance, gentle color, and careful storage, you can create exfoliating body bars that look boutique but feel personal.
The key is balance. Use safe ingredients, avoid overloading the bar with fragrance or scrubby extras, and remember that exfoliation should be gentle. Loofah soap is best for the body, especially rough spots like knees, elbows, feet, and hands. Wrap your bars well, label them clearly, and let them dry between uses.
Whether you are making a batch for yourself, holiday gifts, bridal shower favors, guest bathrooms, or a weekend craft project, handmade loofah soaps deliver that rare combination of easy, useful, and impressive. In other words, they are the kind of DIY project that makes people say, “Wait, you made this?” And you get to smile calmly, as if you did not spend ten minutes chasing a floating loofah around a mold.
Note: This article is for educational DIY crafting purposes. Always follow the safety instructions provided by your soap base, fragrance, colorant, and equipment suppliers. Use loofah soaps gently and discontinue use if irritation occurs.