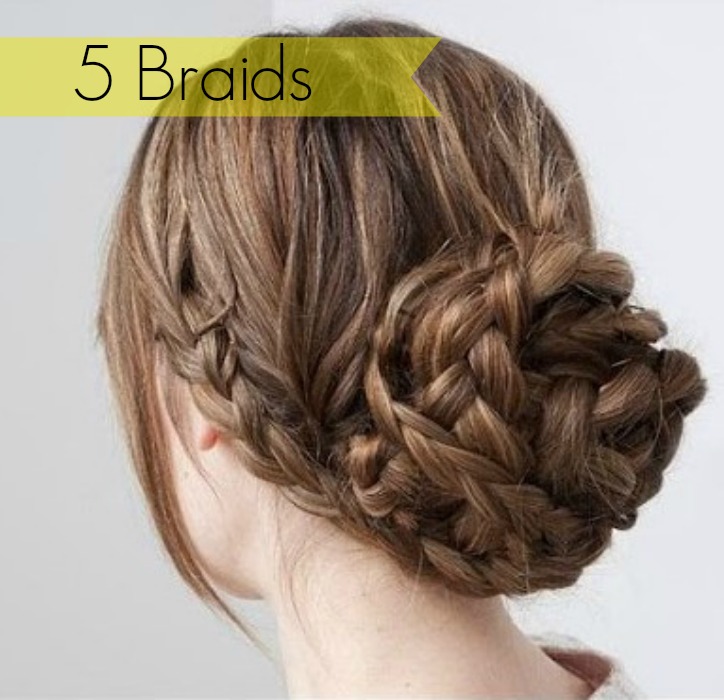
Braids are the Swiss Army knife of hairstyling. They can rescue a questionable hair day, keep strands away from your face during a workout, dress up an outfit for a wedding, or create the illusion that you spent far more time getting ready than you actually did.
Better still, there is a braided hairstyle for nearly every hair length, texture, occasion, and skill level. Fine hair can gain visual fullness from a loosened braid, thick hair can be organized into a secure plait, and curly or coily hair can be styled with less daily manipulation. The secret is choosing the right technique and applying only enough tension to hold the style comfortably.
This guide breaks down five braid hairstyles that belong in every styling toolkit: the classic three-strand side braid, French braid, Dutch braid, fishtail braid, and crown braid. Each section includes clear instructions, customization ideas, and practical advice for making the finished look polished rather than “I braided this during a red light.”
Why Braid Hairstyles Never Really Go Out of Style
Braided hairstyles have remarkable range. A neatly woven French braid looks practical and polished, while a loose fishtail braid feels relaxed and romantic. Double Dutch braids can handle an active day, and a crown braid can turn ordinary hair into a formal updo without requiring an advanced degree in bobby-pin engineering.
Many braids are also heat-free hairstyles. That does not automatically make every braid protective, but a comfortably installed style can reduce the need for repeated brushing, curling, straightening, and restyling. The key word is comfortably. Braids that cause pain, bumps, headaches, or persistent scalp tenderness are too tight and should be loosened. Repeated pulling can contribute to traction alopecia, a type of hair loss associated with prolonged tension on the hair follicles.
What You Need Before You Start Braiding
Basic tools
- A wide-tooth comb or detangling brush
- A rat-tail comb for clean sections
- Small, snag-free elastics
- Bobby pins that match your hair color
- Lightweight styling cream, mousse, or texturizing spray
- A small amount of hairspray or anti-frizz serum
- A handheld mirror when braiding the back of your own head
Detangling is not the glamorous part, but it is the step that prevents your braid from turning into a tiny woven argument. Begin at the ends and work upward toward the roots. Hair that is extremely slippery may benefit from a small amount of dry shampoo, texture spray, or mousse. This creates grip and makes sections easier to control.
Prepare according to your hair texture
Straight or fine hair: Add texture before braiding, especially when the hair has just been washed. After finishing, gently widen the loops to make the braid appear fuller.
Wavy hair: Work with the natural texture rather than brushing it completely flat. A little styling cream can define the braid while preserving softness.
Curly or coily hair: Detangle in sections and apply a moisturizing leave-in product. Avoid forcing the hair into an overly tight pattern. A braid can reduce daily manipulation only when the scalp and strands are treated gently.
Layered or short hair: Keep bobby pins nearby. Escaping pieces are not necessarily mistakes; a few face-framing strands can make the style look intentionally relaxed.
1. The Classic Three-Strand Side Braid
The classic three-strand braid is the foundation for many more elaborate braid hairstyles. It is quick, dependable, and ideal for beginners. Worn over one shoulder, it feels softer and more modern than a rigid braid positioned directly down the back.
How to create it
- Gather your hair over one shoulder.
- Divide it into three equal sections: left, middle, and right.
- Cross the right section over the middle section.
- Cross the left section over the new middle section.
- Continue alternating sides until you reach the ends.
- Secure the braid with a small elastic.
For a soft, lived-in finish, hold the elastic and gently pull outward on the braid’s outer loops. This technique is commonly called pancaking. It widens the braid and can make fine or medium-density hair look more substantial.
Ways to customize it
Wrap a small strand of hair around the elastic and pin it underneath for a clean finish. Add a velvet ribbon for an evening look, weave a narrow scarf through one section, or pull out a few strands around your face. For a casual weekend style, position the braid lower and keep the top loose. For work, smooth the crown and braid more evenly.
Best for: Beginners, second-day hair, casual outfits, travel, and rushed mornings.
2. The French Braid
A French braid begins near the scalp and gradually incorporates additional hair into a traditional three-strand pattern. The result is secure, streamlined, and versatile enough for school, work, exercise, or dinner.
How to create it
- Take a section of hair near the top center of your head.
- Divide that section into three smaller pieces.
- Cross the right section over the middle, followed by the left section over the middle.
- Before the next crossover, add a small amount of loose hair to the section you are moving.
- Repeat on the opposite side, adding similar amounts of hair each time.
- Continue until all loose hair has been incorporated.
- Finish the remaining length as a regular three-strand braid.
Keep your hands close to the scalp while working, but do not yank the sections tight. Adding similarly sized pieces creates an even pattern. A mirror can help at first, although many people find that relying on touch becomes easier with practice. Professional tutorials consistently emphasize clean sections, detangling, and repetition as the fastest route to mastering the technique.
Easy French braid variations
Create two French braids for a sporty style, stop at the nape and form a ponytail, or wrap the finished braid into a low bun. You can also braid only the front section to create a headband effect while leaving the rest of the hair loose.
Best for: Medium to long hair, active days, humid weather, and styles that need to remain secure.
3. The Dutch Braid
The Dutch braid is sometimes described as an inside-out French braid. Instead of crossing the outer sections over the center, you pass them underneath. This causes the braid to sit on top of the hair, creating a bold, three-dimensional appearance.
How to create it
- Separate a section of hair near the hairline or crown.
- Divide it into three pieces.
- Move the right piece underneath the middle piece.
- Move the left piece underneath the new middle piece.
- Add a small amount of loose hair to each outer section before passing it underneath.
- Continue toward the nape.
- Finish with a regular three-strand braid, still crossing underneath.
The underhand movement may feel as though your fingers have suddenly forgotten their job. That is normal. Work slowly and repeat the phrase “under the middle” until the motion becomes automatic. Dutch braid tutorials recommend beginning with neat, detangled sections and opening the loops only after the braid is secured.
How to make it look fuller
Starting at the bottom, gently tug each outer loop. Work upward in small increments rather than pulling one section dramatically. This preserves the braid’s structure while increasing its width. Fine hair may benefit from texture powder at the roots, while thick hair usually needs only a light smoothing product.
Double Dutch braids are especially useful for workouts and warm weather. You can braid to the ends or stop at the neckline and secure two low ponytails.
Best for: Statement styles, workouts, festivals, medium or long hair, and anyone who likes visible braid definition.
4. The Fishtail Braid
A fishtail braid looks intricate, but it uses only two main sections instead of three. Tiny pieces are transferred from one side to the other, creating a woven pattern that resembles overlapping scales.
How to create it
- Gather the hair into a low ponytail or bring it over one shoulder.
- Divide the hair into two equal sections.
- Take a thin piece from the outer edge of the right section.
- Cross that piece over and add it to the left section.
- Take a thin piece from the outer edge of the left section.
- Cross it over and add it to the right section.
- Repeat until you reach the ends, then secure with an elastic.
Small pieces produce a detailed braid, while larger pieces create a looser, faster version. Keep the two main sections separated as you work. Once finished, gently pull the outer edges apart for a relaxed look. A little imperfection helps; a fishtail braid usually looks better when it is not wound tighter than a suspension cable.
Styling options
Wear it low and centered for a polished appearance, pull it to one shoulder for a romantic style, or begin with a high ponytail for a sharper silhouette. A half-up fishtail braid also works well when you want detail without putting all your hair up.
Best for: Date nights, weddings, beach days, long hair, and anyone ready to move beyond the basic plait.
5. The Crown Braid
The crown braid wraps around the head like a woven headband. It can appear elaborate, but the easiest version starts with two ordinary braids. It is an excellent option for formal events, hot weather, or days when your hair has decided that gravity is merely a suggestion.
The easy two-braid method
- Create a center part from the forehead to the nape.
- Divide the hair into two low sections.
- Braid each section and secure the ends with small elastics.
- Lift the left braid over the top of your head toward the right side.
- Pin it securely, hiding the elastic when possible.
- Lift the right braid over the first and pin it toward the left side.
- Tuck the ends underneath and add pins wherever the crown feels loose.
Leave out a few soft pieces around the face or smooth everything back for a more formal finish. Crown and milkmaid braids can be dressed up or down, and a little texture often makes them easier to secure.
The advanced method
For a continuous halo effect, begin a Dutch or French braid behind one ear and gradually work around the head, adding hair as you go. Keep the braid close to the hairline and direct it behind the opposite ear before tucking and pinning the end. This version takes more coordination but produces a seamless crown.
Best for: Weddings, parties, summer events, medium or long hair, and elegant heatless updos.
How to Choose the Right Braid Hairstyle
| Braid hairstyle | Skill level | Ideal occasion | Typical styling time |
|---|---|---|---|
| Three-strand side braid | Beginner | Everyday wear and travel | 3–5 minutes |
| French braid | Beginner to intermediate | Work, exercise, and school | 8–15 minutes |
| Dutch braid | Intermediate | Workouts and statement looks | 10–20 minutes |
| Fishtail braid | Beginner to intermediate | Dates, vacations, and parties | 8–20 minutes |
| Crown braid | Intermediate | Weddings and formal events | 15–25 minutes |
The times above are estimates. Your first French braid may take twenty-five minutes and involve negotiations with several bobby pins. After practice, the same style may take less than ten.
How to Help Braids Look Better and Last Longer
Start with manageable texture
Freshly washed, silky hair can be difficult to control. Apply a small amount of lightweight texture product instead of coating the hair in heavy gel. Too much product can make sections sticky and harder to separate.
Use consistent sections
The most polished braids usually come from adding similar amounts of hair with each pass. Uneven sections are not disastrous, but consistency produces a cleaner pattern.
Secure without excessive tension
A braid should feel stable, not painful. Watch for soreness, redness, bumps, stinging, or broken hairs around the hairline. Loosen or remove any style that causes discomfort. Dermatology guidance warns that repeatedly wearing tight braids, cornrows, ponytails, or extensions can damage the hair and may eventually cause permanent loss where scarring develops.
Protect the style overnight
Use a satin or silk scarf, bonnet, or pillowcase to reduce friction. For a single loose braid, reposition it so you are not sleeping directly on the elastic. In the morning, smooth flyaways with damp fingertips or a tiny amount of serum.
Common Braiding Mistakes
- Braiding tangled hair: Hidden knots make sections uneven and increase pulling.
- Using too much product: Heavy creams can remove volume and attract buildup.
- Beginning too tightly: Secure does not need to mean painful.
- Pulling loops before securing the end: The braid may loosen or unravel.
- Expecting perfection immediately: Braiding is a coordination skill that improves through repetition.
- Ignoring your haircut: Layers may need pins, texture spray, or a deliberately messy finish.
Experience-Based Lessons From Styling These Five Braids
The following observations reflect common real-world experiences among home braiders and professional styling guidance. They are useful reminders of what tends to happen after the tutorial ends and your own two hands take over.
The mirror can make learning harder
Many beginners watch themselves in a mirror and accidentally reverse every movement. This is especially common with French and Dutch braids. A more effective approach is to practice the hand pattern on a side section that you can see directly. Once your fingers understand the sequence, move to the back of the head and rely more on touch. The first attempts may look uneven, but muscle memory develops surprisingly quickly. Photographing the back afterward is often more helpful than twisting your neck like an owl throughout the entire process.
Second-day hair is often more cooperative
Freshly washed hair can be soft, slippery, and determined to escape. Hair with a little natural texture usually holds a braid more easily, which is why many people prefer braiding on the second day after washing. That does not mean the hair should feel dirty or overloaded with product. A small amount of dry shampoo or texturizing spray can provide enough grip. The practical lesson is simple: when a braid keeps falling apart, the problem may be the texture rather than your technique.
Pancaking can transform an ordinary braid
A tightly finished braid may look smaller than expected, particularly on fine hair. Gently widening the loops changes the entire silhouette. The safest method is to secure the end first, hold the braid with one hand, and loosen tiny sections with the other. Starting near the bottom allows you to control the amount of expansion. Pulling aggressively from the top can dismantle the style. With patience, an average three-strand or Dutch braid can look noticeably fuller without extensions or complicated products.
Bobby-pin placement matters more than pin quantity
Crown braids often inspire people to insert a heroic number of pins and hope for peace. Strategic placement works better. Slide each pin against the direction in which the braid wants to move, then anchor it into the hair underneath. Crossing two pins can strengthen a slippery area, but stacking ten pins in one spot mainly creates a tiny metal sculpture. Matching the pins to your hair color and hiding them beneath the braid also gives the finished style a cleaner appearance.
Comfort is the best test of a successful style
A braid can look beautiful and still be installed incorrectly for the wearer. Pain is not proof that the style will last longer. If the scalp throbs, the hairline feels stretched, or small bumps appear, the braid should be loosened or removed. People with fragile, chemically treated, or thinning hair should be especially careful about tension and added weight. A successful braid should let you move, smile, and finish the day without counting the minutes until you can take it out.
Final Thoughts
These five braid hairstyles provide a strong foundation for dozens of variations. Start with the three-strand braid, learn how to add hair for a French braid, reverse the motion for a Dutch braid, switch to two sections for a fishtail, and pin braids around the head to create a crown.
The most important ingredient is not a cabinet full of styling products. It is practice. Work with small, controlled sections, keep the tension comfortable, and allow the finished braid to have a little personality. A loose strand does not always need emergency intervention. Sometimes it is simply the hairstyle’s way of saying, “Relax, I’m supposed to look effortless.”
Editorial note: This article synthesizes braid techniques, styling recommendations, and hair-safety guidance from dermatology organizations, medical resources, professional hair brands, and established American beauty publications.