Once upon a time, before cloud storage, USB-C hubs, and phones with more storage than old office servers, the floppy disk was the tiny plastic hero of everyday computing. It carried school essays, tax files, shareware games, startup disks, printer drivers, and exactly one photo if the photo promised to behave. Today, formatting a floppy disk sounds like a retro-computing ritual, but it is still useful for vintage PCs, embroidery machines, laboratory equipment, music keyboards, industrial controllers, and anyone trying to rescue a box of mysterious disks from a closet.
This guide explains 3 ways to format a floppy disk: using Windows, using Command Prompt or DOS, and using Mac or Linux tools. Along the way, you will learn what formatting actually does, how to avoid erasing the wrong media, which file system to choose, and why a 1.44 MB disk has the confidence of a storage device ten thousand times its size.
What Formatting a Floppy Disk Actually Means
Formatting prepares a floppy disk so an operating system can store files on it. In practical terms, the computer creates a file system, checks the disk surface, and builds the basic structure needed to save and locate data. On classic 3.5-inch PC disks, that usually means a FAT-style file system, commonly recognized by MS-DOS, Windows, and many legacy devices.
There are two common ideas hidden inside the word “format.” A quick format usually clears the file table and makes the disk appear empty without deeply checking every part of the surface. A full format takes longer because it may scan the disk for bad sectors and rebuild more of the disk structure. With old floppy disks, full formatting is often the better choice when you suspect age, dust, magnet damage, or general floppy drama.
Before you begin, remember one golden rule: formatting erases accessible files. If the disk might contain family documents, vintage code, old business records, or the one surviving copy of your 1997 masterpiece called “final_final_reallyfinal.doc,” copy or image the disk first.
Before You Start: Check the Disk, Drive, and Write-Protection Tab
Most people who struggle to format a floppy disk are not doing anything wrong. The problem is usually hardware, media age, write protection, or a mismatch between disk type and drive type.
Check the physical disk
Look for cracks, bent shutters, mold, dirt, peeling labels, or strange rattling sounds. A healthy 3.5-inch floppy should slide smoothly into the drive. If the metal shutter is jammed or the disk smells like it spent twenty years in a damp basement, treat it as fragile.
Check write protection
On a 3.5-inch floppy disk, the small sliding tab in the corner controls write protection. If the hole is open, the disk is protected and cannot be formatted. Slide the tab so the hole is closed, then try again. On 5.25-inch disks, write protection is usually controlled by a notch on the edge, often covered with a small sticker.
Know your disk capacity
The most familiar 3.5-inch high-density floppy stores about 1.44 MB. Older 720 KB double-density disks also exist. A 5.25-inch disk may be 360 KB or 1.2 MB depending on the disk and drive. Formatting a disk at the wrong density can cause errors or create a disk that another machine cannot read.
Way 1: Format a Floppy Disk in Windows
The easiest method is the Windows graphical interface. This is the best choice if you are using a USB floppy drive with a modern Windows computer or an older PC with a built-in floppy drive.
What you need
You need a working floppy disk, a floppy disk drive, and a Windows computer that recognizes the drive. Many USB floppy drives appear as drive A:, though some systems may assign another removable drive letter.
Steps to format in Windows
- Insert the floppy disk into the drive.
- Open File Explorer.
- Look for the floppy drive, usually labeled 3½ Floppy (A:) or similar.
- Right-click the drive and choose Format.
- Select the available capacity, usually 1.44 MB for a standard high-density disk.
- Choose a file system if Windows gives you options. For most floppy disks, use a FAT-compatible format.
- Enter a short volume label if you want, such as BACKUP, DRIVERS, or RETRO1.
- Uncheck Quick Format if you want Windows to perform a more careful format.
- Click Start and confirm that you want to erase the disk.
When the process finishes, Windows should report that the format is complete. You can then open the disk and copy files to it like any removable storage device, only much smaller and with more nostalgic clicking.
When Windows formatting is the best method
Use this method when you need a disk for Windows 95, Windows 98, MS-DOS-compatible tools, BIOS updates for old PCs, industrial machines that expect PC-formatted floppies, or general file transfer between retro and semi-modern systems.
Common Windows formatting problems
If Windows says it cannot complete the format, first check the write-protection tab. Then try another disk. Old floppy disks often fail because the magnetic surface has degraded. If several disks fail, try another drive or another USB port. Some USB floppy drives support only common 1.44 MB disks and may not handle older 720 KB or unusual formats properly.
Way 2: Format a Floppy Disk with Command Prompt or DOS
If you enjoy typing commands and feeling like you are about to launch a satellite, the command-line method is for you. It is also useful when File Explorer refuses to cooperate, when you are working on an older DOS machine, or when you need more control over the formatting options.
Format from Windows Command Prompt
Open Command Prompt. On modern Windows, you may need to run it as administrator. Then use a command like this:
This tells Windows to format the floppy disk in drive A. If your floppy drive uses a different letter, replace A: with the correct drive letter. Read the prompt carefully before pressing Enter. Formatting the wrong drive is the computing equivalent of grabbing the wrong coffee cup and discovering it belongs to someone who drinks cold mushroom tea.
Quick format from Command Prompt
To perform a quick format, use:
A quick format is faster, but it is less useful for checking old media. If you are preparing a disk that has been sitting in a drawer since the era of dial-up internet, a full format is safer.
Add a disk label
To format and apply a volume label, use:
Keep labels short and simple. Older systems may not like long names, special characters, or your attempt to name the disk “The Precious Archive of Forgotten Spreadsheet Glory.”
Specify floppy disk size
Some versions of the Windows format command allow size options for floppy disks. For a 1.44 MB disk, you may see examples like:
Use size options only when you understand the disk and drive you are using. A 1.44 MB high-density disk should be formatted as 1.44 MB. A 720 KB disk should not be forced into pretending it is larger. Floppy disks are small, but they have boundaries.
Format from MS-DOS or FreeDOS
On a vintage PC running MS-DOS, PC DOS, or FreeDOS, the classic command is:
DOS may ask you to insert a new disk and press Enter. After formatting, it may ask for a volume label. On some older DOS systems, you can create a bootable system disk using a system-transfer option, depending on the version:
This copies essential system files after formatting, creating a bootable floppy disk. This is useful for vintage troubleshooting, BIOS updates, and retro computing projects. However, modern Windows systems do not use this DOS boot process in the same way, so do not expect this command to magically turn a modern PC into a time machine. It will not bring back your beige monitor either.
When the command-line method is best
Use Command Prompt or DOS when File Explorer does not show the floppy drive correctly, when you need a boot disk for an older machine, when you are formatting many disks, or when a legacy device manual specifically tells you to use a command-line format.
Way 3: Format a Floppy Disk on Mac or Linux
Formatting a floppy disk on Mac or Linux is possible, but the exact steps depend heavily on the drive, operating system version, and disk type. Modern computers do not treat floppy drives as first-class citizens anymore. They treat them more like visiting relatives from 1993: welcome, interesting, but not always easy to understand.
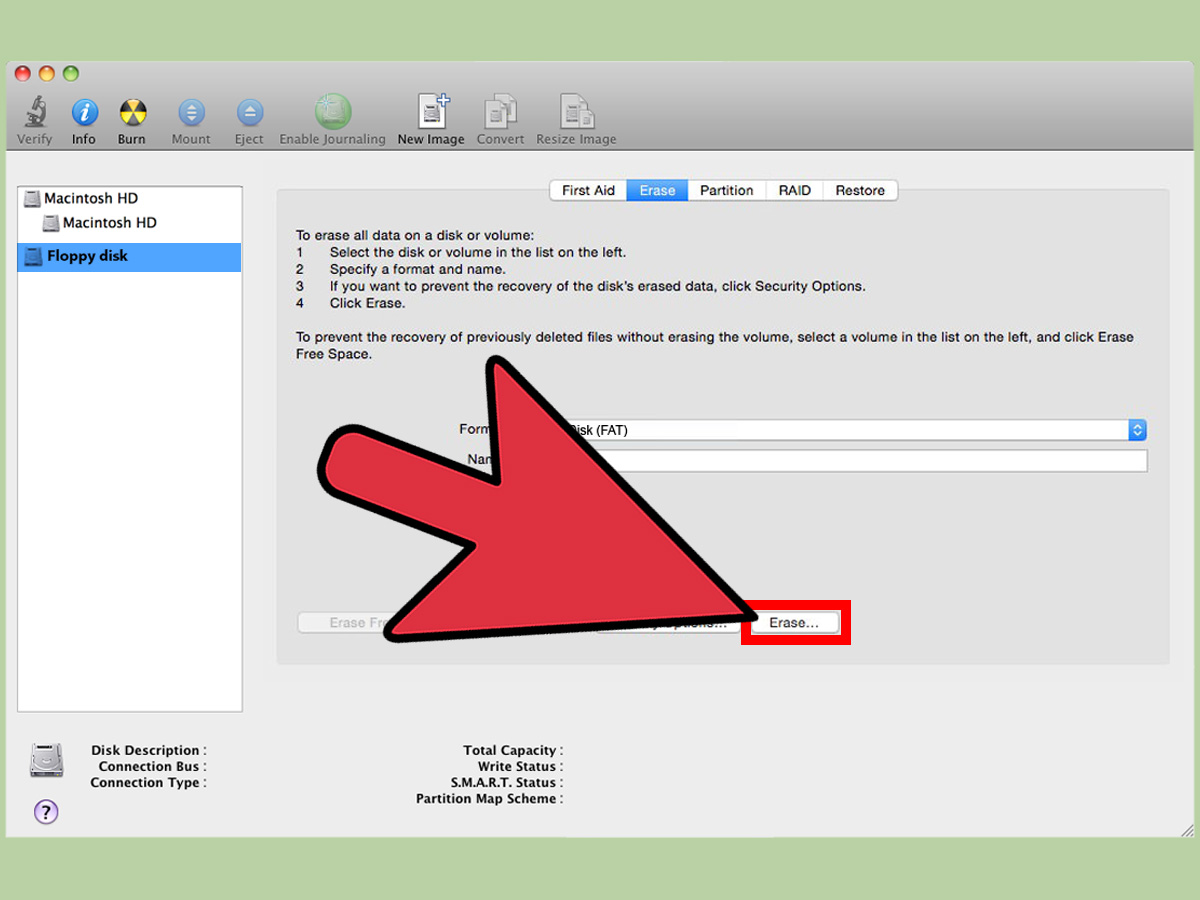
Format a floppy disk on Mac with Disk Utility
If your Mac recognizes a USB floppy drive, you can try formatting it with Disk Utility:
- Connect the USB floppy drive to the Mac.
- Insert the floppy disk.
- Open Disk Utility.
- Choose View and select Show All Devices if needed.
- Select the floppy disk or device carefully.
- Click Erase.
- Choose a compatible format, usually MS-DOS (FAT) for cross-platform use.
- Enter a short name for the disk.
- Click Erase and wait for the process to finish.
This method is best for making a floppy disk readable by PC-style systems. However, some modern Macs and USB floppy drives may not support every floppy format. If Disk Utility does not show the disk, test the drive on another computer or consider using a Linux system with stronger legacy-device tools.
Format a floppy disk on Linux
Linux remains one of the more flexible environments for old storage media. On many systems, a traditional floppy drive appears as:
Before formatting, make sure the disk is not mounted. Then create a FAT file system with a command such as:
Some systems use the mkfs.vfat command instead:
If you are using a USB floppy drive, the device name may be different. Use commands such as lsblk or dmesg to identify the correct device. Be extremely careful here. Linux will do exactly what you ask, even if you accidentally ask it to format your external hard drive full of vacation photos and questionable downloads.
Low-level formatting on Linux
Some Linux setups include tools such as fdformat for low-level floppy formatting. A command may look like this:
Low-level formatting checks the physical structure of the floppy disk more directly. It can be useful with old media, but support varies by hardware. Many USB floppy drives do not expose the same low-level controls that internal floppy controllers once did.
When Mac or Linux formatting is best
Use Mac or Linux when you work with retro-computing archives, need flexible file-system tools, want to format disks for non-Windows environments, or are trying to recover and prepare disks from a mixed collection of old machines.
Which File System Should You Use?
For most users, the safest choice is a FAT-compatible format. A standard PC floppy typically uses FAT12, though modern tools may simply label the choice as FAT or MS-DOS (FAT). This format is widely readable by DOS, Windows, many Linux systems, some Macs, and plenty of legacy equipment.
Use a Linux file system such as ext2 only if the disk will be used strictly with Linux or a legacy Linux setup. Avoid modern file systems like NTFS, exFAT, APFS, or ext4 for ordinary floppy use. They are designed for larger storage media and may not be supported by the old machine or device you are trying to feed.
How to Troubleshoot Floppy Disk Formatting Errors
“The disk is write-protected”
Move the write-protection tab so the hole is closed. Reinsert the disk and try again. If the tab is broken, the disk may remain protected or unreliable.
“Windows was unable to complete the format”
Try a full format, another disk, another USB port, or another drive. If multiple disks fail in the same drive, the drive may be dirty or defective. If one disk fails everywhere, the disk has probably retired from active duty.
The drive clicks repeatedly
Some clicking is normal. Endless clicking, grinding, or repeated read errors suggest a bad disk, dirty drive head, or incompatible format.
The disk works on one computer but not another
This usually means a file-system mismatch, a disk-density mismatch, or a drive alignment issue. Older drives can drift out of alignment, creating disks that only the original drive can read reliably.
The disk shows less capacity than expected
Check the disk type and format options. A 720 KB disk will not become a reliable 1.44 MB disk through optimism. Also, some old systems format disks with nonstandard layouts that modern computers may not recognize.
Safety Tips Before Formatting Old Floppy Disks
If the floppy disk might contain important data, do not format it first. Instead, try to copy the files or create a disk image. Digital preservation specialists often recommend moving data from old magnetic media into current storage as soon as possible because drives become scarce and magnetic surfaces degrade over time.
Store floppy disks upright in protective boxes, away from heat, moisture, dust, speakers, magnets, and strong electrical fields. Avoid sticking new adhesive labels directly on old disks if the label might peel or gum up the drive. Label the sleeve or storage box instead. A floppy disk does not need a spa day, but it does need a clean, dry, boring life.
Practical Examples
Example 1: Preparing a disk for an old Windows 98 computer
Use Windows File Explorer or Command Prompt and format the disk as a standard 1.44 MB FAT floppy. Then copy the drivers, documents, or setup files. Keep file names short if the target system is very old.
Example 2: Creating a DOS boot disk
Use an actual DOS or FreeDOS environment and run a system-disk format command if supported. Confirm that the disk boots on the target machine before relying on it for repairs.
Example 3: Preparing a disk for a legacy machine
Check the machine manual before formatting. Some embroidery machines, synthesizers, CNC equipment, and lab devices require exact disk sizes, folder structures, or file naming rules. A perfectly formatted disk can still fail if the device expects a very specific layout.
Extra Field Notes: Experiences from Formatting Floppy Disks
Working with floppy disks teaches patience in a way modern storage never does. A USB flash drive appears instantly, swallows gigabytes, and rarely complains. A floppy disk, by contrast, announces itself with a mechanical chirp, spins like it has something to prove, and reminds you that 1.44 MB used to be enough room for serious business. Formatting one feels less like managing storage and more like negotiating with a tiny magnetic sandwich.
The first experience many people have is confusion over the drive letter. On classic PCs, the floppy drive was usually A:. That letter still carries decades of computing history. Even on a modern Windows computer with a USB floppy drive, seeing A: appear in File Explorer can feel oddly ceremonial. It is like the operating system is wearing a vintage jacket for the afternoon.
The second experience is learning that not all floppy disks are equal. Two disks may look nearly identical, but one may be high-density and another double-density. A disk from an old word processor may use a format that a Windows PC cannot read. A disk from a music keyboard may have its own structure. A disk that looks clean may fail halfway through formatting because one sector has gone bad. Modern users expect storage to either work or not work. Floppies prefer a third option: work just long enough to raise your hopes.
The third experience is discovering that the write-protection tab is both simple and easy to forget. More than one formatting “failure” has been solved by sliding a tiny plastic switch. It is a humble reminder that old technology often had visible, physical logic. You could touch the protection setting. You could hear the drive. You could feel the disk click into place. Nothing was hidden behind a cloud-sync icon spinning forever.
Another common lesson is that slow formatting can be a feature, not a flaw. A full format gives the drive time to check the disk surface. If the disk is old, that extra time matters. Bad sectors are not unusual. Sometimes the best result is not a successful format but a warning that the disk should not be trusted. A floppy disk used for a vintage game save is one thing. A floppy disk used for the only copy of a machine configuration file is another. When reliability matters, format several disks, test them, label them clearly, and keep duplicates.
There is also a satisfying simplicity to floppy-disk workflows. You format the disk. You copy a few files. You eject it. You move it to another machine. No account login, no subscription, no “storage almost full” notification from a service you forgot you had. The limitation is obvious, but so is the control. That is why floppy disks still appear in retro-computing labs, archives, repair shops, and legacy equipment rooms. They are outdated, yes, but they are not meaningless.
The best practical habit is to treat every old floppy as both fragile and potentially interesting. Before formatting, ask what might be on it. After formatting, test it with actual files. After copying files, read them back. If the disk will be used in a legacy machine, test it in that machine, not just on your modern computer. A disk that works beautifully on one drive may fail in another because of alignment or format expectations.
In the end, formatting a floppy disk is a small technical task with a surprisingly large amount of history packed inside. It connects modern users to the era when software came in stacks, backups lived in plastic boxes, and the save icon looked like something people actually used. Do it carefully, keep expectations realistic, and enjoy the little whirring sound. That sound is storage history clearing its throat.
Conclusion
Formatting a floppy disk is simple once you match the method to your computer and the disk’s purpose. Use Windows File Explorer for the easiest route, Command Prompt or DOS for more control and vintage systems, and Mac or Linux tools when working with mixed environments or legacy media. Always check write protection, choose the right disk capacity, use a compatible file system, and back up anything important before formatting.
Floppy disks may be old, tiny, and hilariously underpowered by modern standards, but they still matter wherever legacy machines, retro computers, archives, and specialized equipment continue to run. Format them with care, label them clearly, and never underestimate the storage device that carried an entire generation of school projects, boot utilities, and pixelated games in its little plastic shell.
Note: Formatting a floppy disk can erase existing data. If the disk may contain valuable files, create a backup or disk image before formatting.