Blank walls have a sneaky way of making a room feel unfinished, even when the furniture is arranged and the throw pillows have achieved diplomatic harmony. Fortunately, vintage wall art does not require an auction-house budget or a mysterious relative with an attic full of oil paintings. With thrift-store frames, family keepsakes, public-domain images, fabric scraps, old paper, and a little patience, you can create artwork that looks collected over decades.
The best DIY vintage wall art feels personal rather than manufactured. A faded map can recall a hometown. Pressed flowers can preserve a summer garden. An old recipe card can turn Grandma’s handwriting into the most meaningful piece in the kitchen. The following projects range from beginner-friendly framing ideas to textured displays and hand-painted signs, so there is something here for every skill leveland every tolerance for glue on the dining table.
Before You Start: Build a Vintage Wall Art Toolkit
Most of these projects use inexpensive basics: thrifted frames, mat board, acid-free paper, archival photo corners, decoupage medium, craft paint, painter’s tape, scissors, a utility knife, a ruler, picture wire, and wall anchors. For fragile originals such as letters, photographs, or antique textiles, avoid permanent glue. Mount them with archival corners, conservation-safe thread, or removable supports so the object can be taken out later.
When downloading historical images, check the rights statement attached to the specific item. Major American institutionsincluding the Library of Congress, Smithsonian, Metropolitan Museum of Art, National Archives, New York Public Library, and National Gallery of Artoffer large collections of public-domain or open-access images, but rights can vary by object. Download the highest-resolution file available and print on heavyweight matte paper for a convincing, non-shiny finish.
20 DIY Vintage Wall Art Ideas to Give Your Home a Story
1. Frame Public-Domain Botanical Prints
Search open-access museum collections for botanical studies, seed catalogs, herbarium sheets, or flower illustrations. Print three or four images at matching sizes, add wide cream mats, and place them in mismatched wood frames. A little variation in frame tone makes the grouping feel gathered over time. For a softer farmhouse look, print on warm ivory paper instead of bright white.
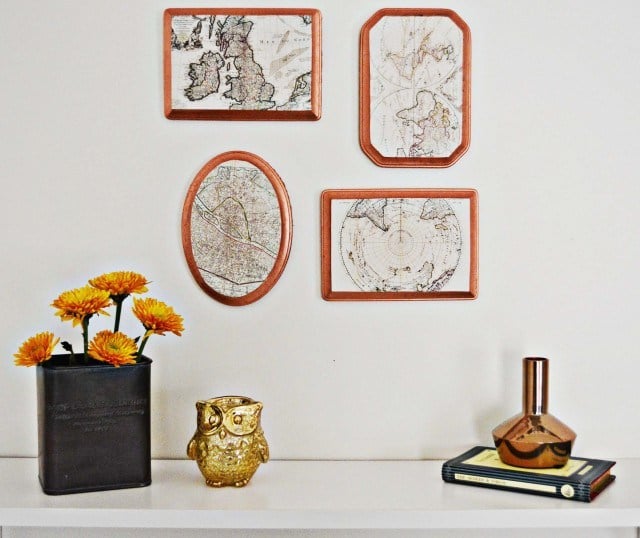
2. Create an Antique Map Gallery
Choose maps connected to places that matter: your hometown, a favorite vacation, or the city where your family began. Crop each map around a meaningful neighborhood, then print the set in coordinated sepia or black-and-white tones. Arrange them in a grid for order or mix sizes for a more relaxed library-wall effect. Vintage maps are especially handsome in narrow black, walnut, or aged-brass frames.
3. Turn Old Book Pages Into Silhouette Art
Use damaged books that are beyond repair rather than sacrificing a healthy first edition to the craft gods. Cut a simple silhouettea bird, fern, profile, teacup, or architectural shapefrom dark paper and mount it over a photocopied page. The text creates texture, while the bold silhouette keeps the result readable from across the room. Make a pair with mirrored designs for instant symmetry.
4. Make a Pressed-Flower Shadow Box
Press flat flowers and leaves between absorbent paper under heavy books until fully dry. Arrange them on linen, handmade paper, or a faded photocopy of a letter, then secure only the stems with tiny dots of archival adhesive. A shadow box protects delicate petals and allows room for thicker blooms. Choose restrained colors so the result suggests a naturalist’s cabinet rather than a botanical traffic jam.
5. Display Vintage Handkerchiefs as Textile Art
Floral handkerchiefs, embroidered napkins, lace collars, and small scarves often cost very little at flea markets. Gently clean them if the fabric is stable, press on low heat, and mount them over fabric-covered board. Use small stitches through the backing rather than glue. A square scarf can fill a large frame, while several handkerchiefs create a charming bedroom gallery.
6. Frame a Family Recipe Card
A stained recipe card has more character than most mass-produced kitchen signsand it may explain why every family gathering involves three versions of potato salad. Scan the original, enlarge it, and print it on textured paper. Pair the handwriting with a small photograph of the cook, a vintage utensil illustration, or a typed note explaining the recipe’s history. Keep the original safely stored.
7. Build a Vintage Postcard Collage
Gather postcards around one theme, such as national parks, beach towns, roadside motels, or holiday greetings. Arrange color copies in overlapping rows on a rigid backing board, then seal the copies with matte decoupage medium. Using reproductions lets you preserve valuable originals and rearrange the composition without guilt. Frame the finished collage without a mat for a lively, layered look.
8. Make Wallpaper-Scrap Panels
Vintage-style wallpaper remnants can become large-scale art for a fraction of the cost of a framed print. Cut one dramatic motif into a large rectangle or divide coordinating patterns among several small frames. For added depth, mount the paper on thin plywood and edge it with stained trim. Wallpaper panels are useful above a sofa, where tiny art tends to look as though it wandered onto the wrong wall.
9. Create Faux Cyanotype Botanicals
Traditional cyanotypes use light-sensitive chemistry, but you can mimic the blue-and-white appearance with acrylic paint. Place flat leaves or fern shapes on watercolor paper, lightly secure them, and sponge or spray deep blue paint around the edges. Remove the leaves after the paint dries. Frame the prints in thin gold or distressed wood frames for a vintage scientific feel.
10. Frame Vintage Clothing or Baby Garments
A child’s dress, embroidered collar, sports patch, or small workwear piece can become deeply personal wall art. Support the garment on fabric-covered mat board and attach it with widely spaced conservation-safe stitches. Never stretch fragile fabric tightly. Deep frames or shadow boxes prevent the glass from crushing buttons and seams while giving the garment space to retain its shape.
11. Paint a Distressed Farmhouse Sign
Sand a pine board, stain it medium brown, and brush on an uneven coat of milk paint or matte acrylic. Once dry, lightly sand corners and high spots so the darker layer shows through. Add a hand-lettered phrase, house name, farm number, or old-fashioned trade label. Keep the wording specific; “Miller Family Orchard” feels more authentic than a generic command to “Live, Laugh, Buy More Signs.”
12. Make a Vintage Seed-Packet Display
Reproduce colorful seed-packet fronts or collect modern packets with old-fashioned illustrations. Mount them in neat rows on burlap, linen, or kraft paper. Another option is to clip packets to a length of weathered wood using miniature metal clips, creating a display that can change with the seasons. This project works beautifully in kitchens, garden rooms, mudrooms, and covered porches.
13. Turn an Old Window Into a Picture Frame
Salvaged window sashes create ready-made grids for photographs, pressed leaves, fabric, or prints. Remove loose paint safely, clean the glass, and stabilize the frame. Mount images behind each pane with removable tape or photo corners. Because old windows can be heavy, use hardware rated for the total weight and anchor them into studs whenever possible. Decorative charm is lovely; gravity remains unconvinced.
14. Assemble a Vintage Plate Wall
Collect inexpensive plates with a shared color, border style, or subject. Lay the arrangement on the floor first, mixing round plates with small platters for movement. Use spring-style plate hangers or adhesive discs rated for the plate’s weight and surface. Start with the central piece, then work outward. A plate wall adds shape and shine while filling awkward vertical spaces.
15. Frame Sheet Music or an Old Song
Choose a song with personal significance and use a legal reproduction or a page from damaged, common sheet music. Highlight the title with a small brass label holder or layer a silhouette over the notes. For a larger installation, divide one oversized page among four frames. The repeated staff lines create continuity, and the melody gives the display a story even when nobody in the house can play it.
16. Make a Curiosity-Cabinet Shadow Box
Arrange lightweight finds such as keys, labels, ribbon, buttons, medals, shells, stamps, or miniature tools inside a deep frame. Choose one theme and leave breathing room around each object. Attach items with wire, stitched loops, museum putty, or removable mounts rather than flooding everything with hot glue. The finished box should look thoughtfully cataloged, not like a junk drawer standing upright.
17. Create Vintage Travel Poster Art
Public-domain collections include bold travel and Works Progress Administration posters that reproduce beautifully. Select designs with a coordinated palette, print them at the same size, and use simple frames so the typography remains the star. A trio of park, rail, or city posters can establish a strong color story in a hallway or home office.
18. Stretch Antique-Style Fabric Over a Frame
Use toile, block print, ticking stripe, barkcloth, or a reproduction grain-sack fabric. Build or buy a shallow wood frame, stretch the fabric evenly across it, and staple from the center of each side toward the corners. Fold the corners neatly, as though wrapping a gift for someone who inspects corners. Large fabric panels are lightweight, affordable, and excellent for filling broad walls.
19. Design a Vintage Ephemera Gallery Wall
Combine ticket stubs, labels, advertisements, envelopes, stamps, photographs, and small illustrations. Repeat two or three frame finishes to keep the variety under control. Before hammering, trace every frame onto kraft paper, tape the templates to the wall, and adjust spacing until the composition feels balanced. Collections of maps, signs, paper goods, and dimensional objects gain impact when arranged around a clear theme.
20. Create a Faux-Antique Portrait
Print a public-domain portrait or one of your own family photographs in muted black and white. Brush a very thin wash of warm brown watercolor over a test print, concentrating color near the edges. Once dry, add a wide oval mat or an ornate thrifted frame. Do not rub coffee grounds directly into the paper unless your desired historical period is “breakfast disaster.” Subtle aging looks far more convincing than theatrical stains.
How to Make New DIY Wall Art Look Authentically Vintage
Vintage style is built through restraint and repetition. Limit each grouping to a deliberate palette: tobacco brown, faded blue, moss green, dusty rose, cream, or charcoal. Mix frame shapes, but repeat at least one feature, such as dark wood, narrow gold edges, or ivory mats. Genuine age usually appears unevenly, so distress corners and raised areas rather than sanding every inch with equal enthusiasm.
Scale matters too. Measure the wall and furniture before beginning. One tiny frame above a long sofa can look marooned, while a large textile panel, map, or grouped collection creates appropriate visual weight. For gallery walls, keep spacing consistent enough to feel intentional. Heavy artwork should be installed with hangers or anchors rated for its weight, and very heavy pieces are safest when secured to studs.
What Experience Taught Me About Making Vintage Wall Art
My earliest attempts at DIY vintage wall art followed a familiar pattern: buy too many unrelated thrift-store objects, place all of them on the floor, and confidently assume they would become “eclectic” through sheer optimism. They did not. They became a small indoor flea market. The breakthrough was choosing a story before choosing the objects. A gallery based on local maps, family photographs, and train tickets immediately felt coherent because every piece answered the same question: where have we been?
I also learned that reproductions are often the smarter material. It is tempting to glue an original postcard, recipe card, or letter into a collage, but old paper can be brittle, valuable, or irreplaceable. Scanning the item preserves handwriting, stains, deckled edges, and personality while allowing mistakes. A copy can be trimmed, enlarged, recolored, and reprinted after an unfortunate encounter with decoupage medium. The original can remain in an acid-free sleeve, quietly judging from safety.
Frames make a larger difference than expected. At first, I searched only for matching frames, which made thrift shopping slow and the finished wall slightly stiff. Better results came from mixing shapes while limiting finishes. Three dark wood frames, two muted gold frames, and one painted oval frame can look collected yet connected. Mats are equally powerful. A wide mat gives humble paper the visual authority of museum art, while fabric-covered mats introduce softness and help unite faded prints.
Dry-fitting every project saved both materials and mood. Before attaching flowers, postcards, or small objects, I photographed several arrangements with my phone. Looking at the composition on a screen made empty spots and awkward clusters surprisingly obvious. The same trick works for a gallery wall: paper templates reveal whether a grouping is too high, too small, or drifting sideways before any holes are made.
I found that the most enjoyable projects were completed in stages rather than rushed from thrift store to wall in one afternoon. I cleaned and repaired frames first, prepared the artwork another day, and handled the final arrangement only when every component was ready. Breaking the process into smaller sessions reduced careless cuts, crooked mounting, and the powerful temptation to declare a wet coat of paint “probably dry enough.”
Another lesson was to stop over-aging everything. Dark wax, sandpaper, tea, brown paint, and crackle finish can each be useful, but using all of them at once makes a project look like it survived a theatrical shipwreck. One or two believable signs of age are enough. Slightly worn frame edges, warm-toned paper, and softened color usually create a more convincing result than aggressive distressing.
Finally, meaningful art consistently outlasted trendy art. A framed page from a family cookbook, a flower from a memorable garden, or a map marked with places lived continues to invite conversation. Vintage style works best when the past is not merely a decorative filter but part of the subject. That is the real advantage of making your own wall art: the finished room does not just look older, richer, or more layered. It looks unmistakably yours.